About Transport
Transport module workflow: First we will add routes then we will add vehicle and then finally can assign vehicle to the routes further student can check the transport route list.

How to create Routes?
To create routes, go to Transport > Routes. Here you can create route by fill the name of route in route title and click on save button, your created route will be show in route list.
To edit route, click on the Edit icon showing in action column, edit route model will appear, now update the route and click on save button, your update will be change successfully.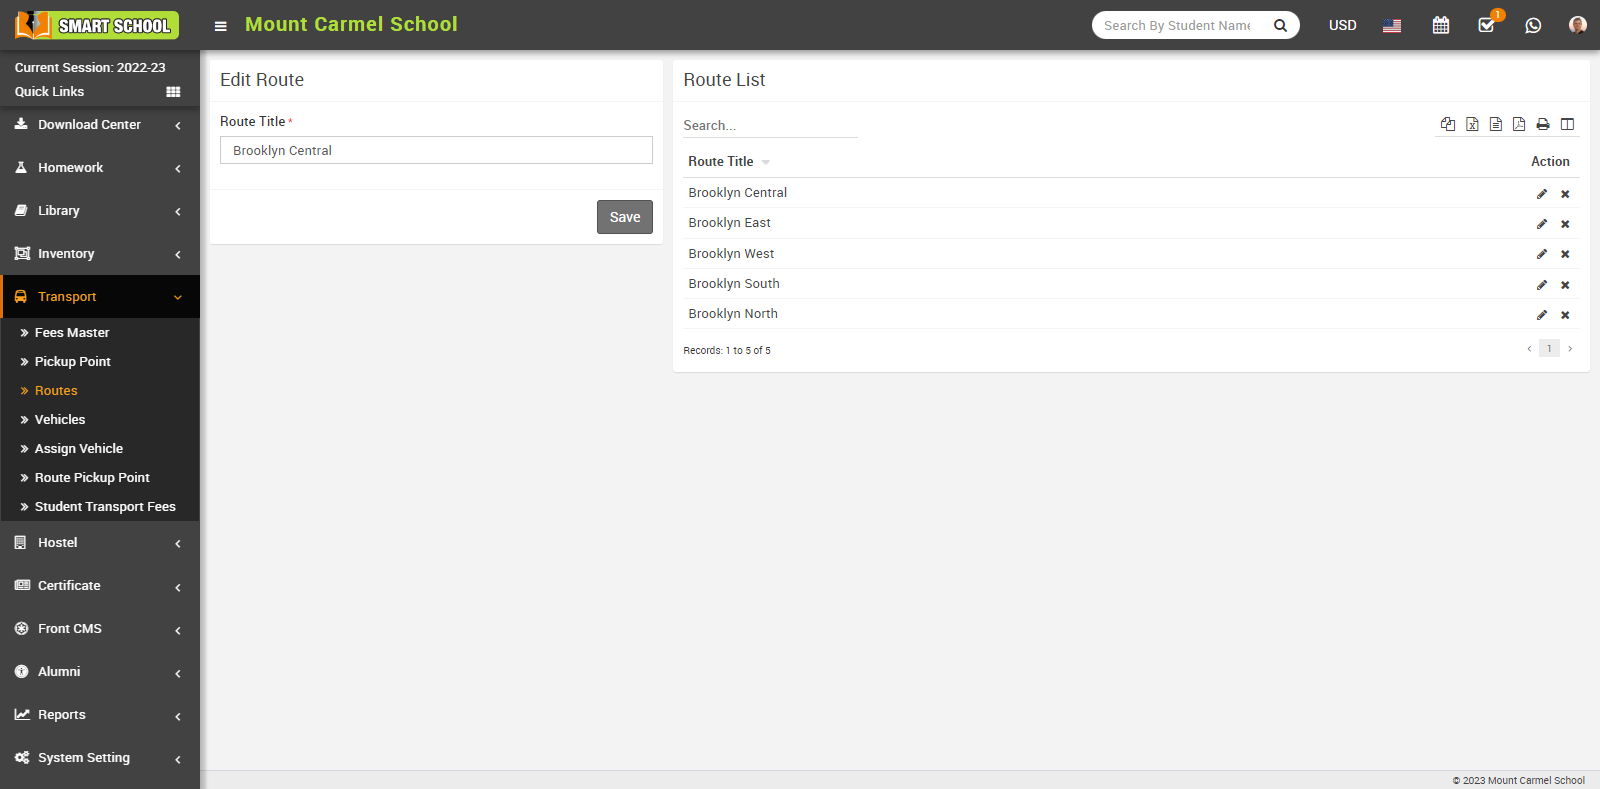
To delete the created route, simply click on the Delete icon in the Action column to delete a route, a confirmation model will appear.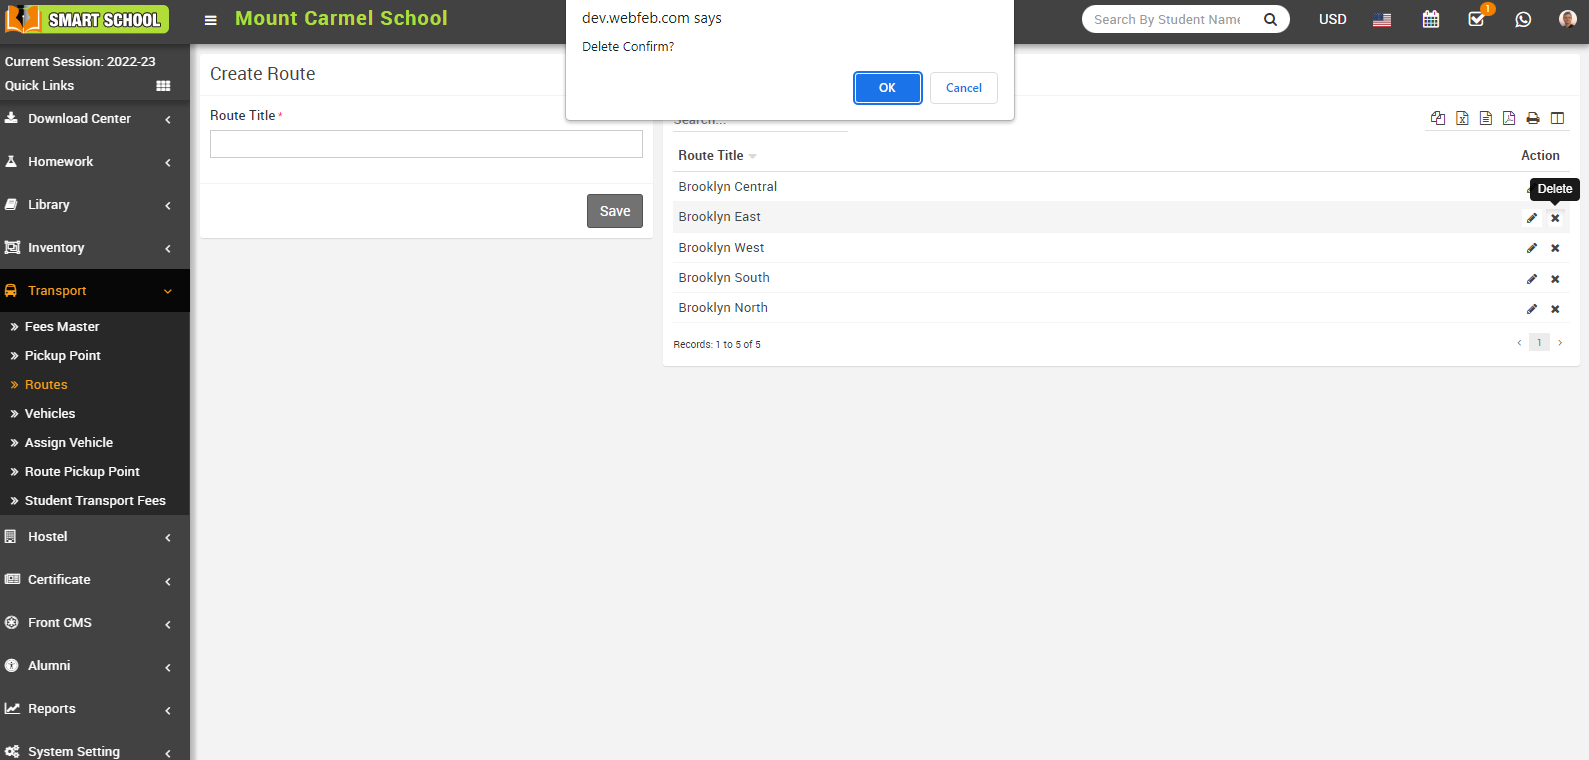
Now click on the OK button, and your route will be successfully deleted.
How to add Vehicles?
To add vehicles, go to Transport > Vehicles. Vehicle list will be open.
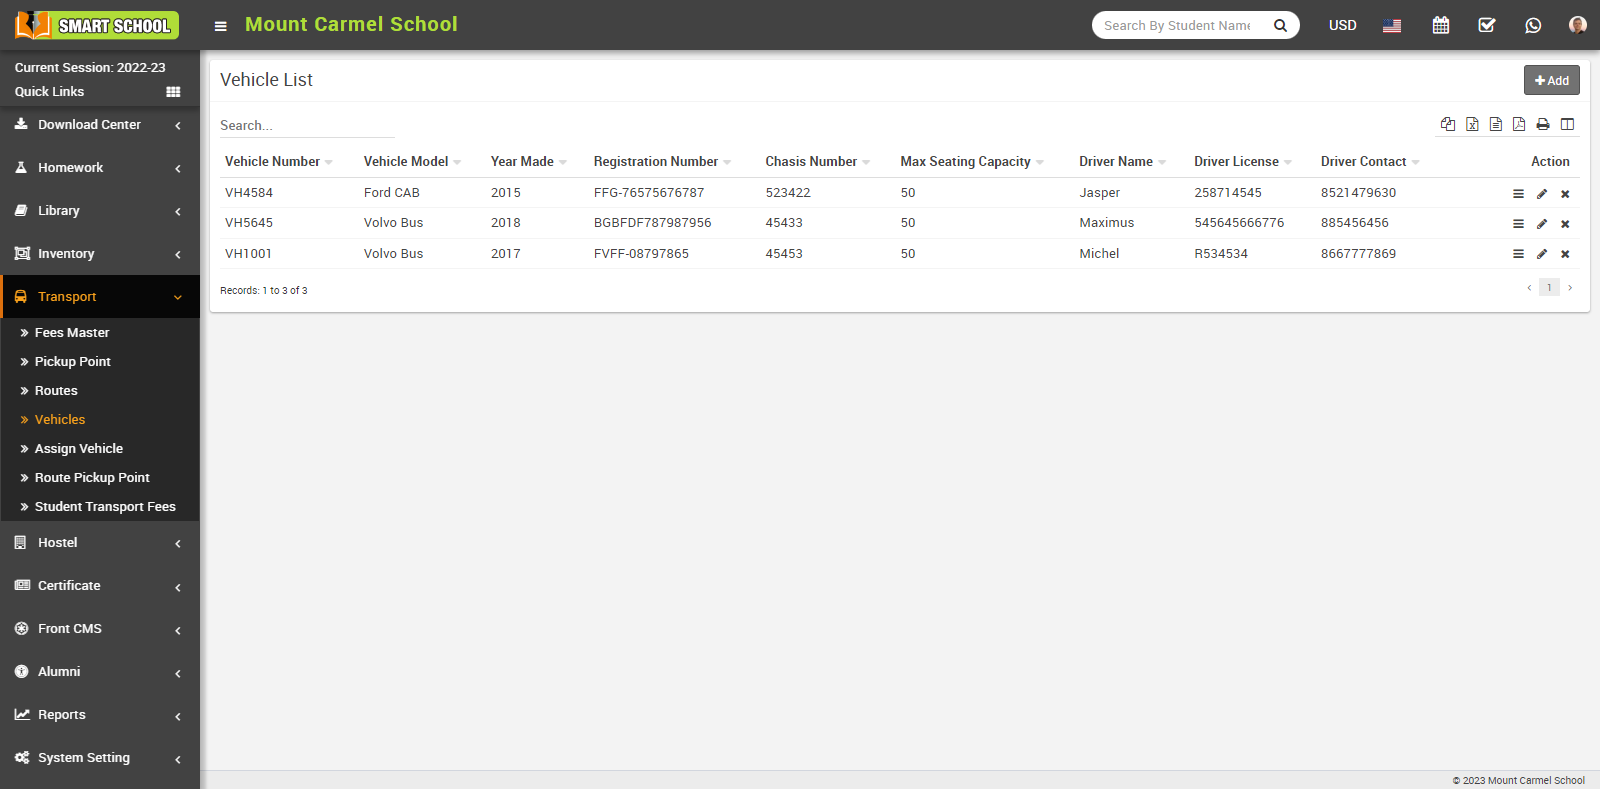
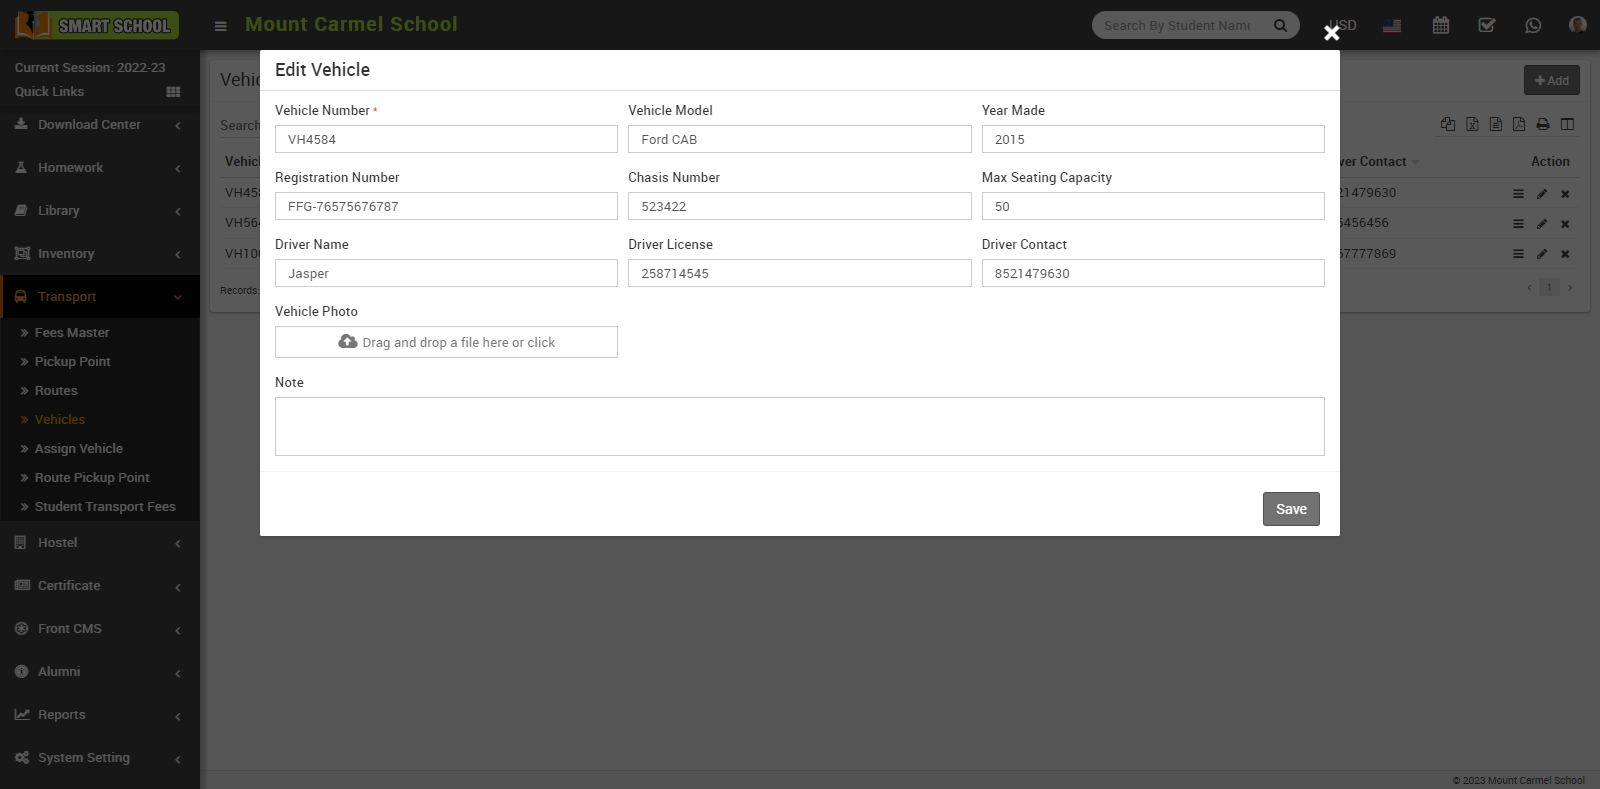
Here you can see the vehicle list, Now click on +Add button for add new vehicle, add vehicle model will be open, in this model you need to fill the all details of vehicle as Vehicle Number, Vehicle Model, Year Made, Registration Number, Chassis Number, Max Seating Capacity, Driver Name, Driver Licence, Driver Contact, Vehicle Photo and Note if any about the vehicle then click on Save button.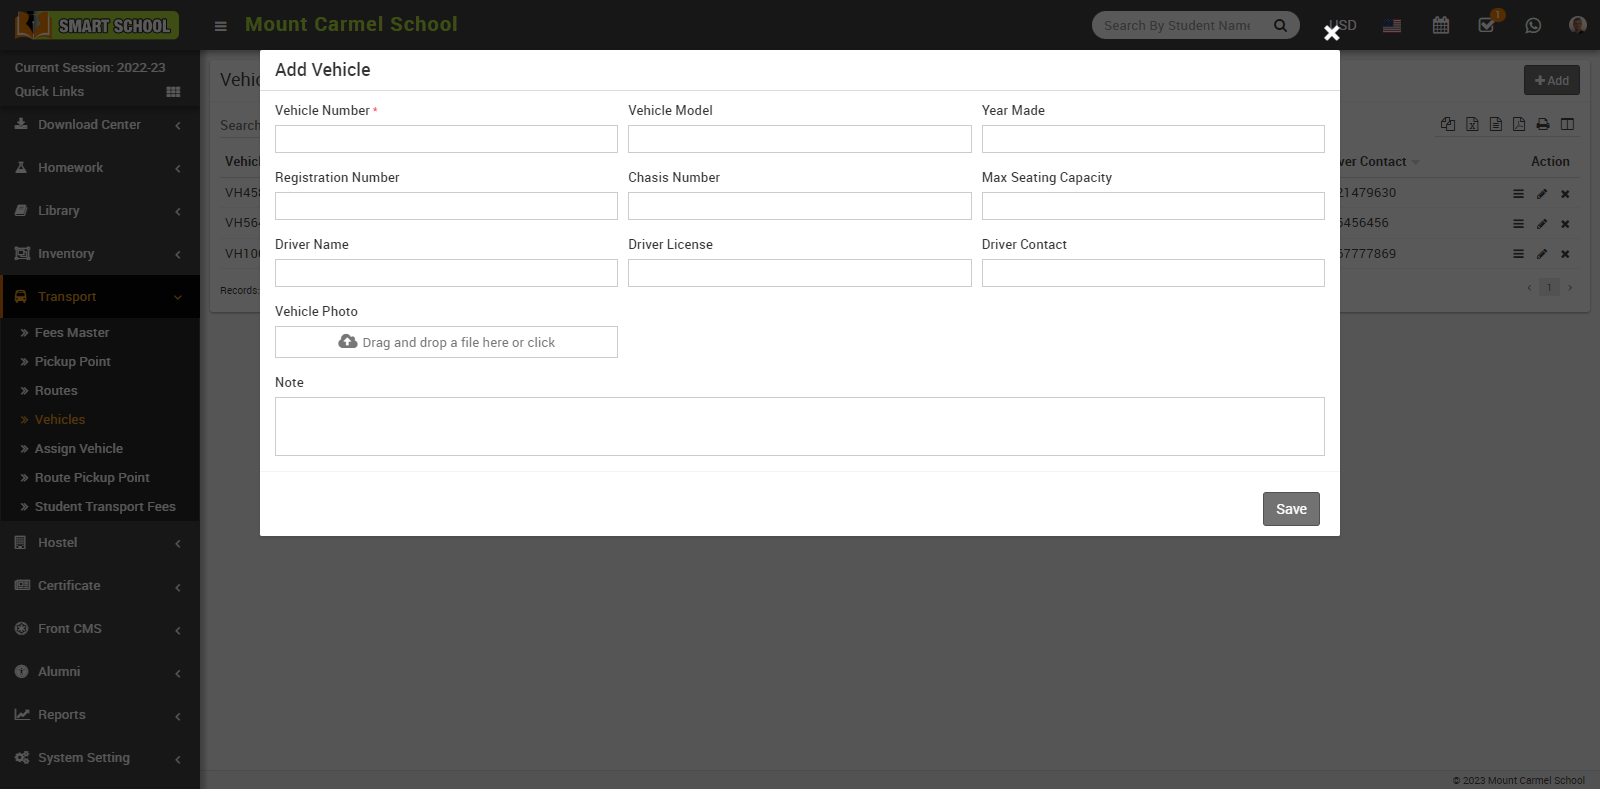
You can see this added vehicle details in the Vehicle List and in action column you can see view, edit and delete option available, by click on view icon you can see the all vehicle details.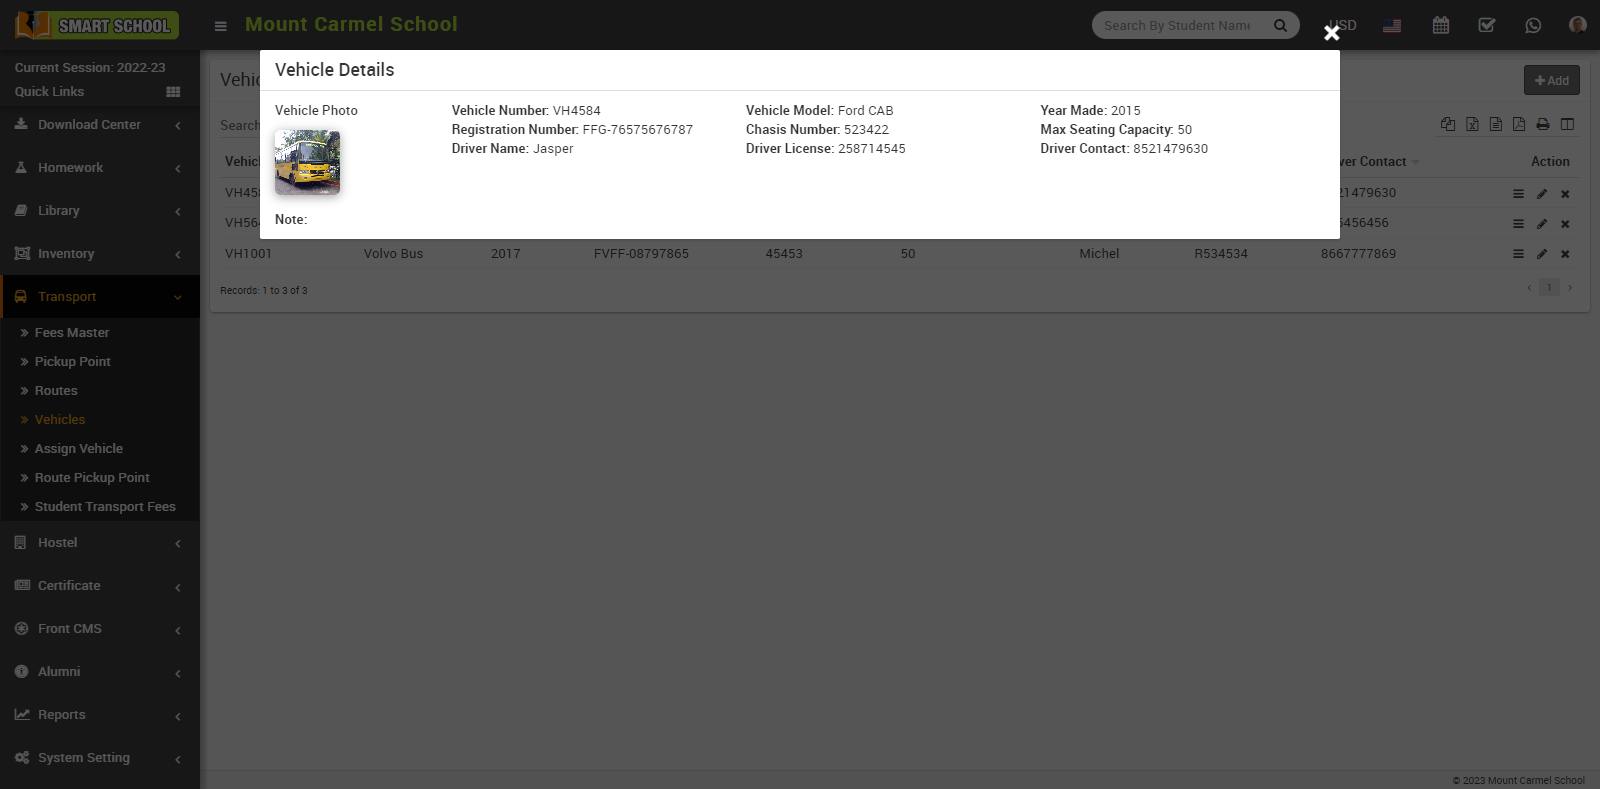
To edit vehicle click on the Edit icon showing in vehicle list Action column edit model will be open, now you can update the vehicle details then click on save button, details will be update successfully.
To delete the vehicle from the vehicle list, click on the Delete icon showing in the vehicle list Action column, confirmation model will be open then click on Ok button, vehicle will be deleted from the vehicle list.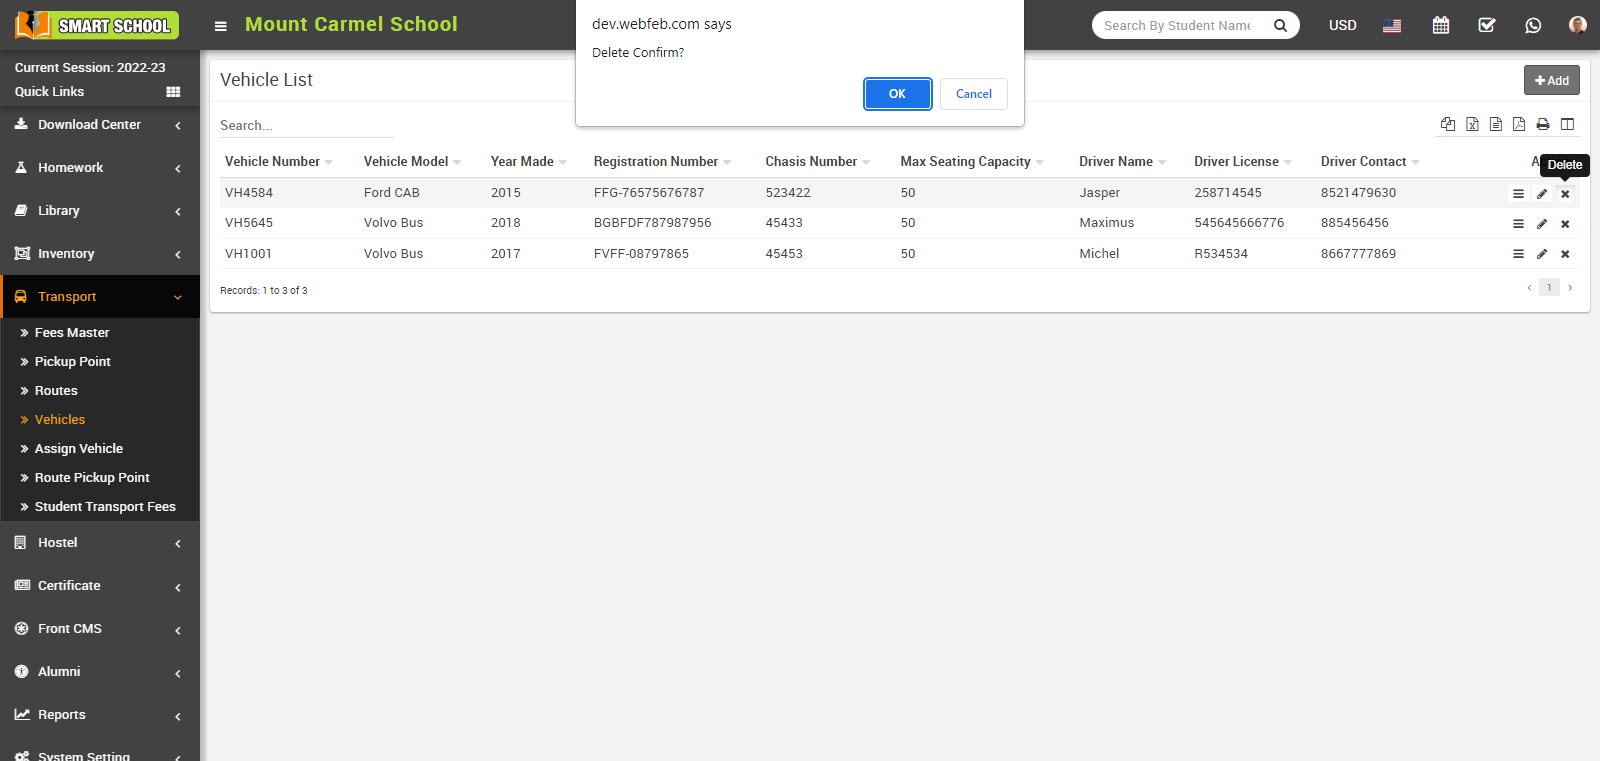
How to assign vehicle to the Route?
To assign a vehicle, go to Transport > Assign Vehicle. Now click on Route so that multiple routes will be open in the drop-down menu, and select your preferred one. You can see the Vehicle option available in the below list, which is showing its vehicle number. Now choose the vehicle by checking the check box for the above selected route. You can also choose the multiple vehicles for the above selected single route by checking the multiple checkbox. Then click on the Save button so that we can see vehicle details in the vehicle route list.

You can now edit the vehicle route list by clicking on the Edit icon in the Action column, simply click on the Edit button, and the edit model will appear.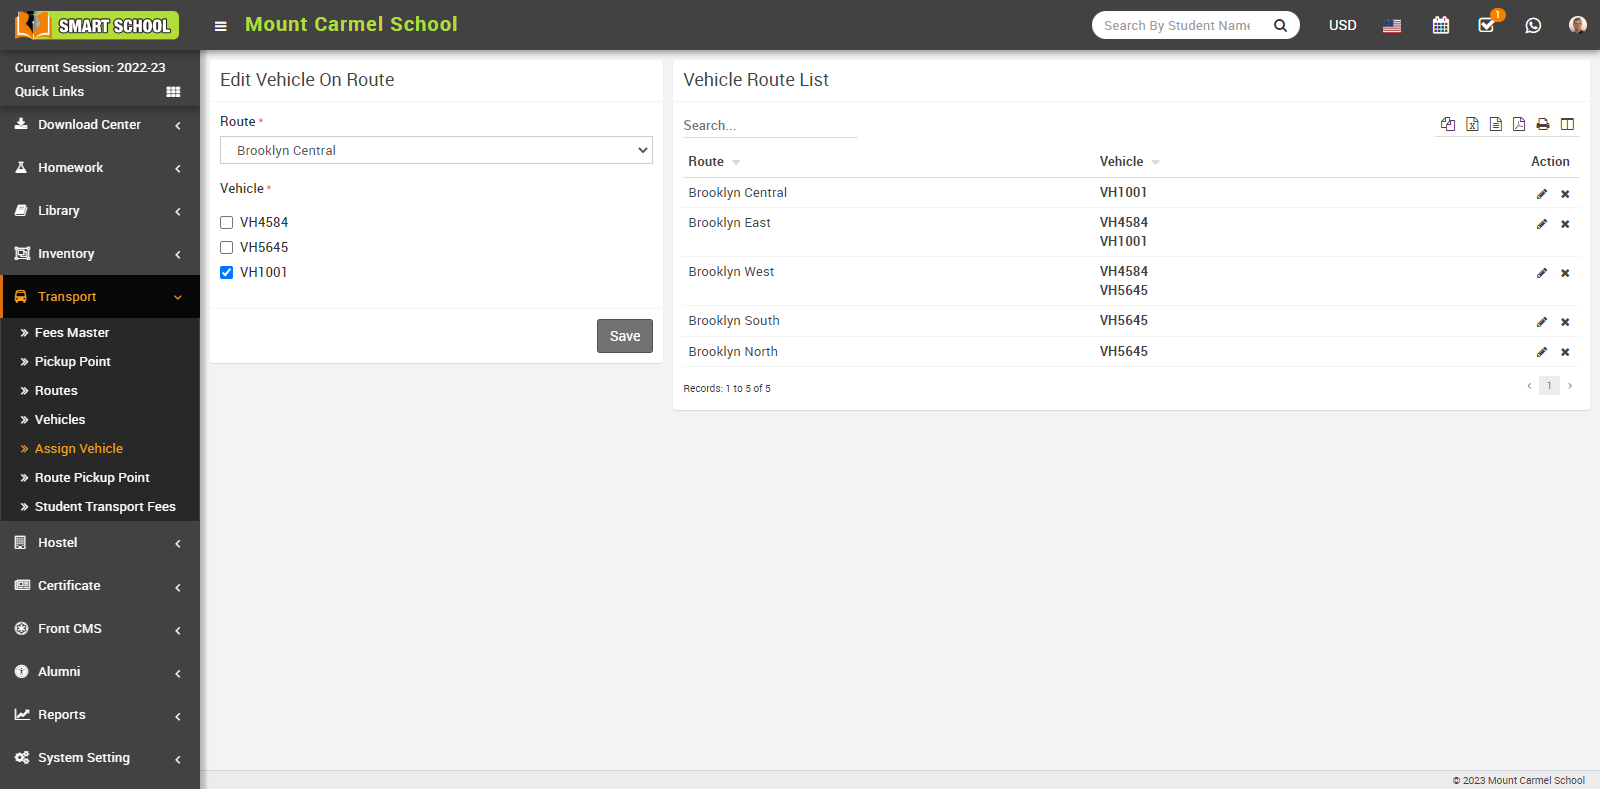
Now update the details and click on the Save button, and your details will be successfully updated.
To delete the vehicle route from the vehicle route list, just click on Delete icon showing at the Action column, delete confirmation model will be open.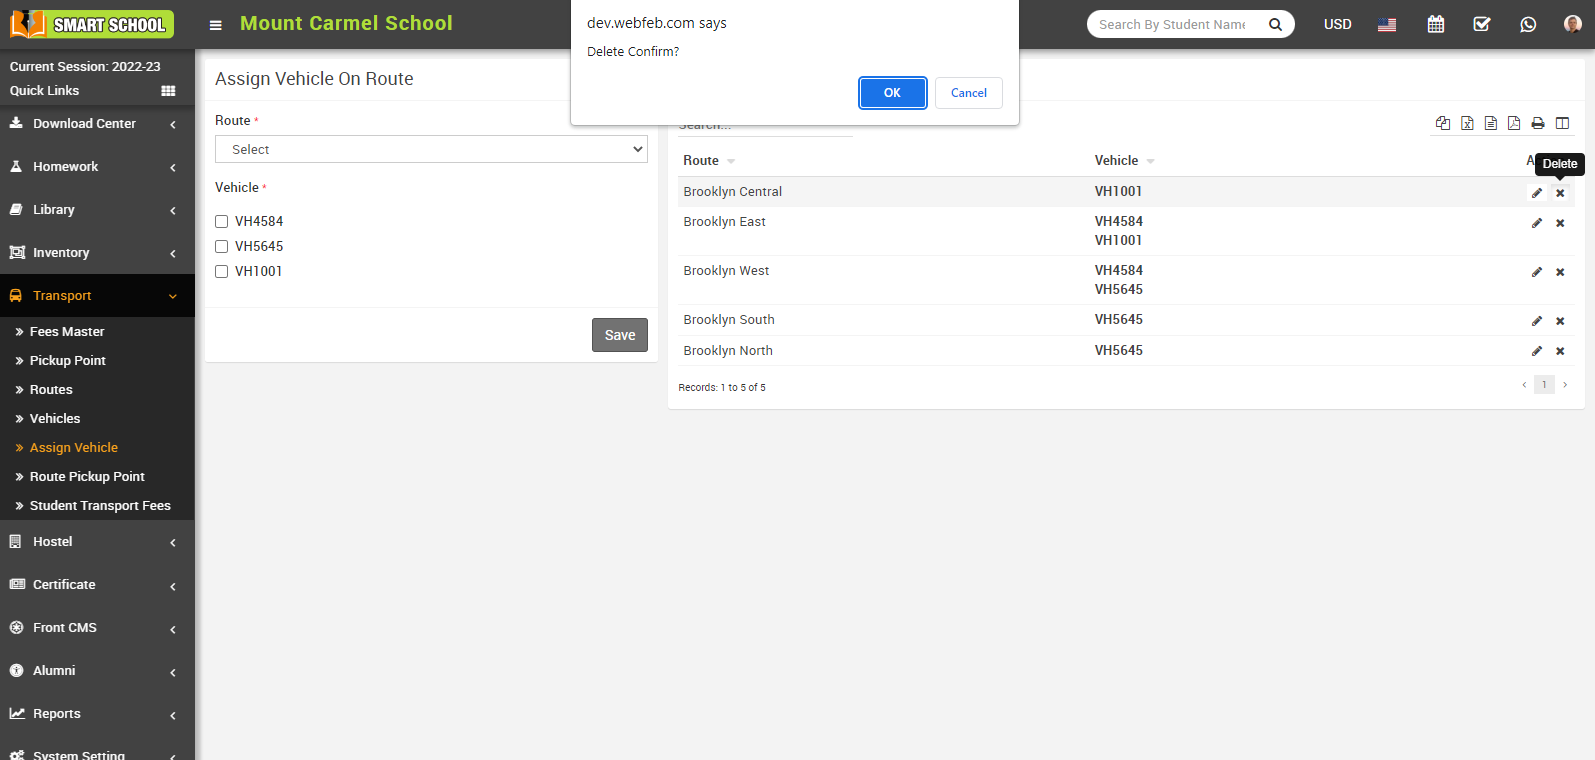
Now click on OK button, vehicle route will be deleted successfully from the vehicle route list.
How to assign route to student?
Note: Transport fees can be collected from fees collection module. You can add a fees group for transportation then add fees master for transportation route. You can add it on any student or any student group after student admission.
Transport routes has no any direct relation with fess module. Transport module’s primary goal is to provide parents to track what are the details of routes, vehicle, driver etc and schools can manage their same things. Regarding transport fees collection you have to create different fees groups according to different transport packages so which package is taken by student you should apply that transport fees group on student it’s no matter what transport route is assigned on him from admission form.
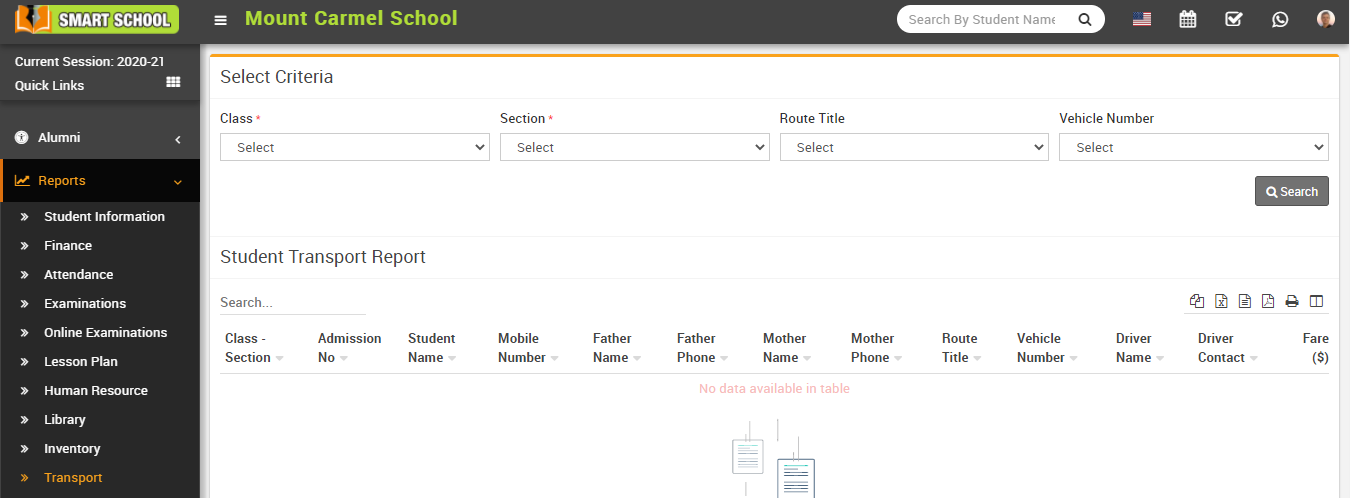
How to check Transport Report?
How student can view Transport Route list?
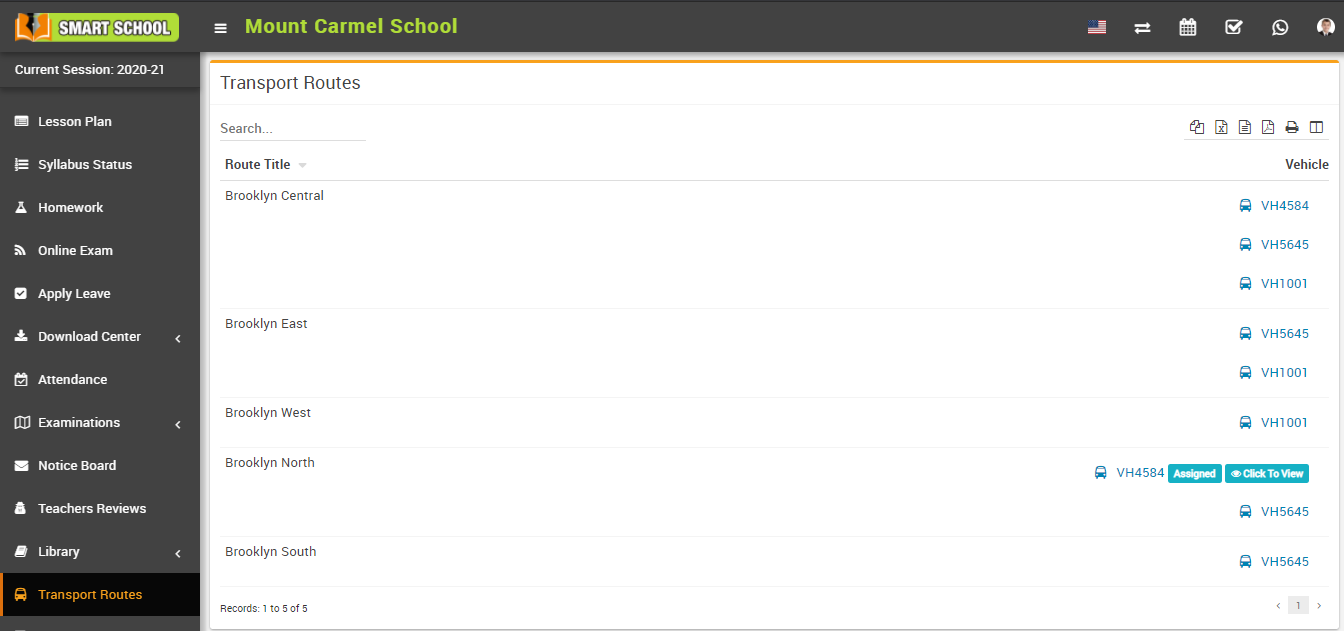
To view assigned vehicle, click on Click To View button present at Vehicle column in the transport routes page, at click of this button Vehicle Details modal will open. here student can see vehicle details like Vechicle No, Vehicle Model, Made, Driver Name, Driver Licence, Driver Contact.

How to manage transport fees master?
To manage the Transport Fees Master, go to Transport > Fees Master, in this module you can see the different columns as months, due date, fine type, percentage, and fixed amount. you can manage the students' transport fees for all months by simply setting the due date for that month and the fine type, if the fine type is marked as none, the percentage and fix amount tabs are disabled; that means fine will not be applicable for that month, if the fine type is unmarked as none, you need to set the fine as a percentage or as a fixed amount, so that fine will be applicable for that month in the form of percentage or fixed amount. Now, if the due date of fees for that month has passed, the fine, whether it is a percentage or a fixed amount, that you have set, it will be automatically apply in student transport fees.
Note: - If you apply the same transport fees for all months as the first month, you just need to check the checkbox "Copy First Fees Detail For All Months," which is shown on the top left, and all month due dates and fines will be successfully set.![]()
For Percentage
To use the percentage fine type for transport fees, simply mark the percentage.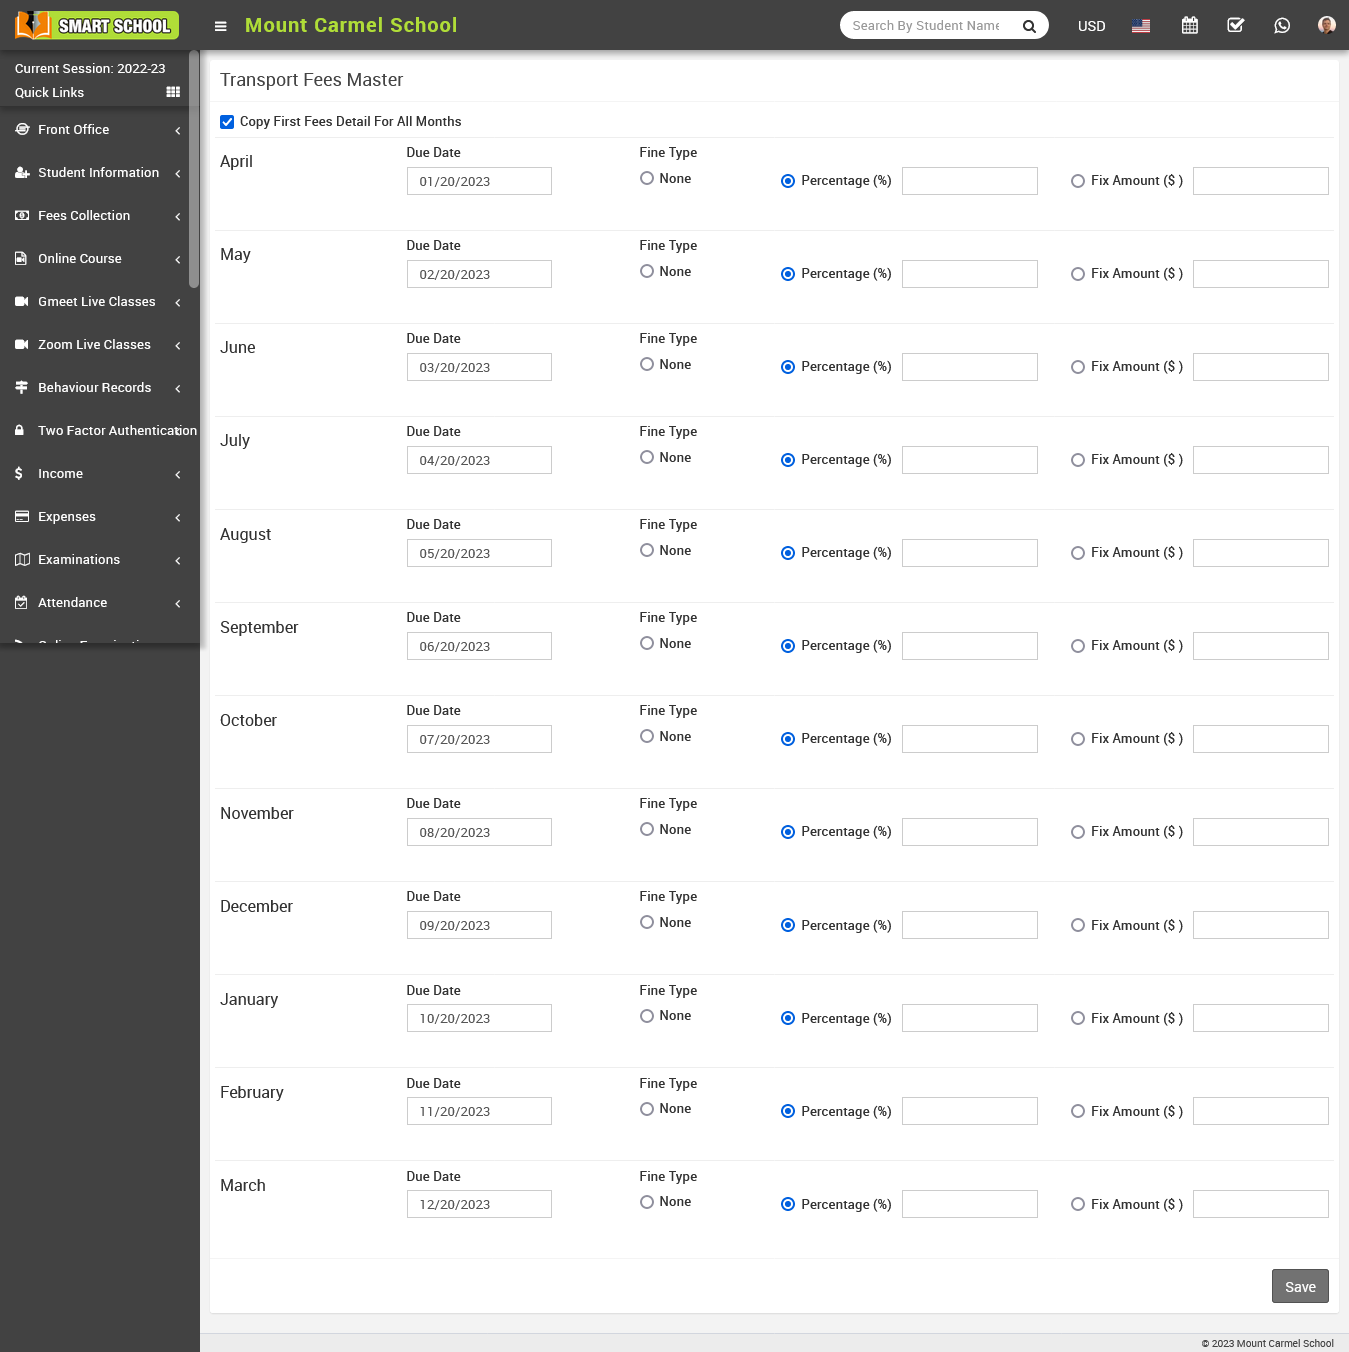
Now the percentage tab will be enabled, fill the percentage and click the save button, the fine in percentage will be applied to student transport fees, and you can see that fine in student fees.![]()
Go to fees collection > collect fees, now search for that student whose transport fees due date has passed. And then click "Collect Fees."![]()
The student fees page will open, and you will see the transportation fees along with the fine. ![]()
For Fix Amount
To use the fix amount fine type for transport fees, simply mark the fix amount tab.![]()
Now the fix amount tab will be enabled, fill the amount that you will charge as fine and click the save button, the fine in fix amount will be applied to student transport fees, and you can see that fine in student fees.![]()
Go to fees collection > collect fees, now search for that student whose transport fees due date has passed. And then click "Collect Fees."![]()
The student fees page will open, and you will see the transport fees along with the fine. ![]()
How to add pickup point?
In a "smart school" a "transport pickup point" refers to the location where students are picked up by the school's transportation service. This is typically used to provide safe and efficient transportation for students to and from school, especially in situations where students live a long way from the school.
To add a pickup point, go to Transport > Pickup Point. The pickup point list will be open, and the "add" button will be visible in the right top corner; now click on the "add" button to open add pickup point model, and fill in the details as pickup point, latitude, and longitude. For latitude and longitude, one option is available above latitude, which is "Click here to get latitude and longitude." With the help of this link, it will take you to the Google Maps page. Now, write here your pickup point so that Google Maps will show you the latitude and longitude of that pickup point, which you can use and then click on save button.
Now, here you can see pickup points in the Pickup Point List, in the list, you can see the column of pickup point name, latitude, and longitude; and in the action column, you can see the map icon, edit icon, and delete icon are available.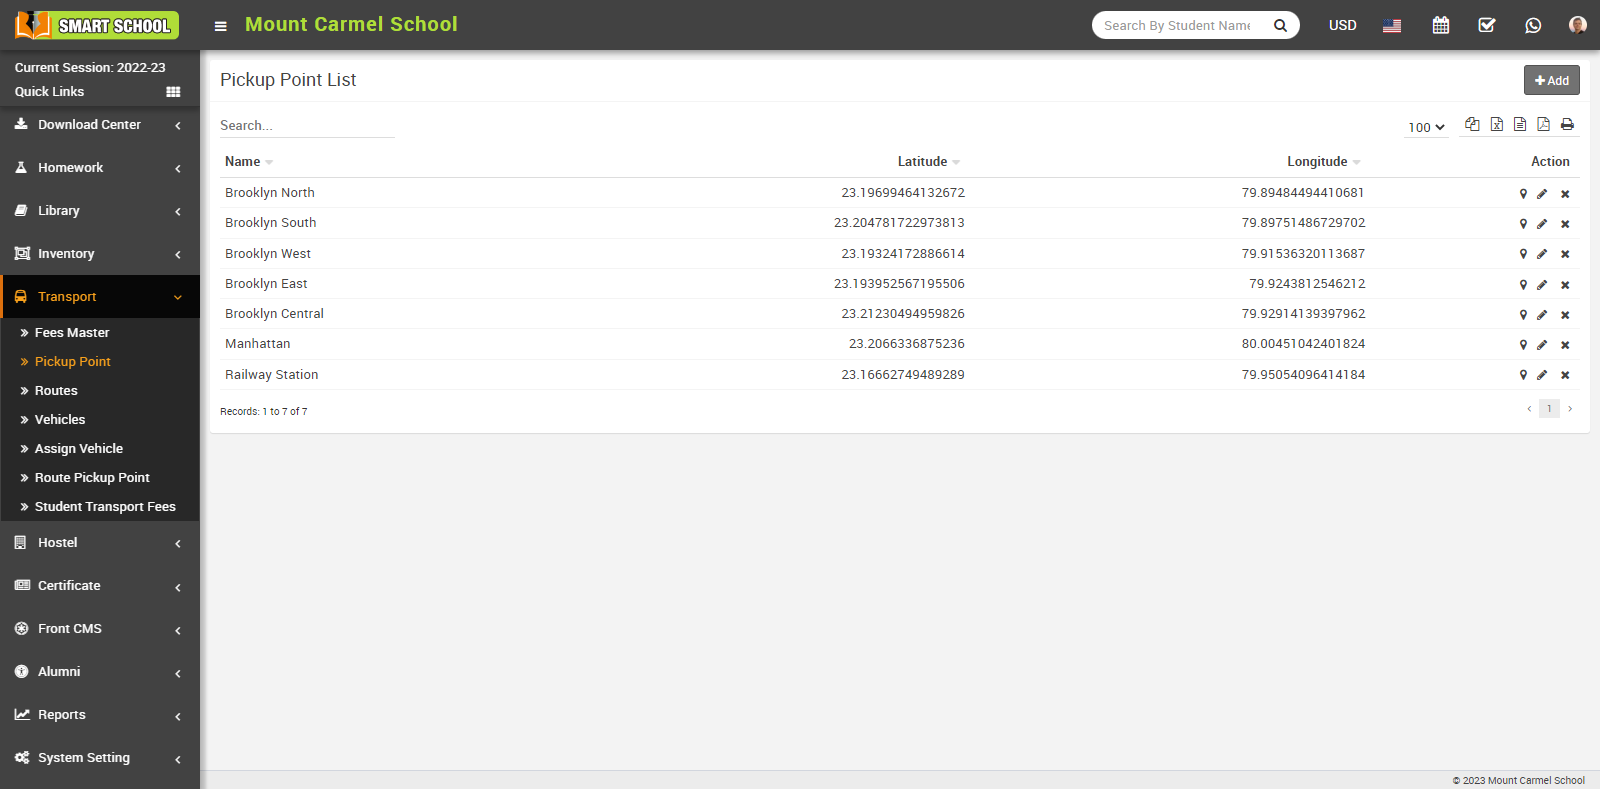
When you click on the map icon, it will open the google map of that pickup point with its assigned latitude and longitude, and if you want to update the pickup point's latitude and longitude, just click on the Edit button. The edit model will open, and you can update the details before clicking on the Save button.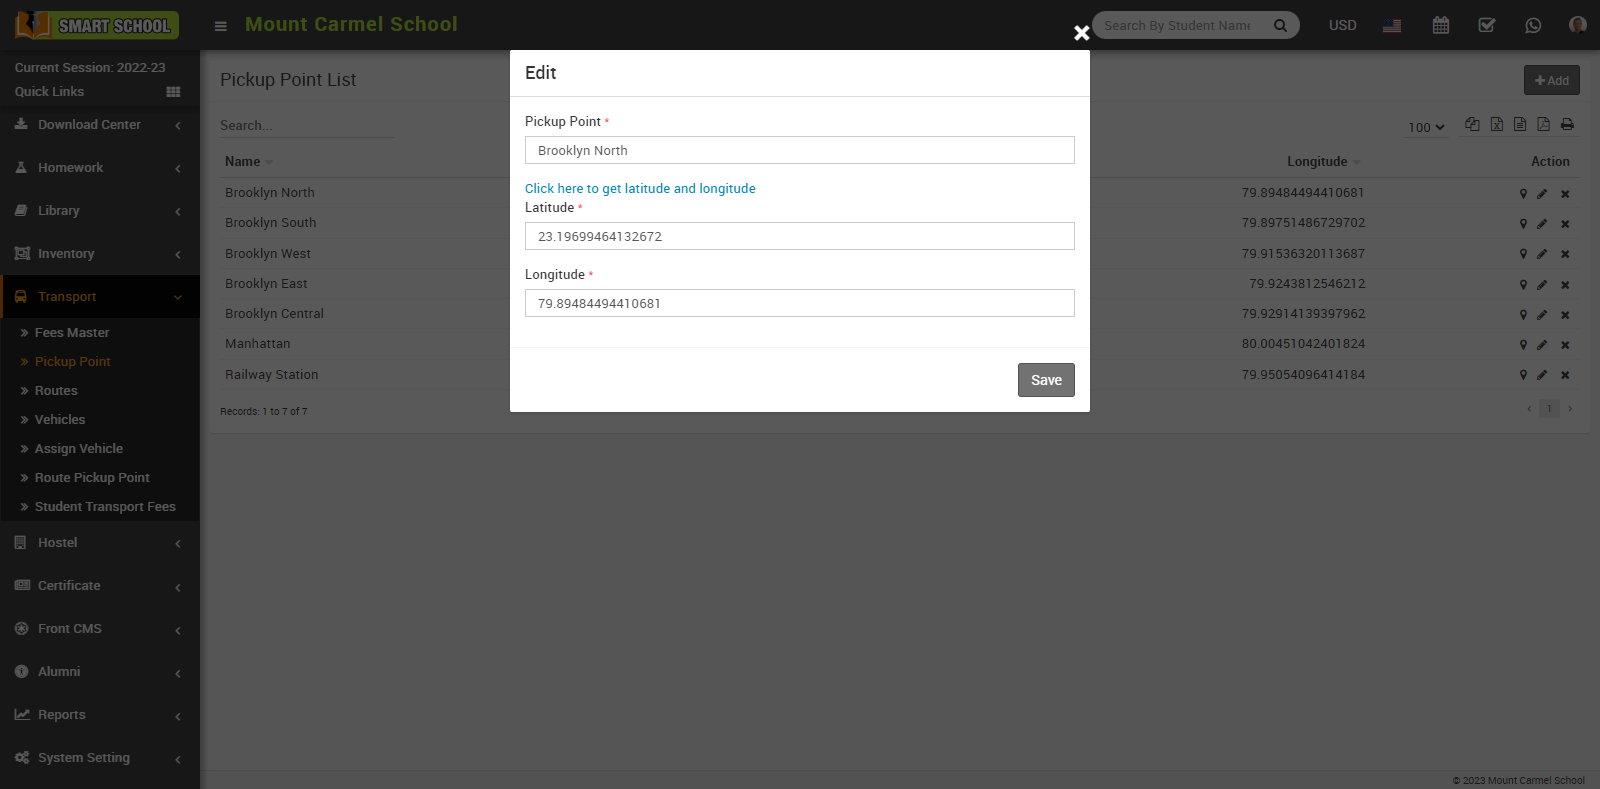
And your edit will be successfully saved and updated in the pickup point list.
If you want to delete the pickup point, simply click on the "delete" (cross) icon in the action column, the confirmation model will appear; click on the "OK" button.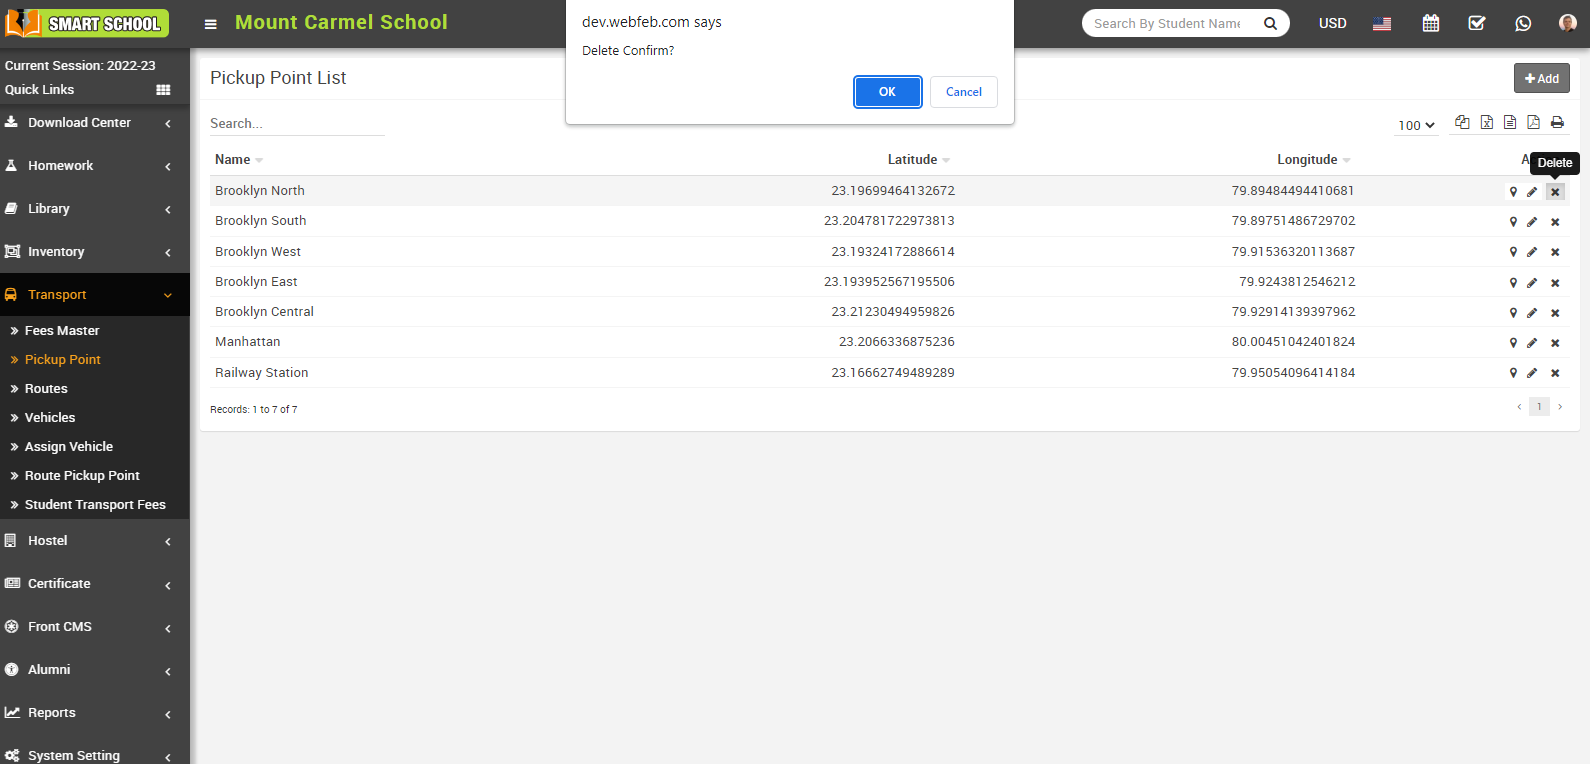
And your pickup point will be successfully deleted.
How to add Route Pickup Point?
The route pickup point for a smart school refers to the specific stops along the transportation route where students are picked up and taken to the school. The exact pickup points are usually determined and communicated by the school, taking into consideration the convenience and safety of the students, as well as the efficiency of the transportation route. The pickup points may change from time to time based on the needs and circumstances of the school and students.
To add a route pickup point, go to Transport > Route Pickup Point. Here you can view the Route Pickup Point list. To add a new route pickup point, click on the +Add button that is showing in the top right corner. The add Route Pickup Point model will be open.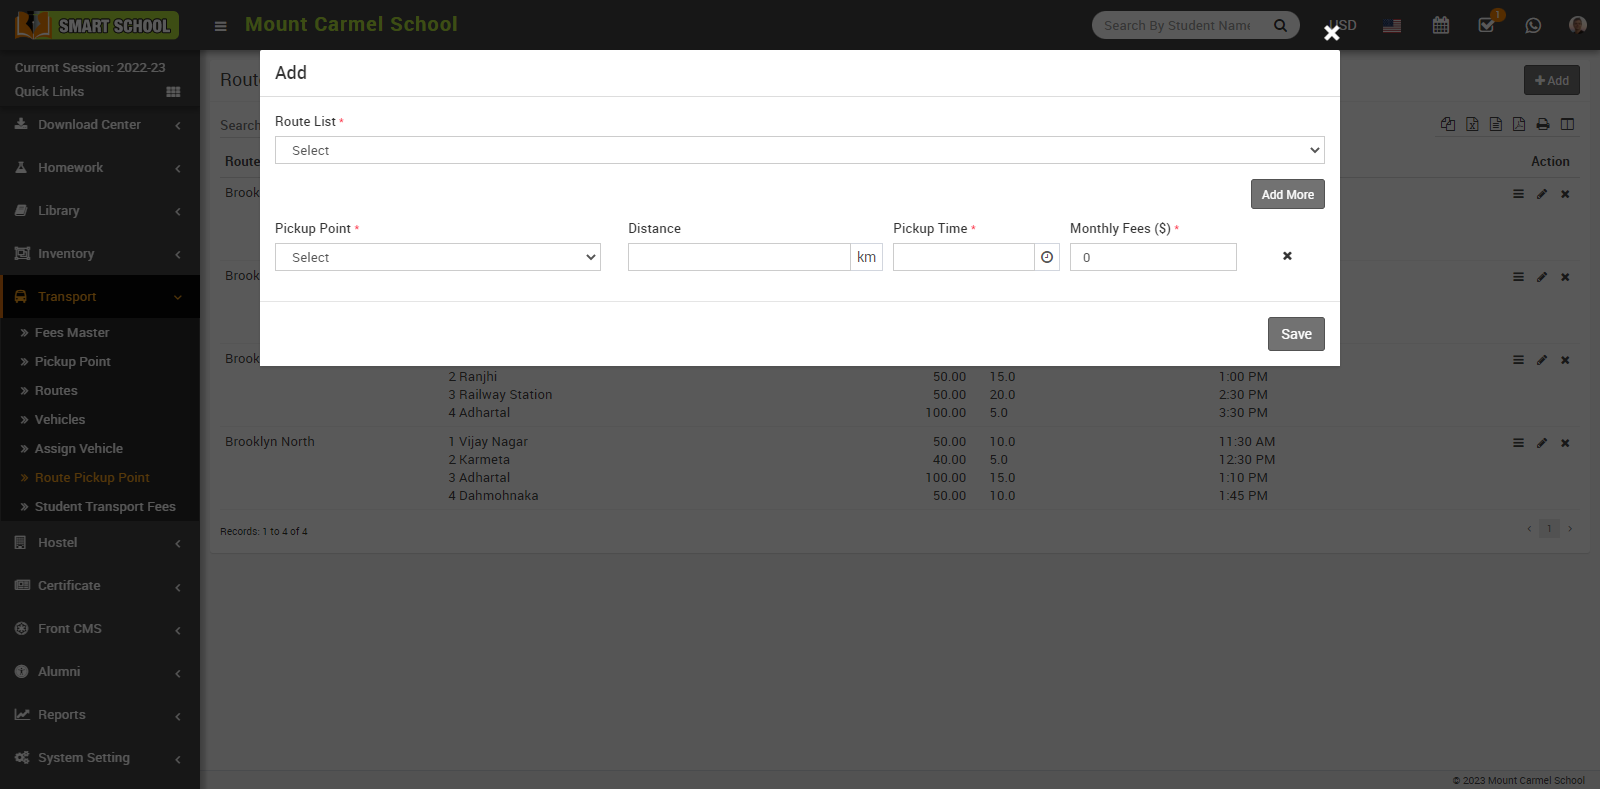
In this model, first you need to select the route for the student, or which route you will make shorter for the student. If in that route you want to make the multiple pickup point, just click on the Add More button that is showing in the right middle so that field will be open and you can set the multiple pickup point for that route.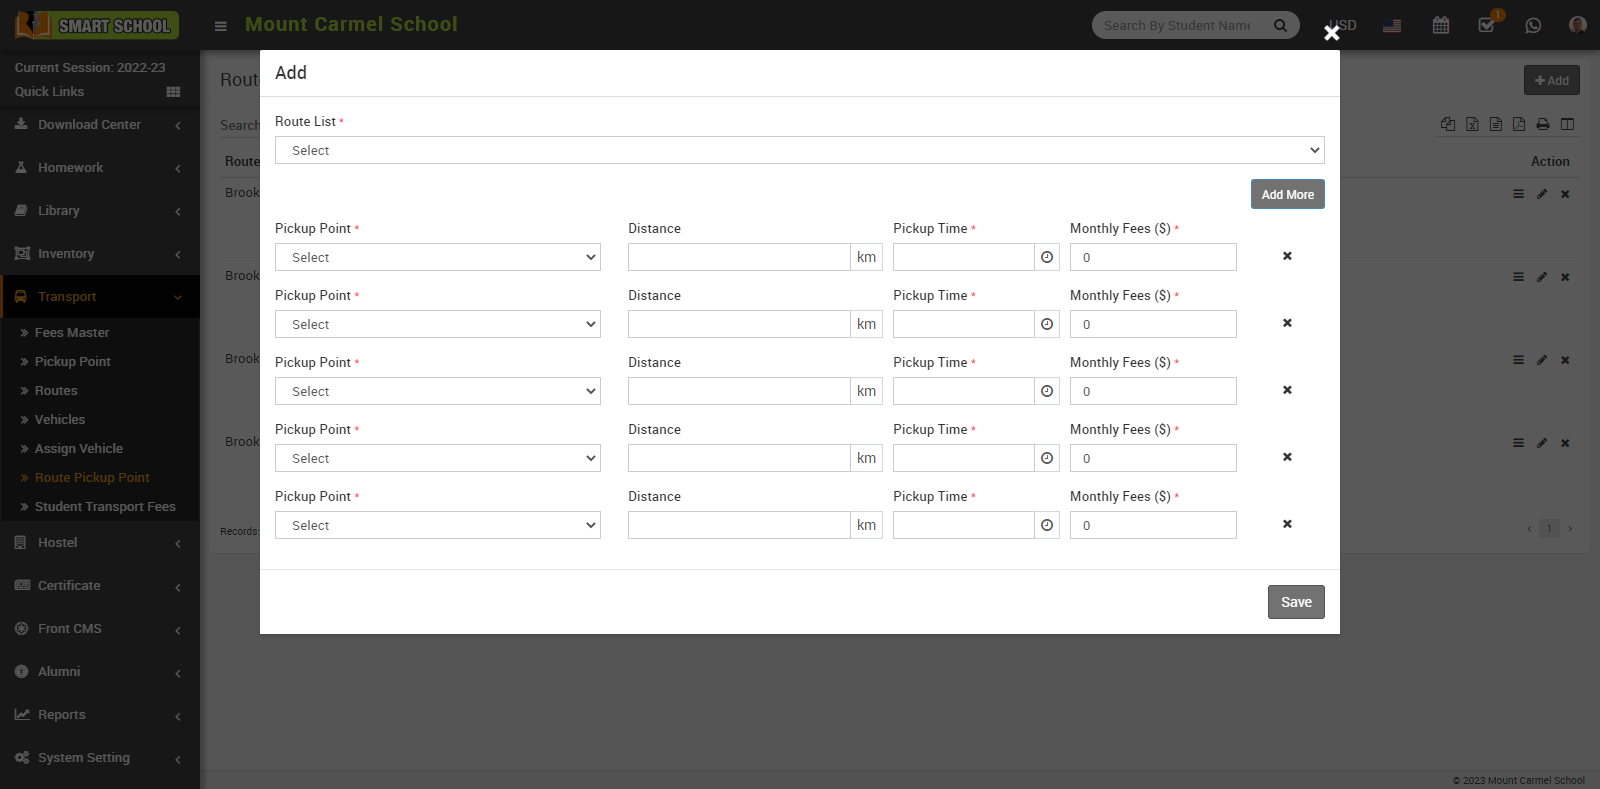
Now select the pickup point, which is where you will be picked up by the bus or other mode of transportation, and fill in the Distance from school to student destination pickup point, as well as the Pickup Time by using the time picker, and fill in the Monthly Fees that will be charged to the student on the route, before clicking the Save button. If you want to delete the pickup point for that route, simply click on the "Delete" (cross) icon next to the monthly fees, and when the delete confirmation message appears.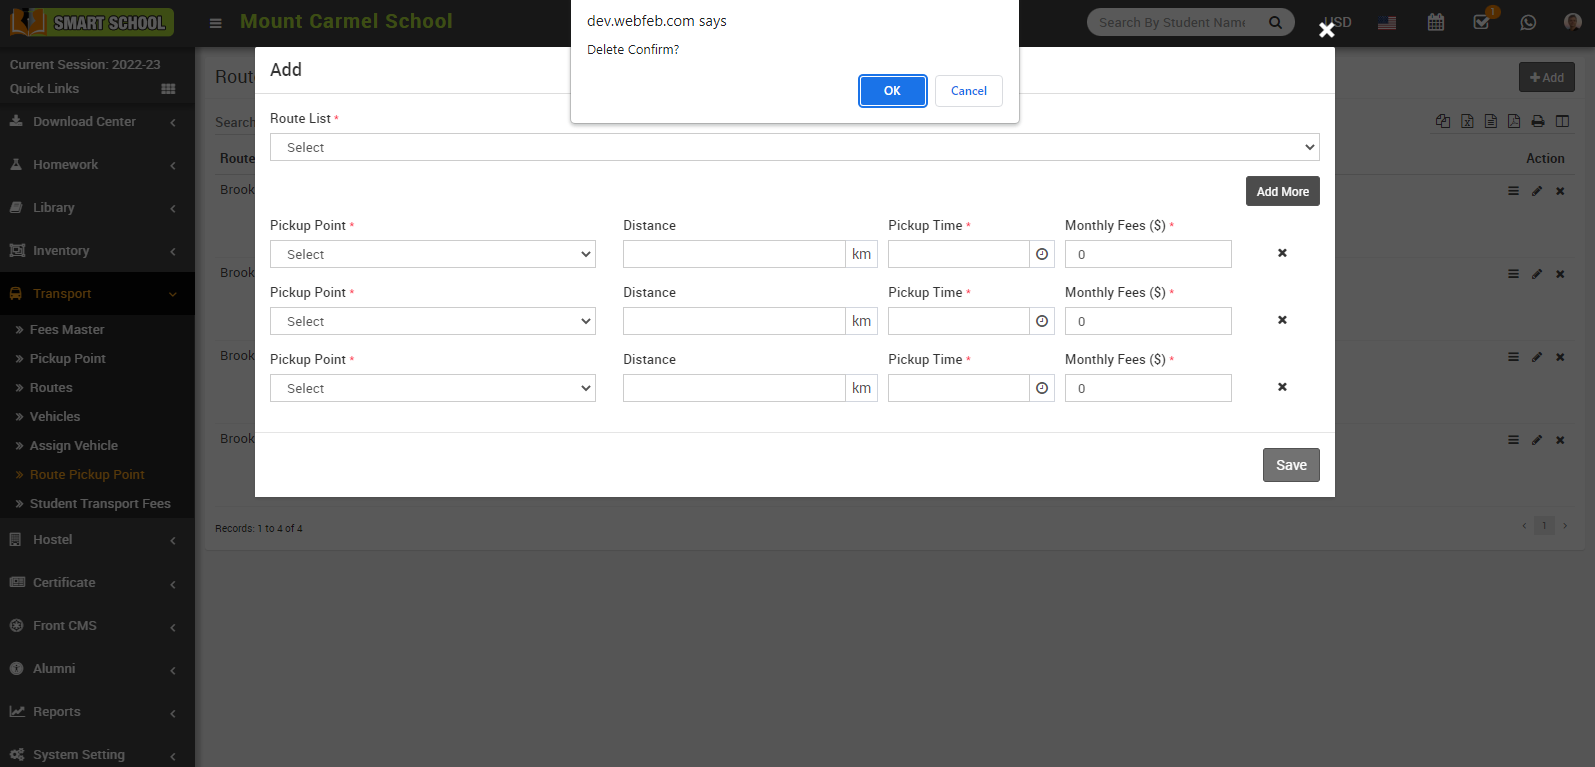
Click on the "OK" button, and your pickup point for that route will be successfully deleted.
After entering all of the details in the route pickup point and clicking the save button, your record will be successfully saved in the route pickup point list, where you can see the details of the route, pickup point, monthly fees, distance, and pickup time that you specified. You can now see the Reorder, Edit, and Delete icons in the action column.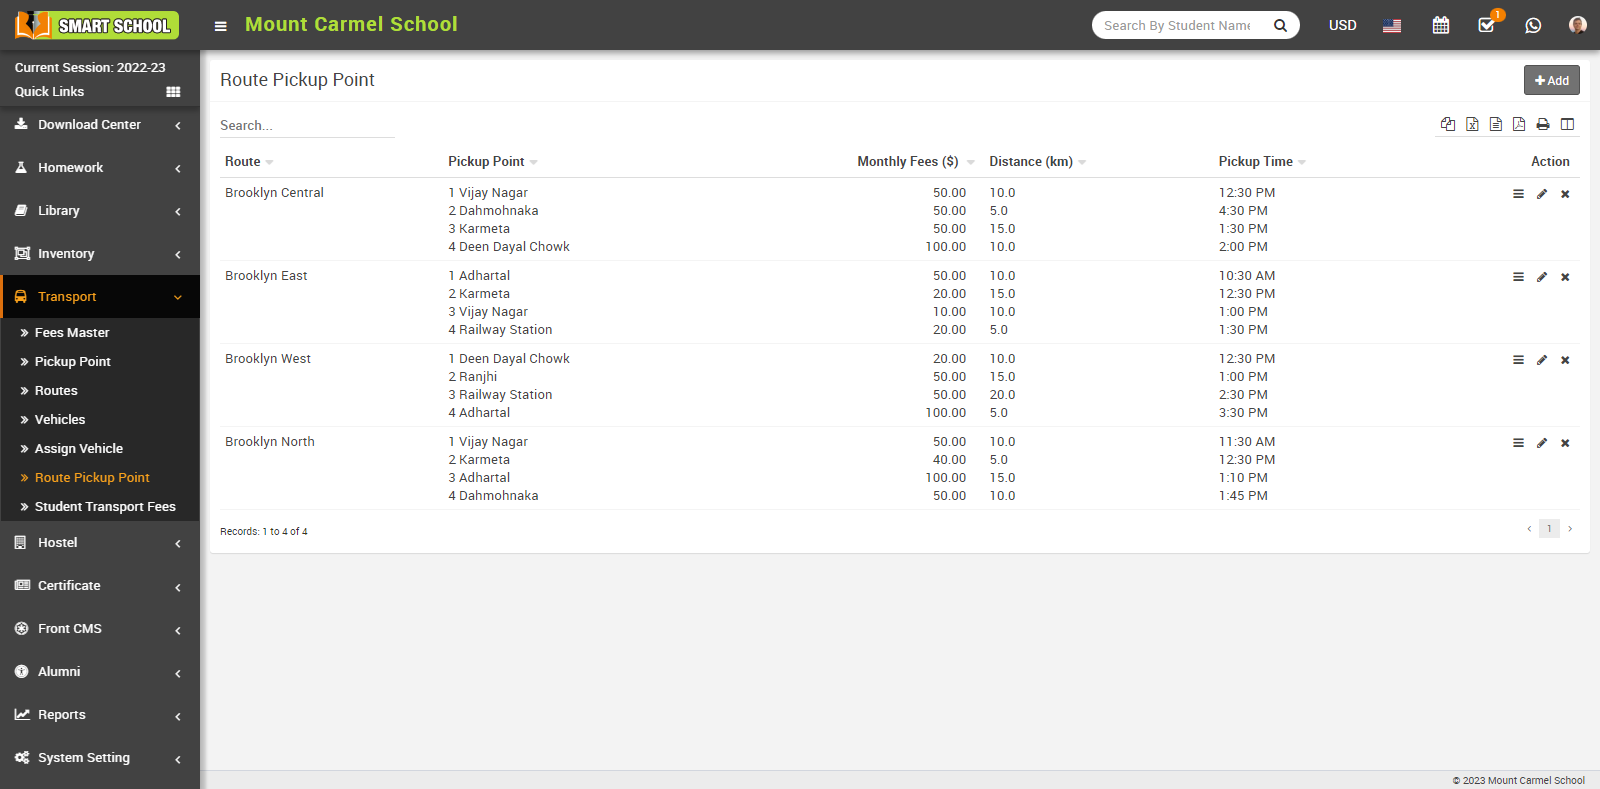
With the help of Reorder, you can manage the order of pickup points on that route, just click on the Reorder icon, Order From School Location model will be open, now drag and drop the row or reset the pickup point with the help of the mouse so that you can manage the preferred order of pickup points on that route.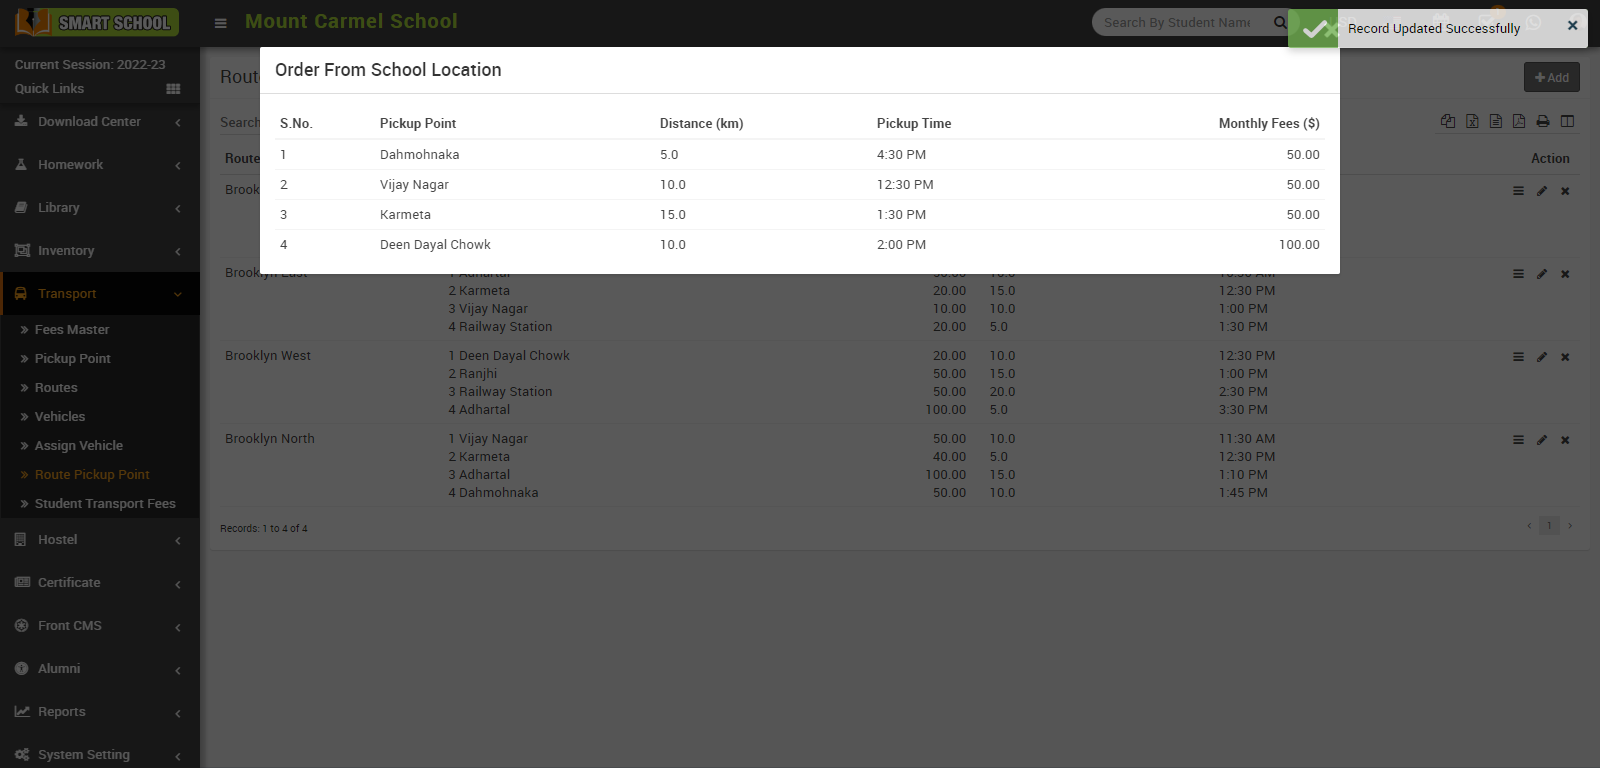
You can edit the route pickup point and its details, you just need to click on the Edit button.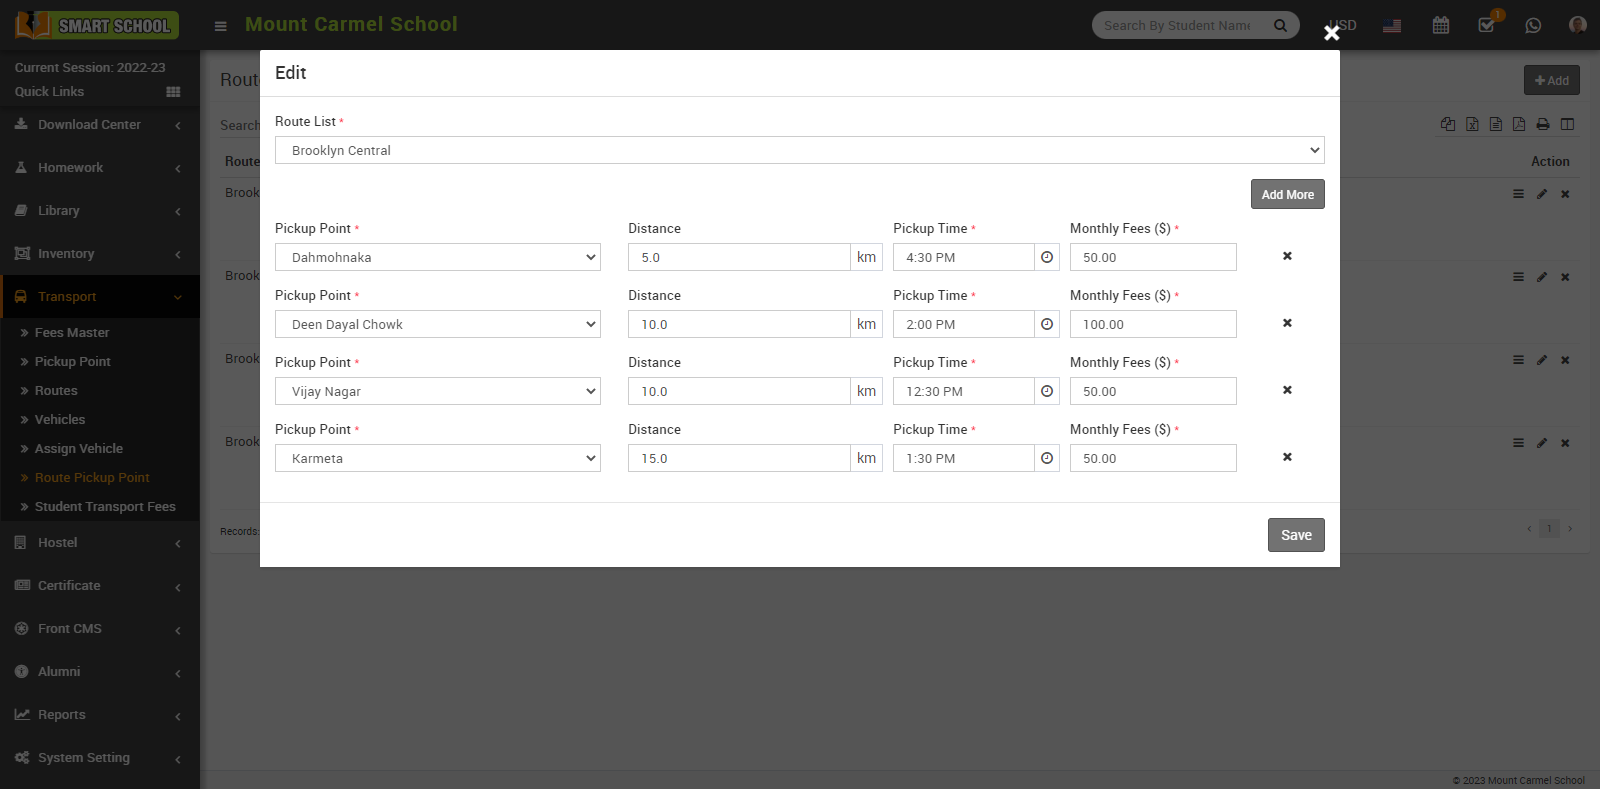
If you want to delete a route pickup point, simply click on the Delete (cross) icon, a Confirmation model will appear, then click on the OK button.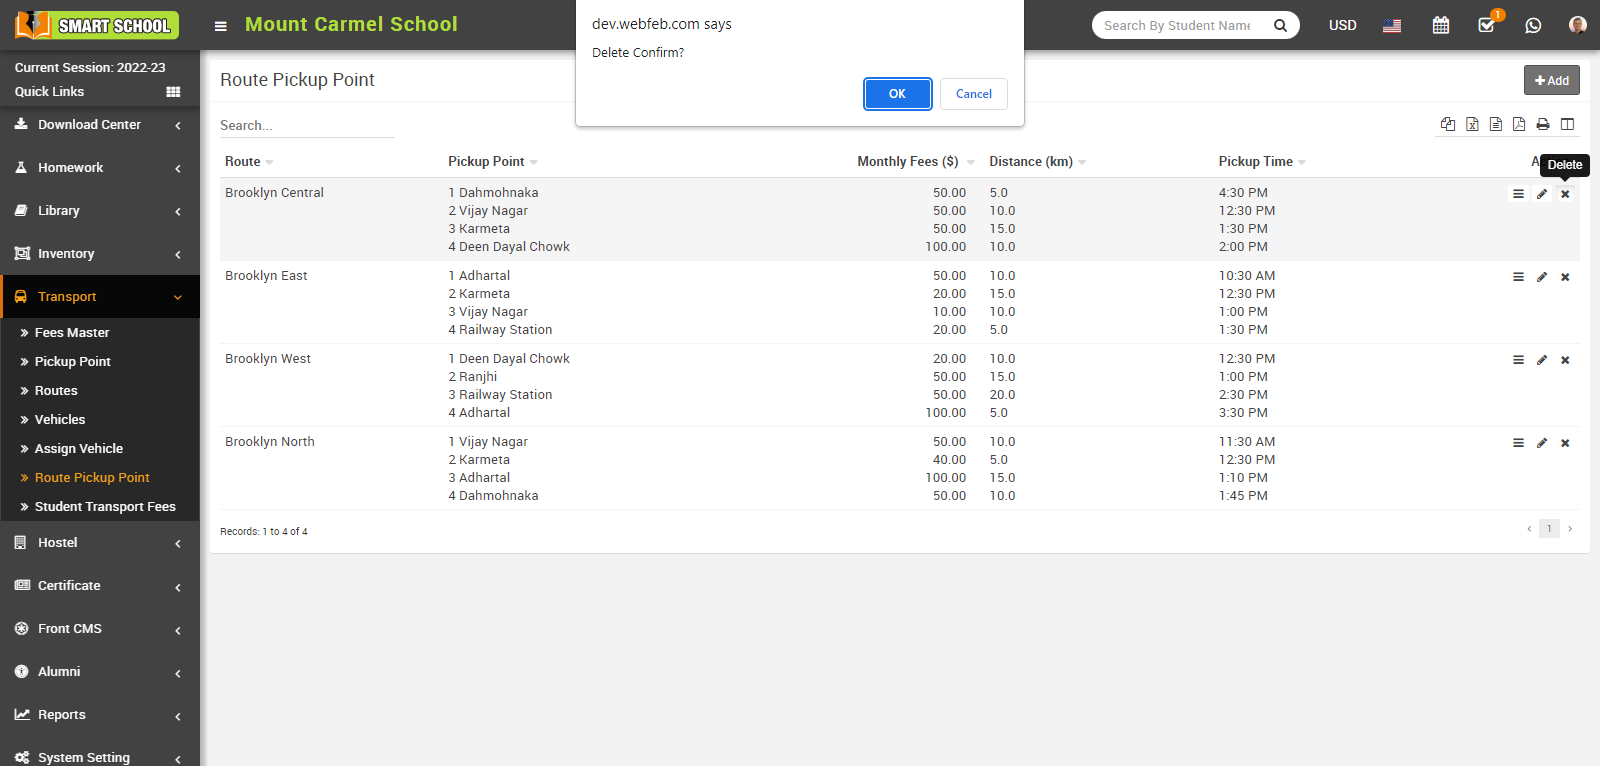
And your route pickup point will be successfully deleted.
How to assign transport fees to the Student?
To add Student Transport Fees go to Transport > Student Transport Fees, select Class and Section then click on Search button.![]()
Here you can view Student Transport Fees, Admission No, Student Name, Class, Father Name, Date of Birth, Route Title, Vehicle Number, Pickup Point and Action column.![]()
When you will click on Assign Fees you can view Assign Fees Student Name, Class, Father Name, Admission No, Mobile Number, Roll Number, Pickup, Pickup Time, Fees ($) and Distance.
You can assign the transport fees to the student by clicking on the Assign Icon, which is shown in the Action column. Now, select the student to whom you want to assign the fees, and the Assign Fees model will open. In this model, you can see the details of that student, and in the list below, you can see a list of all months available with their amount and due date. If you want to assign all of the month's fees to the student, simply check the checkbox for all months on the left side, by checking the box, all of the month's fees are selected. Then click the Save button to successfully assign all of the month's transport fees to the student.![]()
If you want to see assigned fees, go to fee collection > collect fees, then search for the relevant student for whom you want to see assigned fees, now click on the search button, the student list will be opened, and click on collect fees for that relevant student, which is showing in the action column, the student fees list will be opened; and here you can see your assigned transport fees.![]()