About CBSE Examination
This examination adopts a distinct approach to assessing students, encompassing modules such as terms, observation, observation parameter, assessment, marksheet templates, subject marks reports, and template marks reports.
In this examination, you have the option to create multiple terms for various exams, and these multiple terms, along with the exams, can be printed on the marksheet. Overall, there are no limitations to the number of terms you can create within a single year for this examination.
Assessment plays a crucial role in evaluating students' knowledge, skills, and understanding of the subjects. Assessment in this examinations aims to provide a comprehensive view of students' academic performance and holistic development. It emphasizes not only subject knowledge but also practical knowledge.
The role of observation is integral to upholding the integrity and credibility of the assessment process. It contributes to a transparent and reliable evaluation system that is essential for students.
Observation parameters refer to the specific criteria and aspects that are monitored, evaluated, and assessed by external observers during the conduct of examinations.
CBSE Examination Workflow: -
In the CBSE Examination, the following steps should be followed:-
- Create the term.
- Create the assessments.
- Before creating observations, establish the observation parameters.
- Create the observations.
- Assign the observations and link the marks to them.
- Create the exam grade for the examination.
- Create the exam and assign it to the students.
- Enter the subjects and their respective marks.
- Record the attendance and teacher remarks.
- To publish exam, you need to edit the exam and check the checkbox of publish exam.
- To publish result, you need to edit the exam and check the checkbox of publish result.
- To print the mark sheet, create the template first.
- Link the exam with the template.
- Now, you can print the mark sheet.
- To check the result student side, login student panel, go to CBSE Examination > Exam Result.
How to add the term in CBSE Examination?
About Term
In CBSE examinations, a term refers to a specific period of time during the academic year in which exams are conducted. For example academic year is divided into two terms - Term 1 and Term 2. The marks obtained in both terms are added together to determine the final result of the academic year. In this CBSE Examination you can add the multiple terms.
To add a new Term, you first need to log in to the Smart School super admin panel. Once you have logged in to Smart School, click on CBSE Examination > Term, which is displayed in the left sidebar.
After clicking on Term, the Term List page will open on the right side. You will now see an Add button in the top right corner. Simply click on the Add button, and the Add Term model will open.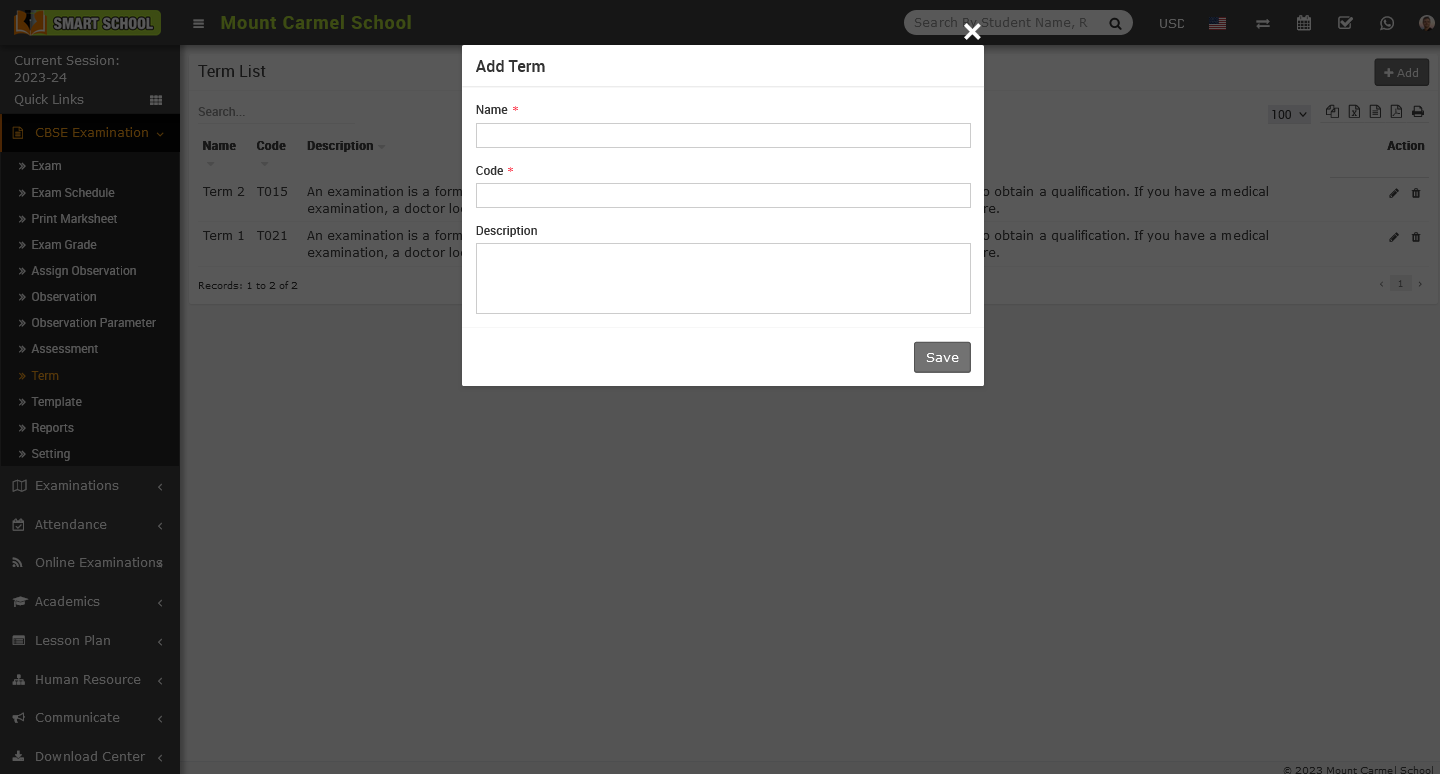
Please enter the Name, Code, and Description of the term. Afterward, click the Save button. The new term will be successfully added, and you will be able to see it in the Term list.
To edit the term, go to CBSE Exam > Term. The term list will be displayed. On the right side, you will see the action column. In this column, there is a pencil icon. Click on the pencil icon and the Edit Term model will open.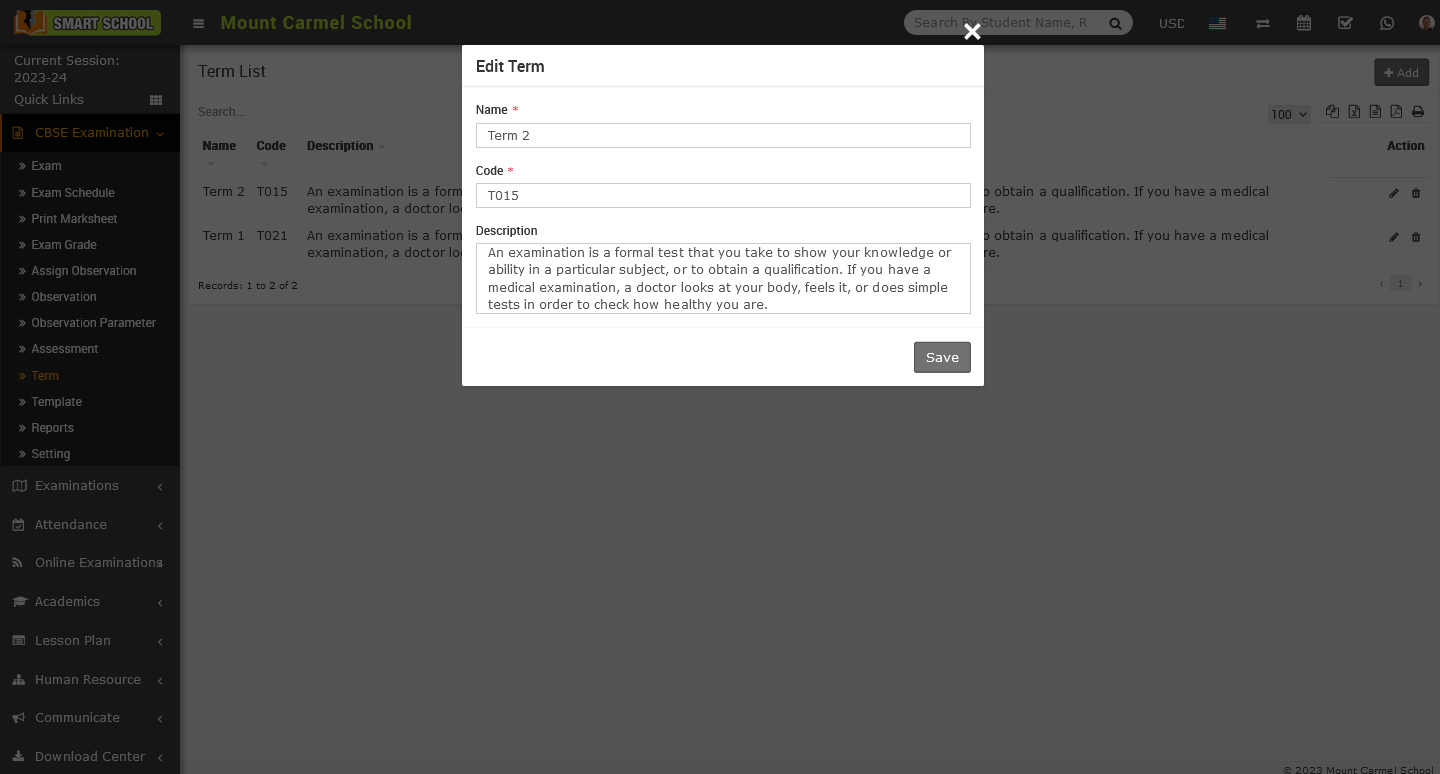
now here you can edit the term name, code, description then click on save button, your update will be successfully save in the Term list.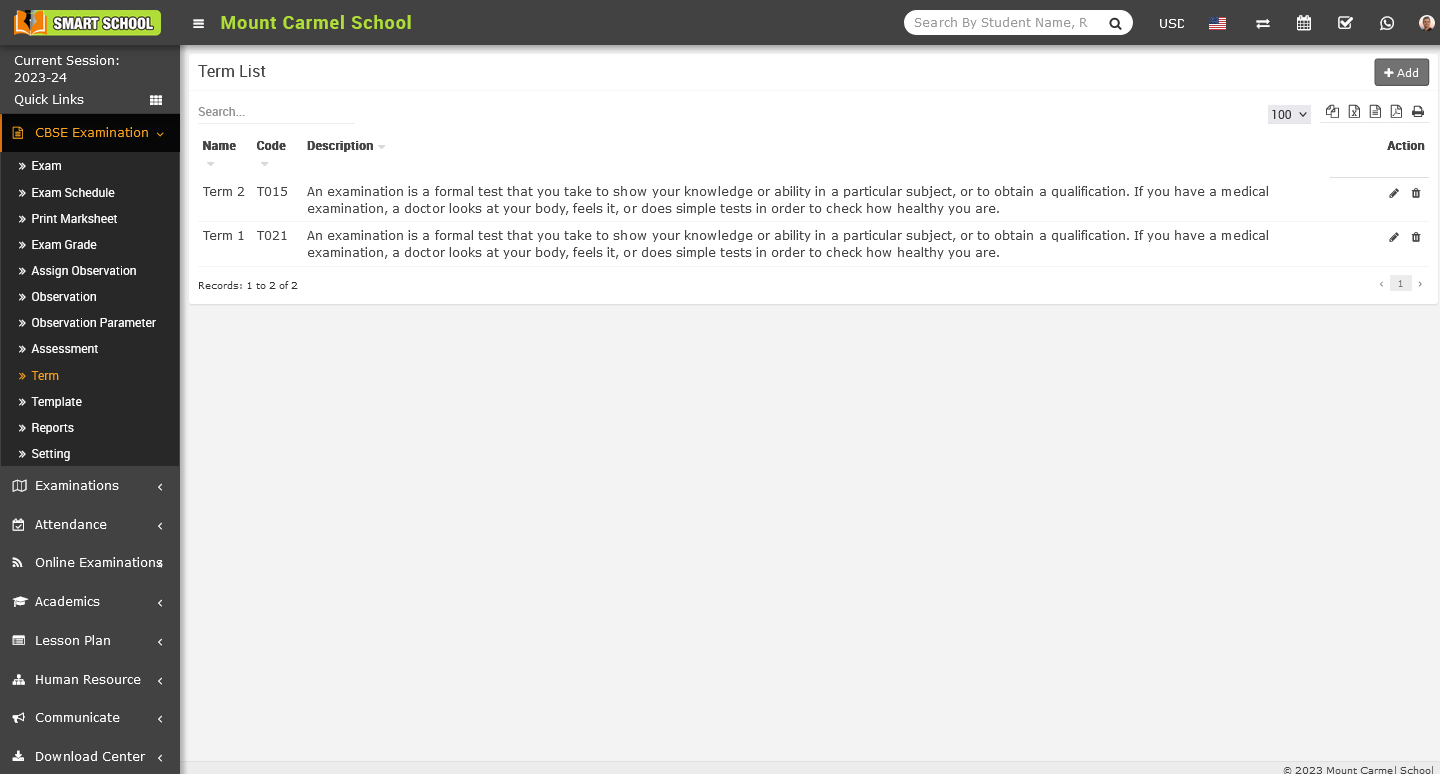
To delete the term, go to the CBSE Exam > Term. The term list will be displayed. On the right side you will see the Action column, in this action column there is the delete icon showing, simply click on the Delete icon, Delete confirmation model will be open.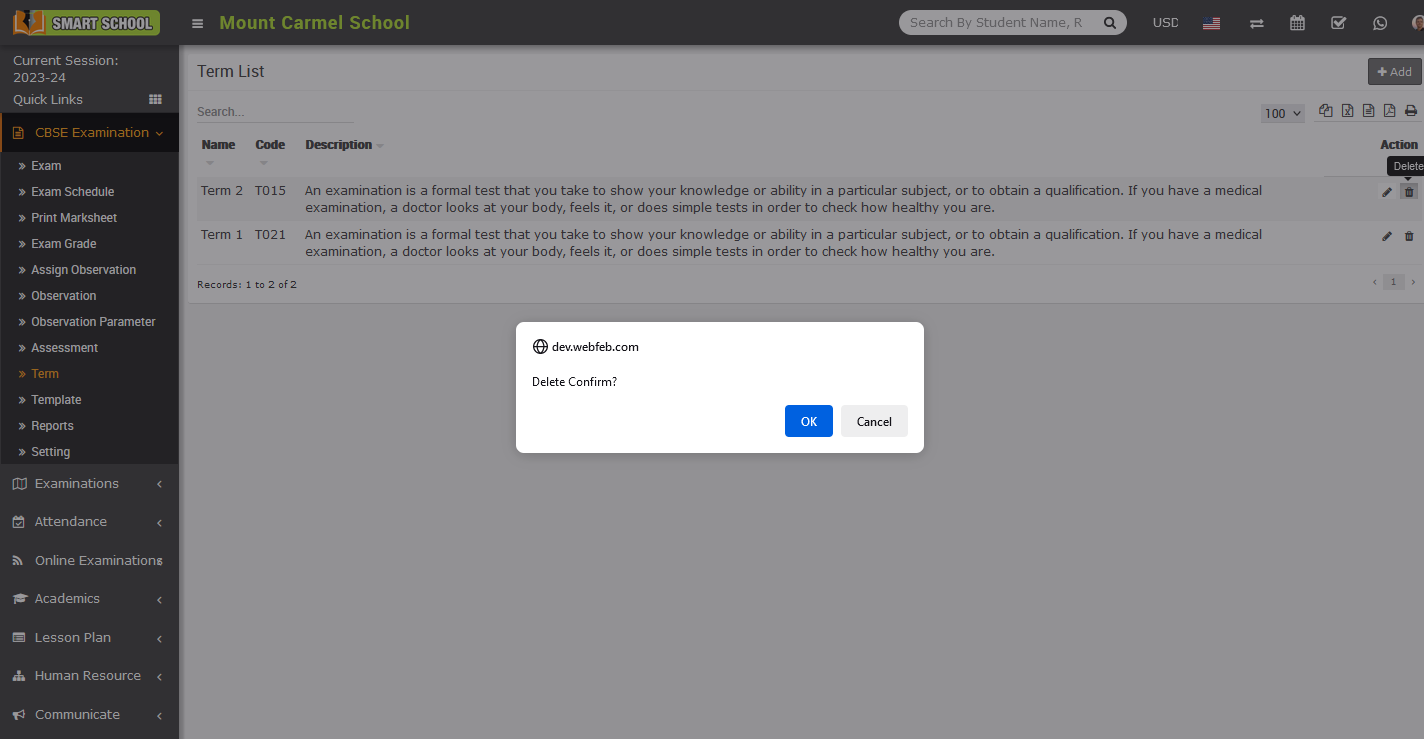
Now click on the OK button, the term will be deleted successfully from the term list.
How to add assessment in CBSE Examination?
To add the assessment, go to CBSE Examination > Assessment. The Assessment list will be displayed. On the top right corner add button showing, simply click on Add button, Add Assessment model will be open.
Now fill the name of assessment and right the description about the assessment and in below you can fill the assessment type (it could be theory and practical etc.), fill the code of Assessment Type, and fill the Maximum Marks, Pass Percentage and the description. If you want to more assessment type simply just click on Add More button, the multiple inputs will be open.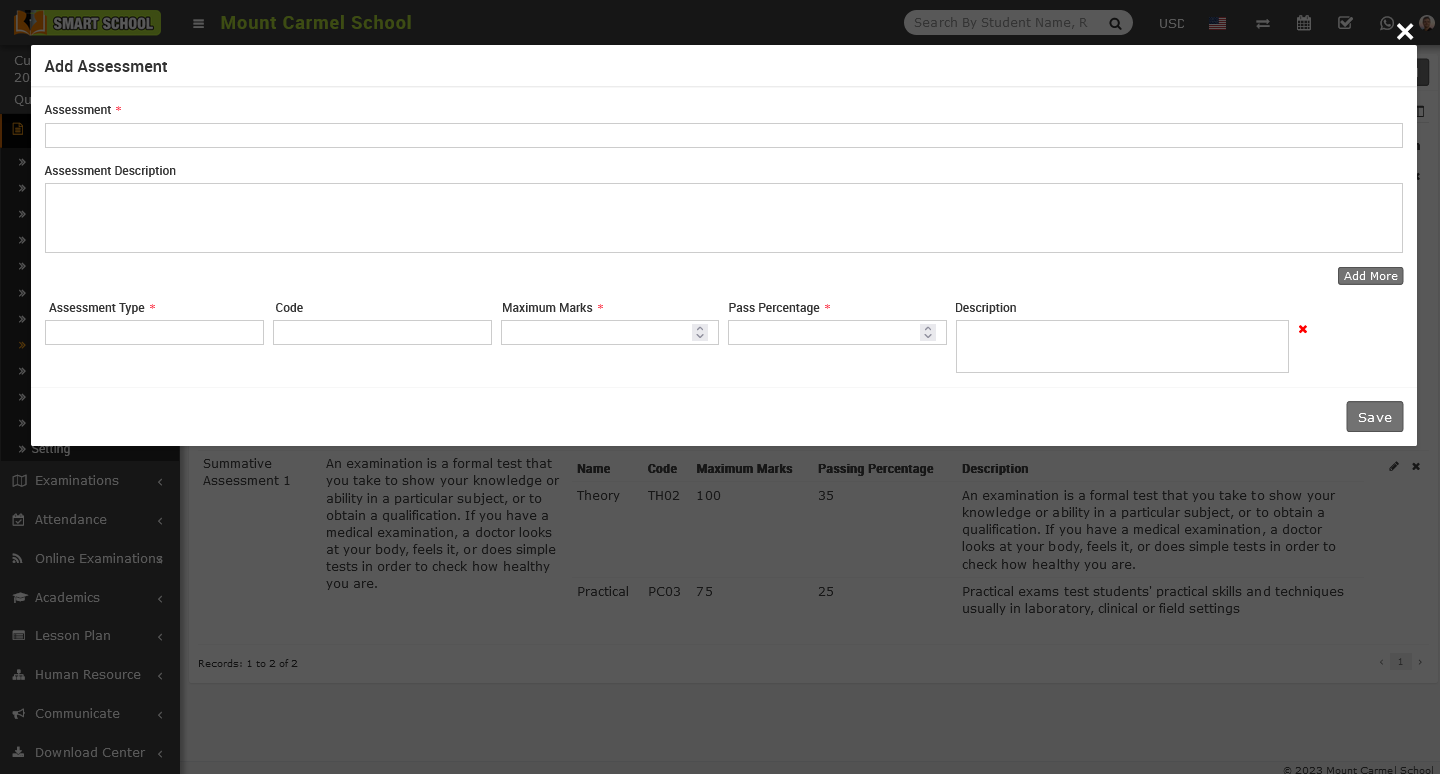
And if you want to delete the multiple inputs, simply just click on Red Cross icon which is showing on the right side of input and the inputs will be delete successfully.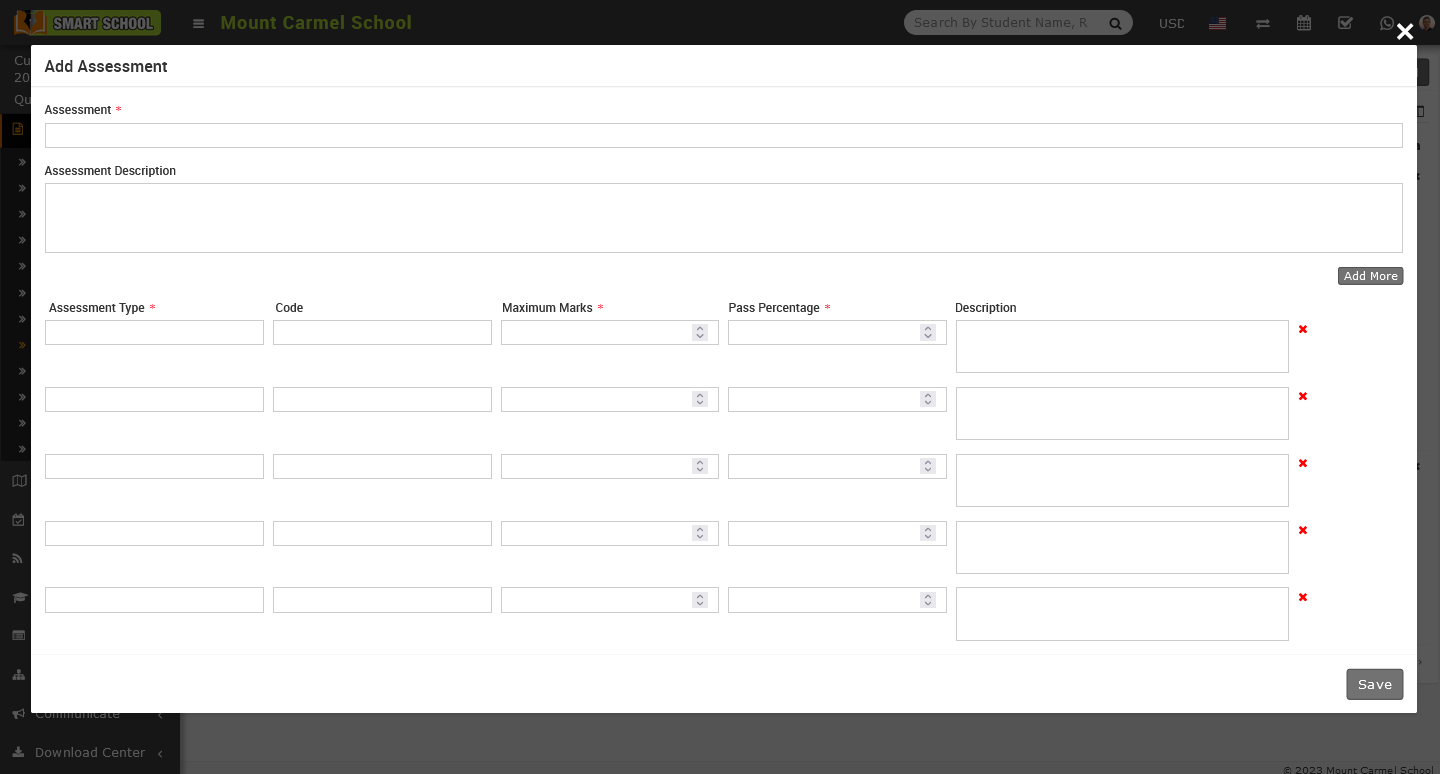
After add the all details of the assessment, just click on save button which is showing on the bottom right corner and details will save in Assessment list successfully.
To Edit the assessment, go to CBSE Examination > Assessment. The assessment list will be displayed, and on the right side, the Action column will be visible. To initiate the edit, simply click on the pencil icon, which will open the Edit Assessment model.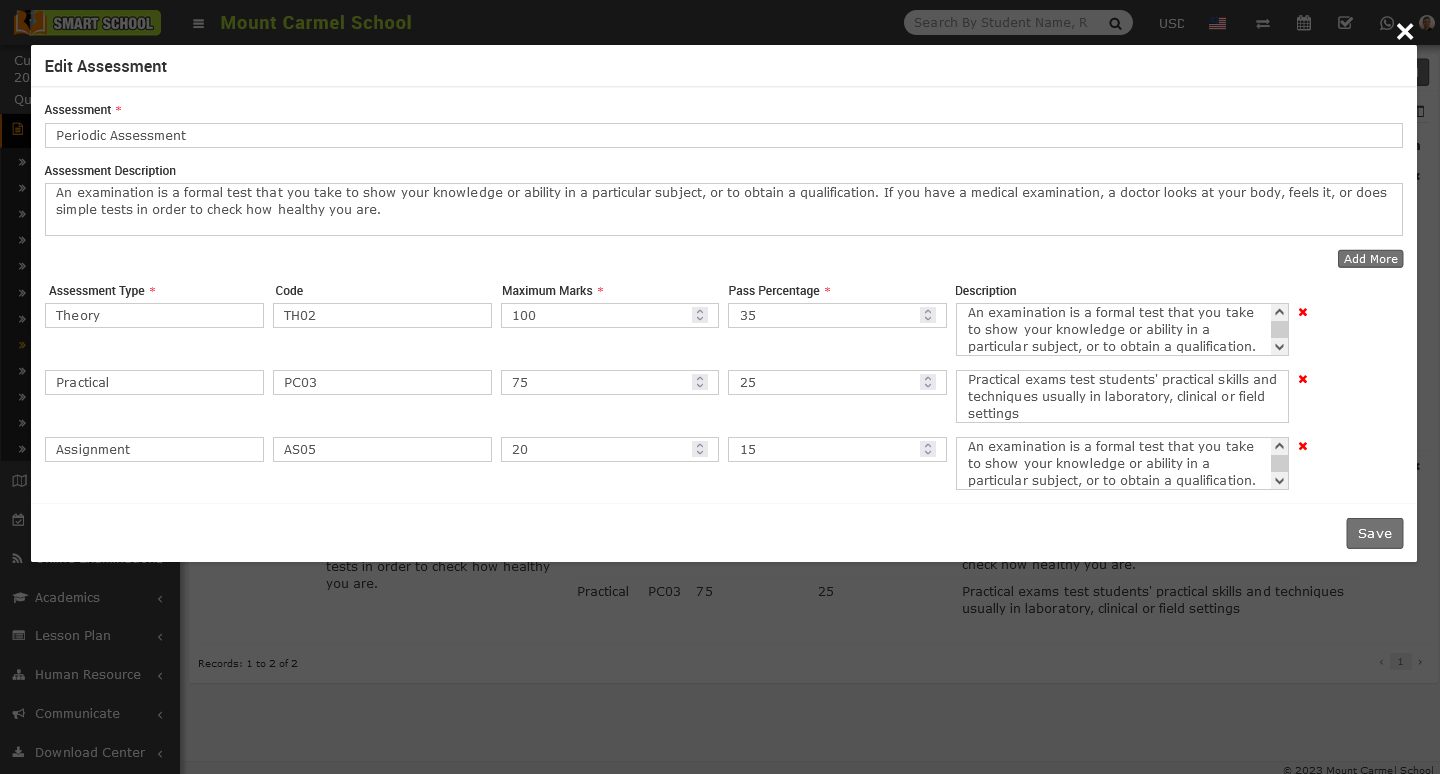
Now update the relevant details of assessment and click on save button, your details will be update successfully on the assessment list.
To delete the Assessment, simply click on Delete icon which is showing in action column, Delete Confirmation model will be open.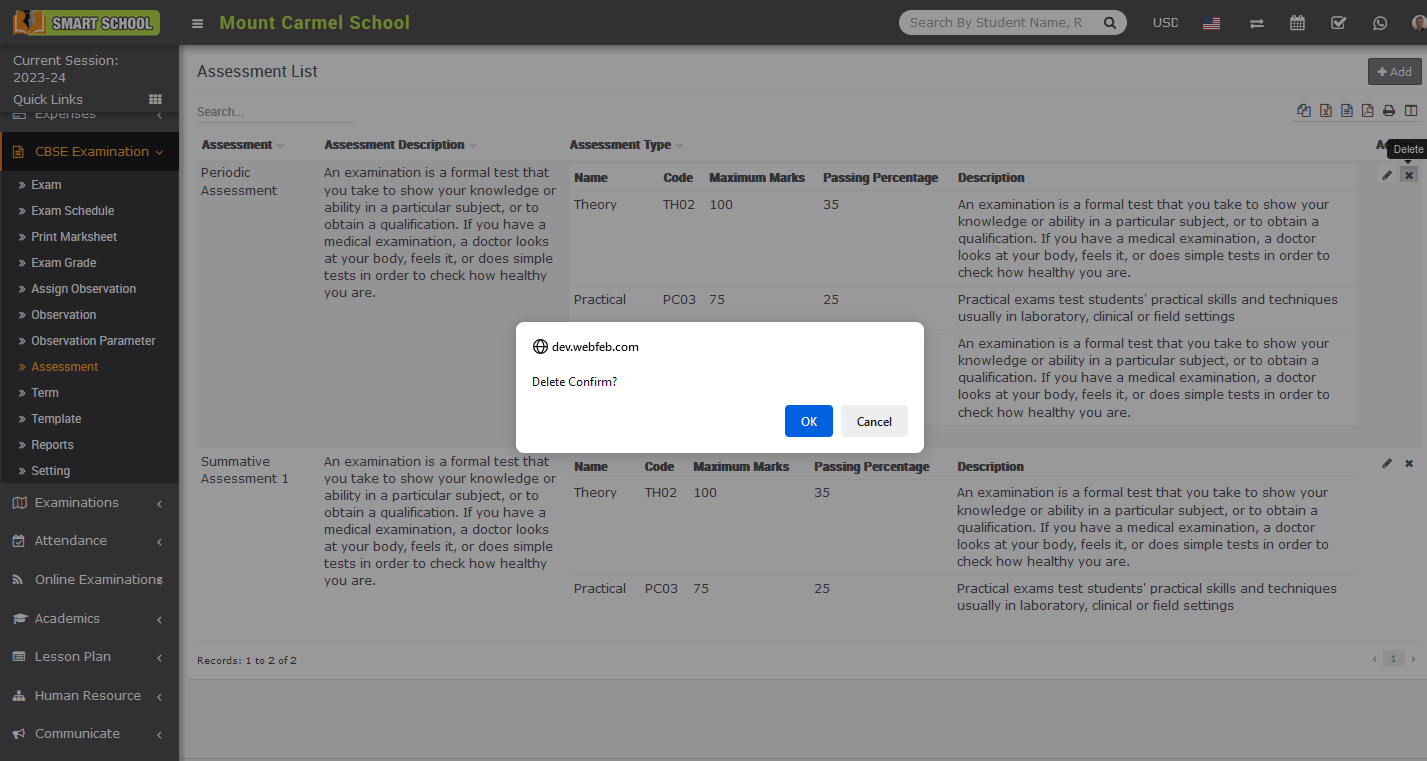
Now just click on OK button and your assessment details will be deleted successfully.
How to add the observation parameter in CBSE Examination?
To add the observation parameter, go to CBSE Examination > Observation Parameter.
Now on the left side you can see the input field for add the parameter, simply fill the name of the parameter and click on save button, parameter name will be displayed on the right side.
To edit the parameter name, just click on pencil icon showing at the action column and update the parameter name then click on save button, parameter name will be update successfully.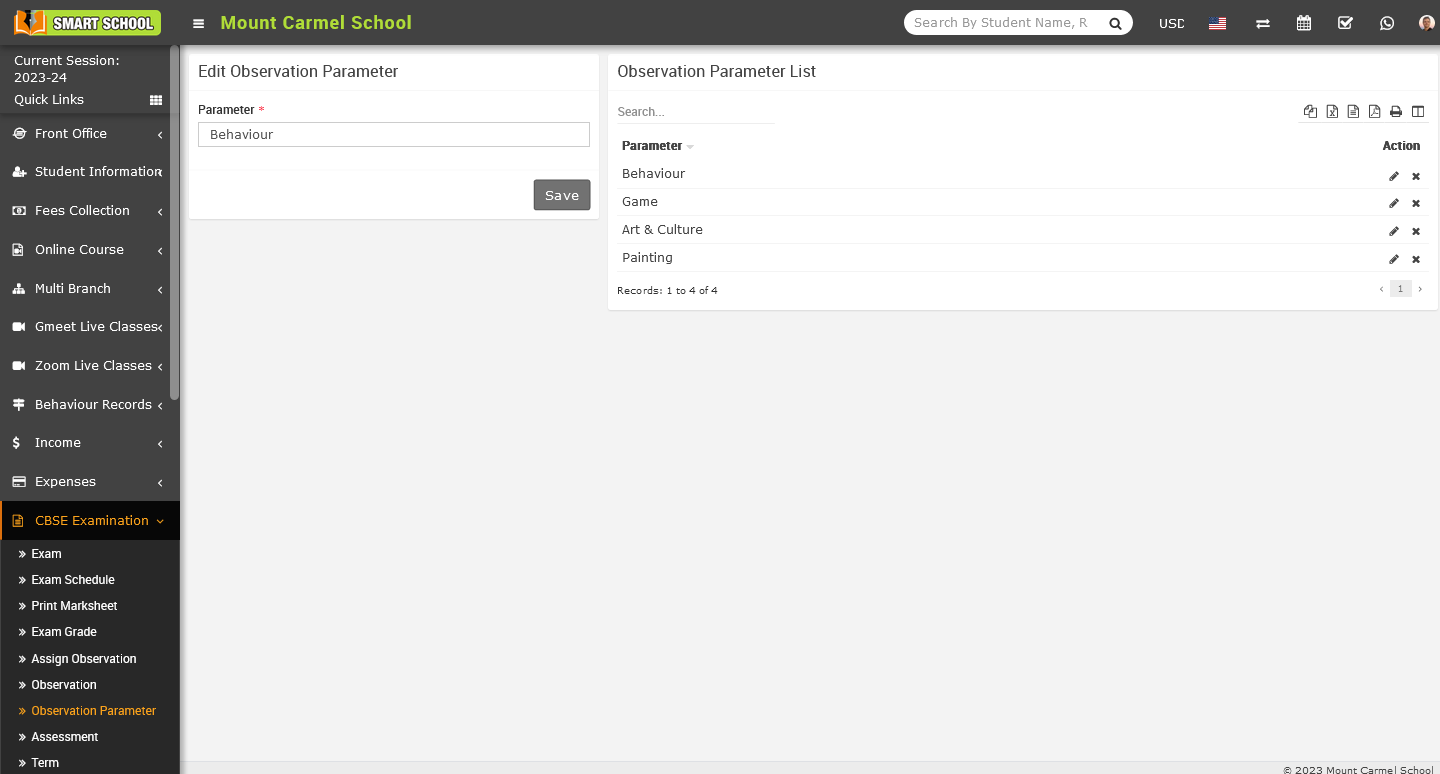
To delete the parameter, just click on cross icon showing at the action column, delete confirmation model will be open.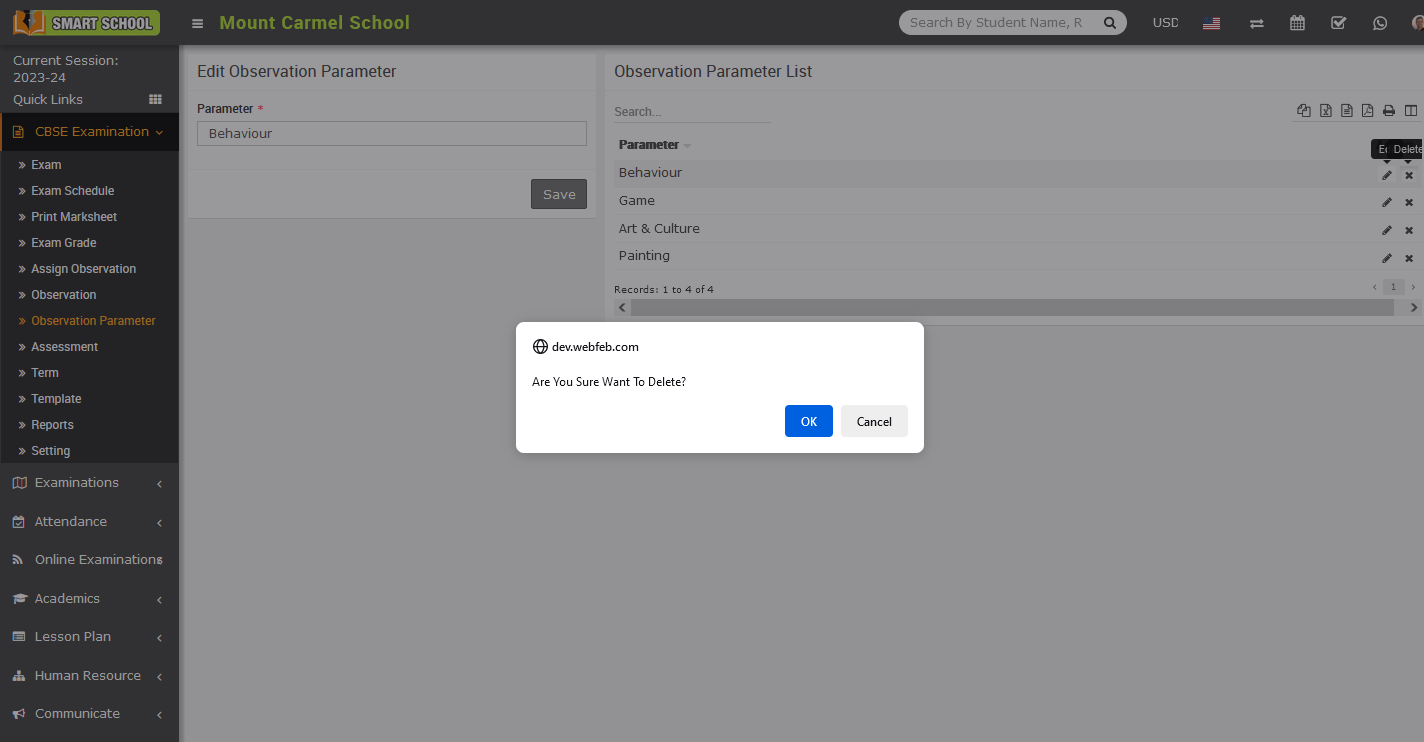
Simply click on the OK button, parameter name will be deleted successfully.
How to add observation in CBSE Examination?
To add an observation, go to CBSE Examination > Observation. Once you click on the observation, the observation list will open on the right.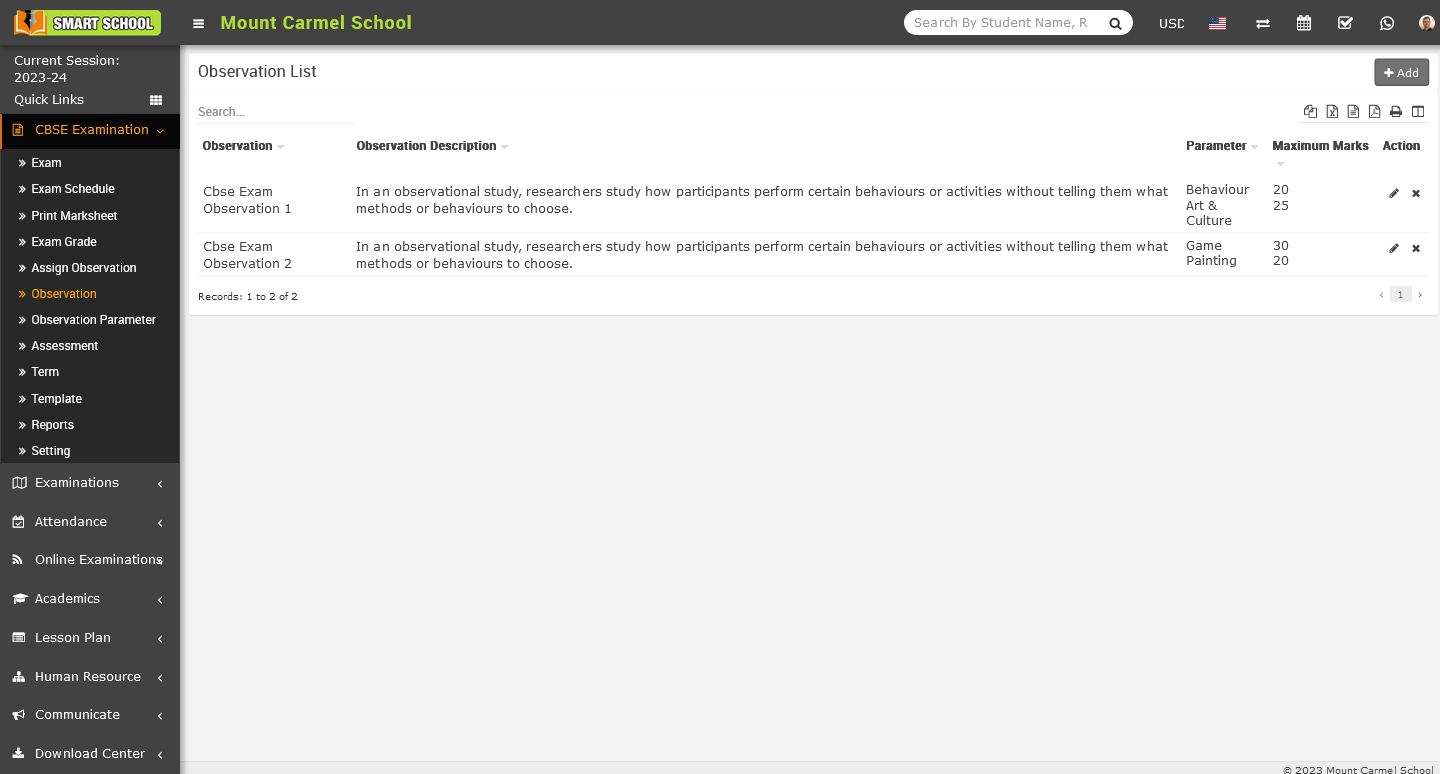
The observation list will be displayed on the right side, and the Add button will be shown in the top right corner. Simply click on the Add button, and the Add Observation model will open.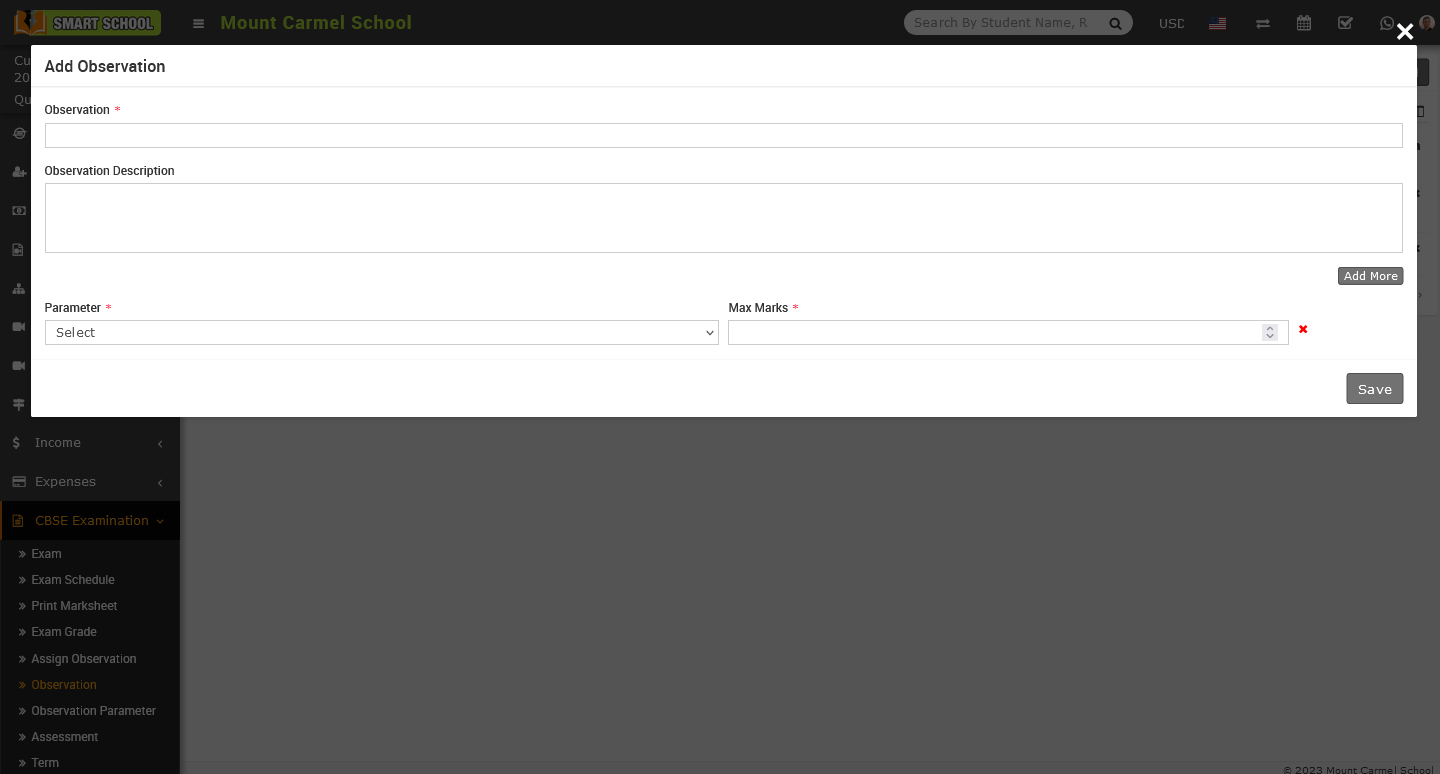
Please enter the Name and Description of the Observation. Next, select the relevant parameter from the CBSE Examination > Observation Parameter module that has been already added and set the maximum marks for that parameter. If you wish to add multiple parameters for the observation, simply click on the Add More button to open additional fields below.
And if you want the delete some field, simply click on Red Cross icon showing at the right side, relevant field will be deleted successfully.
After entering all the relevant details, simply click on the save button located in the bottom right corner, the details will be saved successfully and displayed in the observation list.
To edit the observation details, located at the action column on the right side. Simply click on the pencil icon corresponding to the desired observation, and the Edit Observation model will open.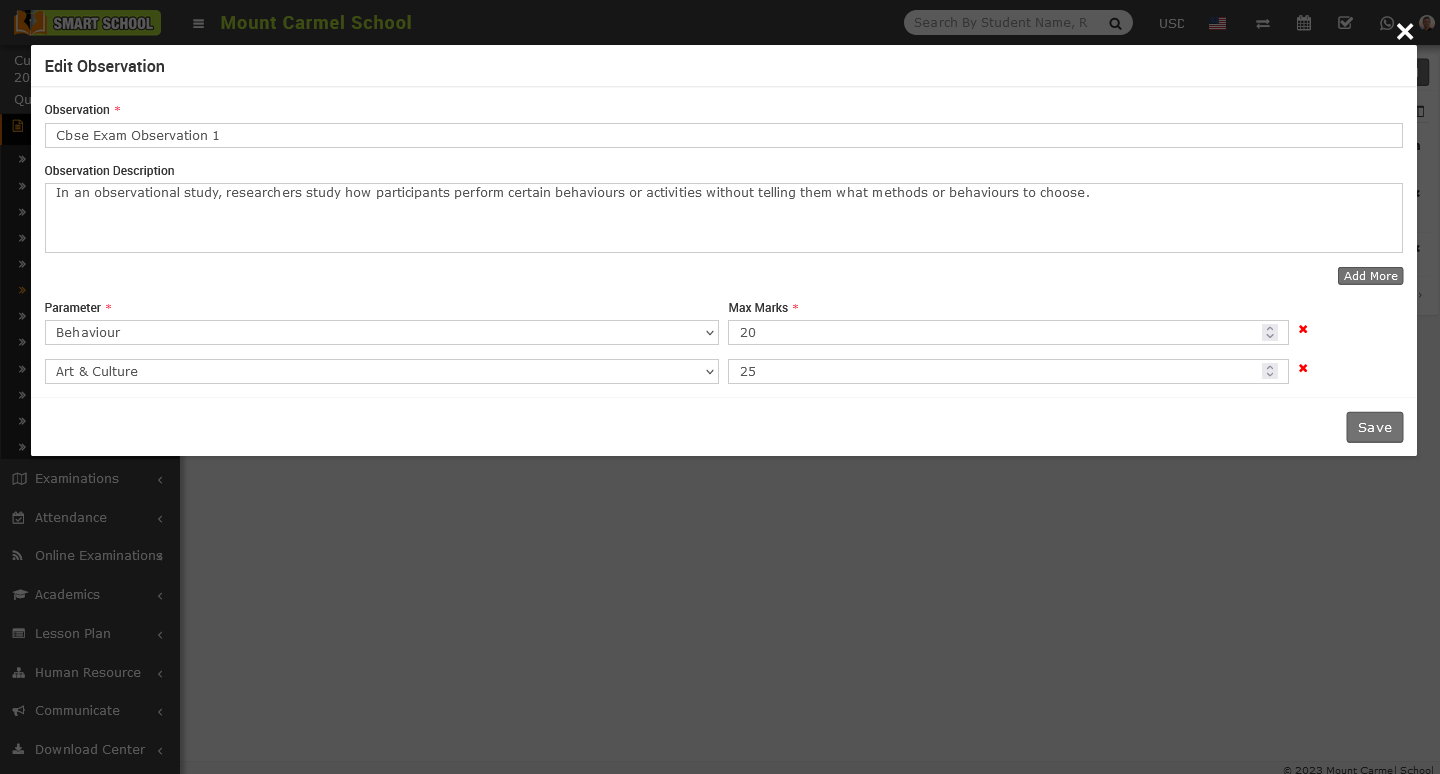
Now update all relevant details, then click on the save button, the details has been successfully saved on the Observation List.
To delete the observation from the observation list, just click on Delete (cross) icon which is located in action column, delete confirmation model will be open.
Now click on OK button, observation has been deleted successfully from the observation list.
How to add the assign observation in CBSE Examination?
To assign observation, go to CBSE Examination > Assign Observation. Once clicked on the assign observation, assign observation list will be open on the right side.
Now at the top right corner Add button showing, simply click on add button Add Observation Term model will be open.
Now, click on the Observation, a drop-down menu will appear, allowing you to select the desired observation that you have already saved in the observation module. Additionally, click on the Term. The term drop-down menu will open, and you can select the term that you have already saved in the term module. Fill description and click on the Save button, the details has been saved successfully in the Assigned Observation List.
In assign observation list, you can see the details of Observation, Term, Code, Description column which you recently added.Now assign marks to the specific observation, simply you need to go to the action column, where in first icon for the Assign Marks.
To assign marks to a specific observation, simply go to the action column and click on the first icon for assigning marks.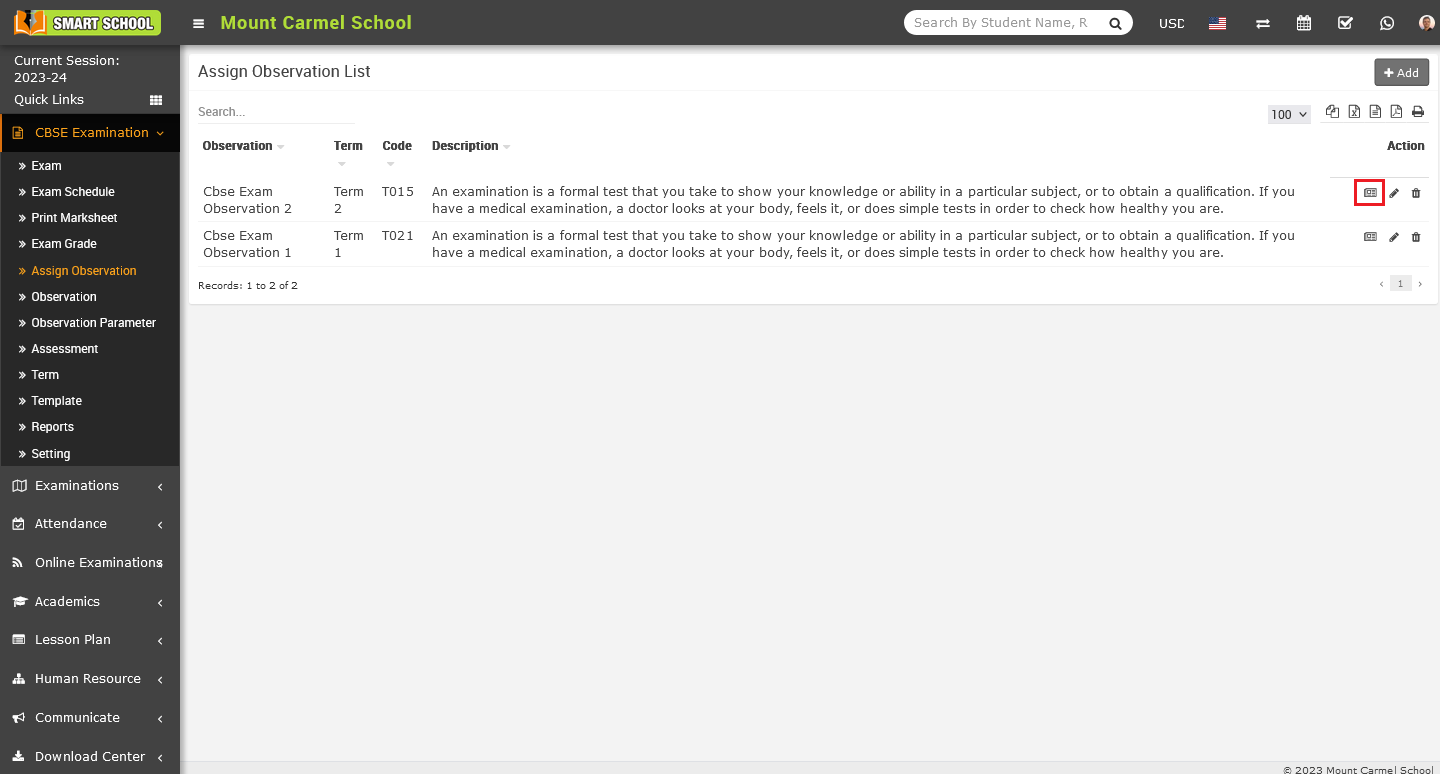
Just click on that icon, Assign Marks model will be open.
In this model, you only need to select the class and section for which you want to assign marks to parameters. Once you have selected the class and section, click on the search button to open the student list for that class, along with their details.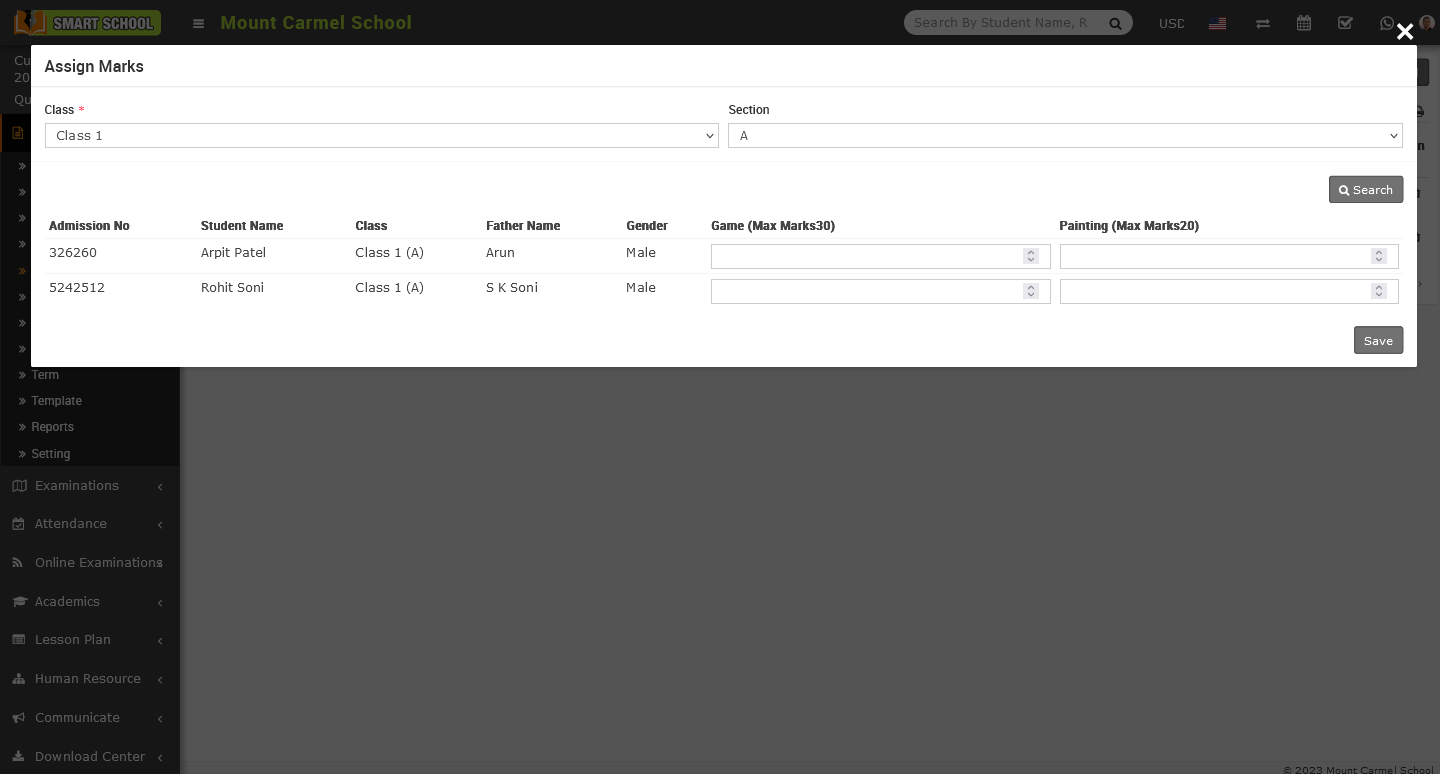
Here, you can view the details of multiple students along with the parameter columns. To enter their marks, simply input the marks in the corresponding parameter column and click on the save button. This will successfully save the marks, and you can view them in the marksheet.
To edit assign observation list, go to the action column, here you can see the one pencil icon, simply click on pencil icon, edit observation term model will be open.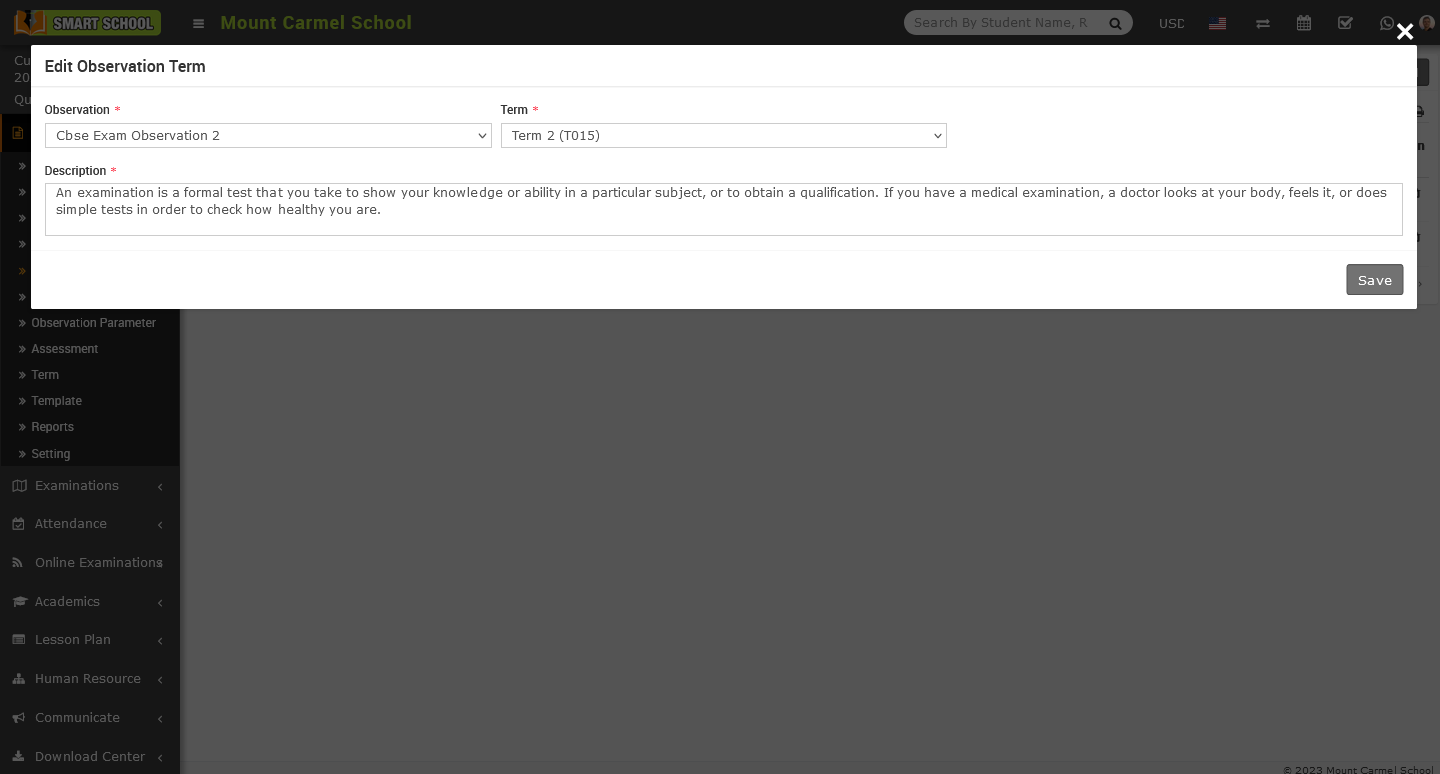
Now update the details of observation term then click on save button, your update has been successfully save in Assign Observation List.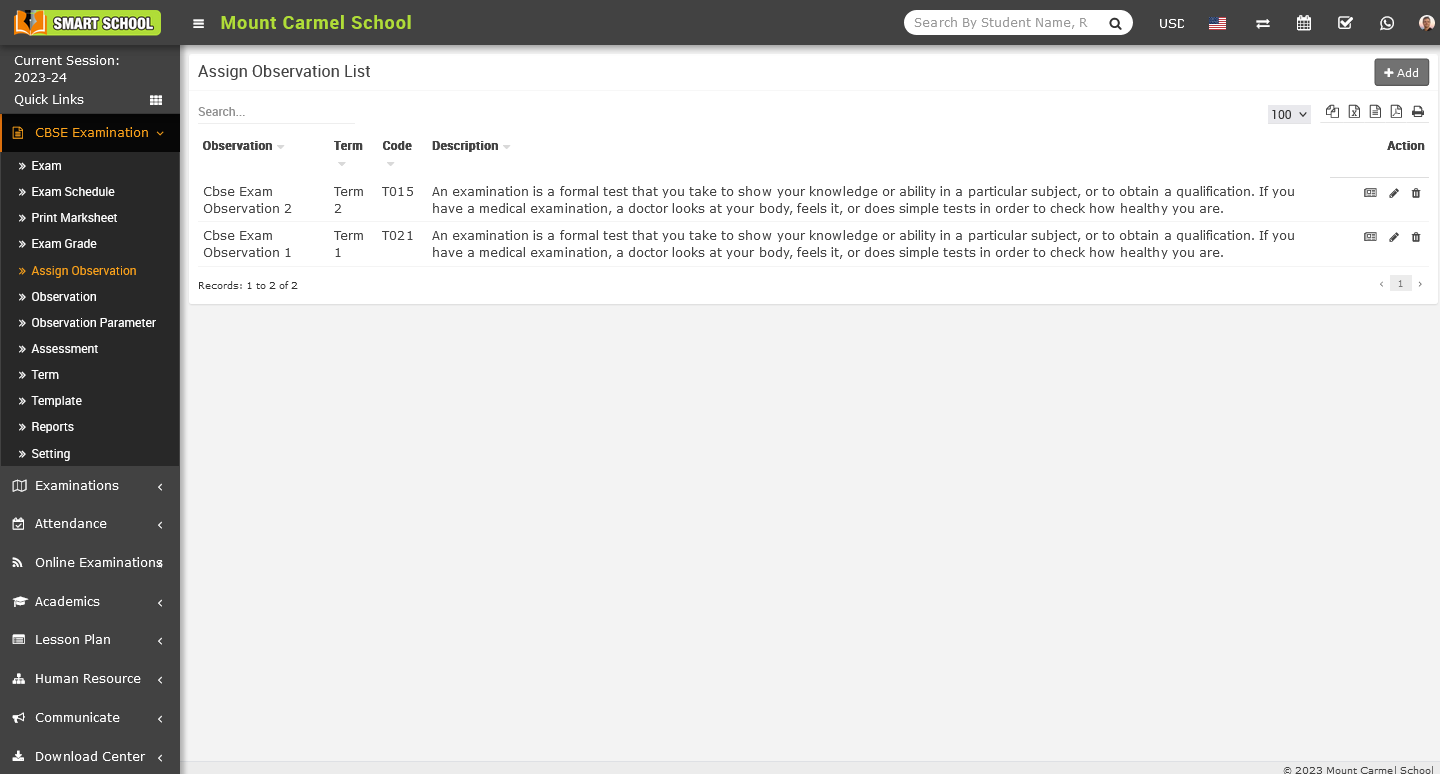
To Delete the assign observation from the list, you need to go in action column, here you can see delete icon, simply click, delete confirmation model will be open.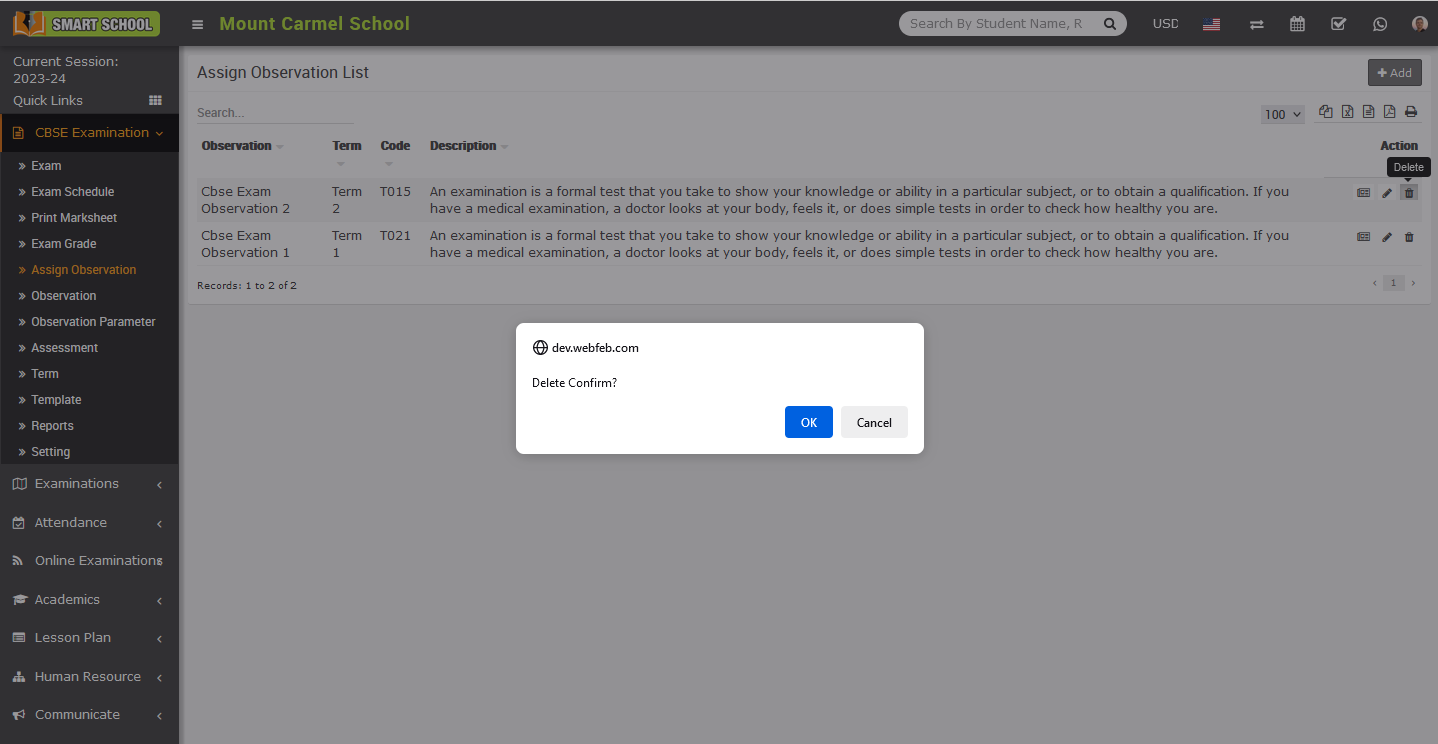
Now click on OK button, assign observation from the list successfully deleted.
How to add the exam grade in CBSE Examination?
To add Exam Grade, go to CBSE Examination > Exam Grade. After click on exam grade, the Exam Grade List will be open on the right side.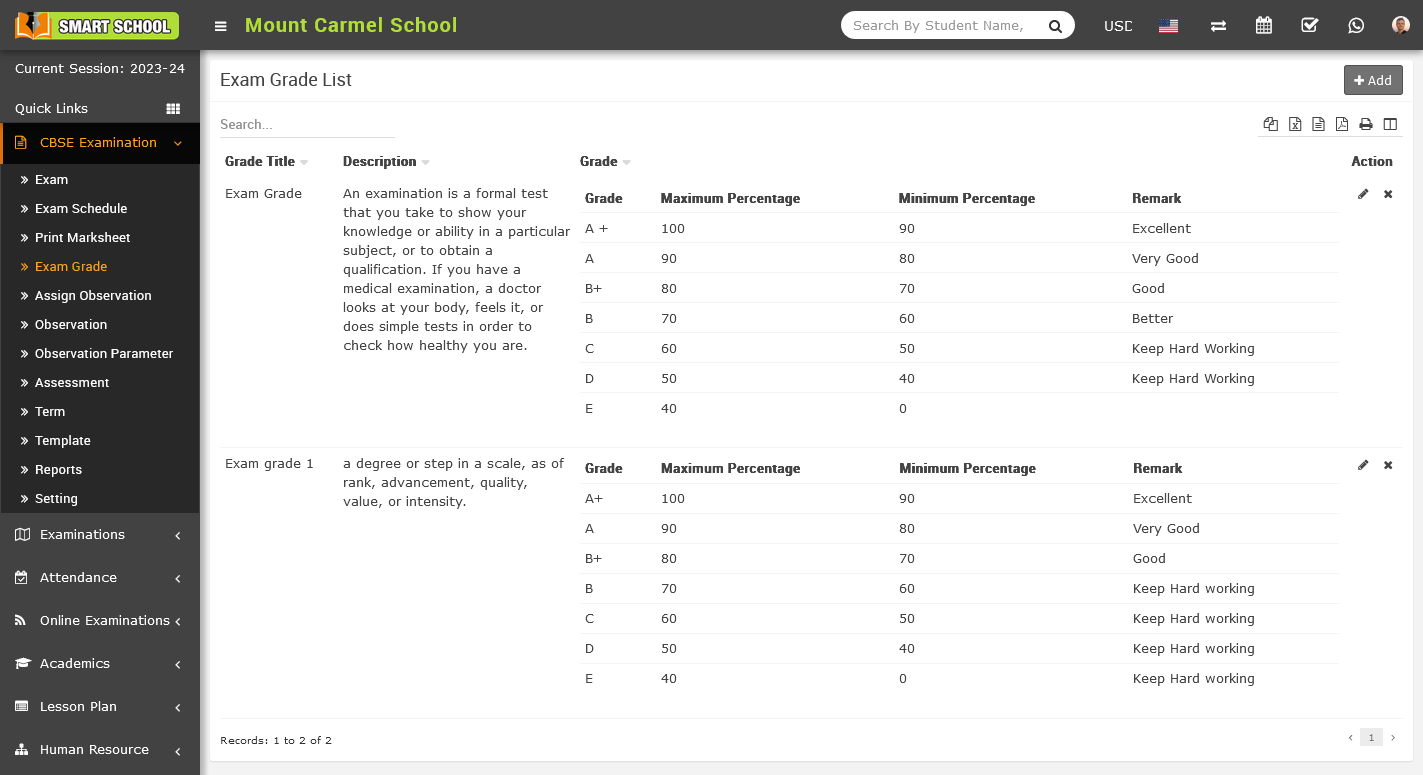
To Add Exam Grade, simply click on the Add button which is located at top right corner, Add Grade model will be open.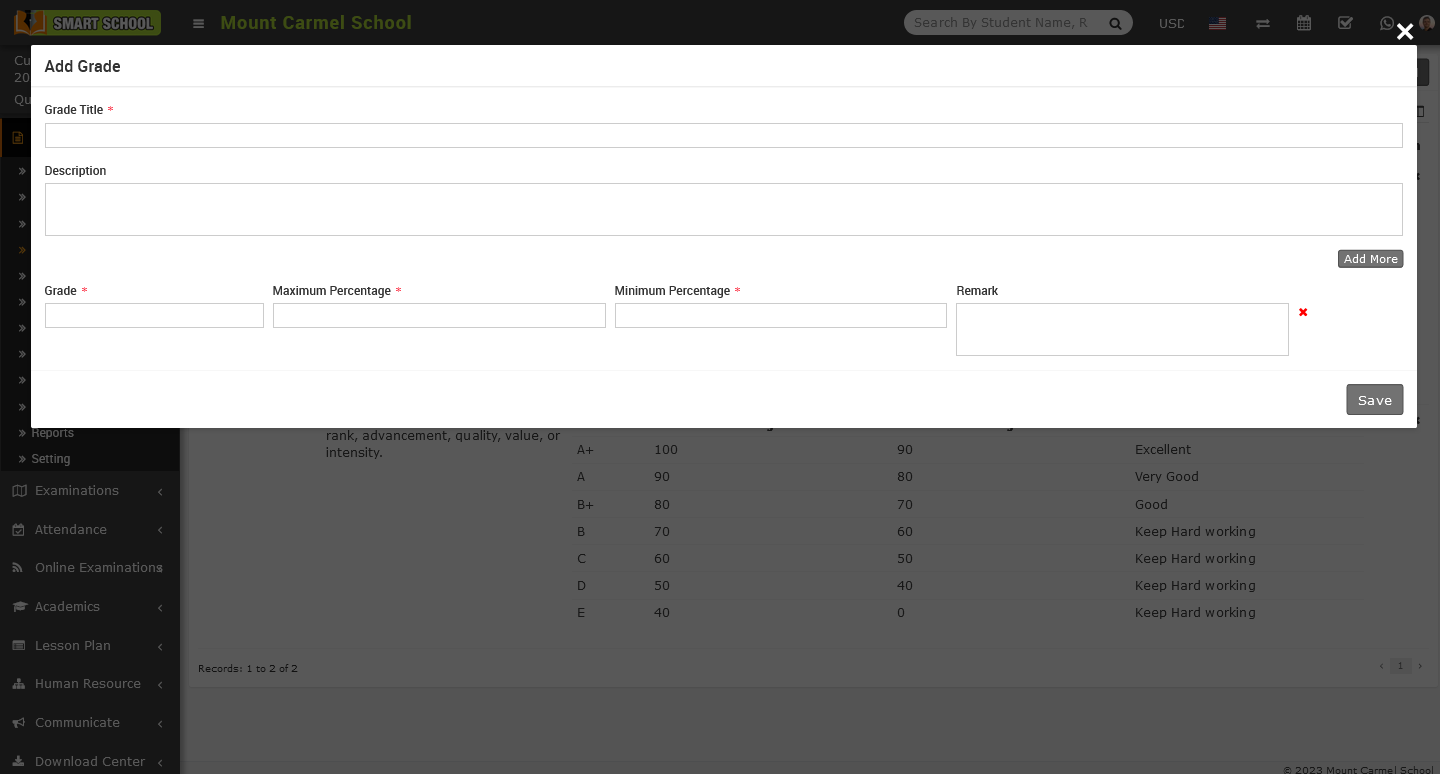
Please enter the Grade Title and Description of the Grade. Below, you will see multiple input fields. First, enter the Grade. Then, set the Maximum and Minimum Percentages for that grade. Finally, include any remarks.
You can also add the multiple input field, now click on the Add More button, multiple input field will open in below.
To Edit Grade, go to the action column, here you can see one pencil icon, just click on edit (pencil) icon, Edit Grade model will be open.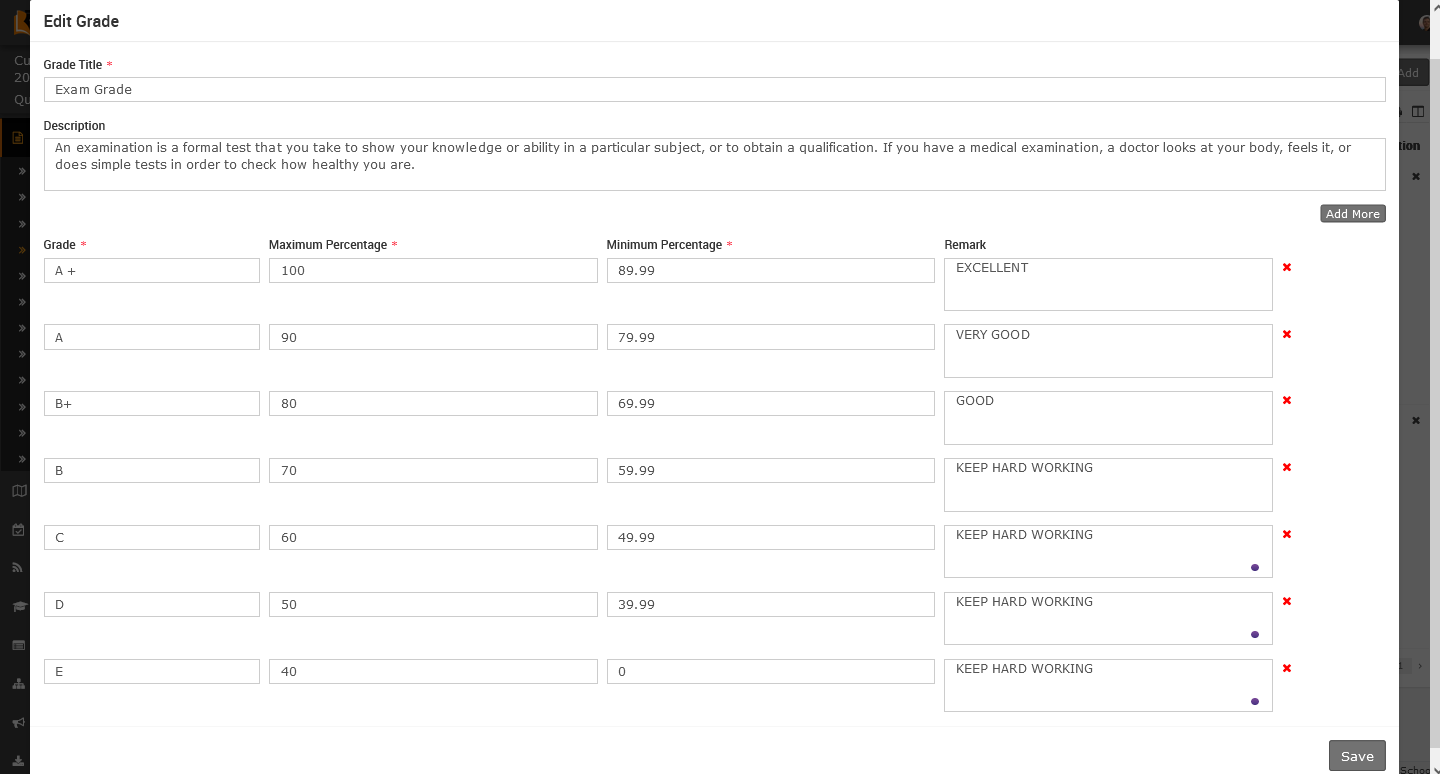
Now update the details of grade and click on save button which is showing bottom right corner, the grade details will be update successfully, and you can see them on the exam grade list.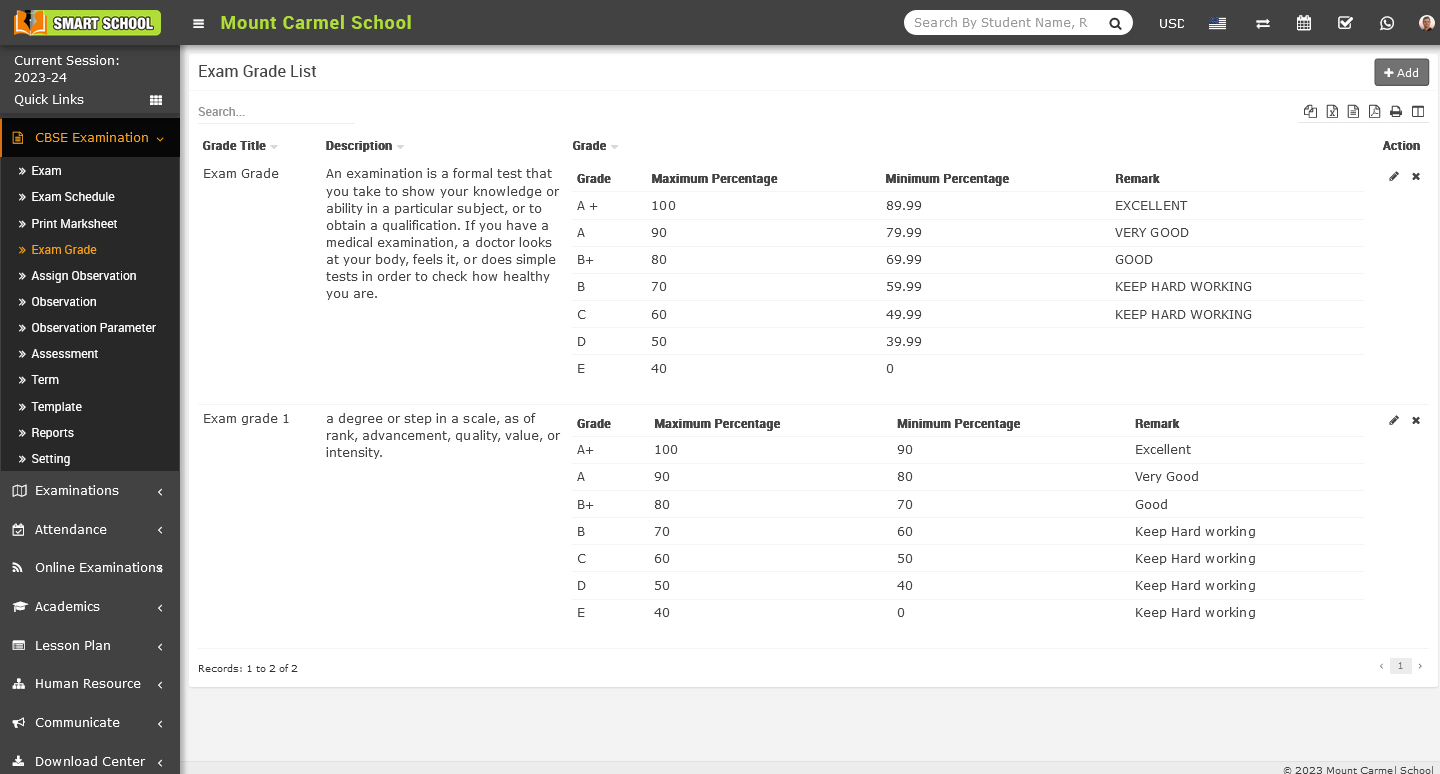
To delete the grade from the exam grade list, go to the action column, here you can see one delete (cross) icon will showing.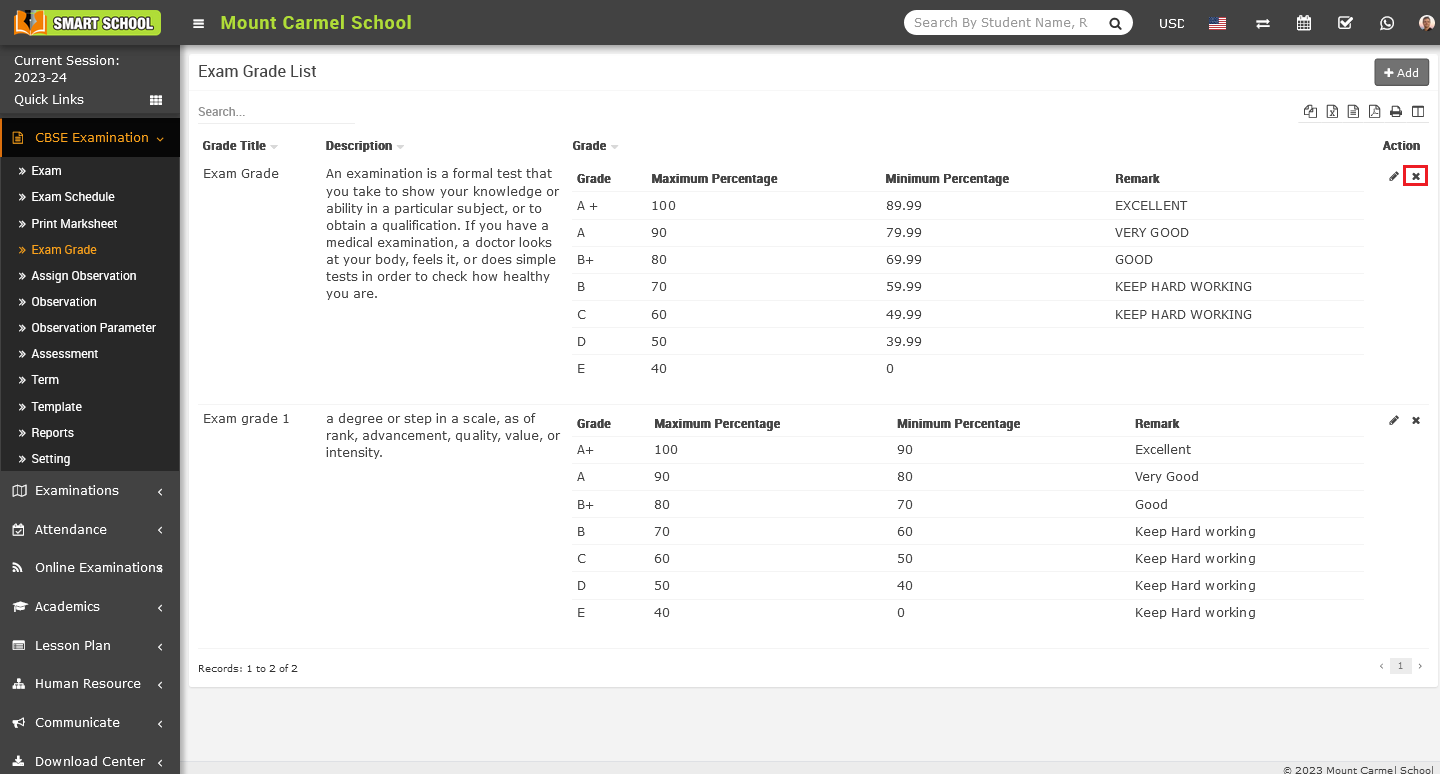
Now click on Delete icon, delete confirmation model will be open.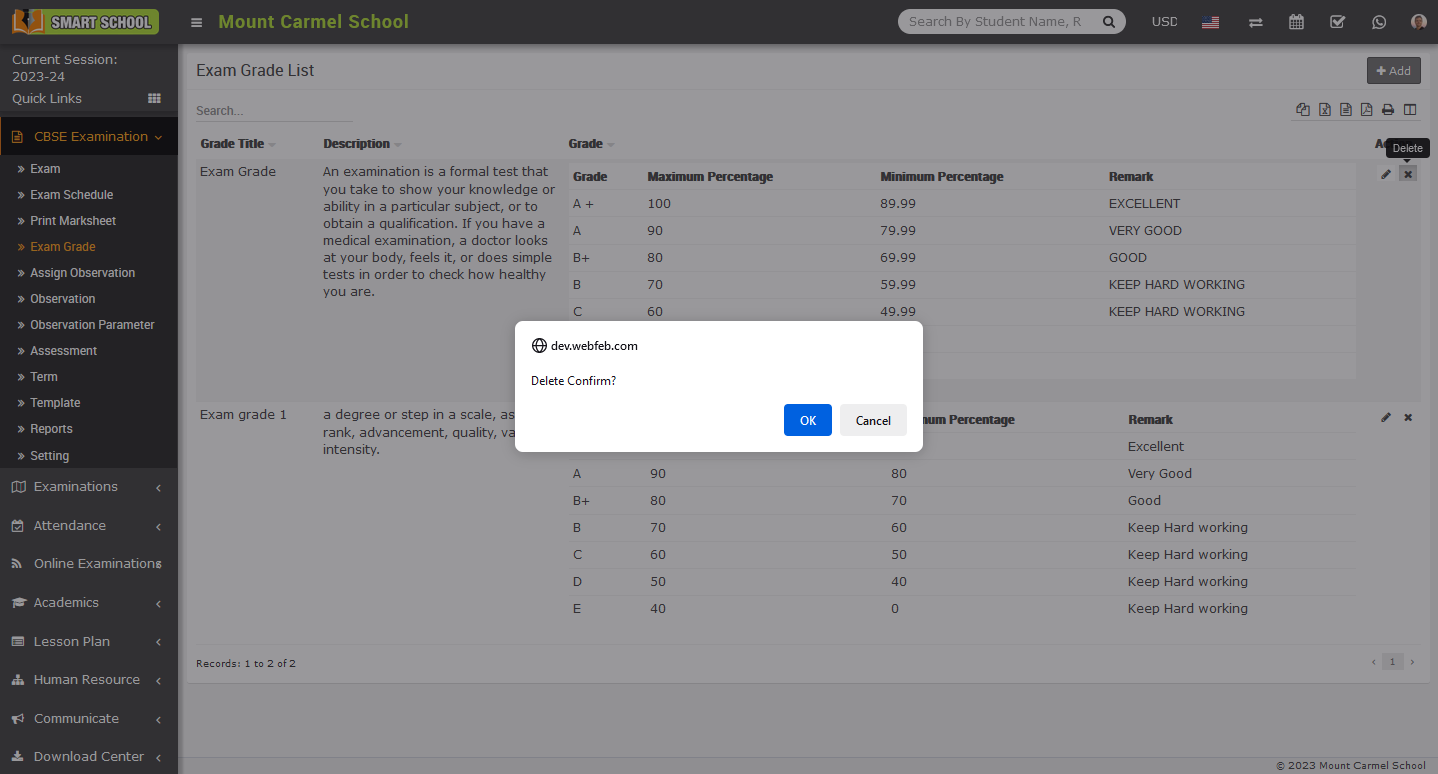
Now click on OK button, so grade will be deleted successfully from the exam grade list.
How to add the exam in CBSE Examination?
To add exam, go to the CBSE Examination > Exam. After clicking Exam, Exam List will be open on the right side.
Now on the top right corner, you can see the Add button, simply click on Add button, Add Exam model will be open.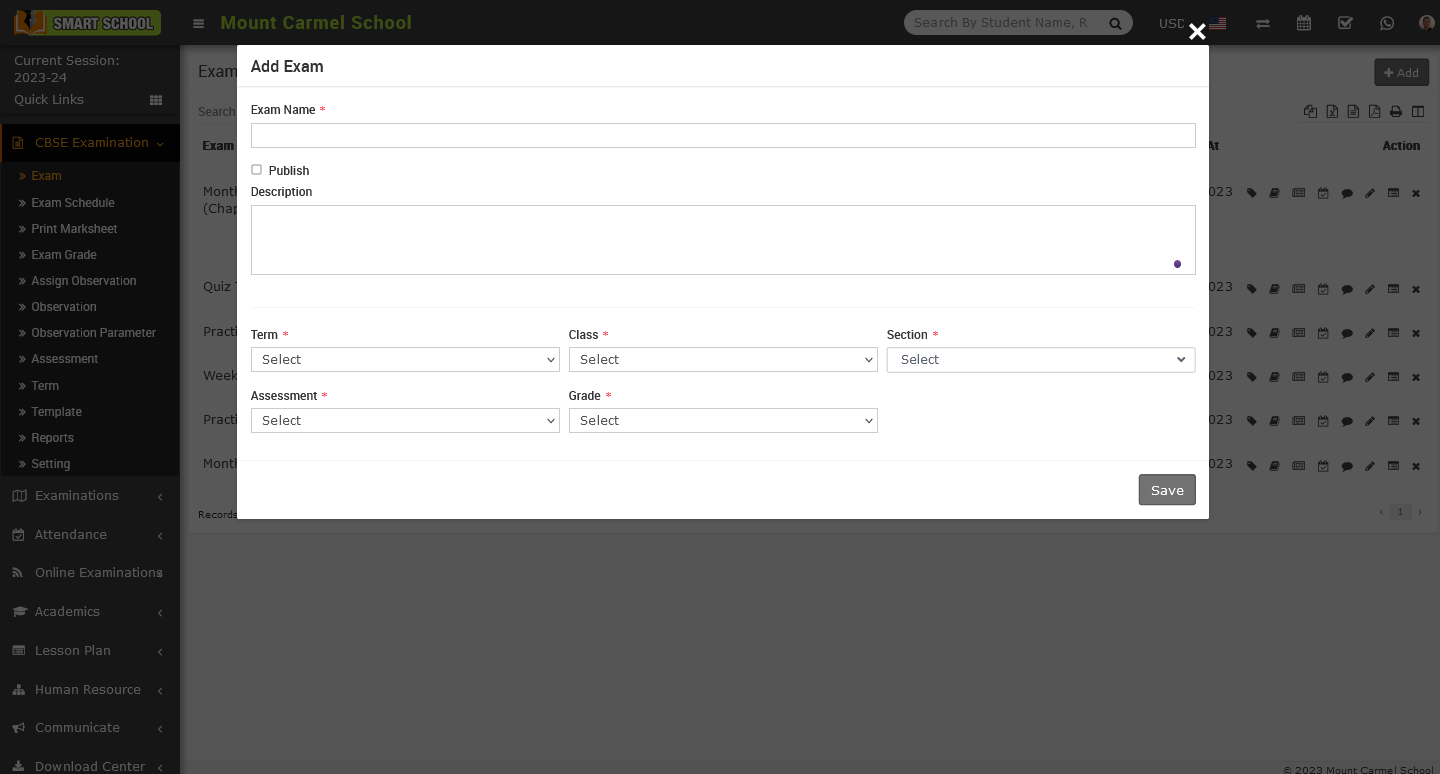
In this model, first, you need to enter the Exam Name. To publish the exam, check the checkboxes (For a recommendation, fill in all the details related to the exam first, then publish the exam. After completing the exam, you can also publish the result by checking the checkbox for publishing the result). Now provide a Description of the exam. Next, select the Term field that you have already created in the CBSE Examination > Term module. Click on the term field dropdown list to open it, and select the term you wish to use for this exam for the relevant Class and Section you have chosen. Finally, select the Assessment that you have already added in the Assessment module, and choose the preferred Grade for that exam. Then click on the save button, and the new exam will be added to the exam list.
To edit the exam, simply click on the edit (pencil) icon showing at the action column, Edit Exam model will be open.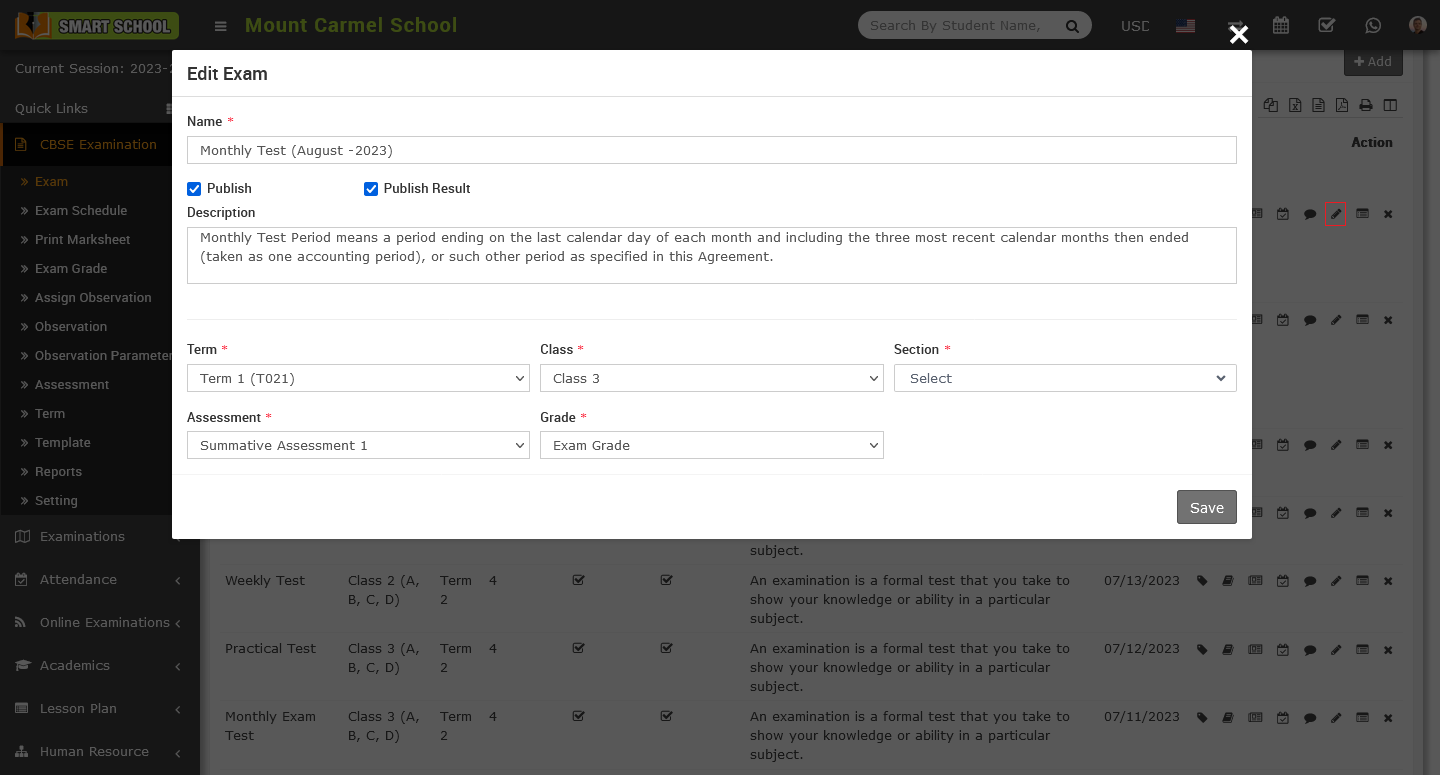
Please update the exam details as desired, then click on the save button. Your details will be successfully updated and can be viewed in the exam list.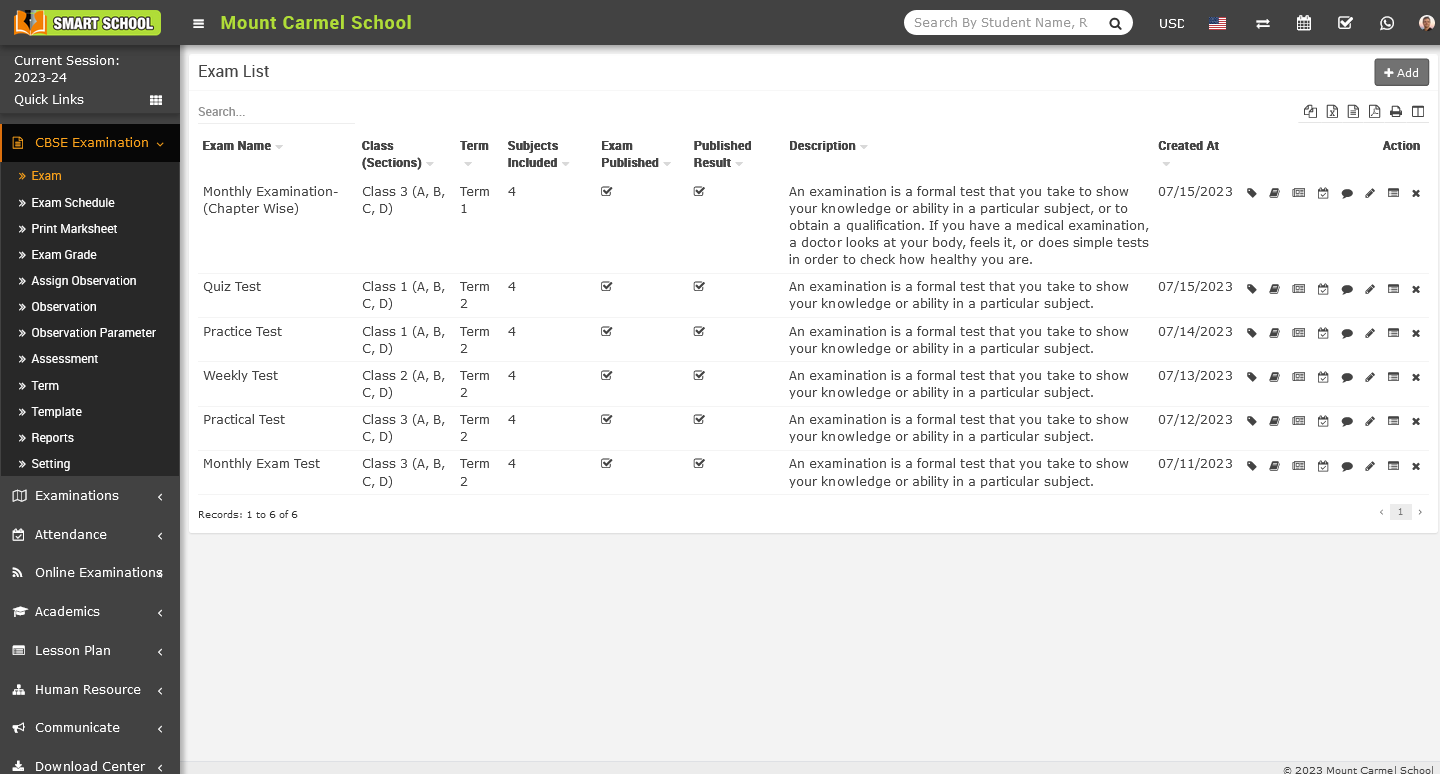
Note:- 1. Once you have created the exam and added the subjects along with all the related details, you can proceed to publish the exam by utilizing the edit icon. Simply click on the edit icon, which will open the edit exam model. Within this mode, you can check the Publish Exam checkbox. By checking this checkbox and click on save button, your exam will be successfully published, and it will become visible in the exam schedule for both superadmin and students.
2. For Publish Result, you can proceed to publish the results by utilizing the edit icon. Simply click on the edit icon, which will open the edit model. Within this model, you can check the Publish Result checkbox. By checking this checkbox and click on save button, your results will be successfully published, and it will become visible in the Exam Results section from students side. On the superadmin side, you can access the results in the reports module or download the marksheet from the print marksheet module.
How to assign / view student in CBSE Examination?
To Assign / View Student on exam, go to CBSE Examination > Exam, Exam List will be open on the right side, and action column displayed on the right side of the page, while hovering the mouse, the first icon will be Assign / View Student.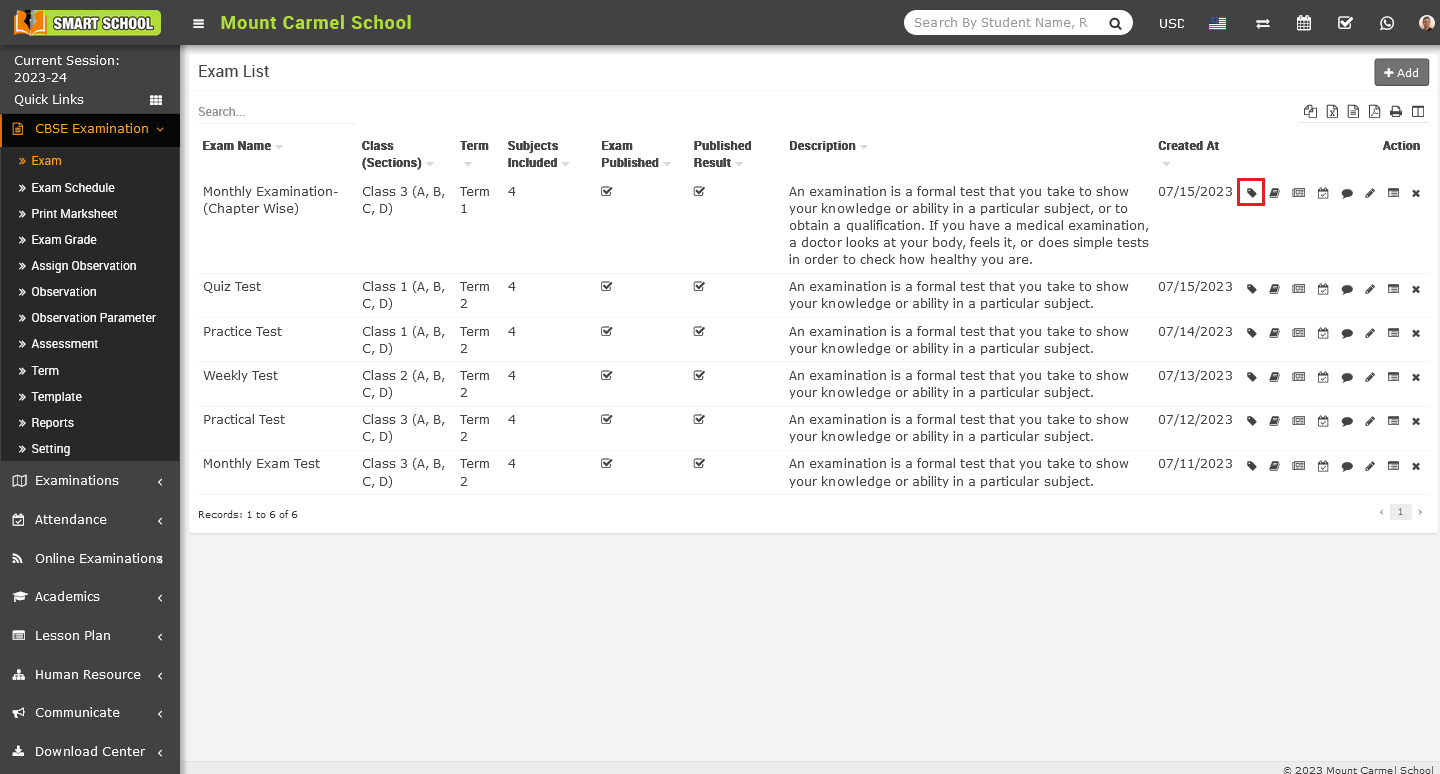
When click on this icon, Assign / View Student model will be open.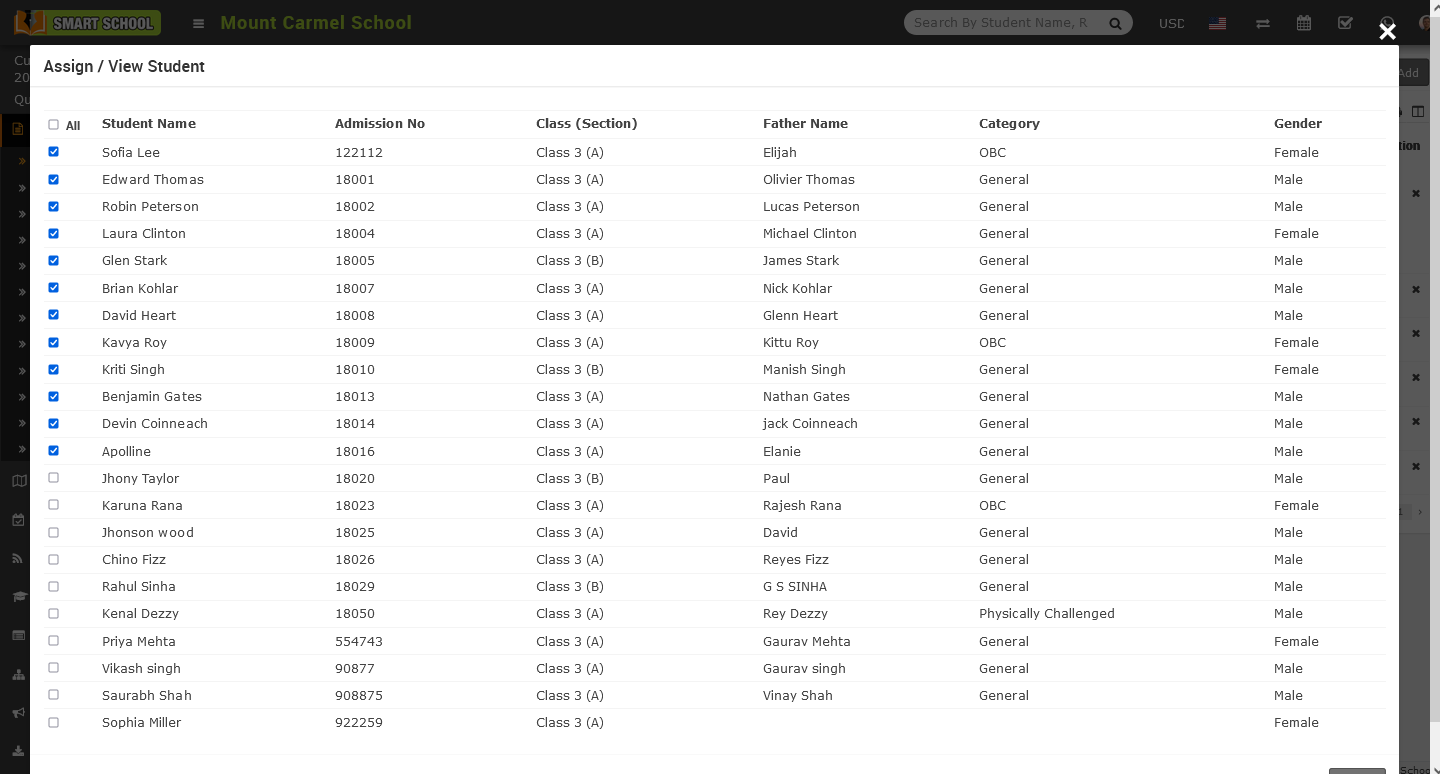
To Assign / View Student model, you can access the student list along with their details. By checking or unchecking the corresponding checkbox, you can assign or unassigned students for the exam. After making the necessary changes, click on the save button to successfully assign or unassigned the exam to the student.
How to add exam subjects in CBSE Examination?
To add a subject, go to CBSE Examination > Exam. On the right side, in action column, you will see multiple icons. The second icon is for Exam Subjects.
Simply click on that icon, Add Exam Subject model will be open.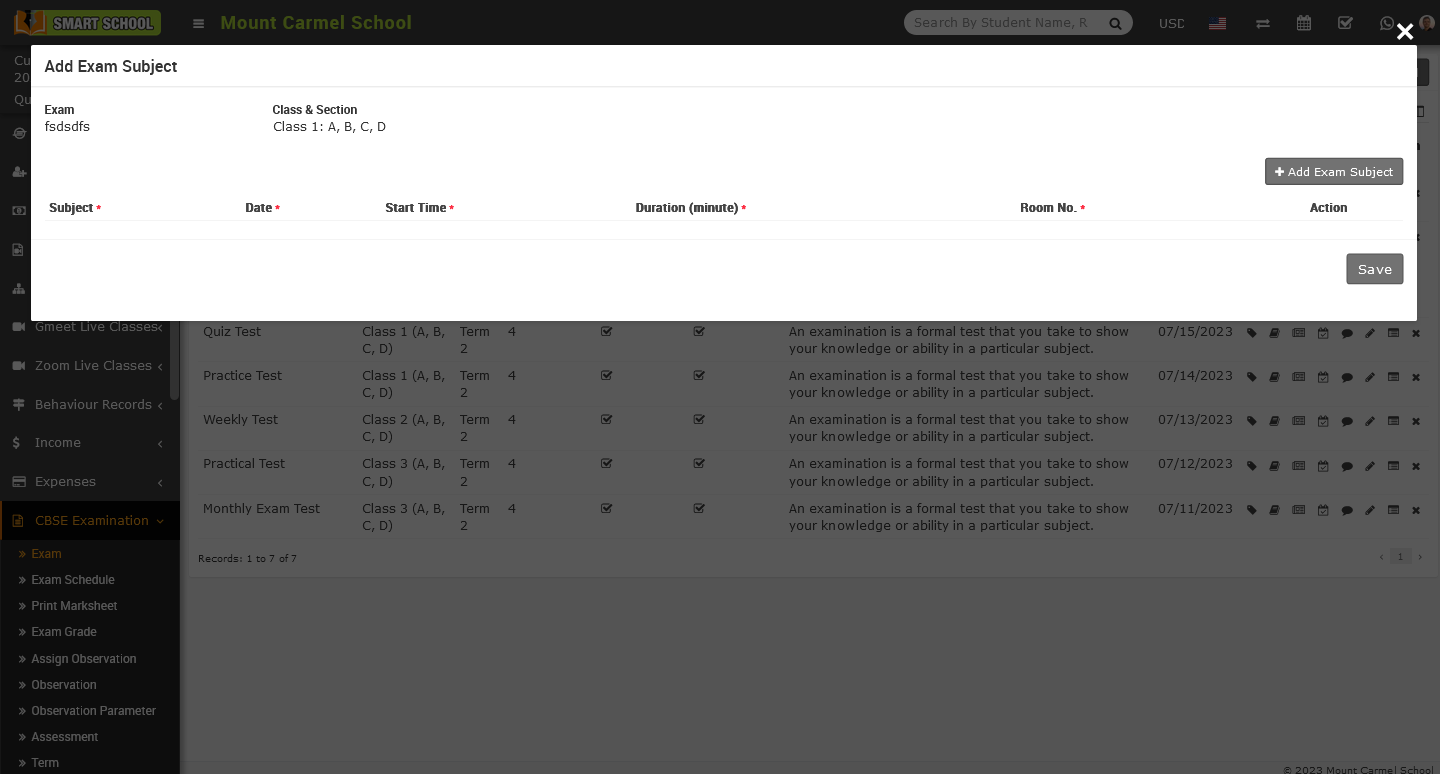
In this model you can see the details as exam name and class, section, now for add the exam subject, Add Exam Subject button showing at the right side of the model, simply just click on this button to open the multiple field for adding subject.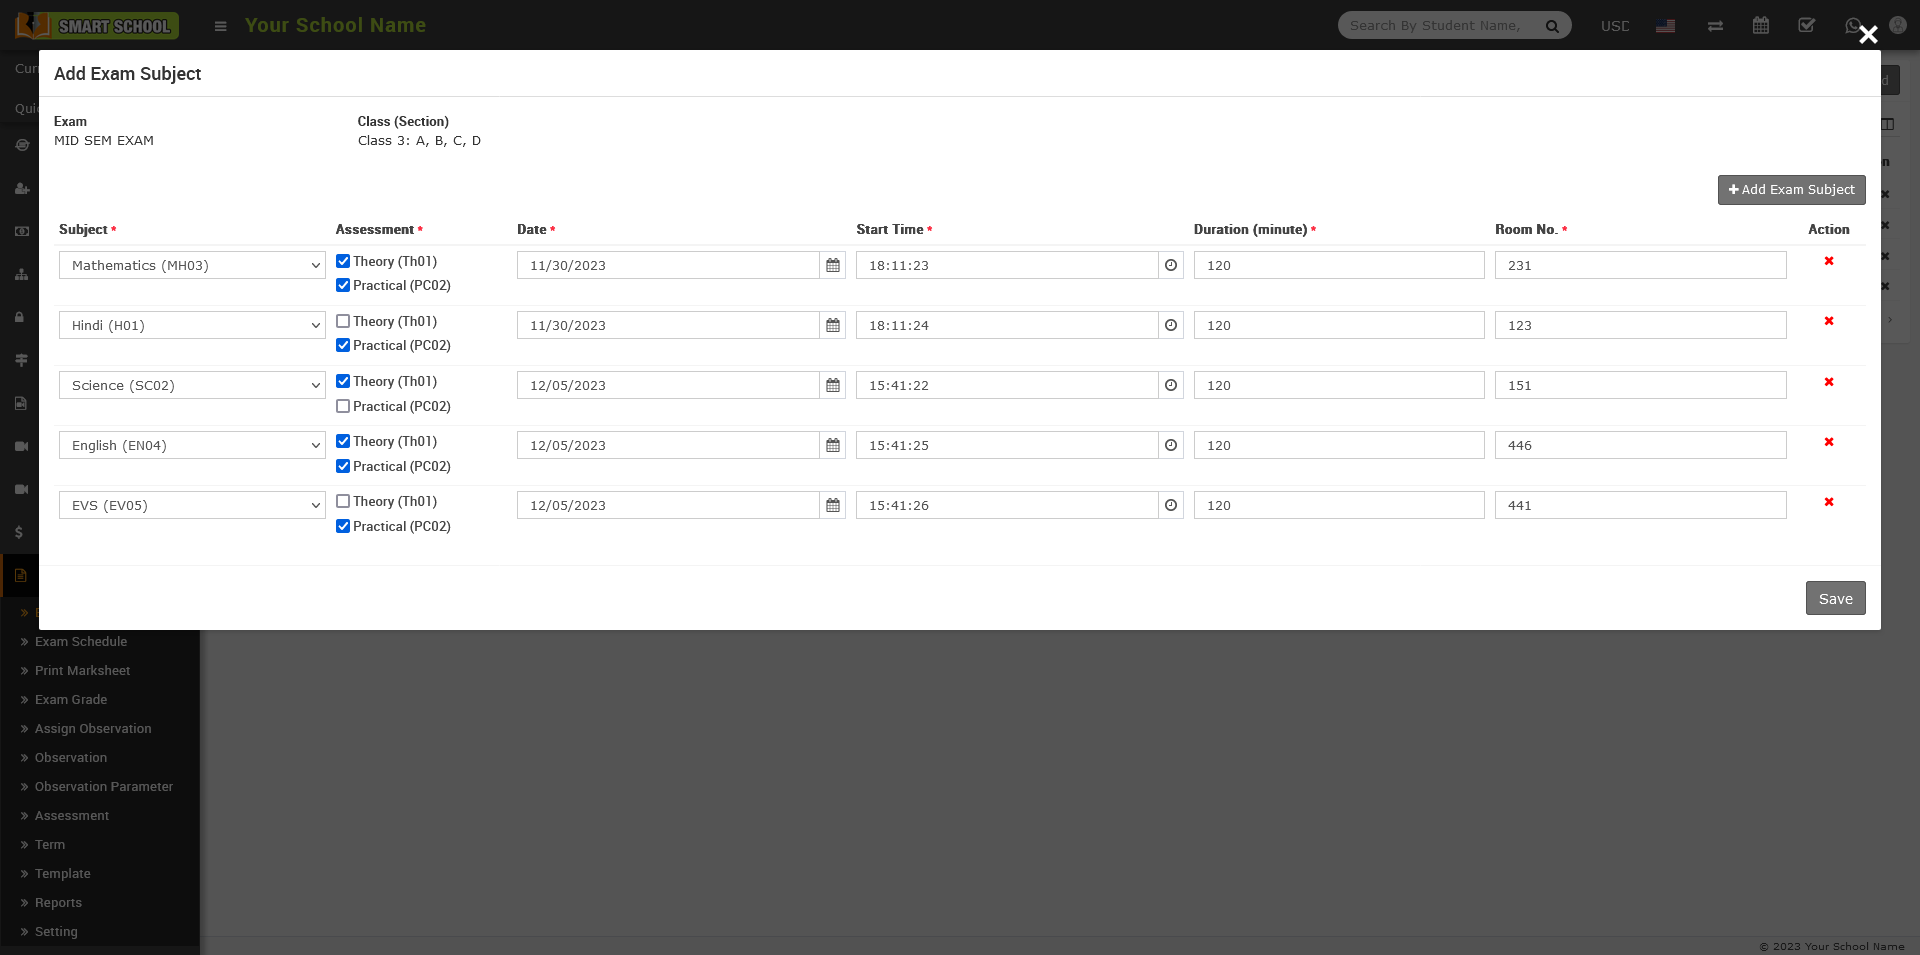
To add a subject, click on Select, and a drop-down menu will appear where you can view the subject list. Simply choose one of the subjects and In the Assessment column, you can find options for both theory and practical, each accompanied by its respective checkbox. When you select the checkbox, the marks for both theory and practical subjects will be displayed in the marksheet. If you do not check the checkbox for either theory or practical, the marks will not be shown in the marksheet. Now, select the Exam Date, pick the Start Time, enter the Duration in minutes, and finally, choose the Room number where the examination will be held. Repeat this process for all subjects, then click on the Save button to successfully add your subjects. If you want to remove any of these fields, click on the Red Cross icon located on the right side of the model.
Note :- When you creating two or more exams, such as Exam One and Exam Two, and linking them, make sure to add the same subject to both exams. If you don't keep the same subject in both exams, the marksheet may appear irrelevant when you print it.
How to check exam schedule in CBSE Examination?
To Exam Schedule, go to the CBSE Examination > Exam Schedule, exam schedule page will be open on the right.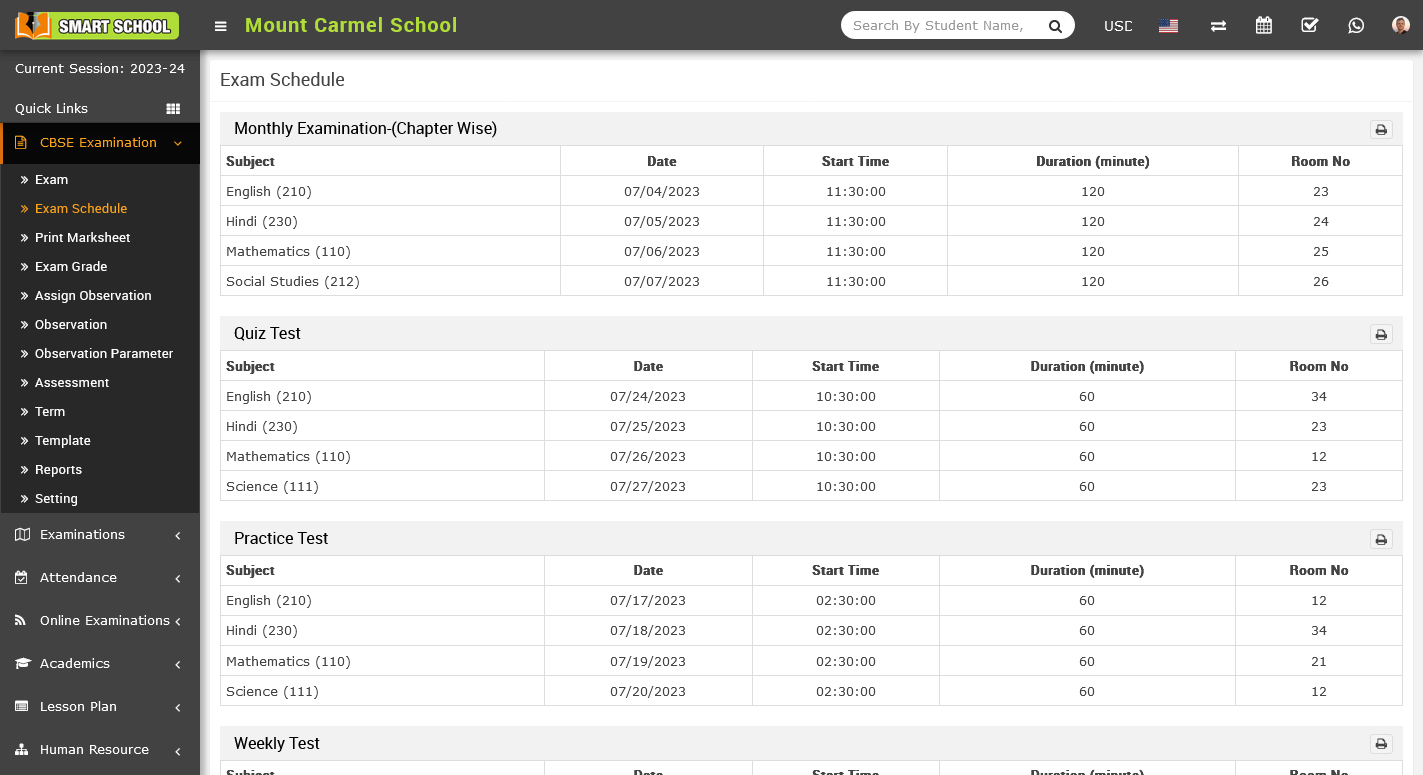
On this page, you can view the recently created and published upcoming exam schedule from the exam module. The exam schedule provides information about the exam, such as the number of subjects, exam dates, start times, durations, and room numbers.
How to add marks in CBSE Examination?
To add the marks, go to the CBSE Examination > Exam. Exam list will be open on the right side, now in action column, you can see the Exam Marks icon which is showing in beside of exam subjects.
Simply click on the Exam Marks icon, Exam Subject model will be open.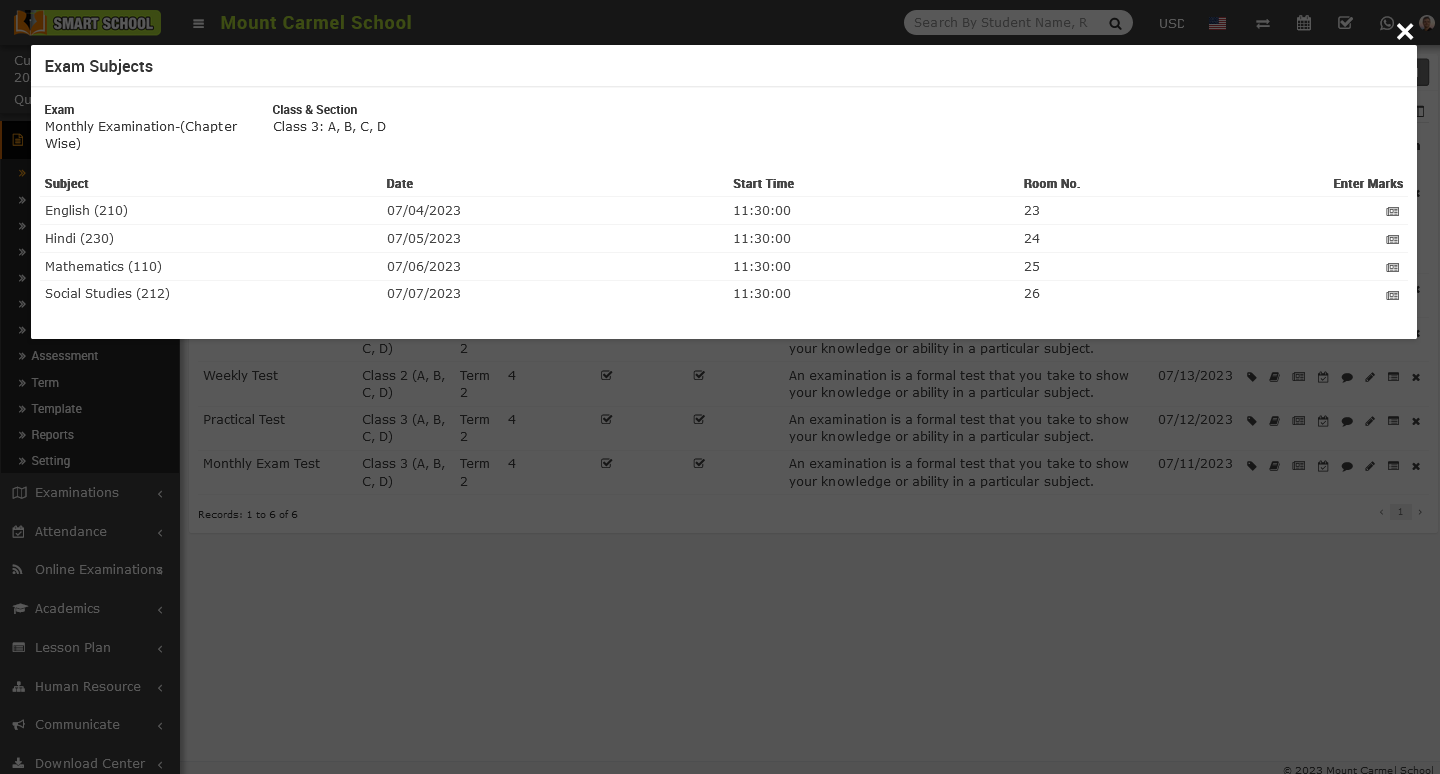
On this model, you can view the details of the Exam, Class, Section, and all the subjects with their respective Dates, Times, and Room numbers that you previously added through the Add Exam Subject feature. Additionally, you can now see the Enter Marks column where you can add marks subject-wise. To do so, simply click on the icon corresponding to the subject for which you want to enter marks. For example, if you click on the first icon for the Hindi subject, the Enter Hindi Marks model will appear.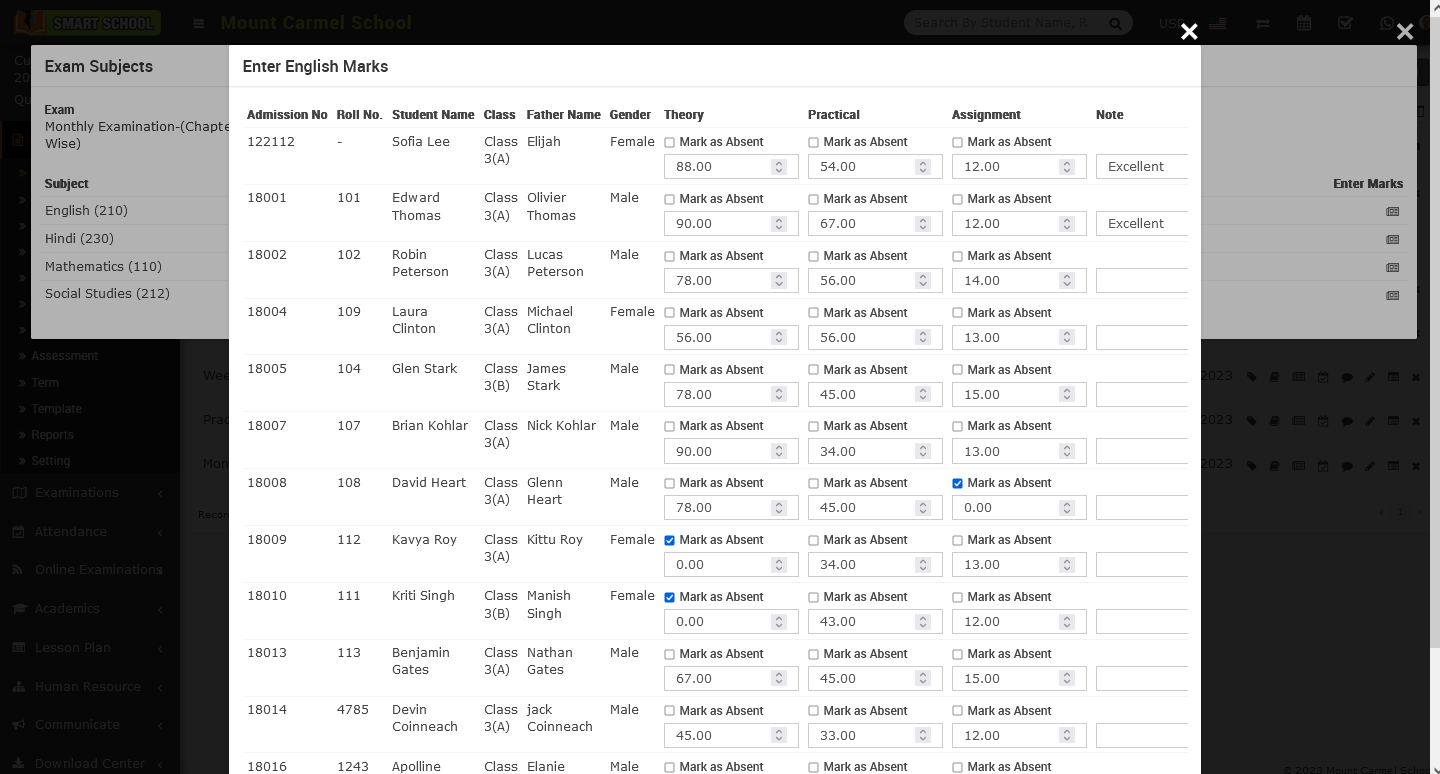
In this model, you can view multiple students for a particular subject along with their Admission Number, Roll Number, Father's Name, and Gender. You can also see the Theory and Practical columns with corresponding input fields. Simply enter the marks based on the students' performance along with any notes you want to include regarding their performance. If a student was absent during the relevant exam, simply check the Mark As Absent checkbox located above the input field and finally click on the save button and marks will be save for that subject successfully. Please follow the same process to enter the marks for all subjects for the student.
How to add attendance and teacher remark in CBSE Examination?
To add the Attendance, go to the CBSE Examination > Exam. On the exam list, in action column you can see the Exam Attendance icon beside of exam marks.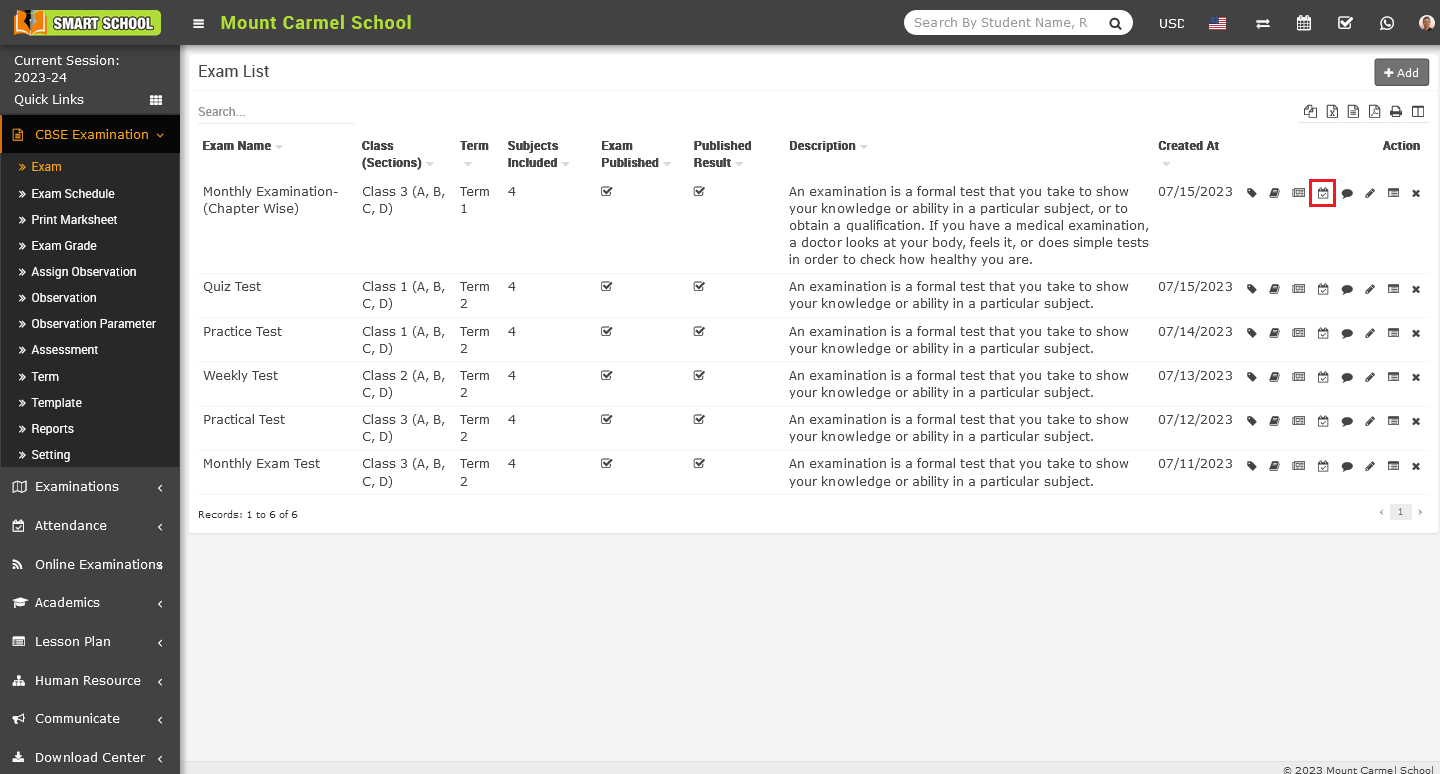
Now click on the exam attendance icon, Exam Attendance model will be open.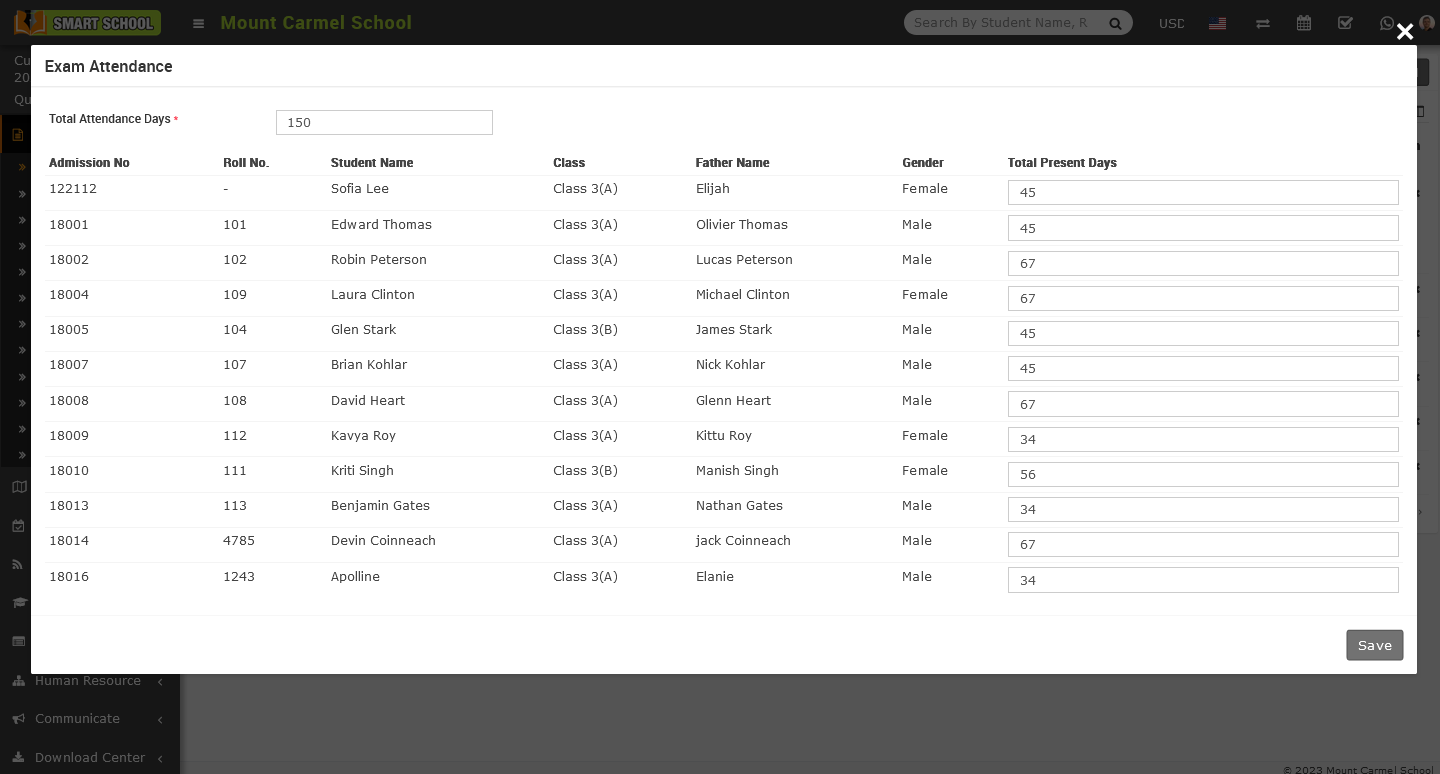
On this model, you will first see Total Attendance Days, which indicates the number of days the school has been in session. Below that, you can view student details such as Admission Number, Roll Number, Student Name, Class, Section, Father Name, Gender, and a field for Total Present Days. Enter the number of days the student was present in school and click on the save button to mark their attendance successfully.
To add Teacher Remark, go to the CBSE Examination > Exam. On the exam list, in action column you can see the Teacher Remark icon beside of Exam Attendance.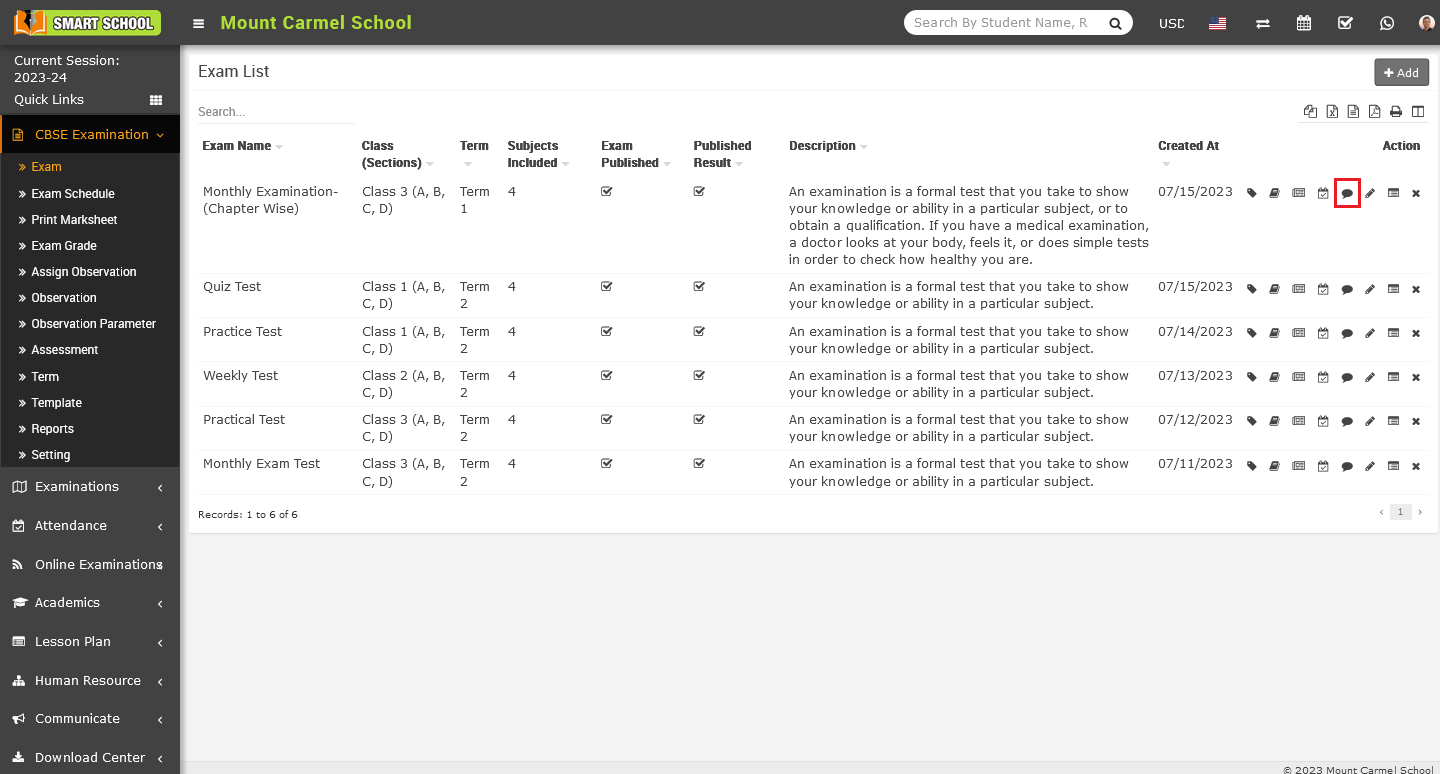
Now click on the Teacher Remark icon, Teacher Remark model will be open.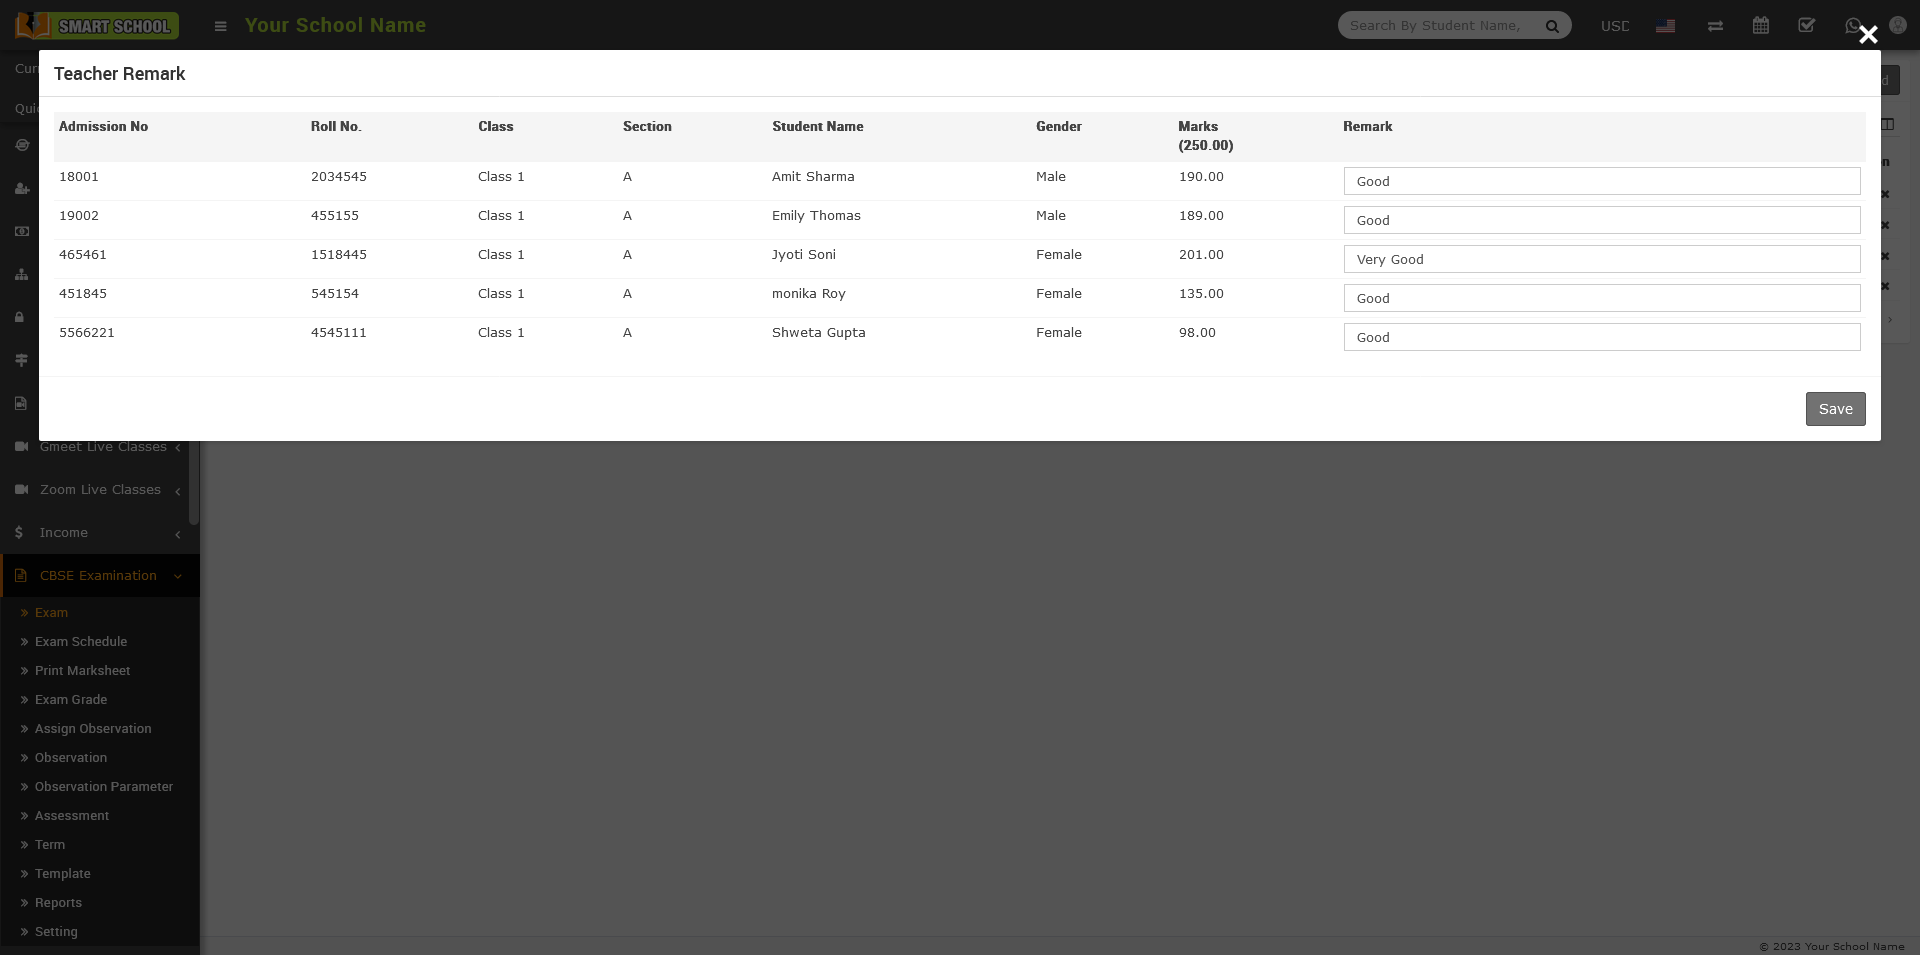
On this model, you can view student details such as Admission Number, Roll Number, Class, Section, Student Name, Marks, Gender, and the last column will be for Remarks. The teacher can give remarks to the students based on their performance in the exam and click on the save button and the remark for the student will be successfully saved.
How to generate the exam wise rank in CBSE Examination?
To Generate the Exam Wise Rank , first you need to go to CBSE Examination > Exam.
On the right side, you can see the Exam list. Within that list, on the right side, there is an action column where you can find the delete icon. Additionally, beside the delete icon, there is also the Generate Rank icon available.
Now click on Generate Rank icon, Generate Rank page will be open. On this page, you can view the list of student details, including the student's admission number, student name, class, and father’s name, date of birth, gender, mobile number, and rank. Initially, the rank column will be blank until you generate the rank.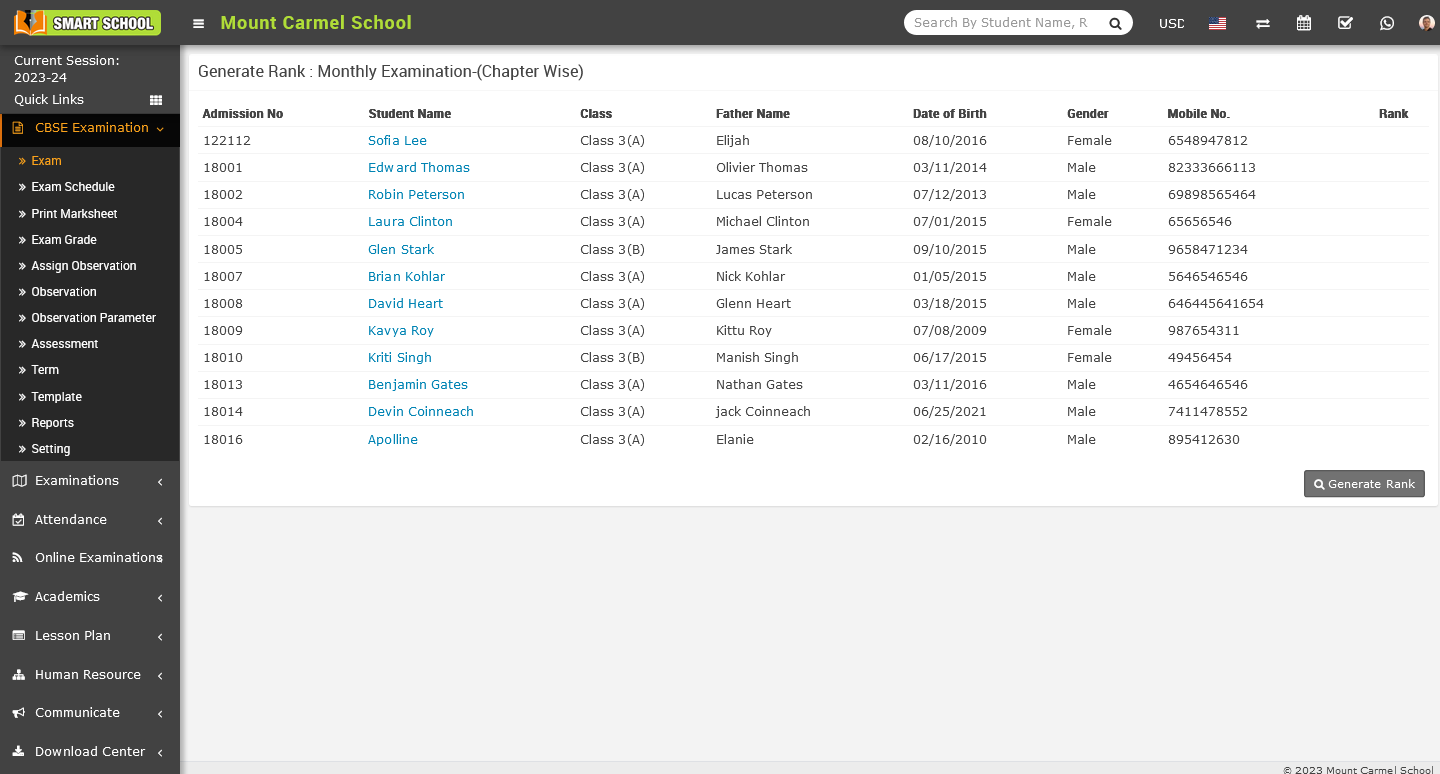
To generate the rank, simply click on the 'Generate Rank' button located in the bottom right corner. Once generated successfully, you will be able to see the rank in the rank column. Additionally, a message stating 'Rank has been generated, further you can update the regenerated rank' will be displayed above.
Note : - This rank will show as exam wise and you can also check this rank from the student side CBSE Examination > Exam Result.
How to add the template in CBSE Examination?
Adding a template for the marksheet is the process of designing or customizing the marksheet according to your examination pattern. With the help of this customization, you can add or remove fields based on your exam.
To add the Template, go to the CBSE Examination > Template. After click on the template, template list will be open on the right side.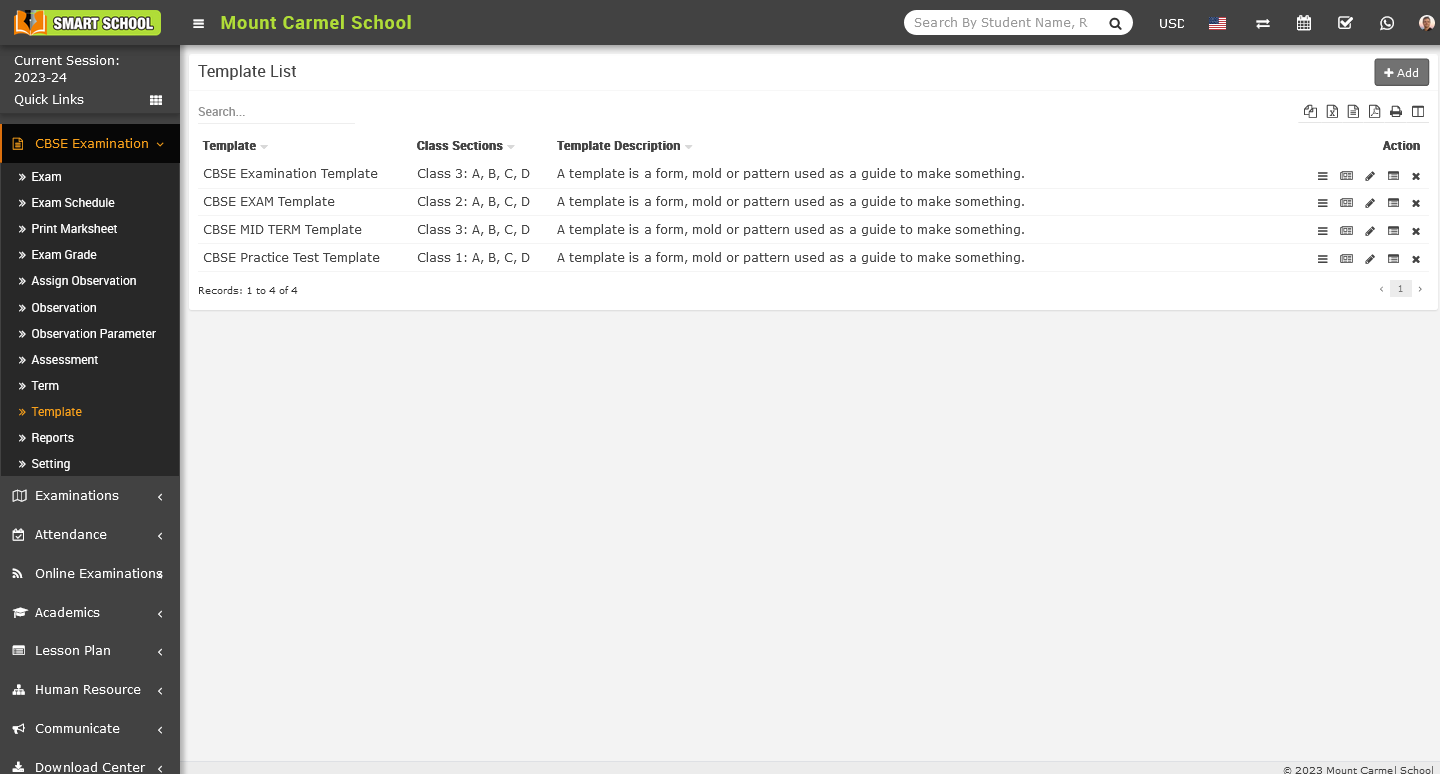
Now in the template list page, add button showing at the top right corner, simply click on the Add button, Add template model will be open.
In Add Template model, first enter the template name, then select the class and section. Next, select the marksheet type, whether you want the marksheet view to be landscape or portrait, now enter the school name, exam centre, printing date, and upload the header image for the marksheet. Add the footer text and below it, You will see multiple fields to upload files, such as the left sign, middle sign, and right sign. Upload the background image for the marksheet and write a description about the template.
Below the template description, you will see multiple toggle buttons, such as Name, Father Name, Mother Name, Exam Session, Admission Number, Photo, Class, Section, Date of Birth, Teacher Remark, etc.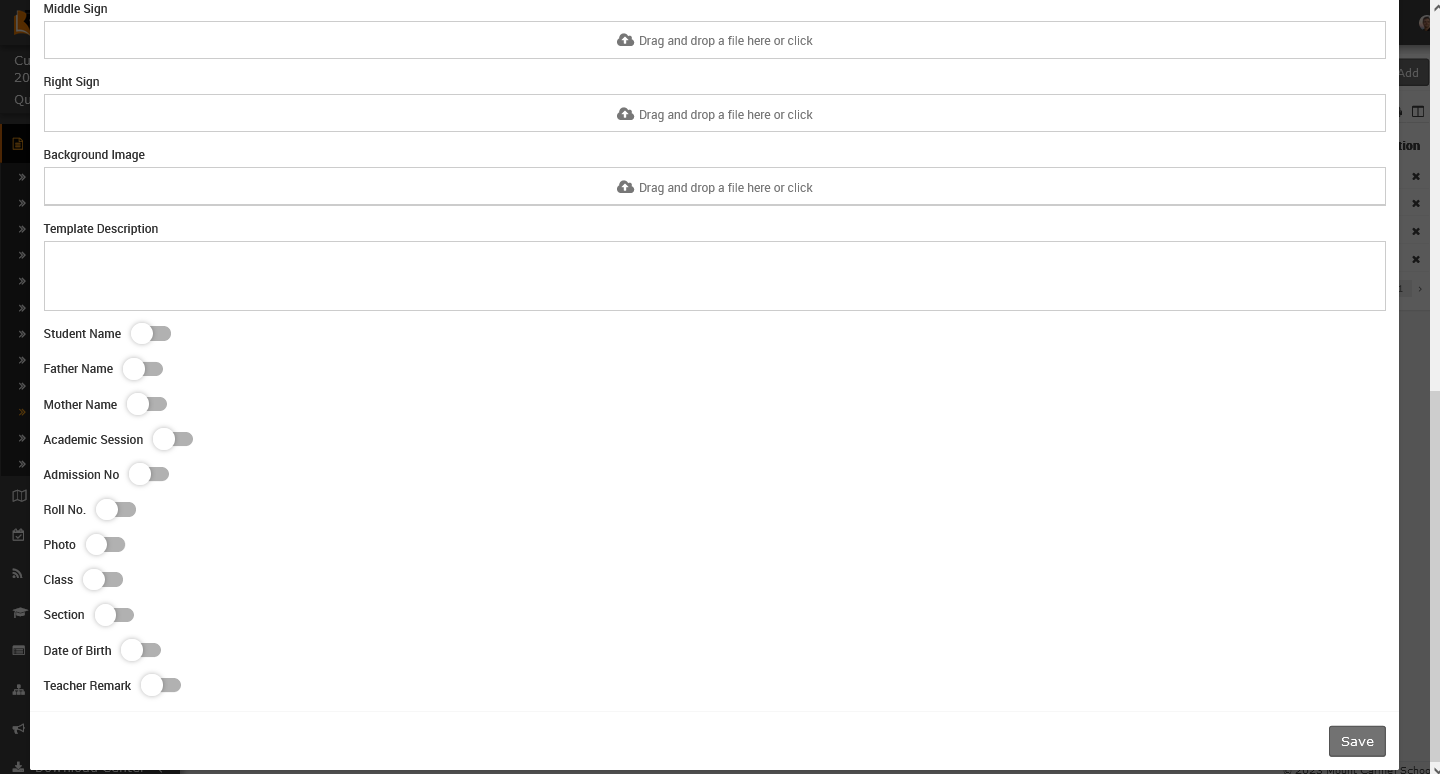
Using these buttons, you can enable or disable these fields so that if you don't want to print a certain field name, it will not be printed until you enable the button. And finally click on the save button, so template will be save in template list successfully

To Edit the template, go to the action column, here you can see one pencil icon.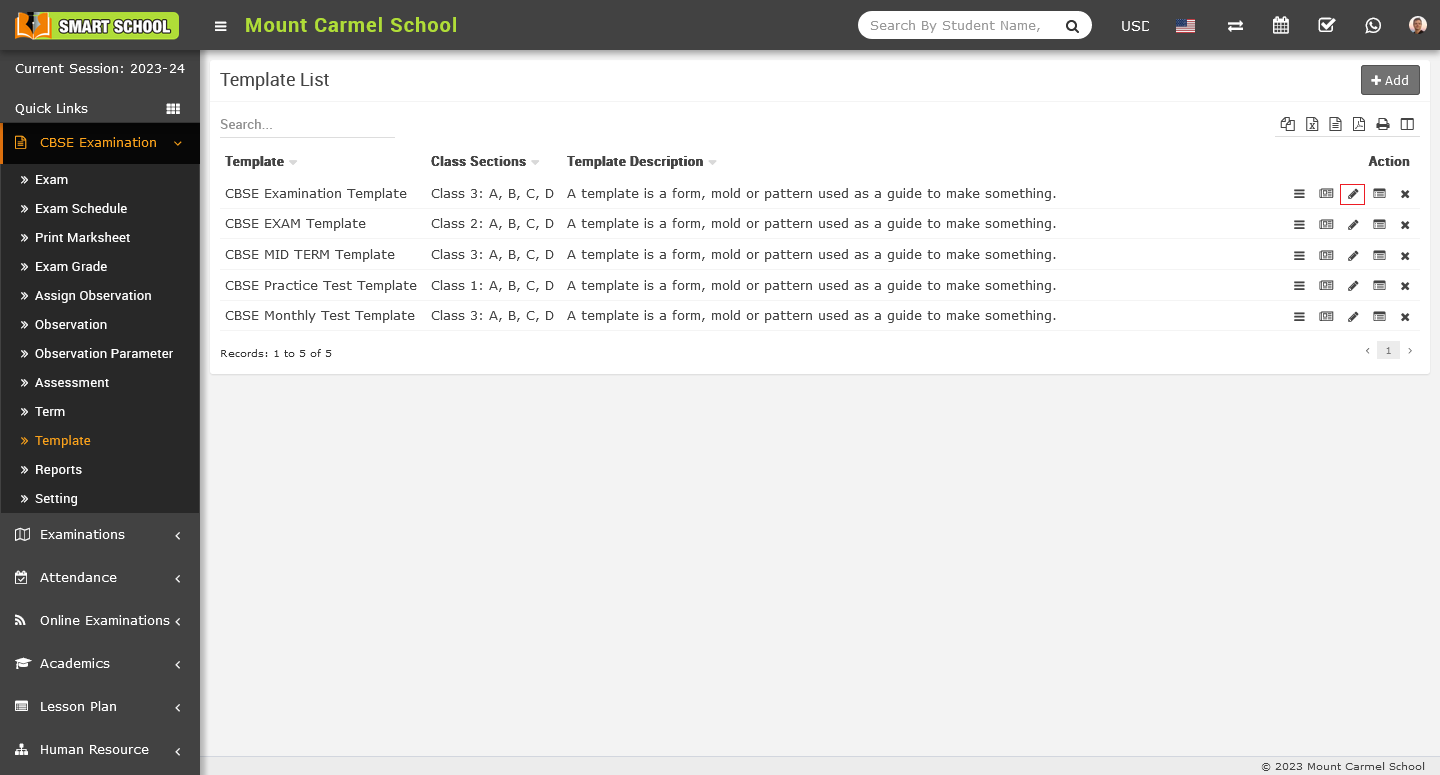
Simply click on that icon, Edit Template model will be open.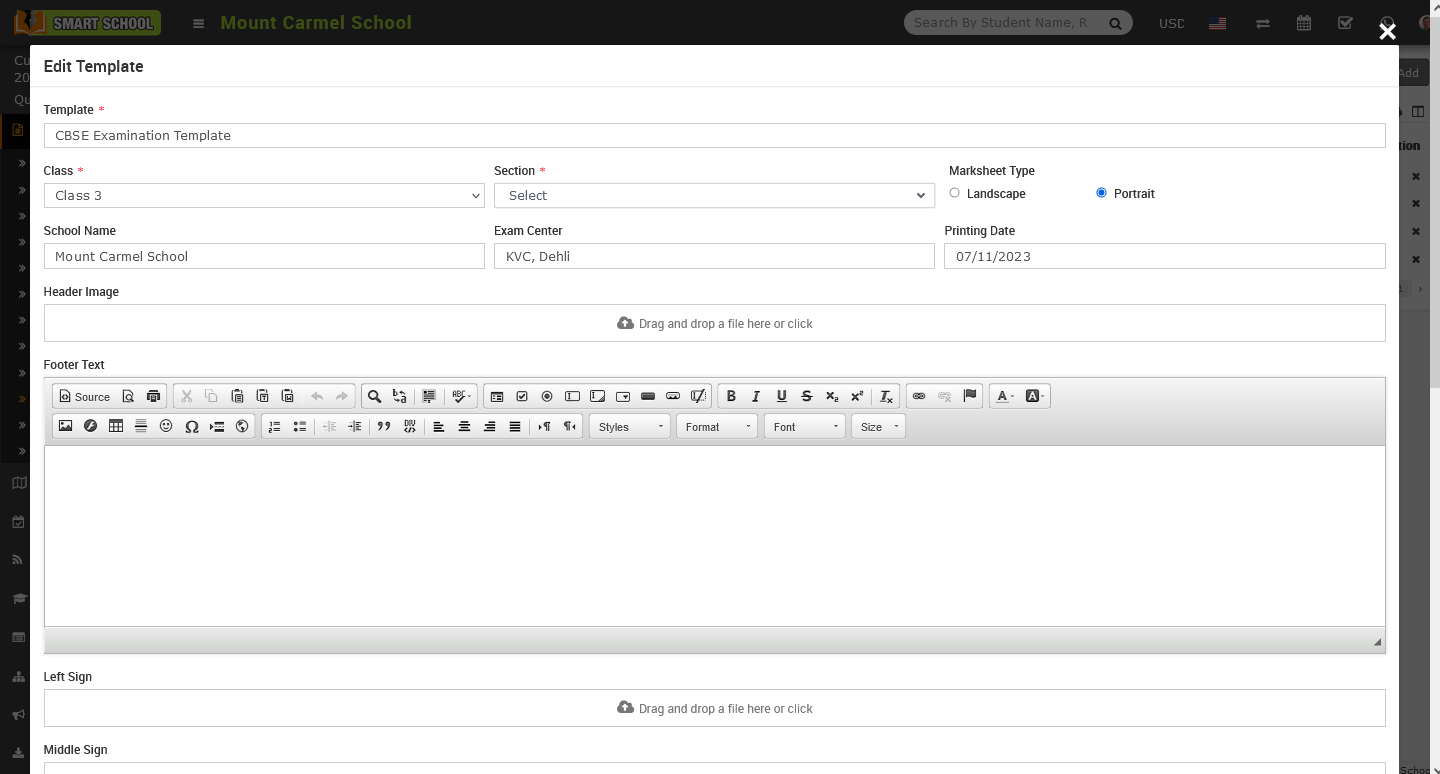
Here you can update the details of the template based on the marksheet then click on the save button, update successfully save in the template list.
To Delete the Template, go to the template list, at the right side in action column you can see the one cross icon is available.

Simply click on that icon, delete model will be open.
Now, click on ok button, template will be deleted successfully.
To View the Template, go to the action column on the right side of the template list, here first icon is for the template view or marksheet view which you created previously.
Simply click view icon, template of the marksheet will be open.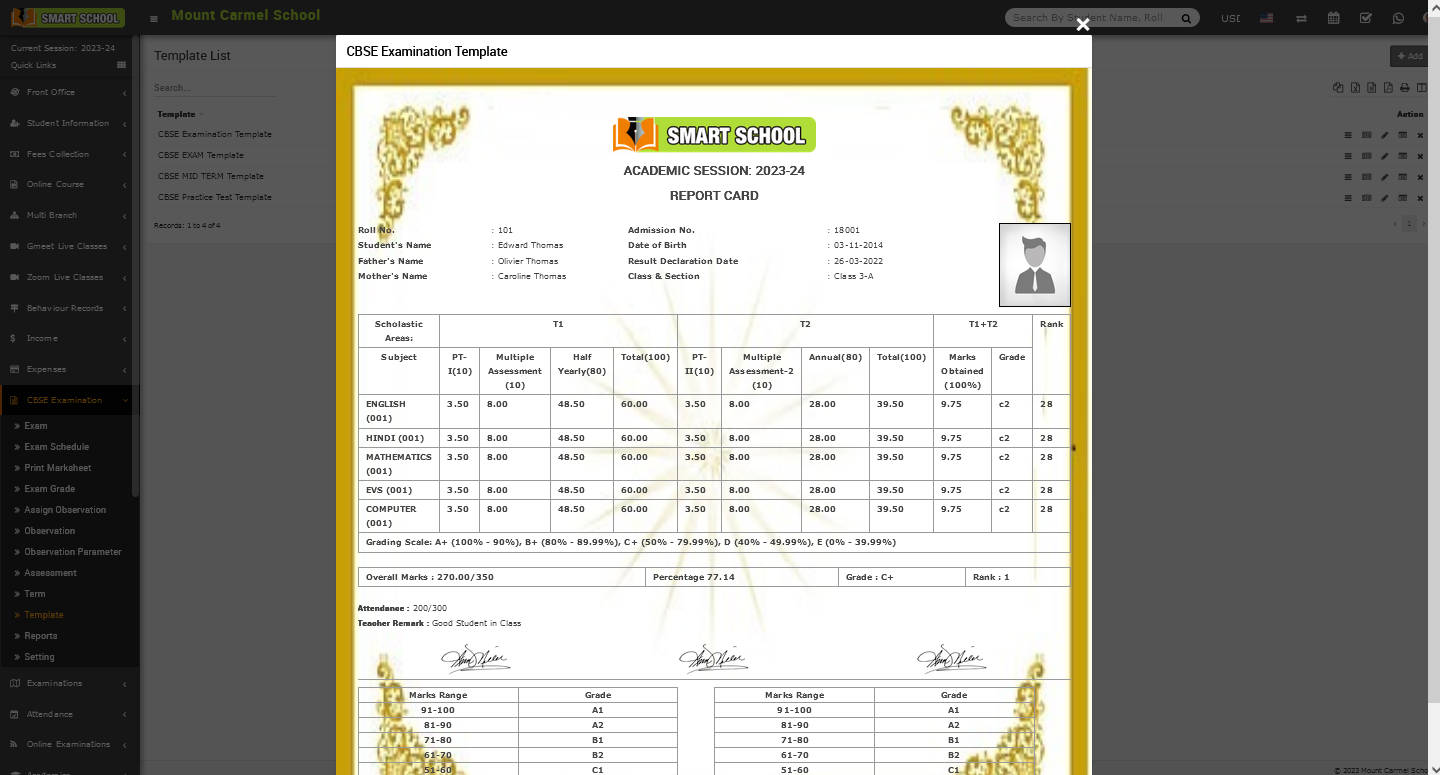
On this template you can see all the details of the student on the marksheet.
How to link the exam with template in CBSE Examination?
To link the exam, go to the CBSE Examination > Template. After click on template, template list will be open on the right side.
On this page you can see action column on the right side and in this action column, second icon is for Link Exam.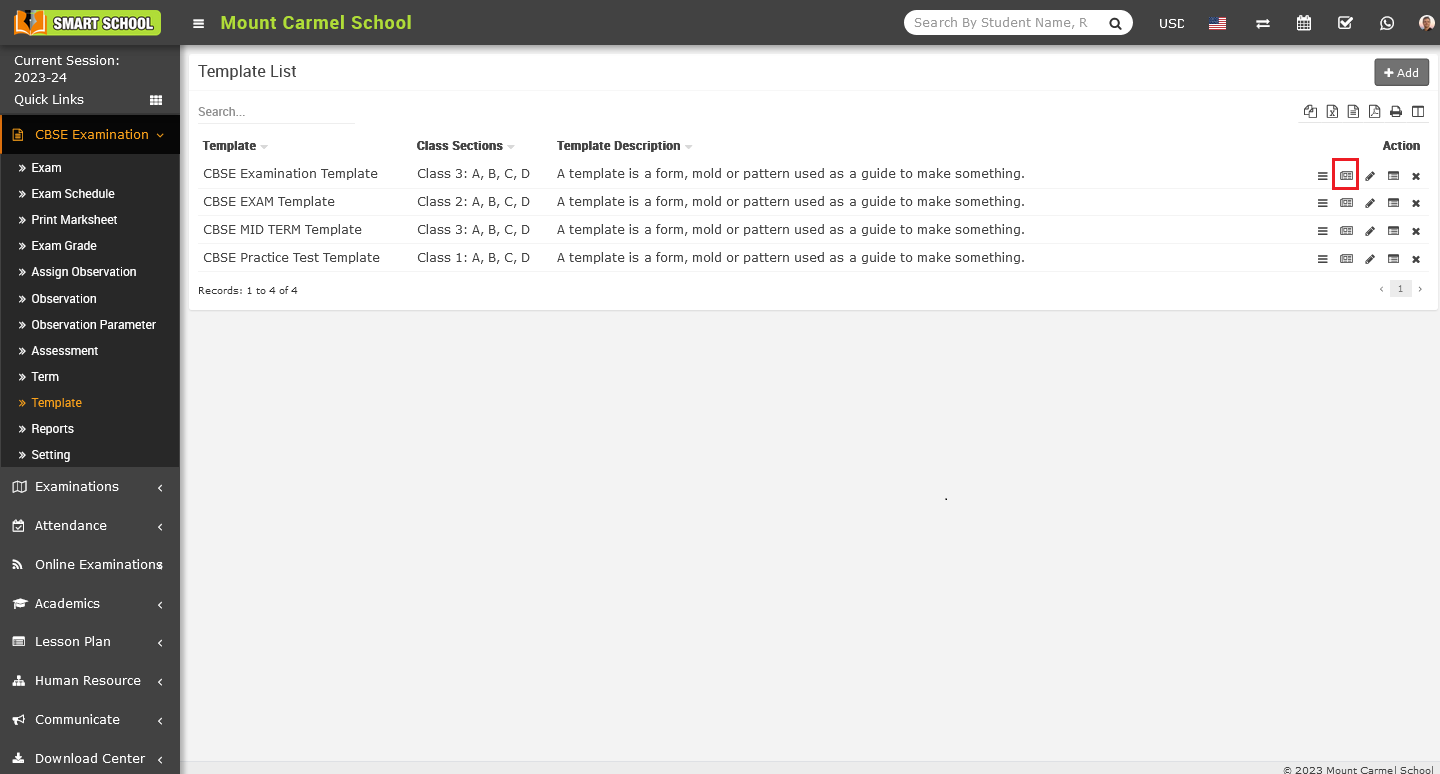
Simply click on Link Exam icon, link exam model will be open.
Now in this model first option will be Marksheet Type, simply click on the select button, marksheet type drop down list will be open.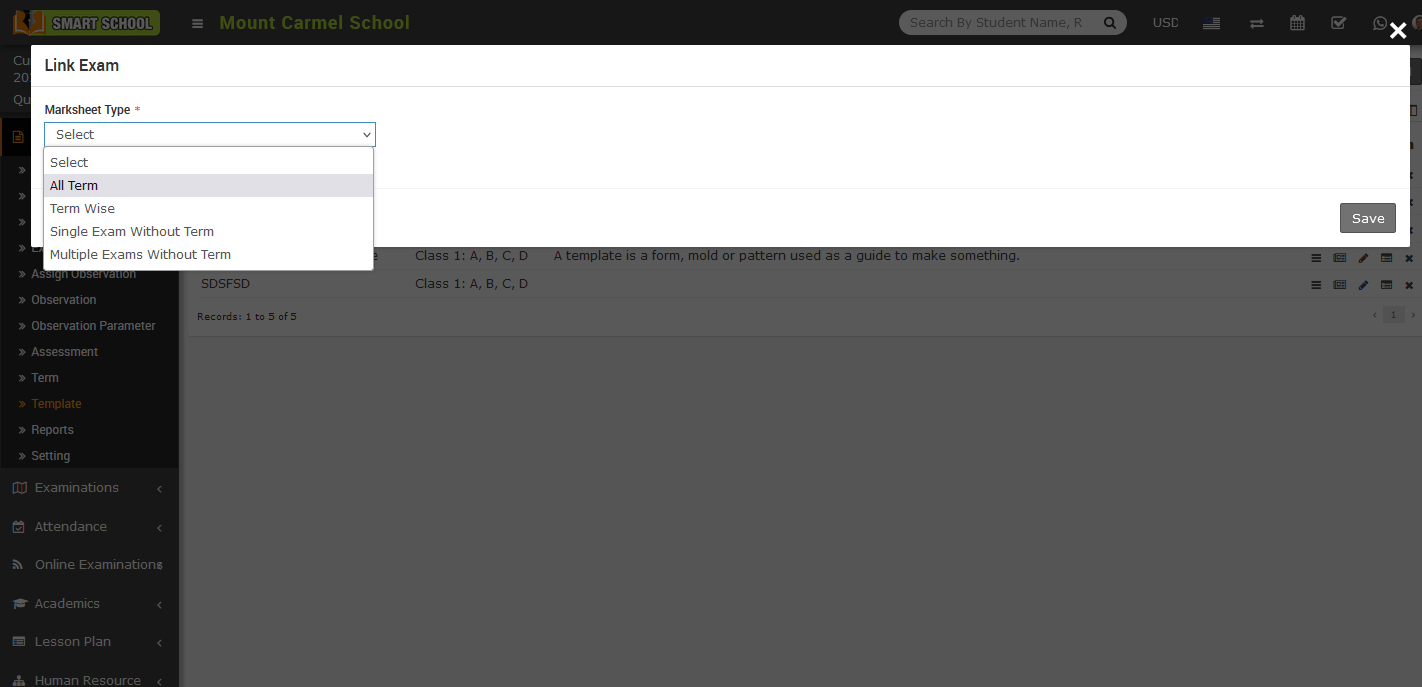
In this drop-down menu, you can see a list of options including All Terms, Term-wise, Single Exam without Term, and Multiple Exams without Term. This means that you can select one of these options to print a marksheet based on the exam.
When you select the All Term, according to all term field will appear in below.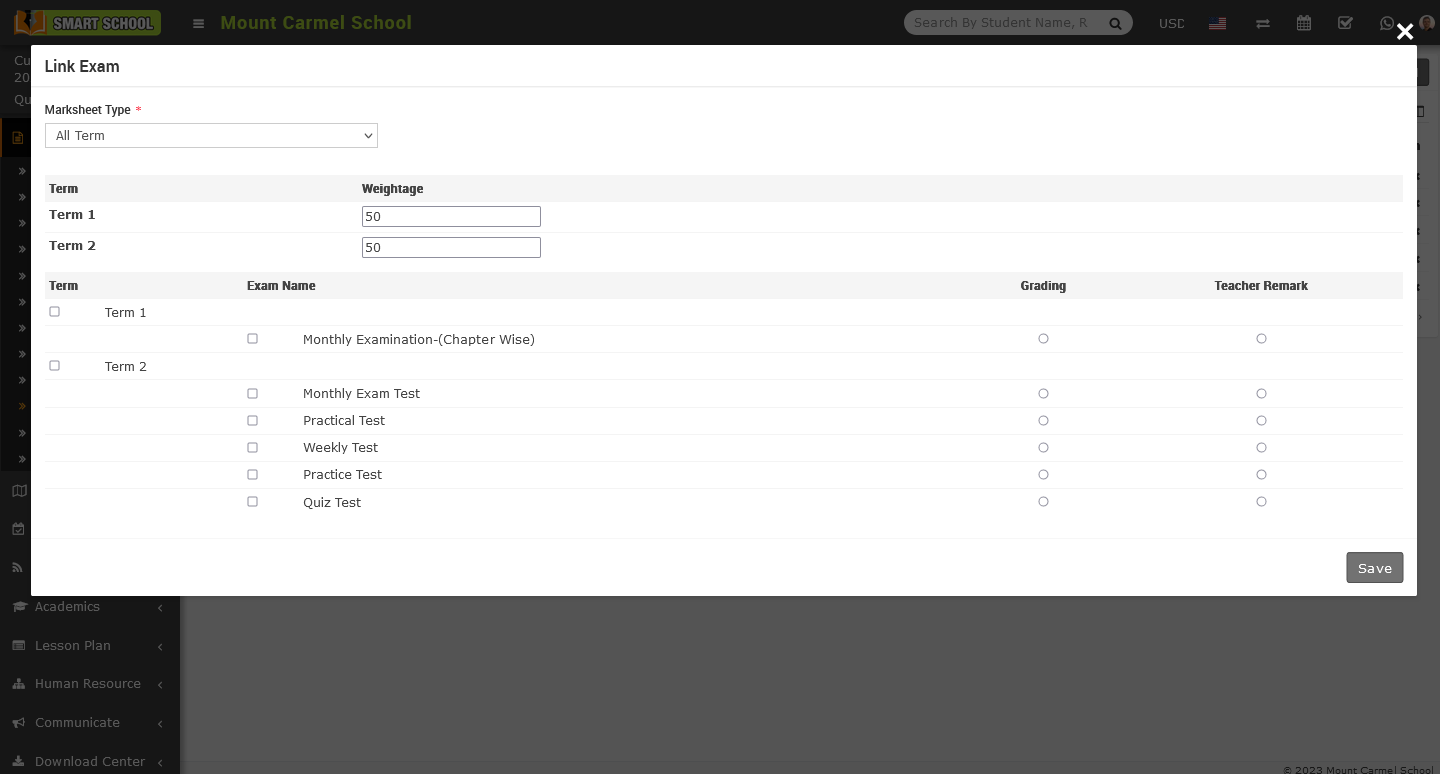
Here, you can see the Term column along with the Weightage column. If there are only two terms, divide the weightage between them and remember the term for which you have divided it. Below, you can see four different columns: Term, Exam Name, Grading, and Teacher Remark. In the Term column, all terms are shown which you created in the term module, along with their checkboxes. Check the checkbox of the term for which you assigned the weightage above. Then, select the exam name associated with that term, as well as the grading and teacher remark of that exam which you want to display in the marksheet. After select the relevant details of All Term please select the save which is showing at the bottom left corner.
After click on the save button details will be save successfully.
Note: - By using the 'All Term' feature, you can select multiple terms at the same time and add the exams related to those terms to be displayed in the marksheet.
To select the marksheet type is Term Wise. Simply go to the CBSE Examination > Template > Link Exam, link exam model will be open.

Now click on select button of marksheet type, so drop down will open then select the term wise.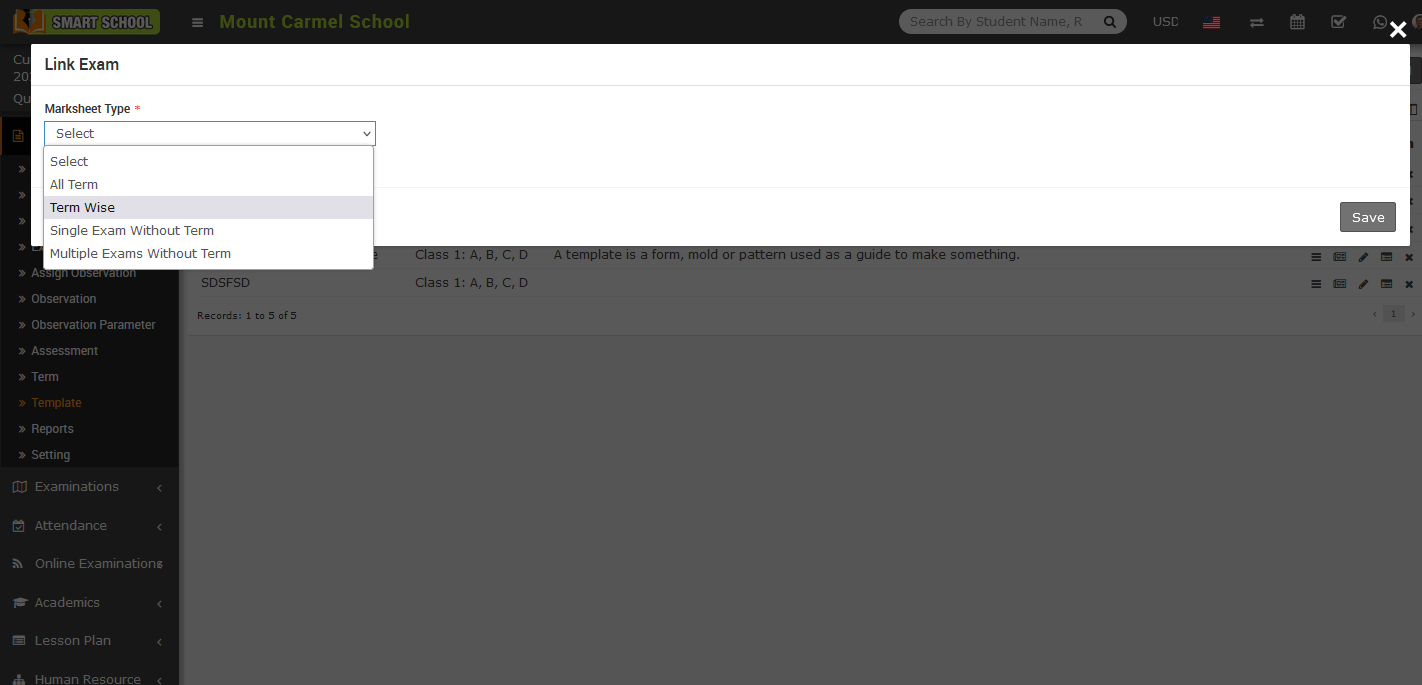
Term wise of marksheet type page will appear in below.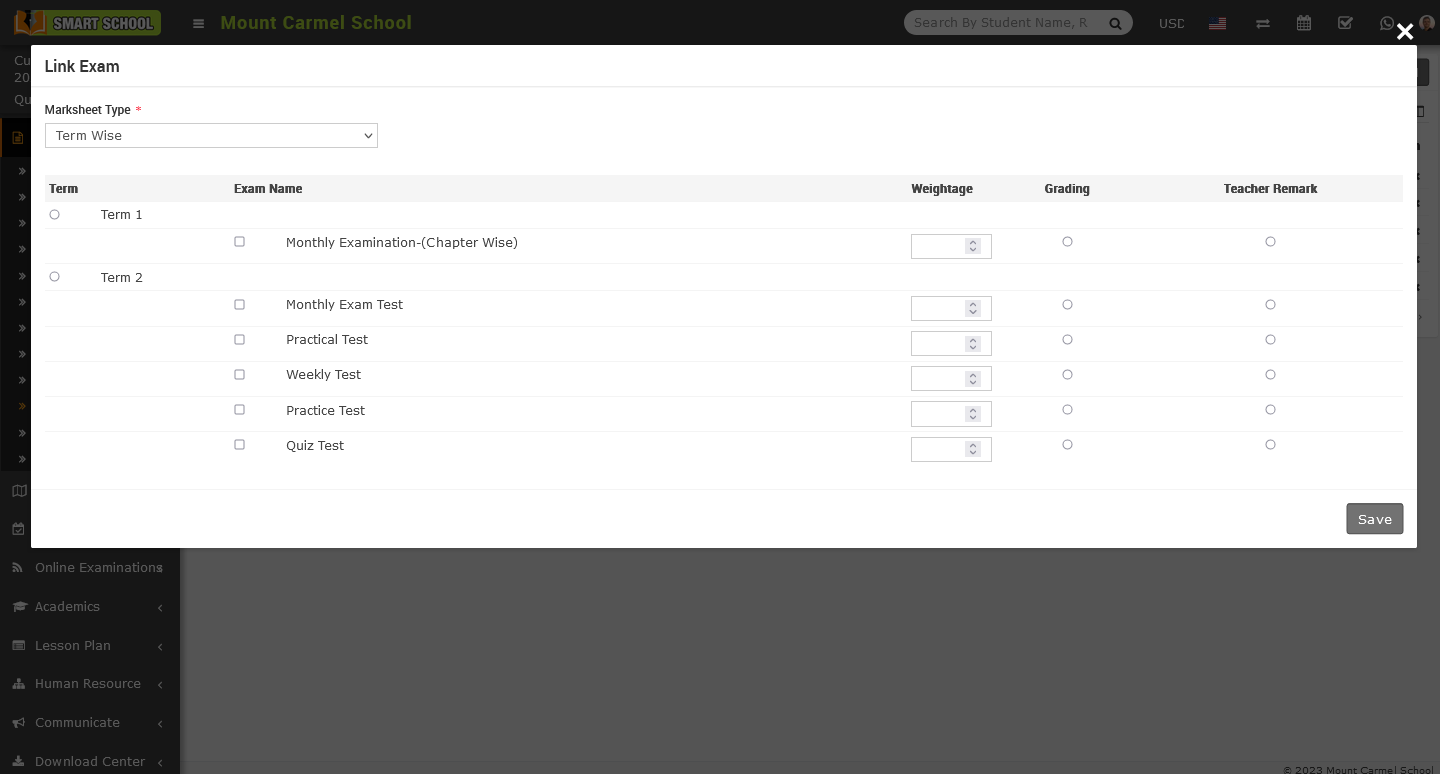
In this model, you can see multiple columns such as Term, Exam Name, Weightage, Grading, and Teacher Remark. Please select the appropriate term that you want to display on the marksheet. Then, choose the Exam Name that corresponds to that term. When you select a term, all exams under that term will be automatically selected. If you do not require all exams for that term, you can uncheck the ones you do not want to appear. Next, divide the weightage among the exams and select the grading and teacher remark for that exam which you want to display on the marksheet, now after select the all relevant details, click on save button which is showing at the bottom left corner and your details will be successfully save.
Note: - The difference between All Term and Term Wise in a marksheet is that in All Term, you can select multiple terms at the same time, whereas in Term Wise, you can only select a single term at a time.
In Single Exam without Term, go to the CBSE Examination > Template > Link Exam. After click on the link exam model will be open.
Now click on the select, drop down will be open, and select the Single Exam without Term.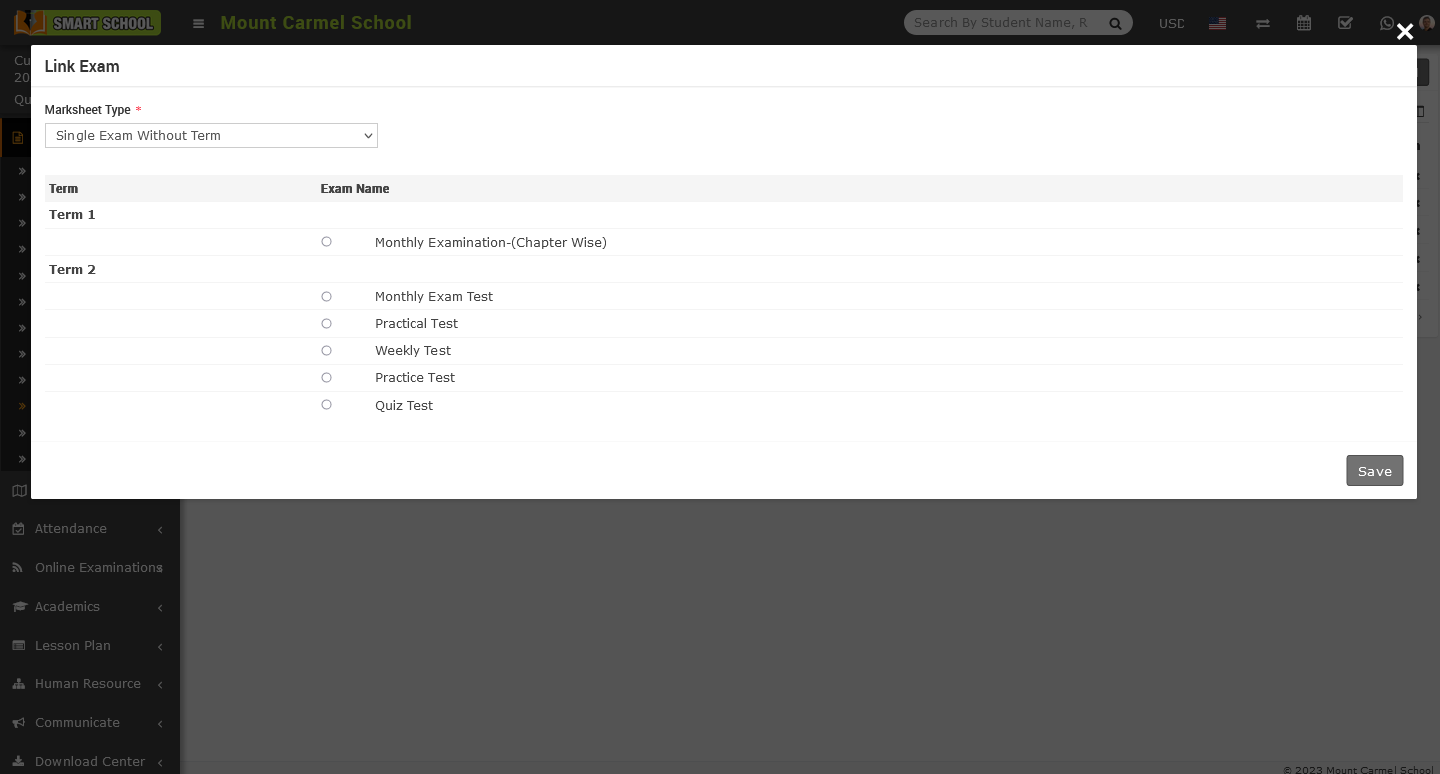
In Single Exam without Term, here you can see that, two column is available first for the Term second for the Exam Name, in this marksheet type you can choose only one exam of any term where term will not be select but under that term you can select the exam then click on the Save button which is showing at the bottom right corner.
To Multiple Exam without Term, Go to the CBSE Examination > Template > Link Exam. After click on the link exam icon, link exam model will be open.
Now, click on the select button. The marksheet type drop-down menu will open. In this menu, you will see the last option, which is Multiple Exam without Term.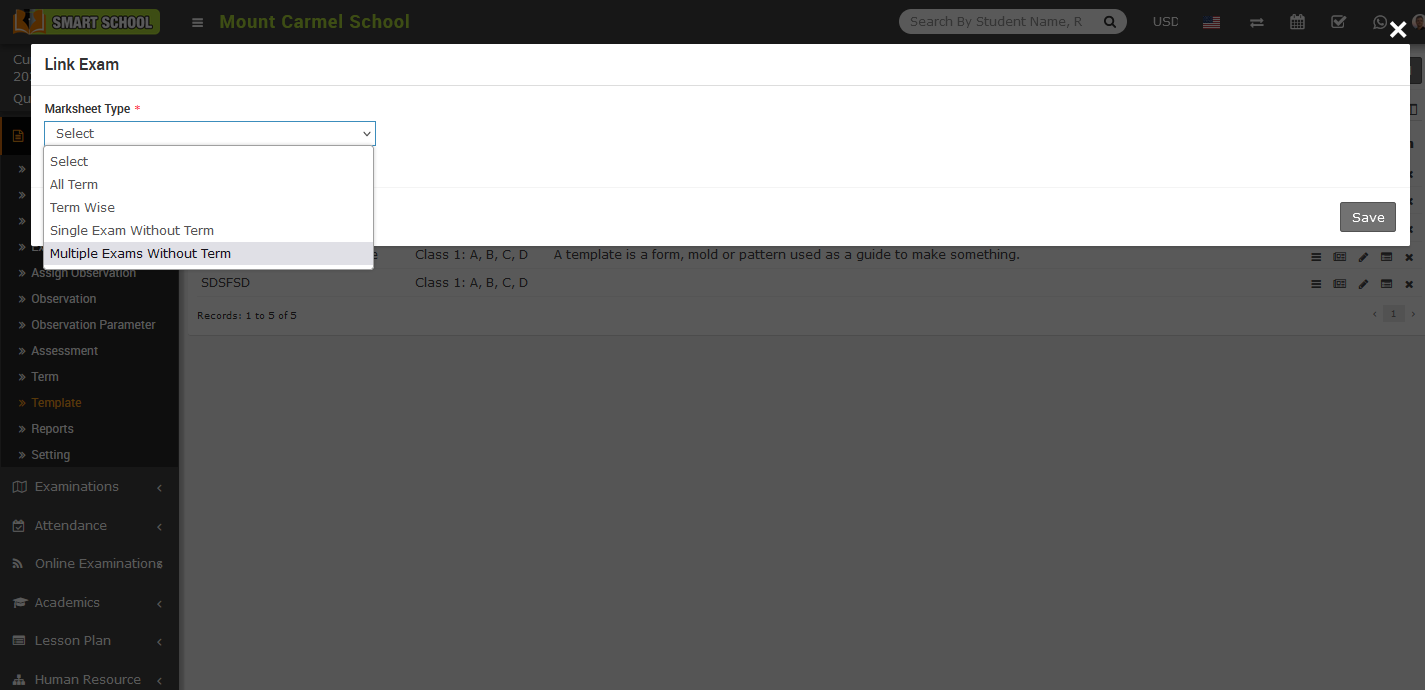
Please select that option, and the multiple exam without page model will open.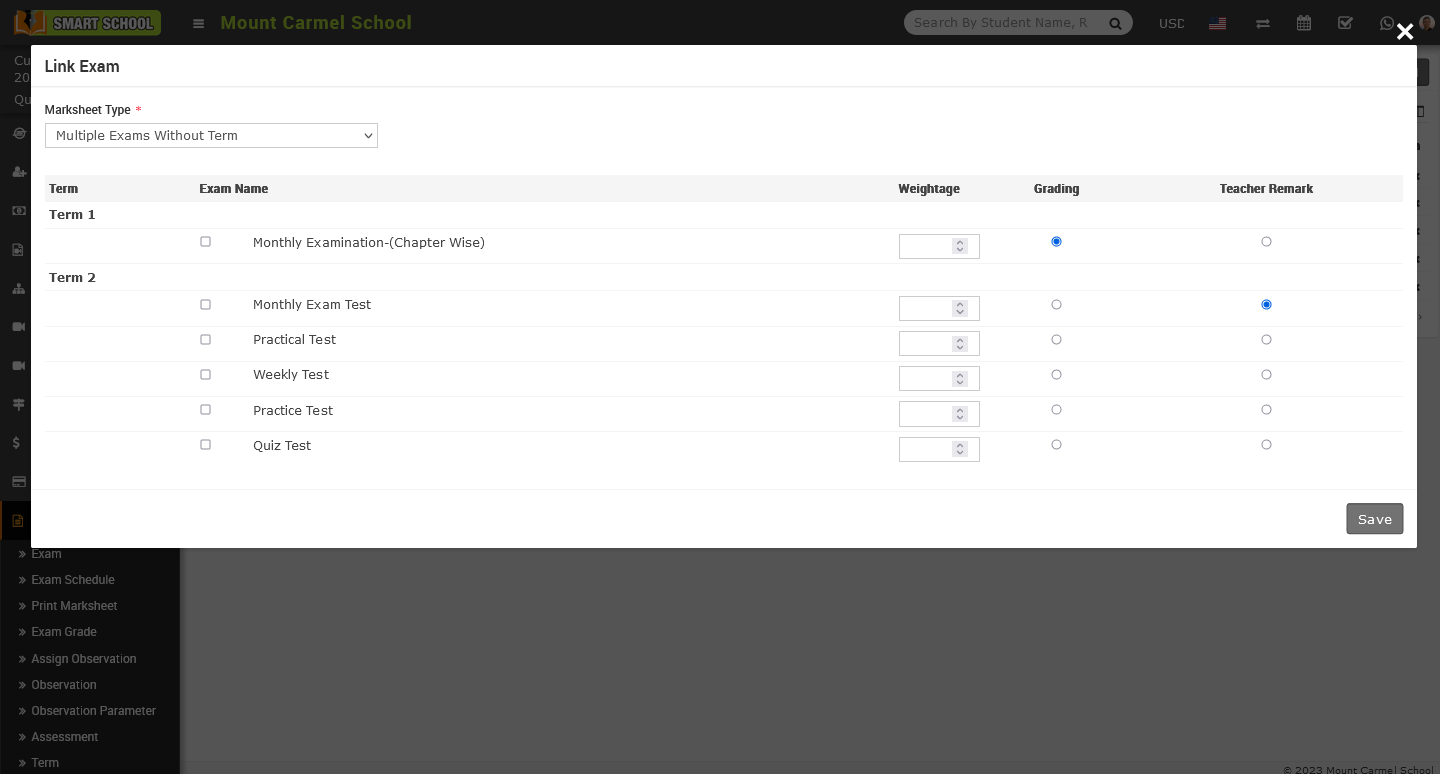
In the Multiple Exams without a Term feature, you can view columns for Term, Exam Name, Weightage, Grading, and Teacher Remark. You can select multiple exams under any term at the same time, enter the weightage for each exam which you selected, choose the Grading and Teacher Remark to be displayed on the marksheet, and then click on the save button located at the bottom right corner.
Note: - The difference between Single Exam without Term and Multiple Exam without term only is that you can choose only one exam at the same time whereas in multiple exam, you can choose multiple exam at the same time for the marksheet.
Note:- When you creating two or more exams, such as Exam One and Exam Two, and linking them, make sure to add the same subject to both exams. If you don't keep the same subject in both exams, the marksheet may appear irrelevant when you print it.
How to generate the template wise rank in CBSE Examination?
To Generate Template Wise Rank, go to CBSE Examination > Template, here template list will be open on the right side.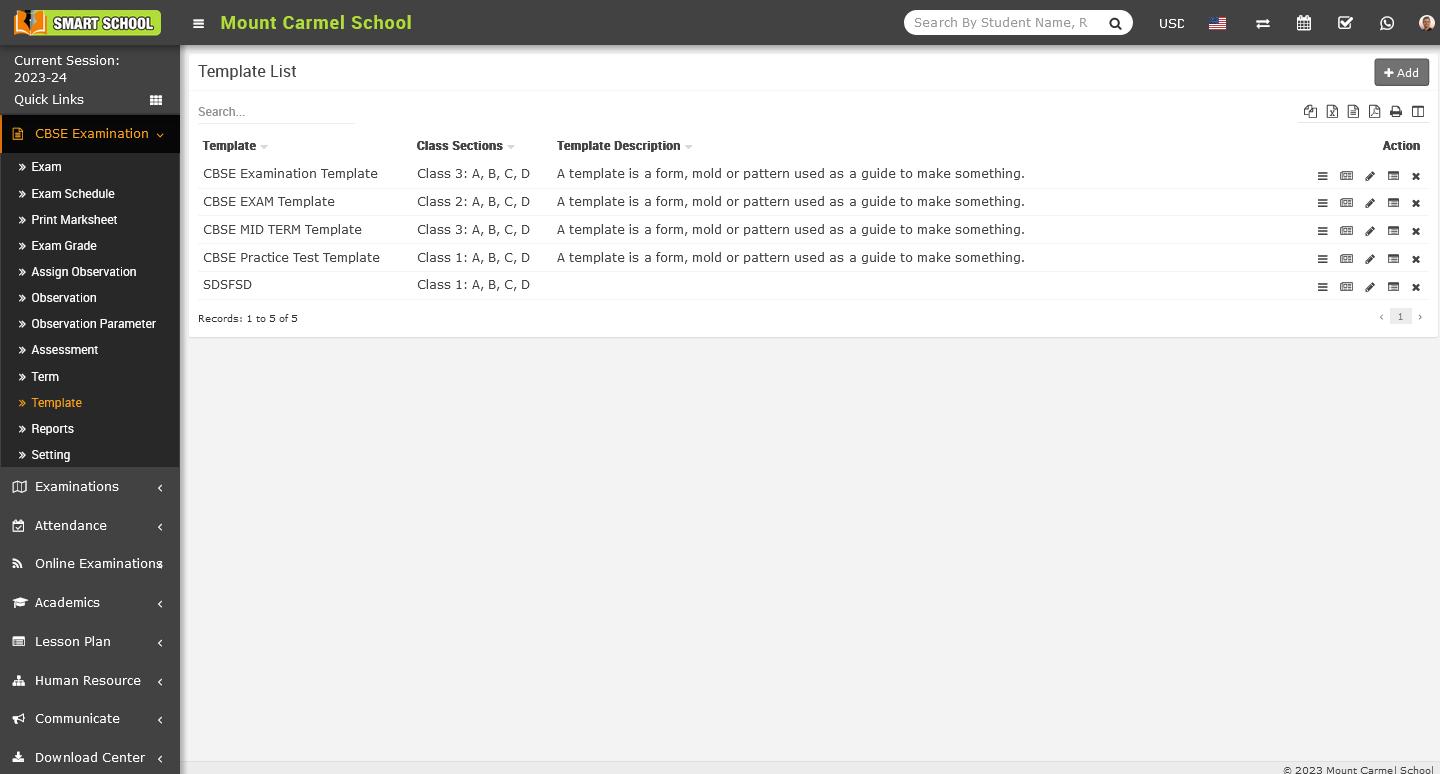
On this template list page, you can view multiple templates along with their details. On the right side, there is an action column where you can find the delete icon. Additionally, next to the delete icon, there is a rank generation icon specific to each template.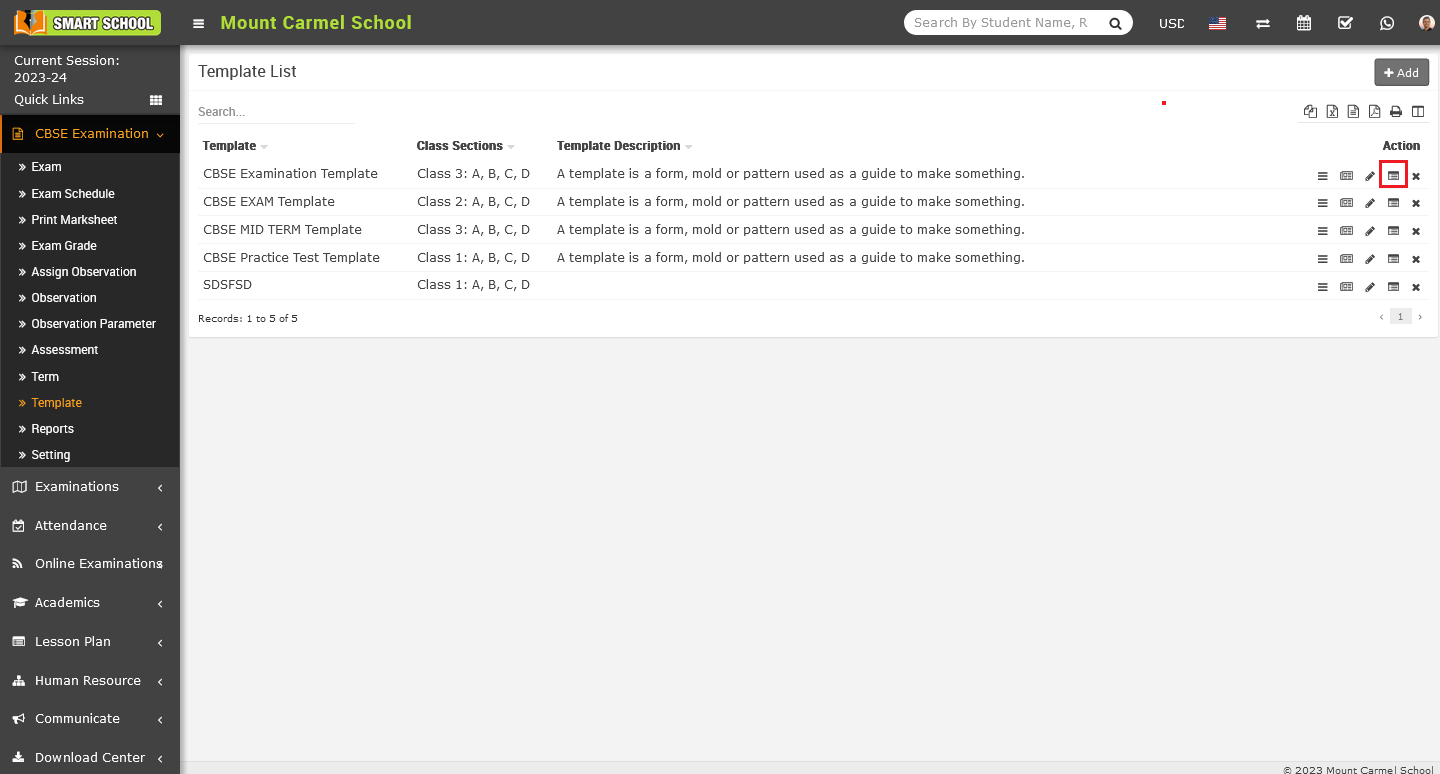
Now click on the Generate rank icon, Generate rank CBSE Examination page will open. On this page, you can view the list of student details, including the student's admission number, student name, class, and father’s name, date of birth, gender, mobile number, and rank. Initially, the rank column will be blank until you generate the rank.
To generate the rank, simply click on the Generate Rank button located in the bottom right corner. Once generated successfully, you will be able to see the rank in the rank column as well as 'Rank has been generated, further you can update the regenerated rank' message will be displayed above.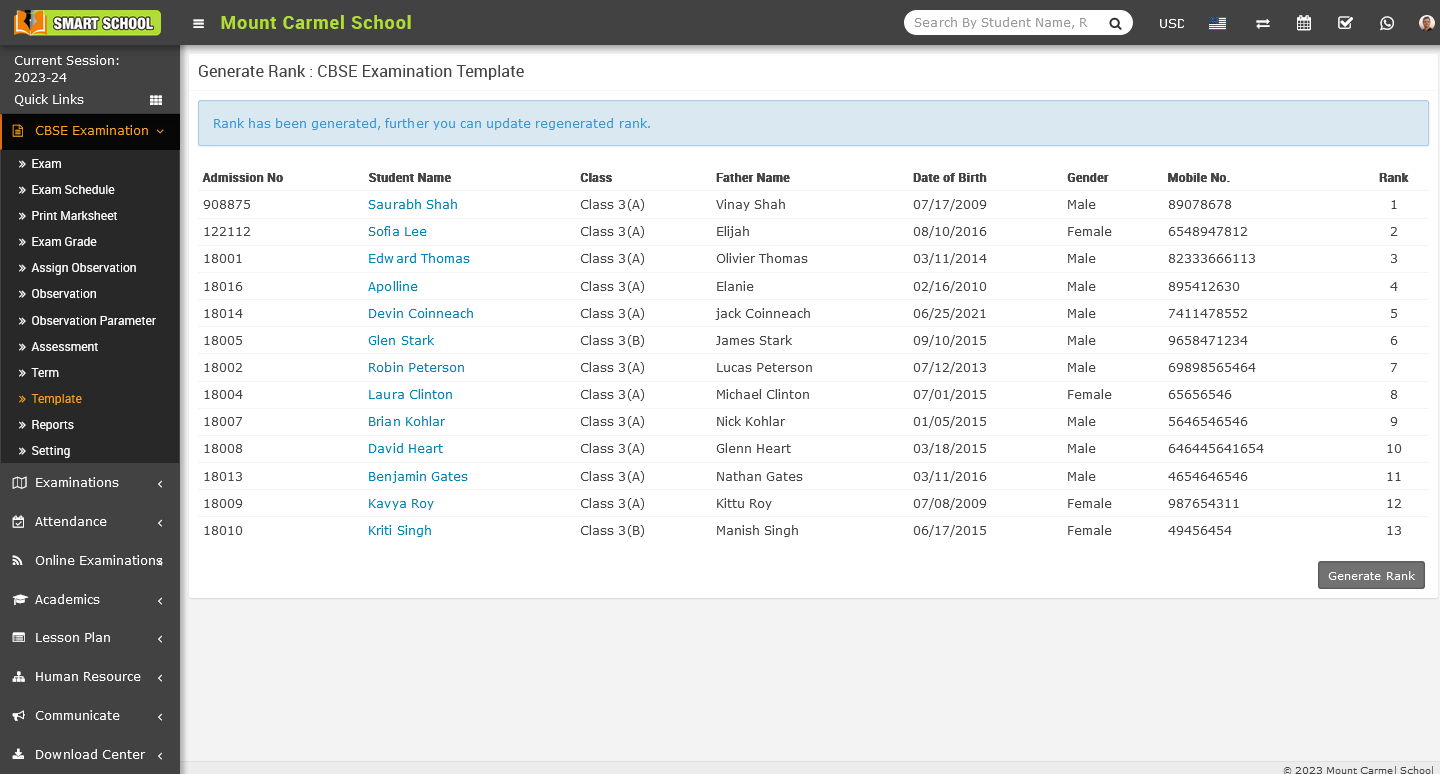
Note: - This rank will show on the mark sheet according to the selection of template.
How to take the print of marksheet in CBSE Examination?
To print marksheet, go to the CBSE Examination > Print Marksheet. After clicking of print marksheet on right side select criteria page will be open.
In this page, you can see Class, Section, and Template filters are displayed. In order to print the marksheet, you need to select the appropriate class, section, and template that you wish to print. First, click on the Class field, which will open a drop-down list of multiple classes. Select the class that you need, then click on the Section field. This will open a drop-down list of multiple sections. Select the section that you need. Next, click on the Template field, list of templates that you have already created for the exam marksheet in the template. Select the appropriate template, then click on the Search button to open the student list below.
In student list, you can see the student details as his Admission Number, Student Name, Father Name, Date of Birth, Gender, Mobile Number.
To download the marksheet in bulk, simply you just need to select the all student using checkbox, then click on the Bulk Download button and multiple marksheet in one pdf will be download in your system.
To download the single marksheet for the individual student, you just need to click on Download icon, which is showing in action column, single marksheet will be download of that student.
After clicking on the download icon, the mark sheet will be downloaded to your system. Simply go to the download folder on your system and view the mark sheet.
If you want to send the student's marksheet to their registered email address, simply click on the email icon corresponding to that student in the action column.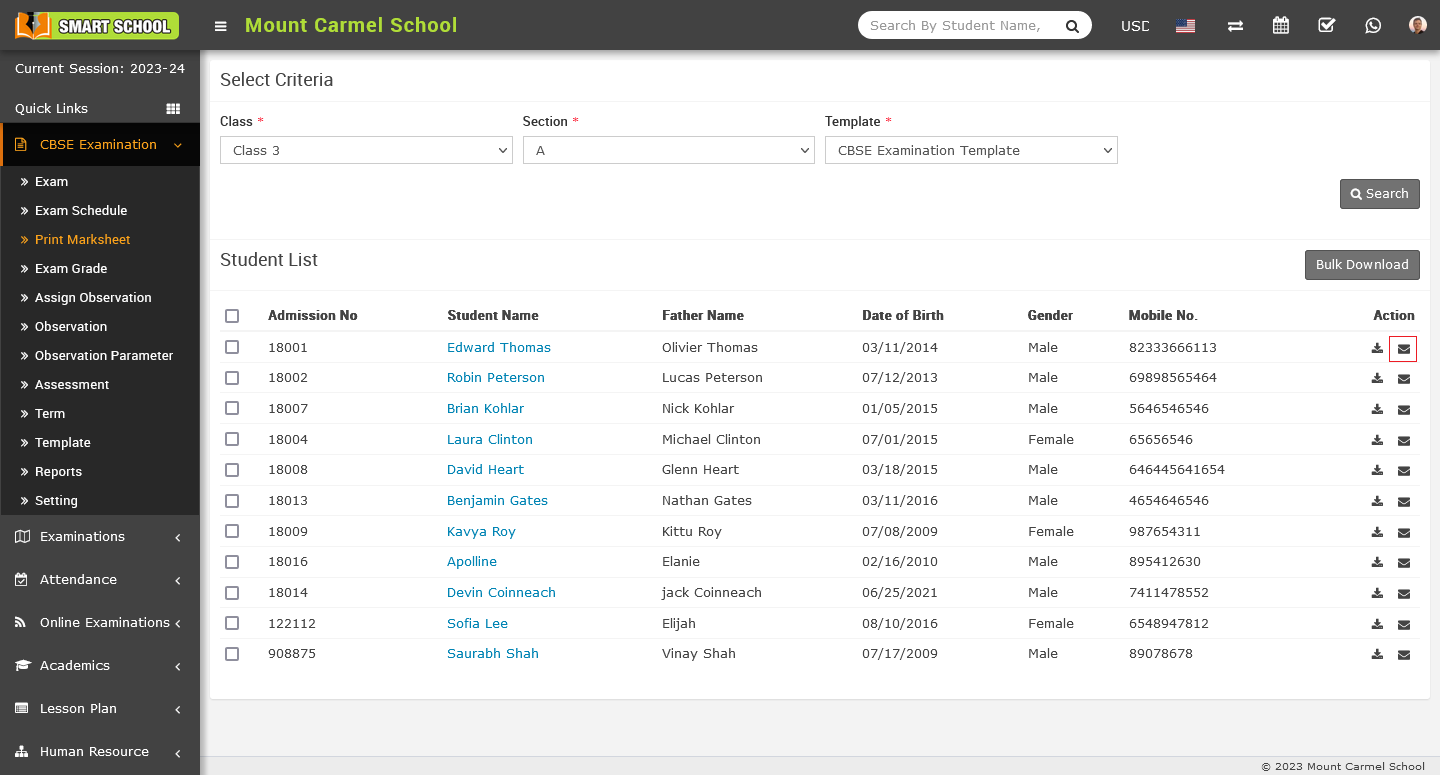
This will send the marksheet to your registered email, from which students can download it.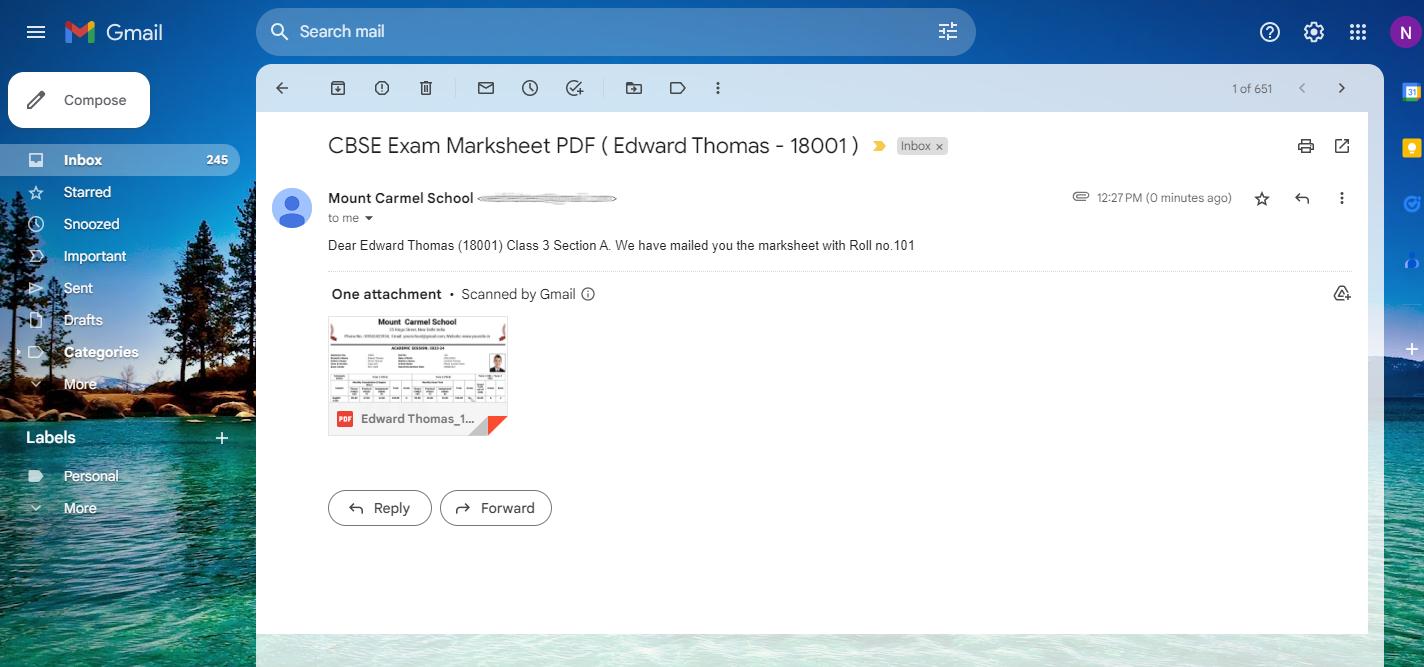
Note :- When you creating two or more exams, such as Exam One and Exam Two etc., and linking them, make sure to add the same subject to both exams. If you don't keep the same subject in both exams, the marksheet may appear irrelevant when you print it.
How to check exam result and exam schedule from student side?
Enter the student's Username and Password, and then click on the 'Sign In' button to successfully login in to the student panel.
Here, you can see the student profile page, and below it, you will find the CBSE Examination module. Simply click on the CBSE Examination module to access two options: Exam Result and Exam Schedule.
Now, click on 'Exam Result', and the CBSE Exam-wise results will open on the right side. On this page, you can view the exam-wise results that have been published by the Superadmin. The result displays subject-wise marks, as well as the total marks, percentage, grade, and rank for that exam.
To view the upcoming Exam Schedule, simple click on the exam schedule, which is showing below in the Exam Result.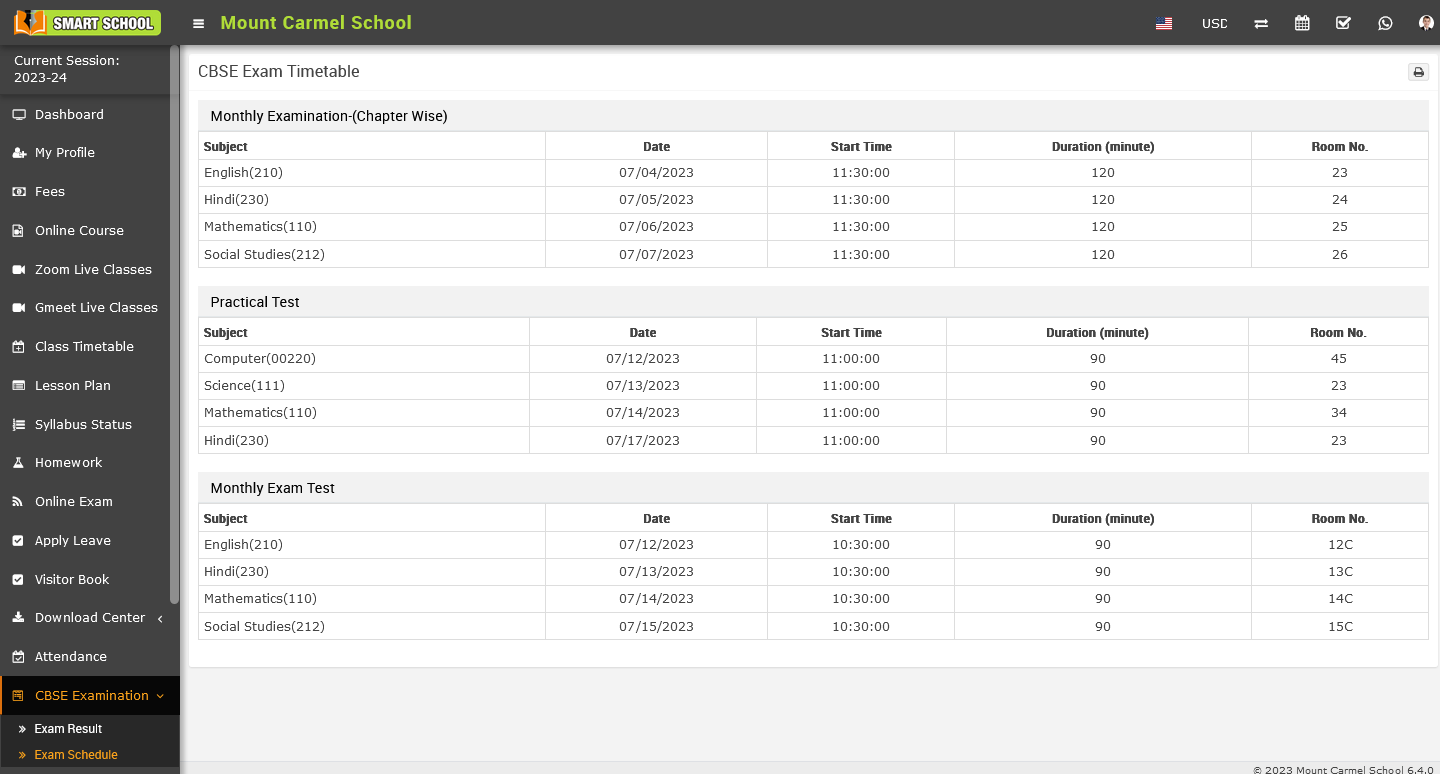
On the right side, you can see schedule for the upcoming exams that has been published by the Superadmin. In exam schedule, you can see the information about the exam such as number of subject of exam, exam dates, start times, durations, and room numbers.
How to show CBSE exam result tab on front site?
To show CBSE Exam Result on the front site, first you need to create the CBSE Exam Result tab on the front site, for this simply go to Front CMS > Menus.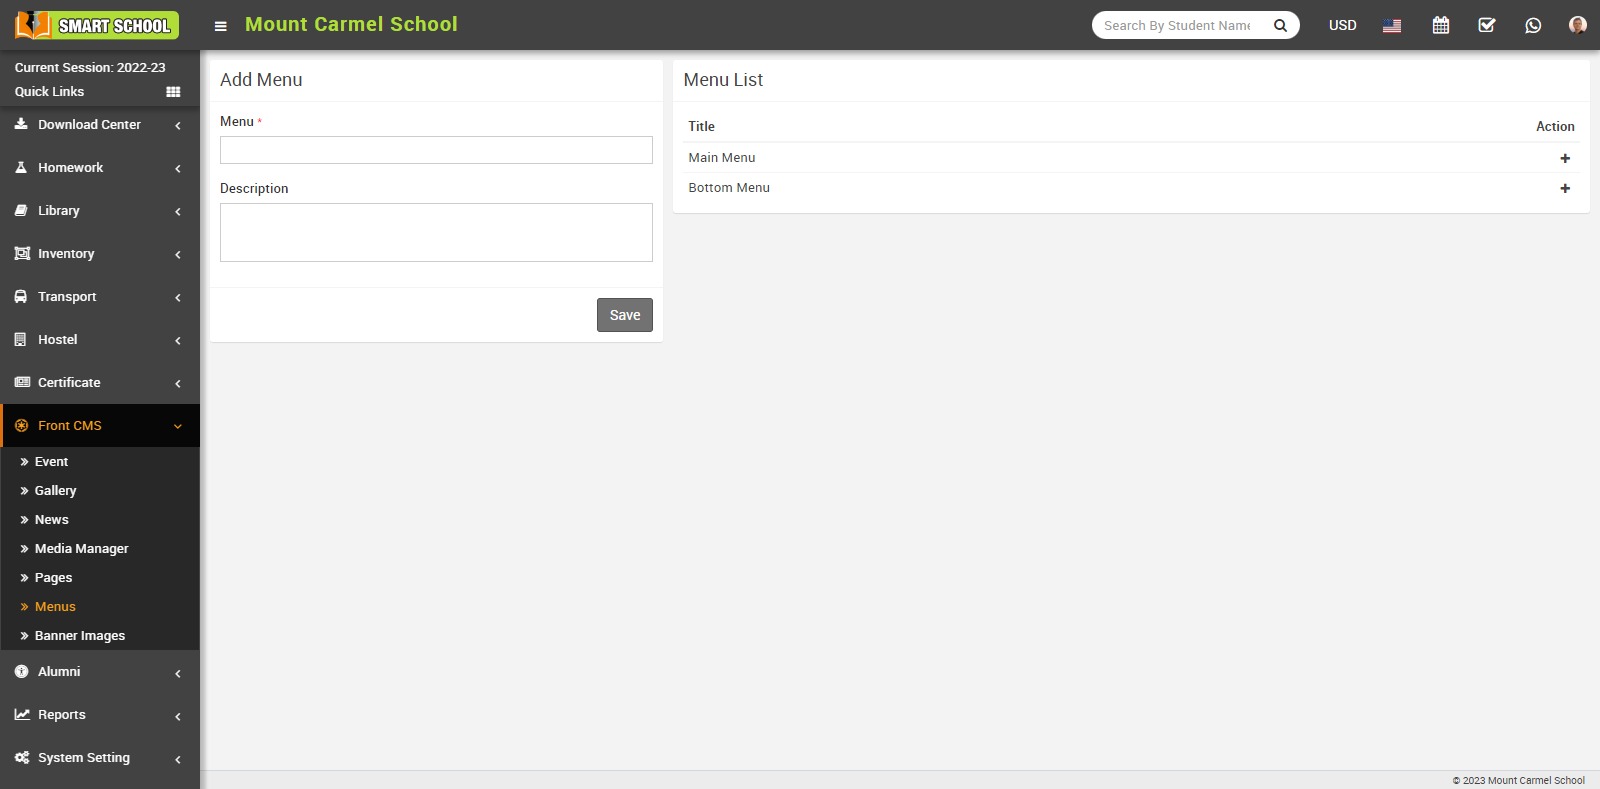
Here, you can see the Add Menu page and the Menu List, which displays the Main Menu and the Bottom Menu. Click on ‘+’ icon of the Main Menu to go to the 'Add Menu Item' page. 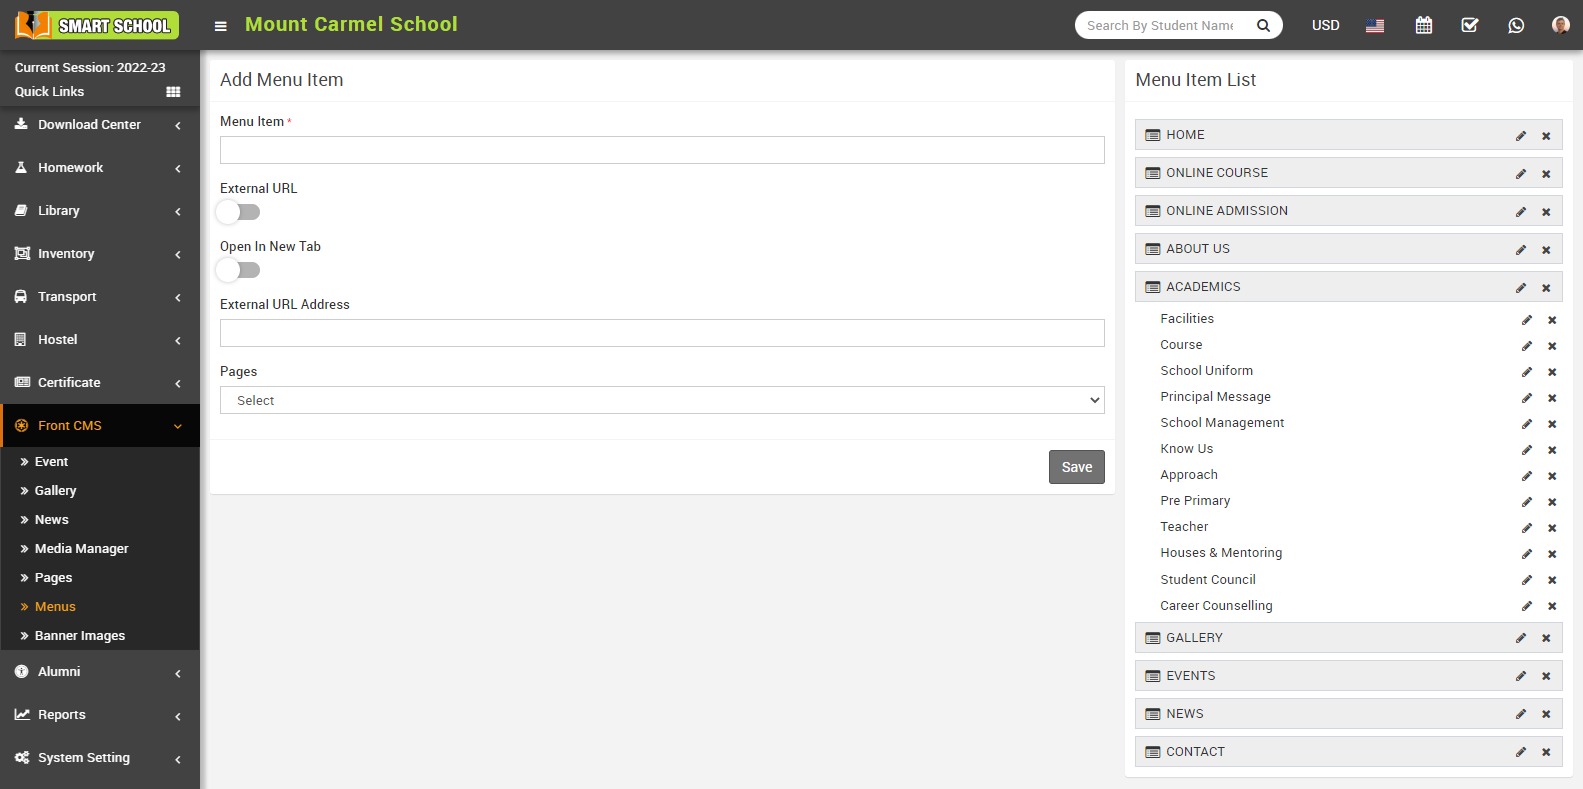
Here you can view Menu Item, External URL, Open in New Tab, External URL Address, Pages drop down and save button.
In Add Menu Item, here enter Menu Item, enable External URL, keep disabled Open In New Tab button and in External URL Address enter your domain address then at the end of domain add exam result, such as https://yourdomain/cbseexamresult. In the Pages dropdown, don’t select any dropdown, leave it as it is, and then click on the save button. The new item can be seen on Menu Item List the right side.
For Example:- In Menu Item enter CBSE Exam result, enable External URL toggle button, disable Open in New Tab, enter External URL Address, Pages drop down don’t select any dropdown then click on the save button.
You can now view the CBSE Exam Result option will be available at the Menu Item List on the right site and you can also readjust sequence by using drag and drop the CBSE Exam Result tab according to your preference.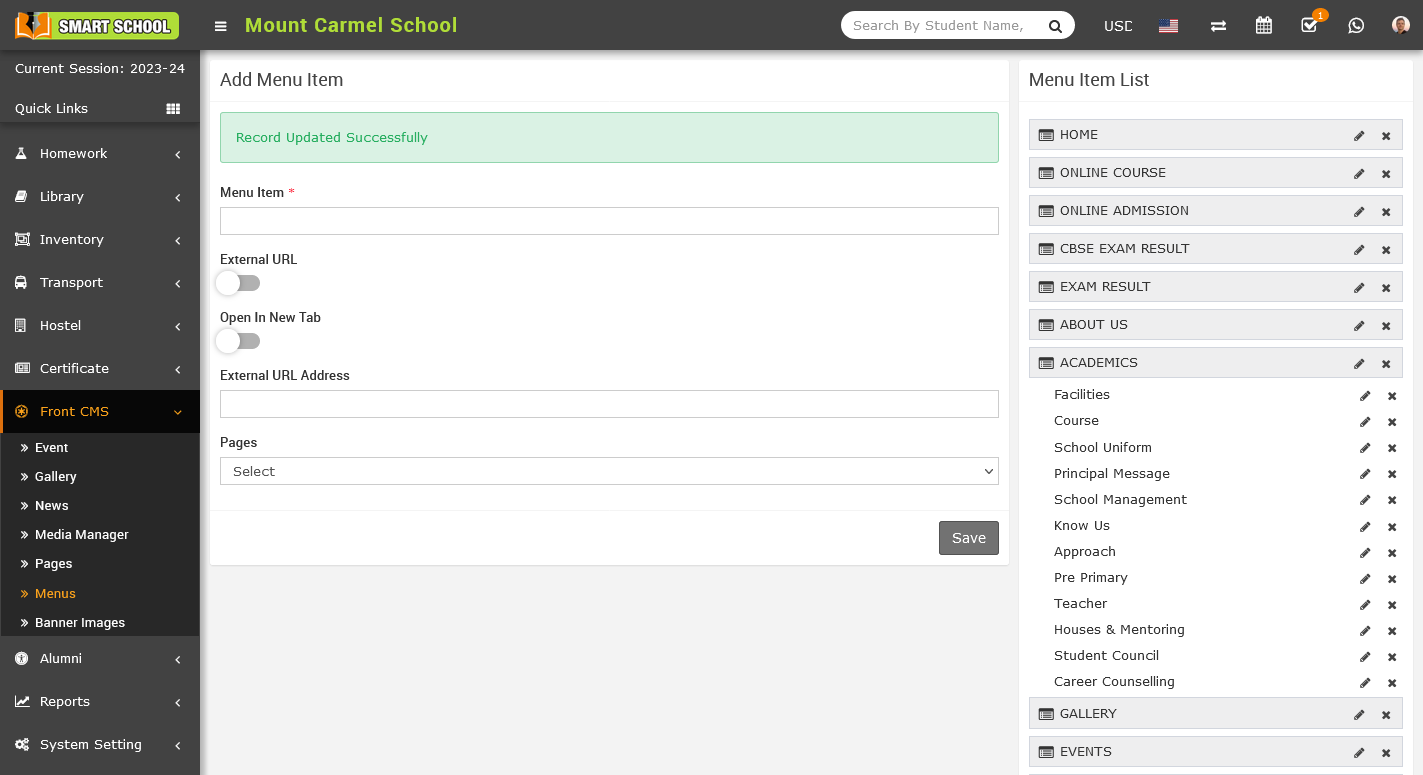
To edit the menu item, simply click on the edit icon showing at the right side, edit page will be open, now edit the details then click on save button, showing on the bottom right corner.
details will be saved successfully.
To delete the CBSE Exam Result tab, click on Delete icon on the right, Confirmation model will be open. Now click on OK button, CBSE Exam Result will be deleted successfully.
You can view the CBSE Exam Result tab that has been generated successfully at the front site of your Smart School.
You can view CBSE Exam Result on your Smart School's front site. In this module you can see Exam tab drop down and Admission No. tab drop down available.
Students can view their CBSE Exam Results without logging into their student panel account. Simply visit the Smart School front page, here you can see CBSE Exam Result tab, simply click on the tab, CBSE Exam Result search option will be open in below. Now, click on the Exam tab, drop down will be open, select your preferred exam then enter student Admission Number. Finally, click on the Search button, the exam details will be display in below.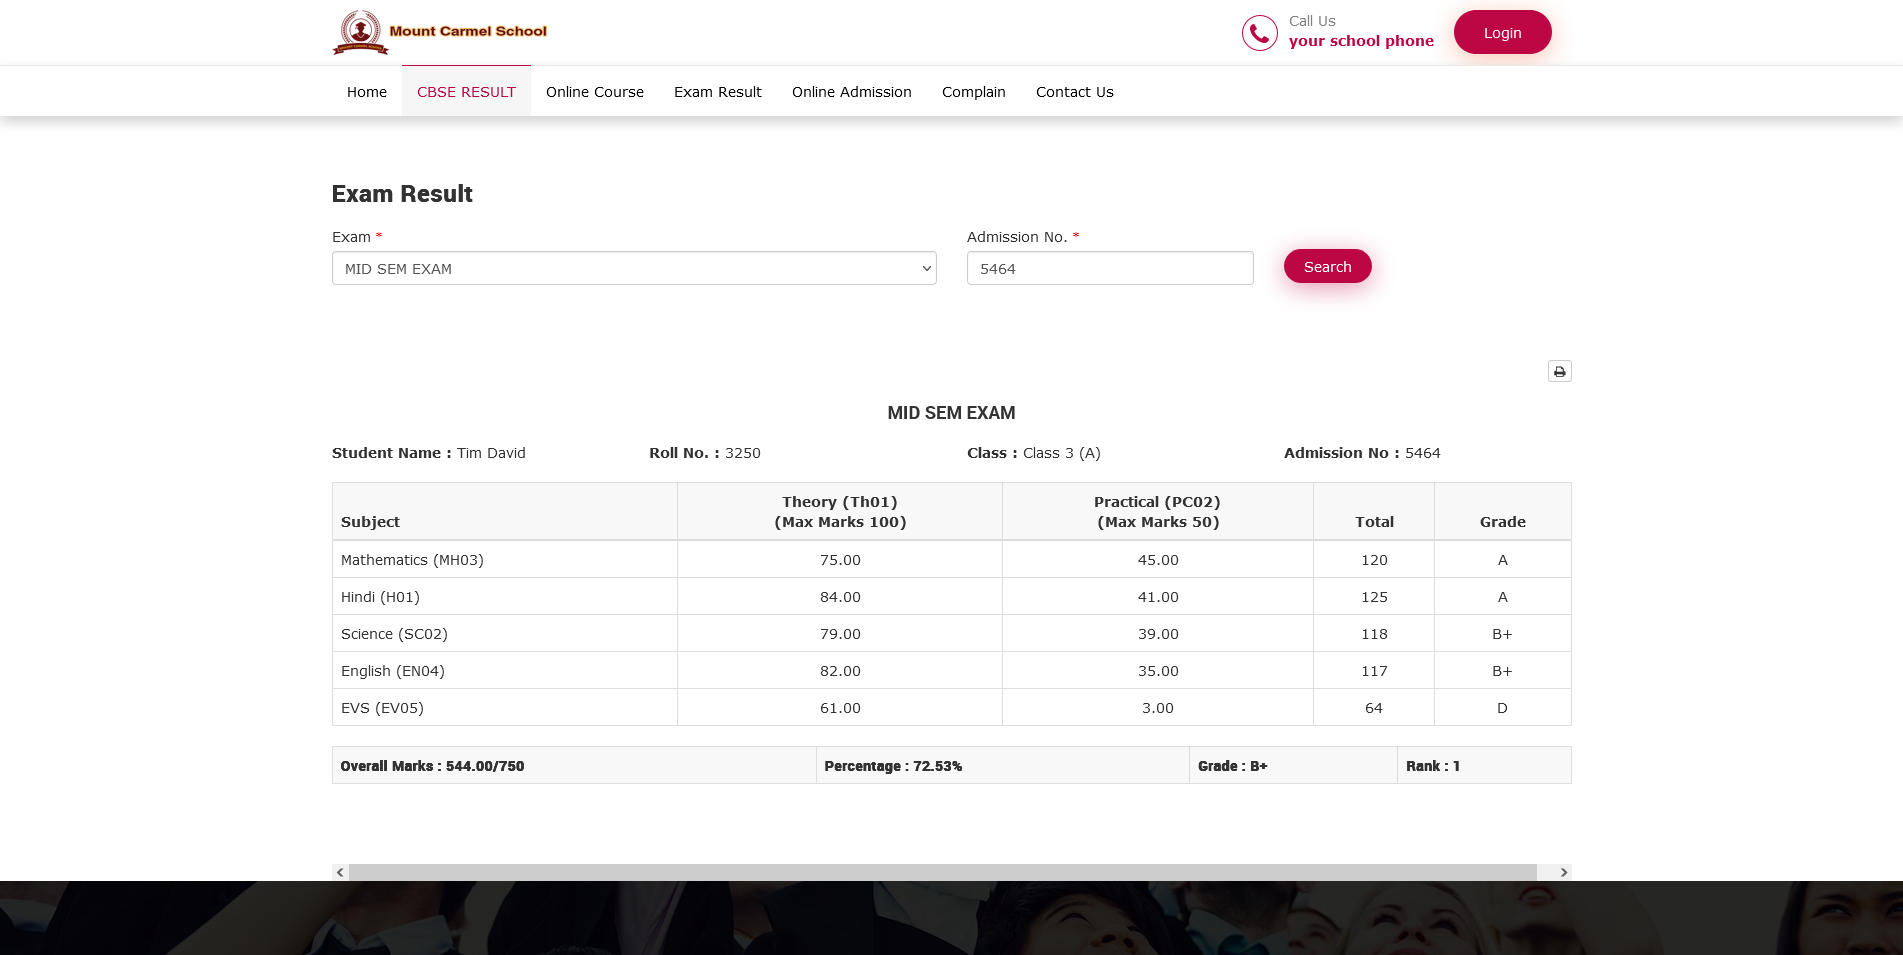
How to check template marks report in CBSE Examination?
To view the Template Marks Report, go to CBSE Examination > Report. Once you click on the Report, the page will appear on the right-hand side.
Here, you can see the Template Marks Report. Simply click on the Template Marks Report option, and the template marks report field will open below.
Now, you can see options for Class, Section, and Template are available. Simply select the relevant class and section, and then choose the template that you have already created in the CBSE Examination > Template module and click on the search button that is located on the right-hand side. This will open the report below, according to your selection.
Note: The template will be available based on the Class and Section. Therefore, when searching for the template marksheet report, please ensure you use the relevant class and section for which the template has already been created in the template.
On this report you can see the multiple column such as Student, Admission No, Date of Birth, and Examination Column, Exam Weightage column along with Grand Total, Percentage, Grade and Rank.
Note: With this report, you can easily check the overall performance of each student in the exam. You can view the total marks obtained in all subjects, as well as the overall percentage, grade, and rank.
How to check the subject marks report CBSE Examination?
To check the subject marks report, go to the CBSE Examination > Reports. Once you have clicked on the Report, the Report page will appear on the right side.
On this page you can see Subject Marks Report available, simple click on Subject Marks Report and subject wise mark report field will be open in below.
Here, you can see the Exam field is displayed. Simply click on the Select, and a drop-down list of exams will appear below.
Please select the exam for which you would like to view the report, and then click on the search button located on the right-hand side. This will open the subject-wise marks report for that exam below.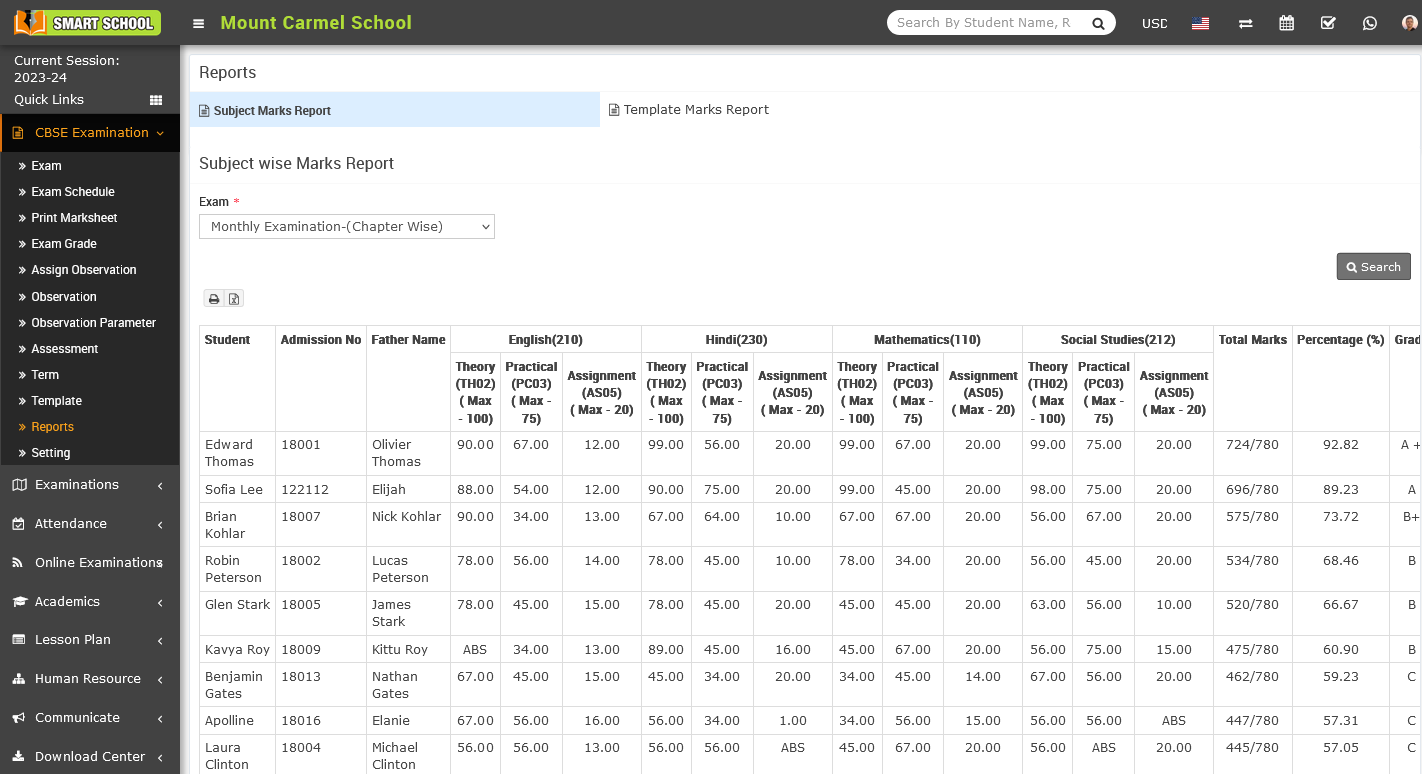
In this report, you can view the Subject-Wise Marks Report for the students who took the exam. The first three columns display the student details, including their Name, Admission Number, and Father's Name. The subsequent columns show the subject-wise marks obtained by the student, followed by the grand total of all subjects. The report also includes the overall Percentage, Grade, and Rank of the student.