How to add the addons on Smart School?
Addons Management
In the Smart School Management System, there are 10 types of Addons available, which provide additional features to enhance the system's functionality.
- Smart School Thermal Print
- Smart School Quick Fees Create
- Smart School QR Code Attendance
- Smart School CBSE Examination
- Smart School Two Factor Authentication
- Smart School Multibranch
- Smart School Behavior Record
- Smart School Online Course
- Smart School Gmeet Live Class
- Smart School Zoom Live Class
To get Addon, simply go to the System Setting > Addons, Now click on it, addons page will be open.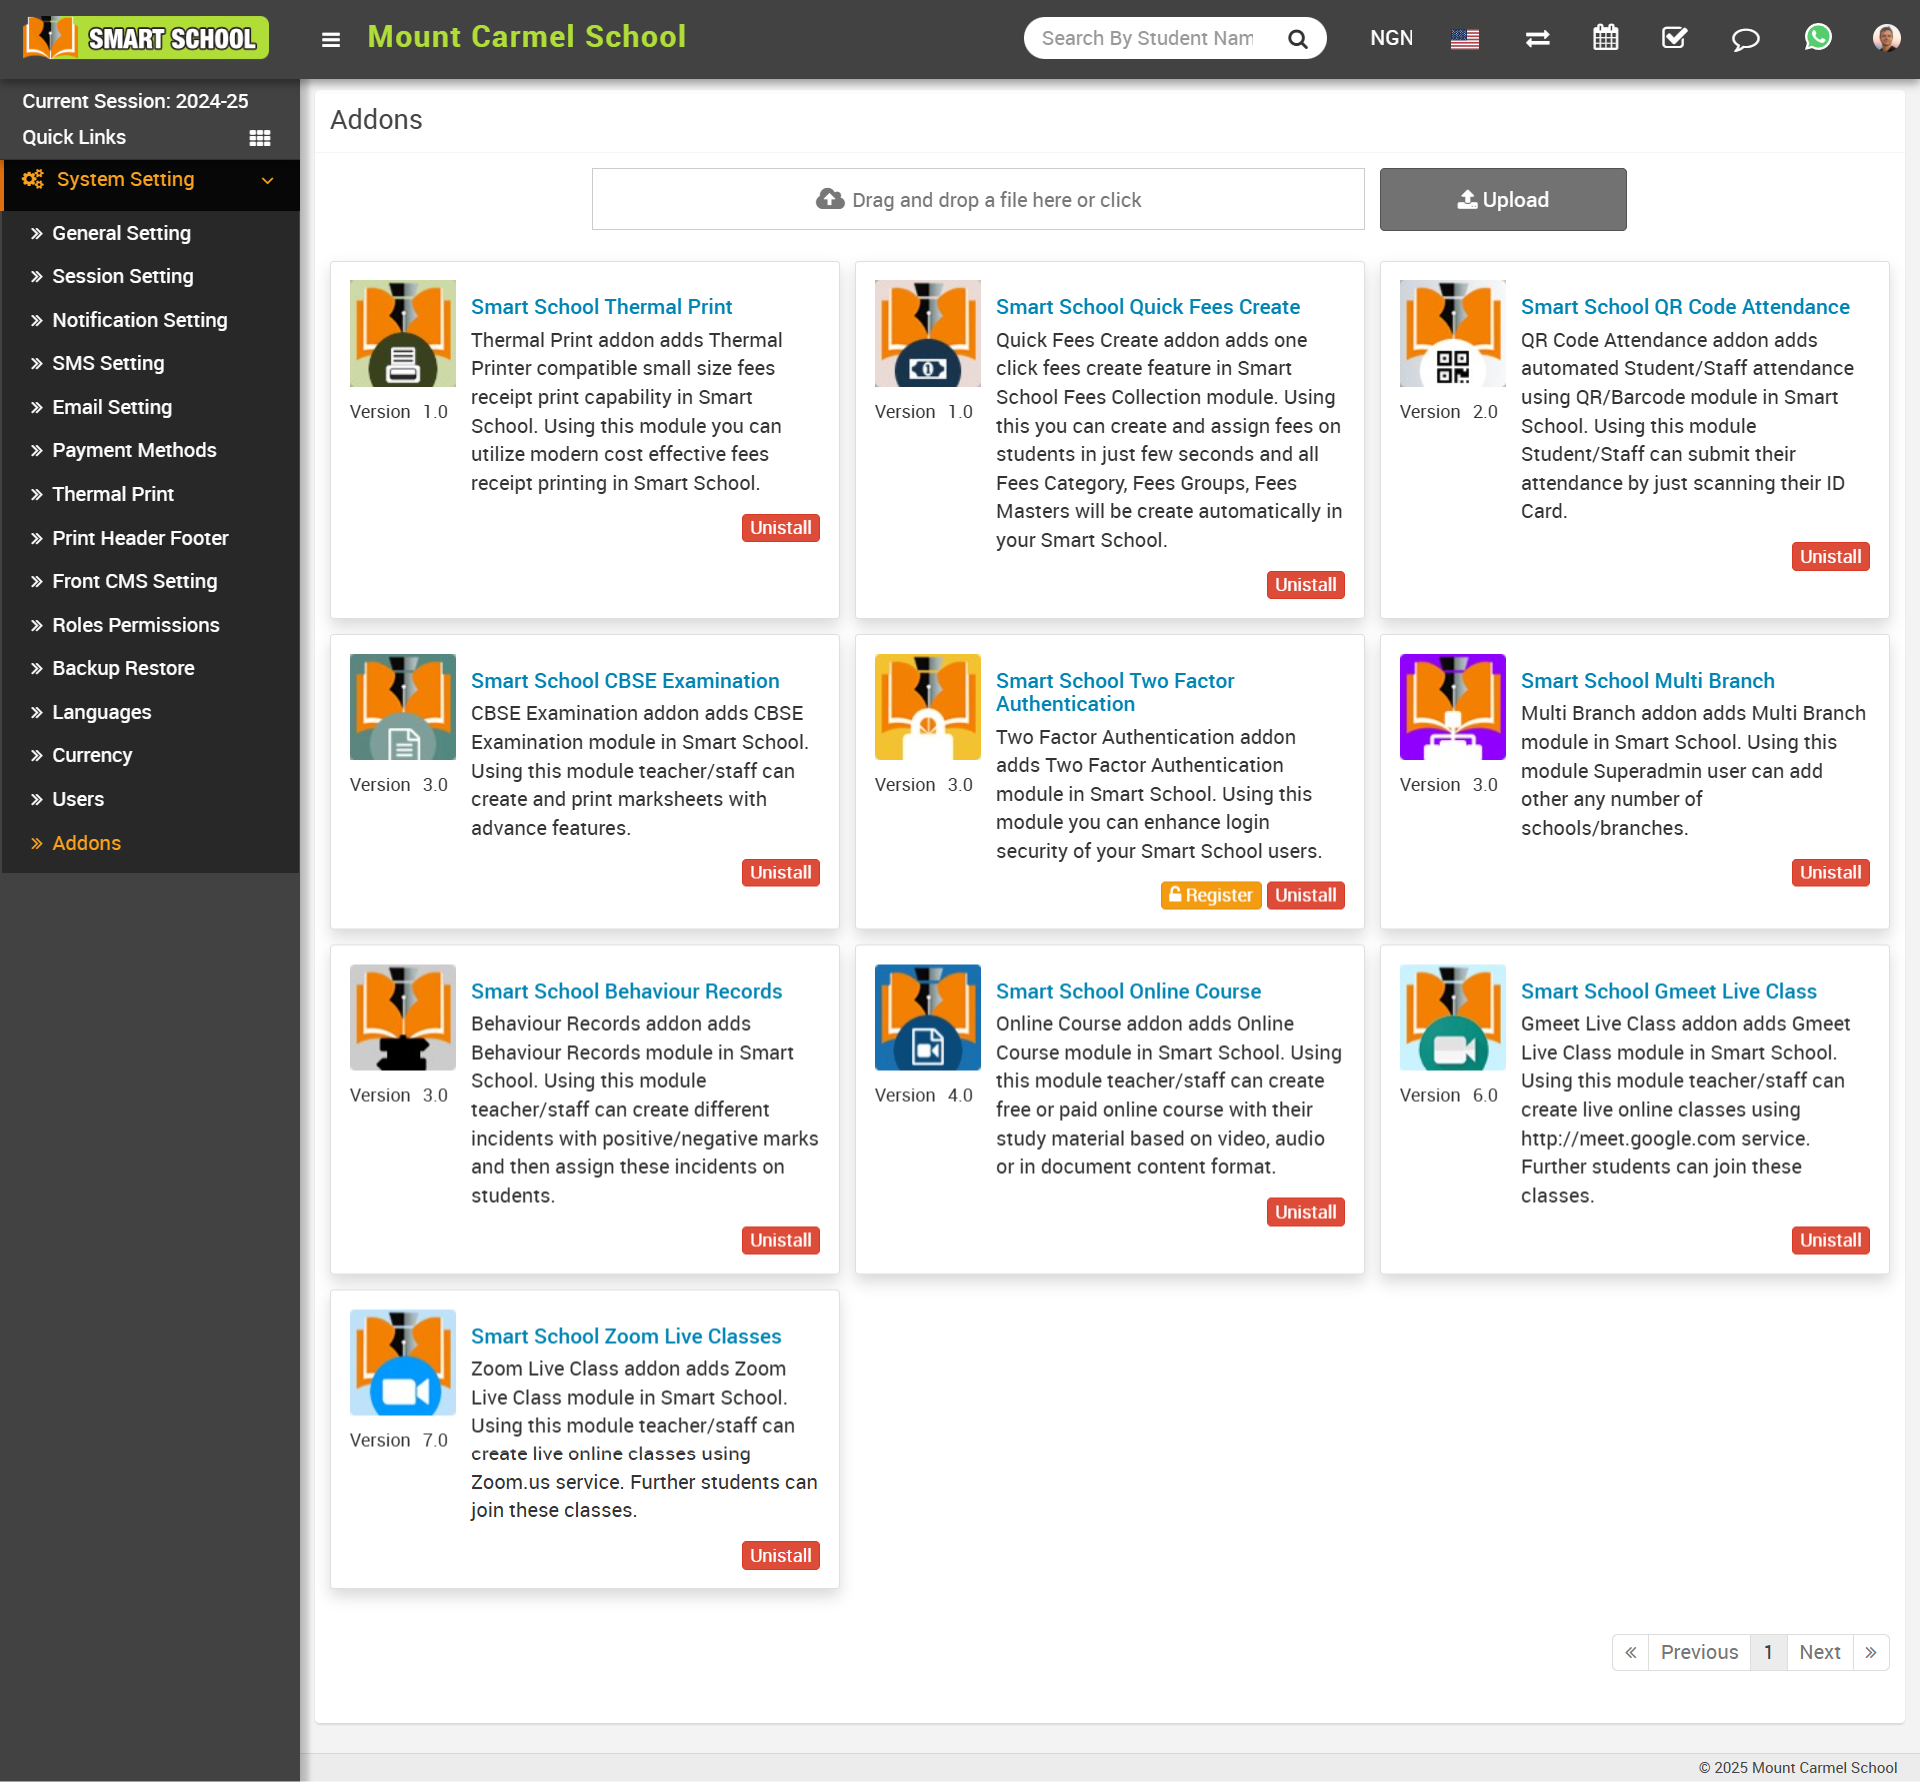
On this page, you can see the upload option. Simply click on the 'Drag and Drop' file option, select the addon file, and click the 'Upload' button. The addon will be successfully added to your system.
About System Settings
About ID Auto Generation
ID auto generation refers to the process of automatically creating a unique identifier for a piece of data or record. This can be done through various methods, such as using a database's built-in auto-incrementing feature, or by generating a random alphanumeric string. The purpose of an auto-generated ID is to ensure that each record in a database has a unique identifier, which can be used to easily retrieve and manage the data.
Student Admission No. Auto Generation

If you keep this mode enabled, than you do not need to manually generate the admission number, it will generate automatically. To Generate Admission No Automatically you have to fill the Admission No. Prefix, Admission No. Digit and Admission Start From and click on save button, your student admission no. auto generation will be active.
Staff ID Auto Generation
To set Staff ID Number automatically go to System Settings > General Setting > ID Auto Generation and set Auto Staff ID from Disabled to Enable.
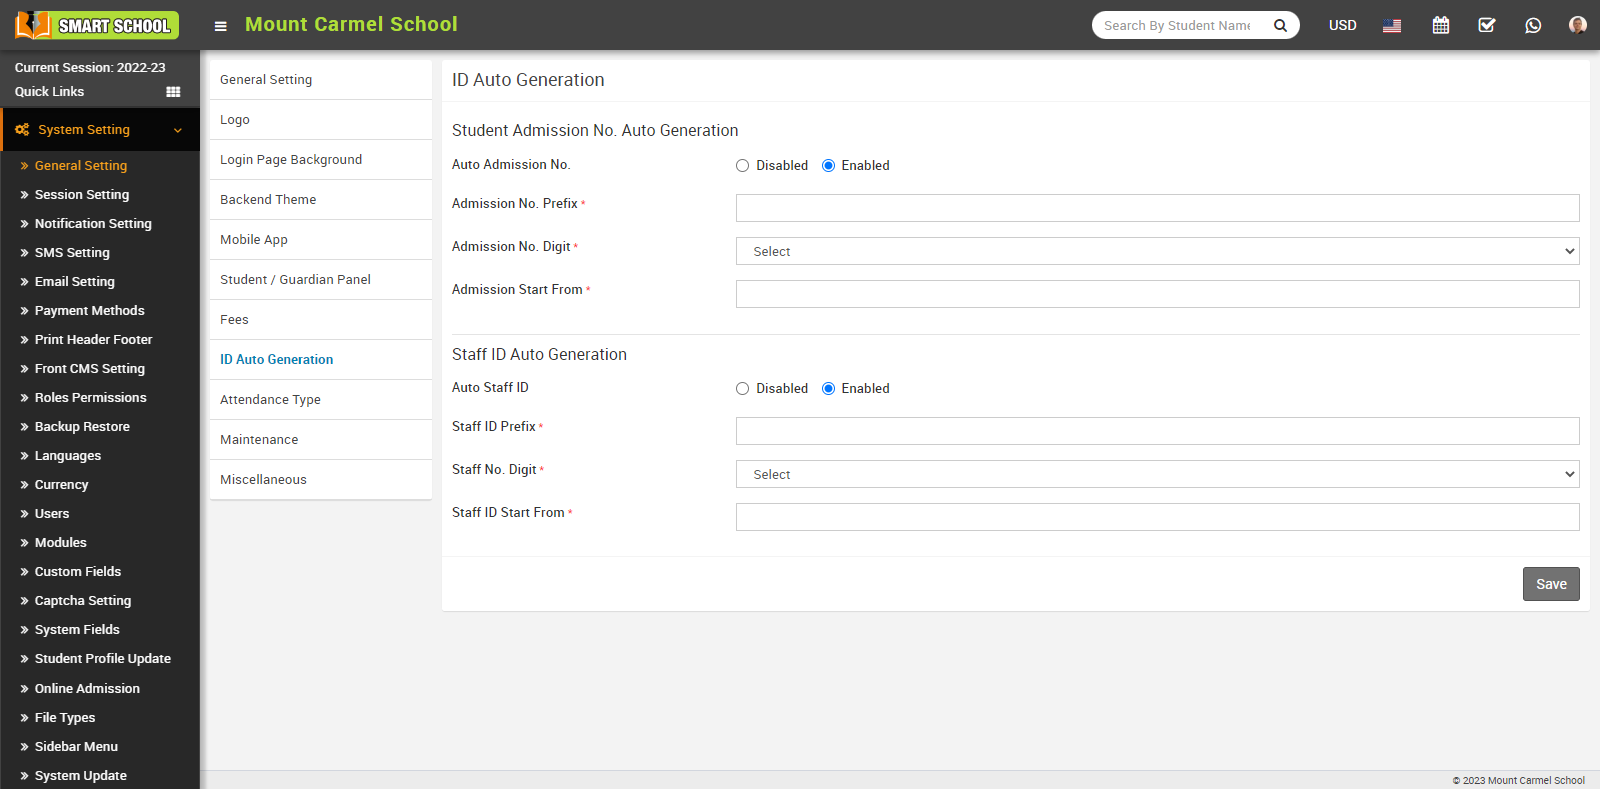
If you keep this mode enabled, than you do not need to manually generate the staff id, it will generate automatically. To Generate Staff ID Auto Generation you have to fill the Staff ID Prefix, Staff No. Digit and Staff ID Start From and click on save button, your Staff ID Auto Generation will be active.
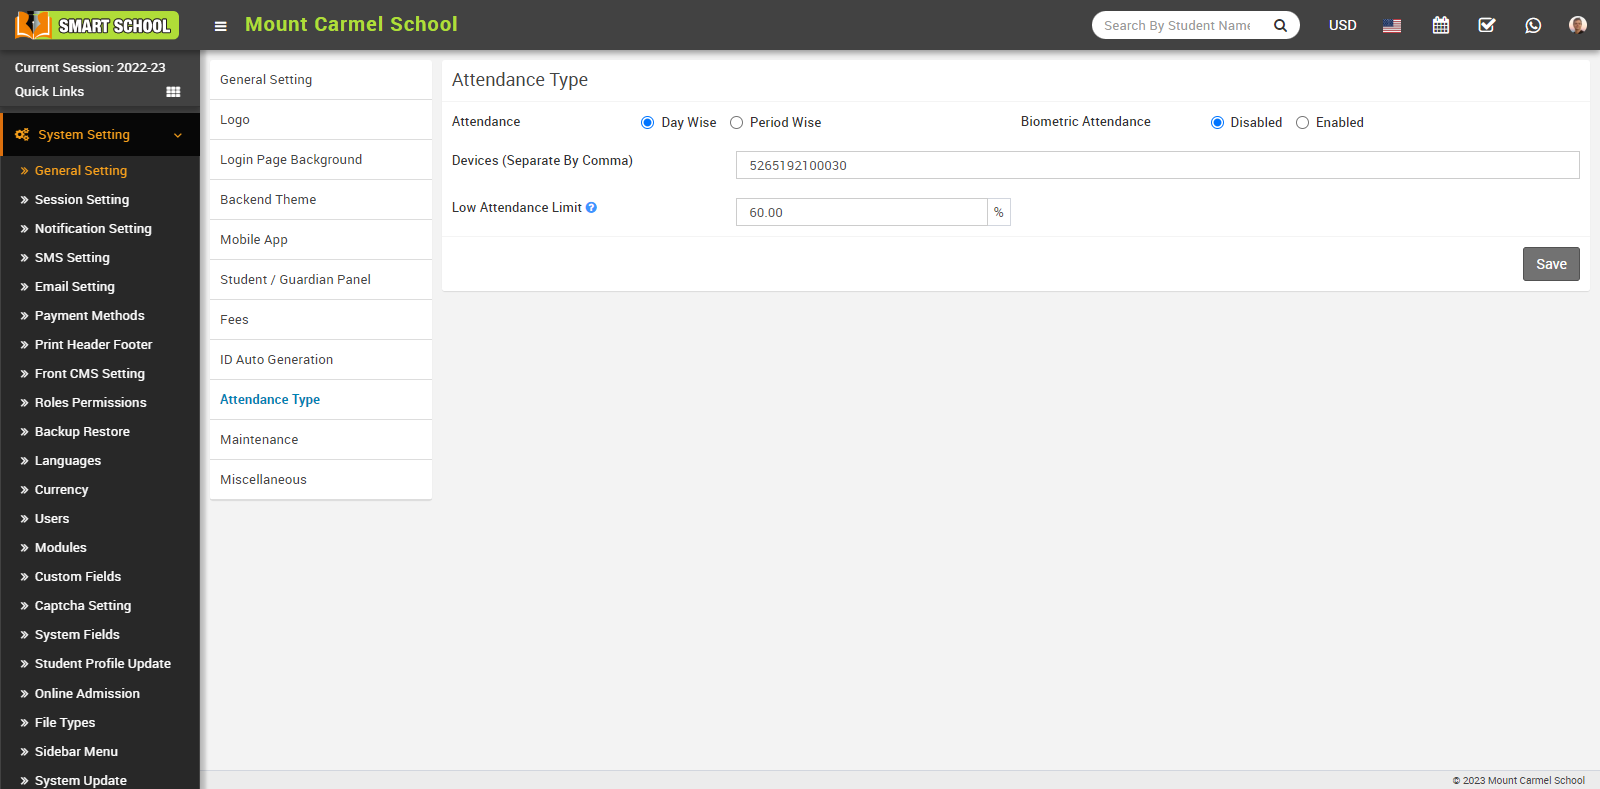
How to manage attendance type?
Attendance module workflow: In smart school, we can use two types of attendance (Attendance and Biometric Attendance). You can run any type at time attendance day wise and period wise and attendance type can be select from System Settings > General Settings. In Attendance Type here select the any one attendance type Day Wise or Period Wise and click on Save button.
In day wise attendance, just you need to go Attendance > Attendance By Date. Here, you have to select the class, section, and attendance by date, then click on the Search button. An attendance list of students will open below, and you can see the attendance of multiple students in that relevant class and section that you set.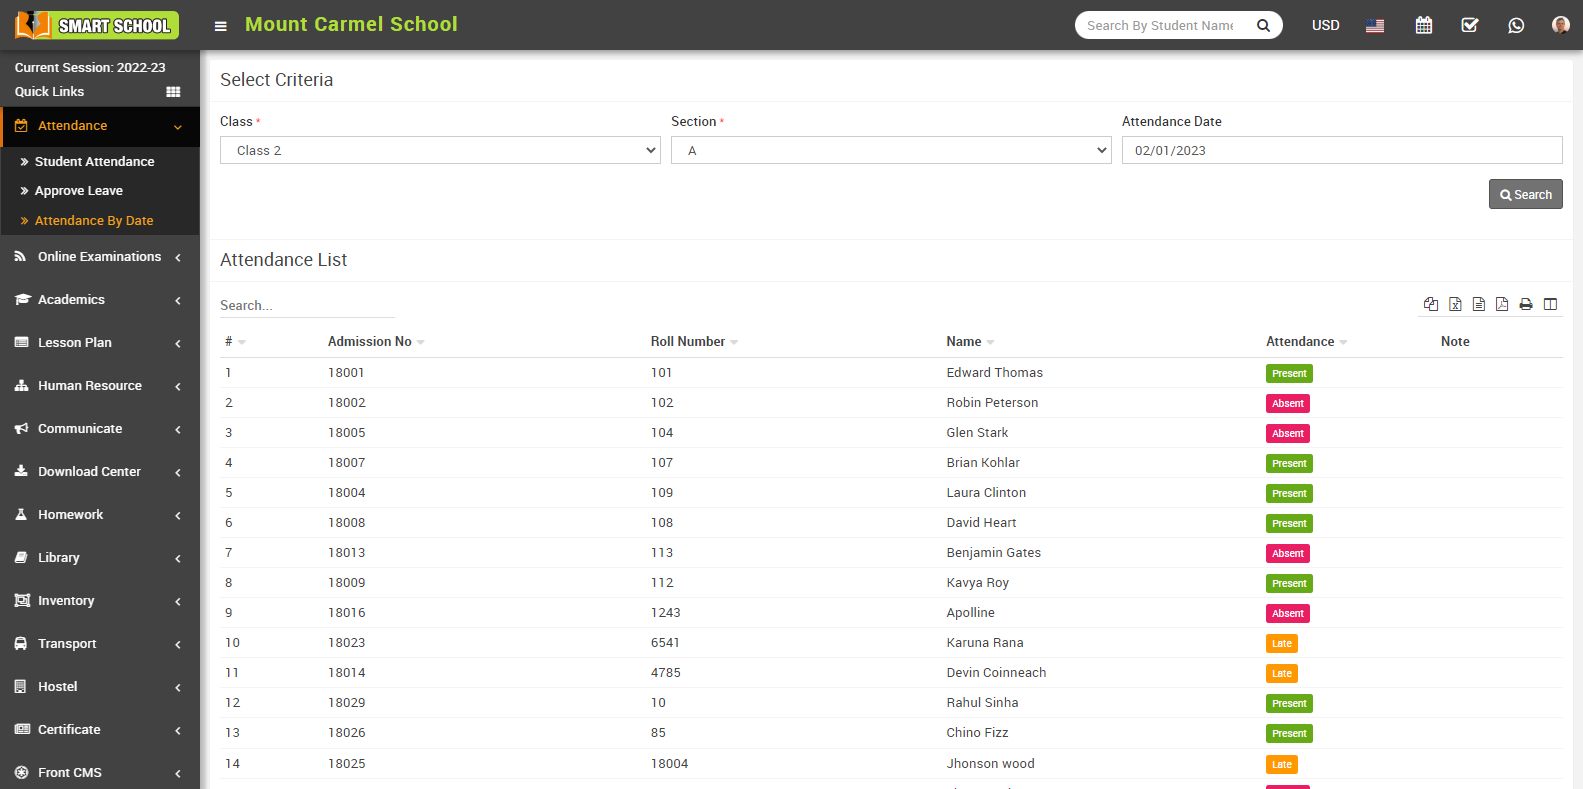
For period wise attendance go to System Setting > General Setting > Attendance Type. Click on the Period Wise checkbox then click on Save button.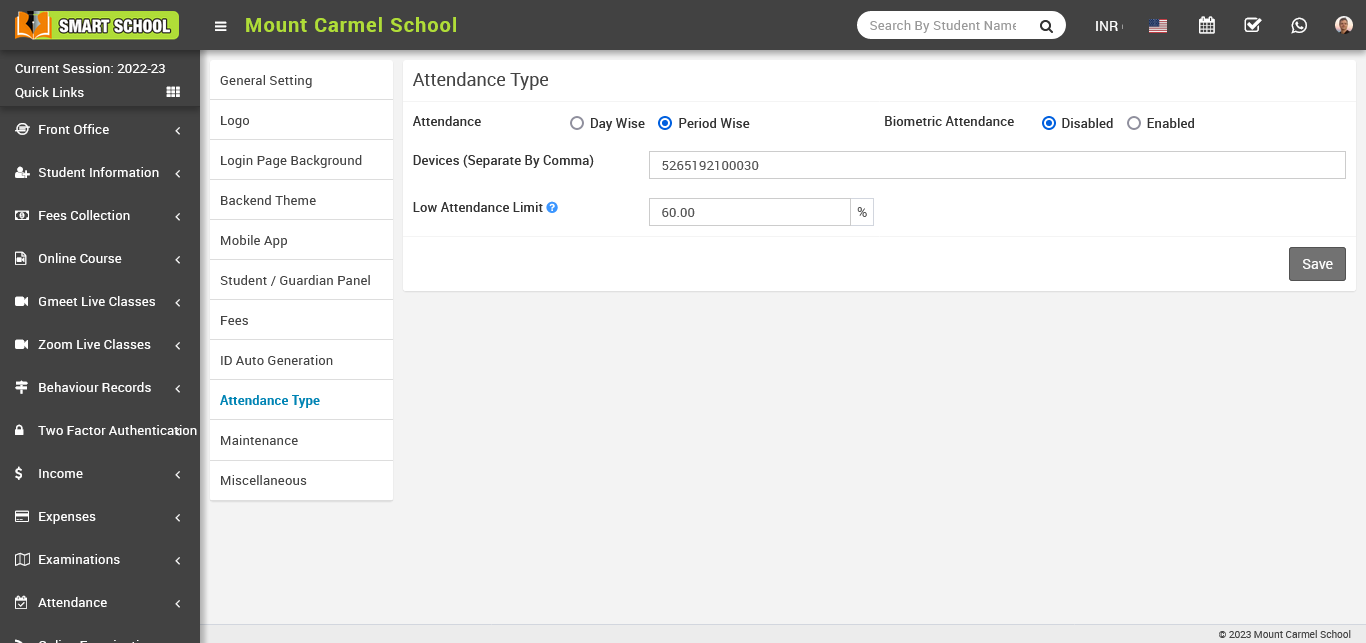
In period wise attendance, just you need to go attendance > period attendance by date. Here, you have to select the class, section, date and subject then click on the search button.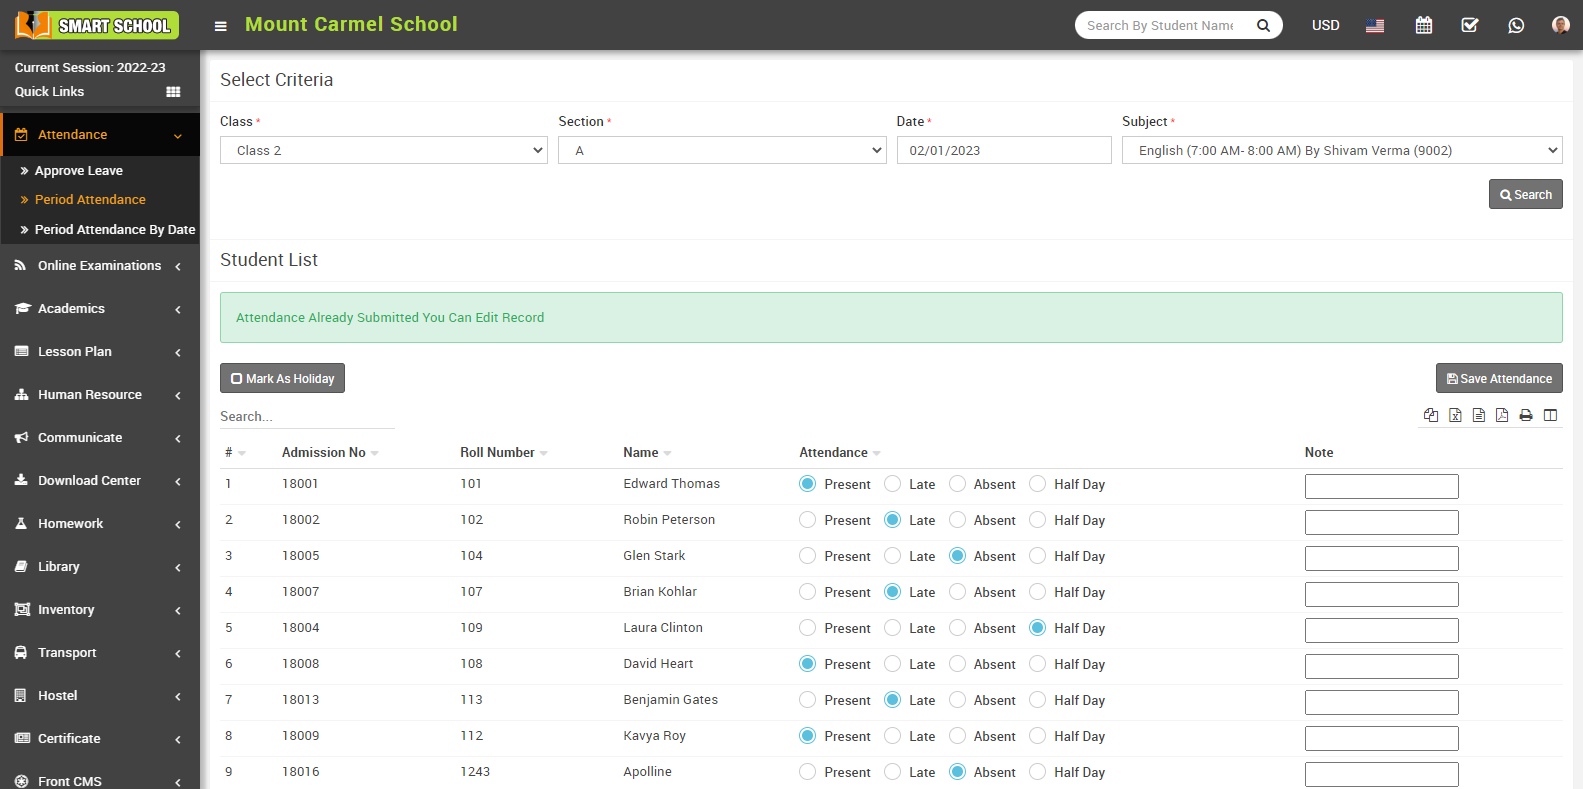
And if you want to see the attendance by date you just need to go attendance > period attendance by date and select the class, section and date than click on search button, Student list will open below, and you can see the period wise attendance of multiple student’s in that relevant class and section that you set.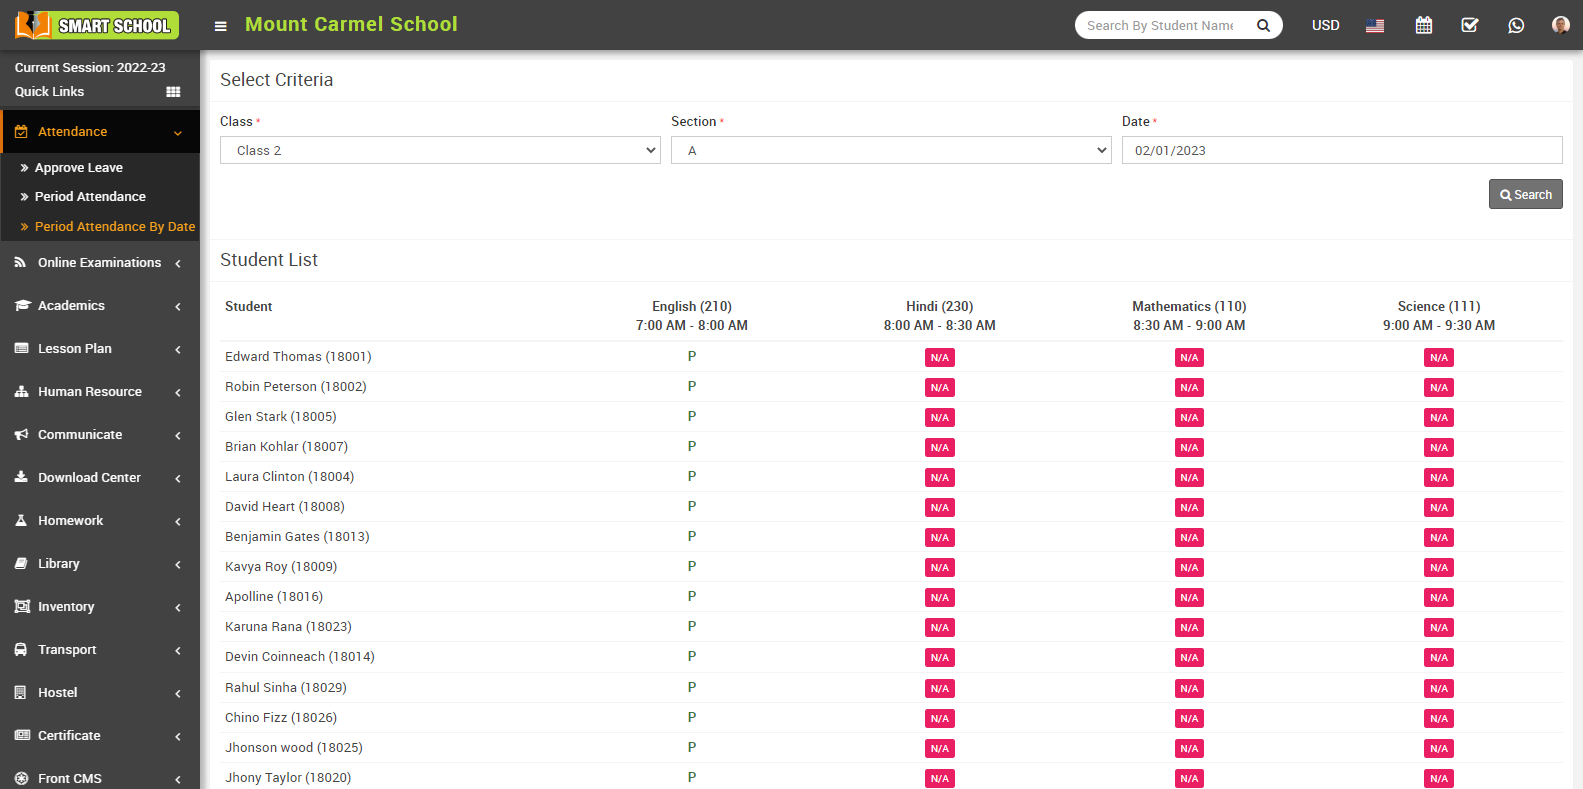
In attendance type, you can also see the option of biometric attendance available. By this feature you can manage the attendance biometrically. Here two option is available, disabled and enabled. When you will keep the biometric attendance disabled and click on save button, class attendance time for auto attendance submission will not be show below and you won’t be able to mark the attendance biometrically.
And if you will keep the biometric attendance enabled and click on save button, class attendance time for auto attendance submission will be show in below and you can mark the attendance biometrically. You just need to set the specific school time for every class and section and click on save button which is showing on right below.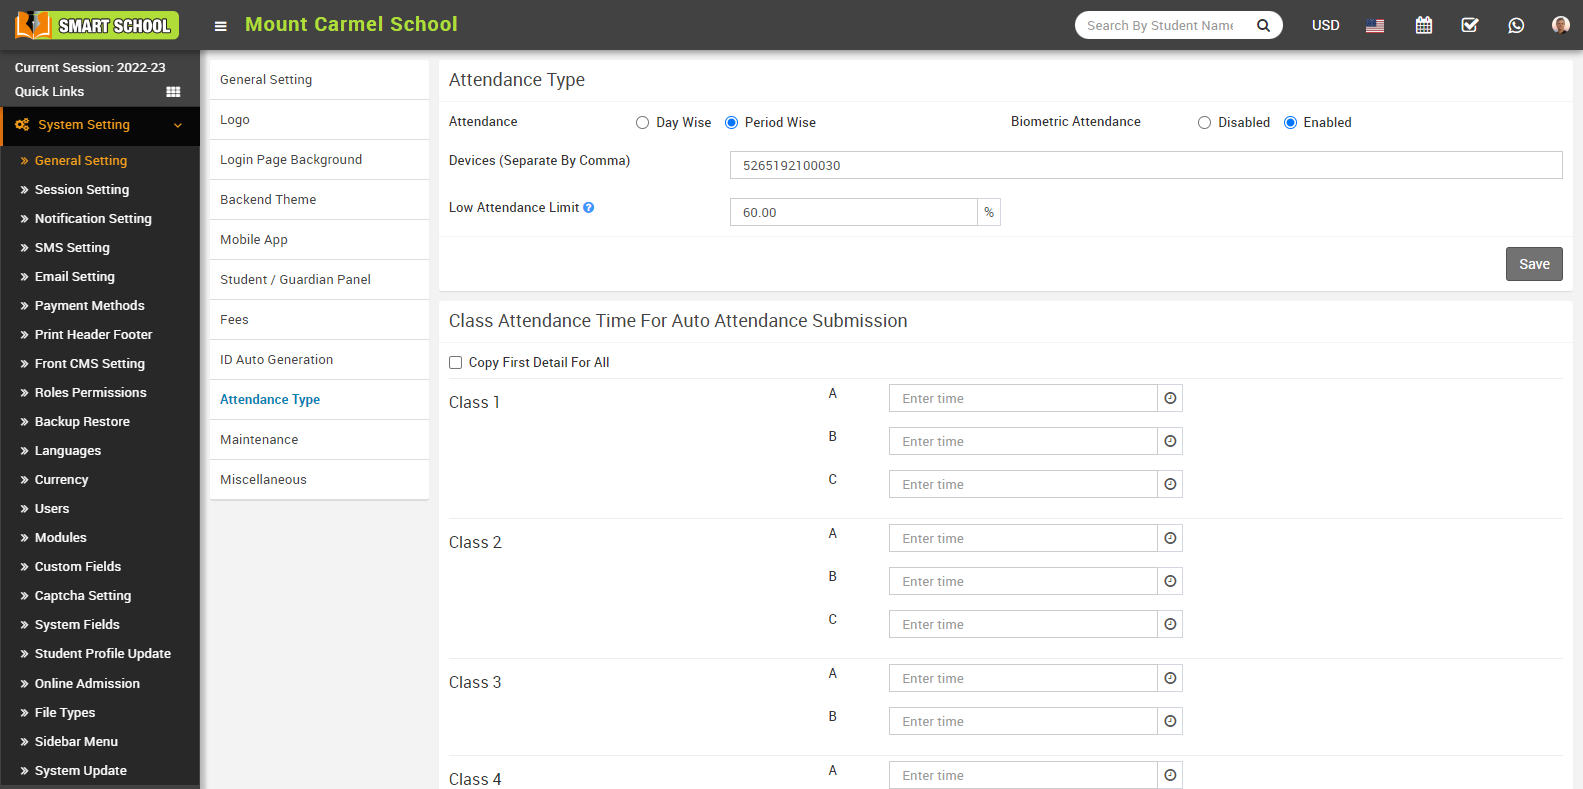
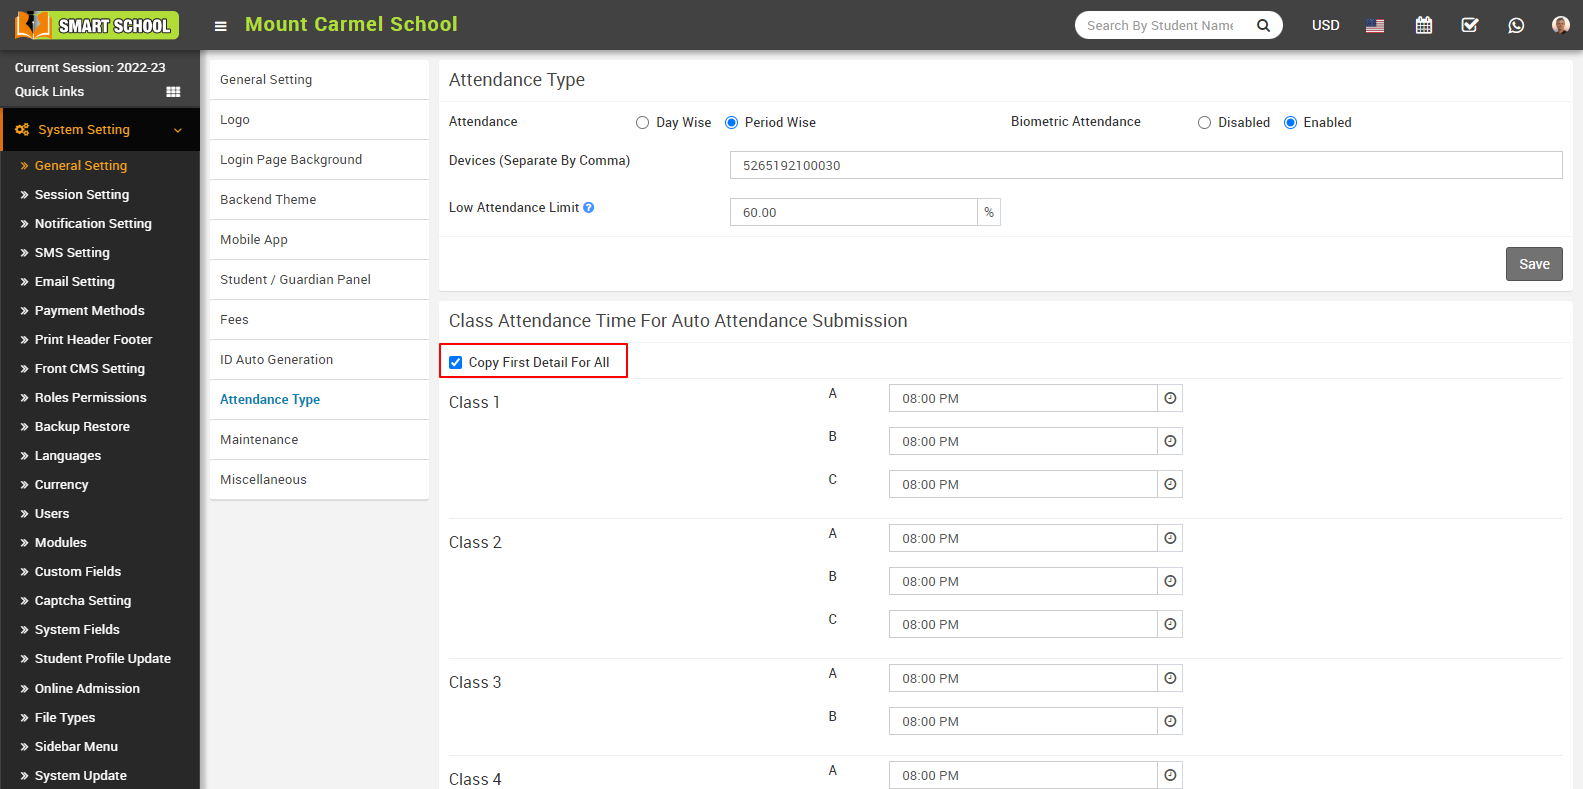
Note: - if you want to set the same time for every class and section, you need to check the checkbox of copy first details for all.
Devices (Separate By Comma)
When using multiple biometric devices, you need to manage their respective device IDs by separating them with a comma. Simply fill biometric ID in the input field, and if you want to fill in another biometric ID, just mark the comma and fill in the next ID. Repeat this process for each additional biometric device..png)
Low Attendance Limit
To Low Attendance Limit, you need to go System Setting > General Setting > Attendance Type. In attendance type, you can see the last option of low attendance limit.
With the help of this feature, you can set the limit of attendance in the form of a percentage and then click on the save button. The attendance limit will be set and a message will be displayed on the student dashboard. In the low attendance limit, one question mark is available, it will show as Below it attendance will be mark as low attendance.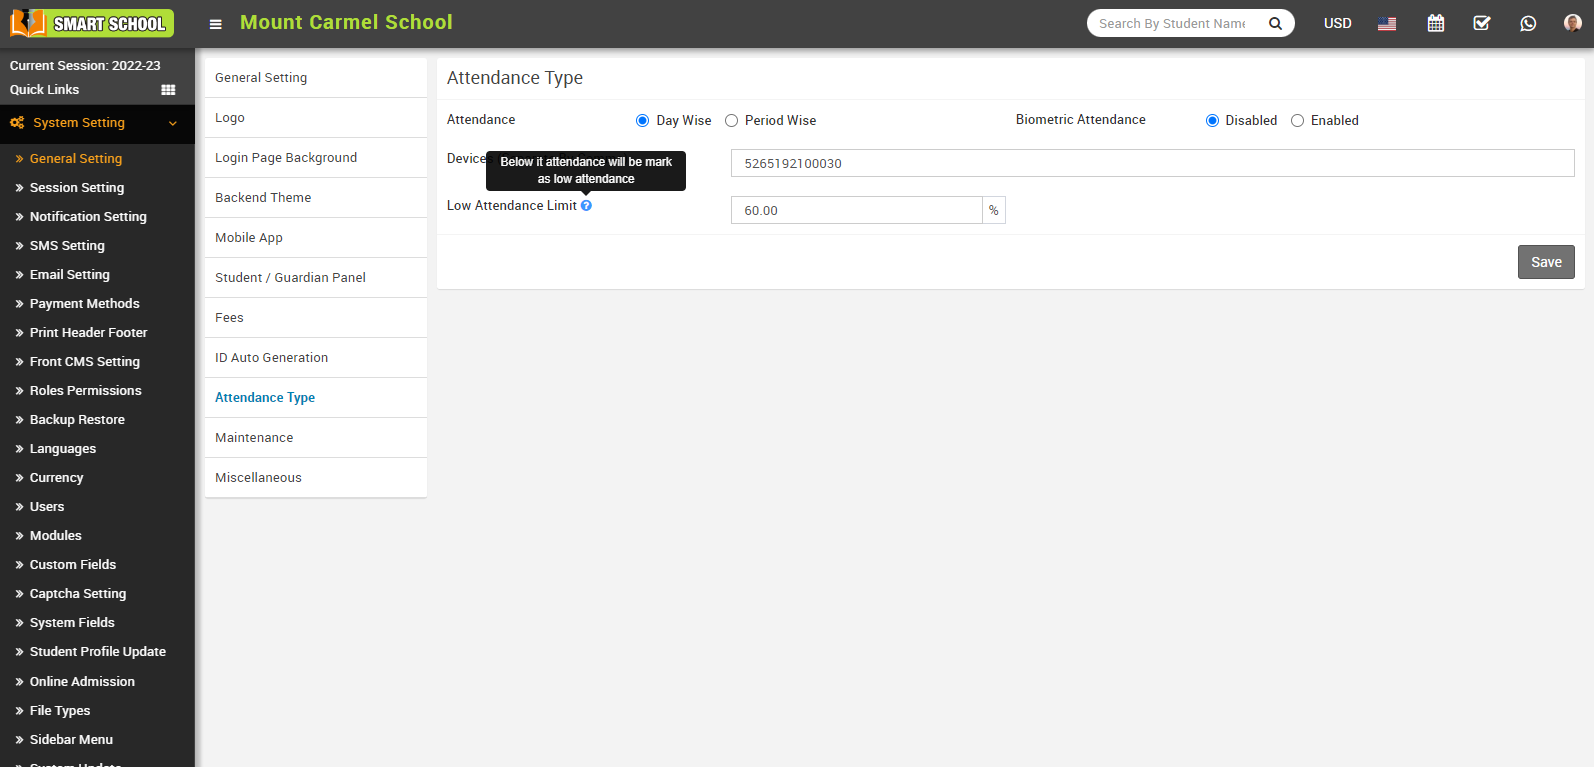
If you do not set a low attendance limit, no messages will appear in the dashboard. 
If student get the lower attendance, which is lesser than the low attendance limit so that it will show the red alert message in the dashboard. Which means student attendance is not as per the required attendance. 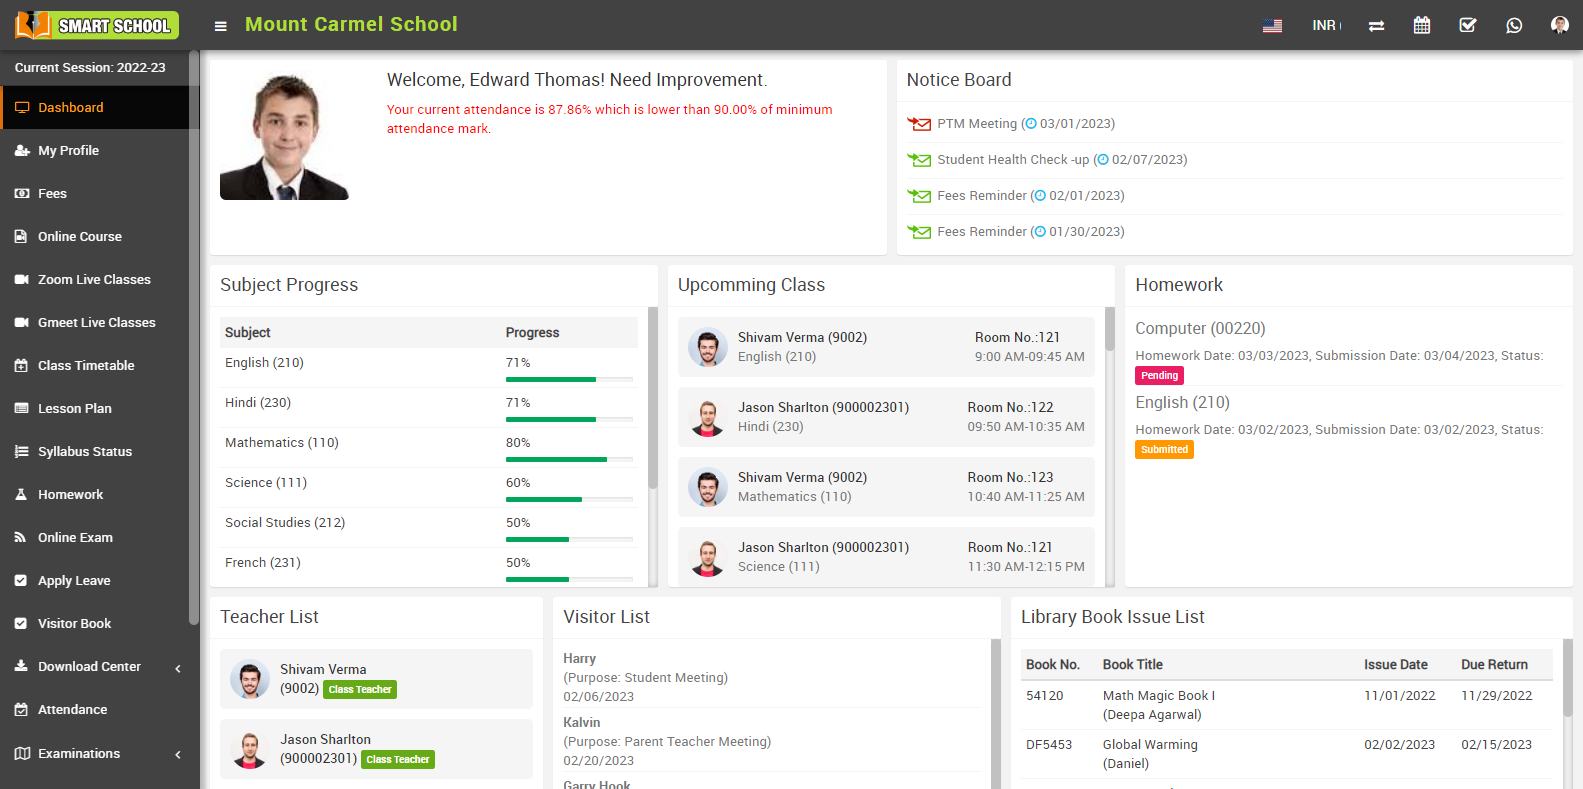
If student get the maximum attendance, which is more than the low attendance limit so that it will show the green alert message in the dashboard. Which means student attendance is as per the required attendance. 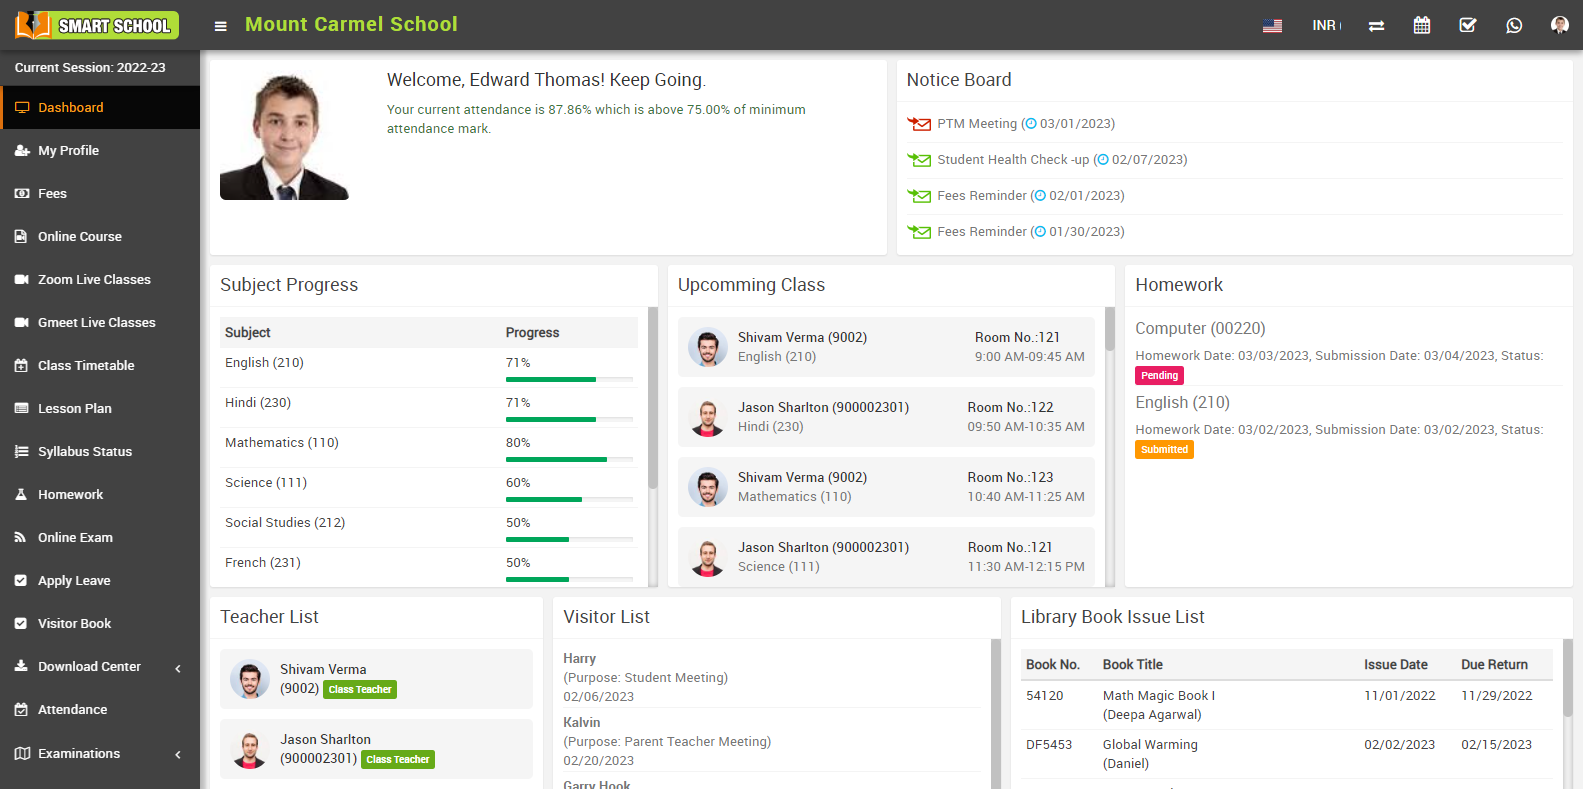
How to manage miscellaneous?
Show Me Only My Question
To show only my questions, go to System Settings > General Settings. Under Miscellaneous, you will find the 'Show Only My Questions' setting.
Enabled this setting allows a teacher to hide their own questions, preventing other teachers from seeing them.

When 'Show Only My Questions' is disabled, other teachers can view these questions which you have added.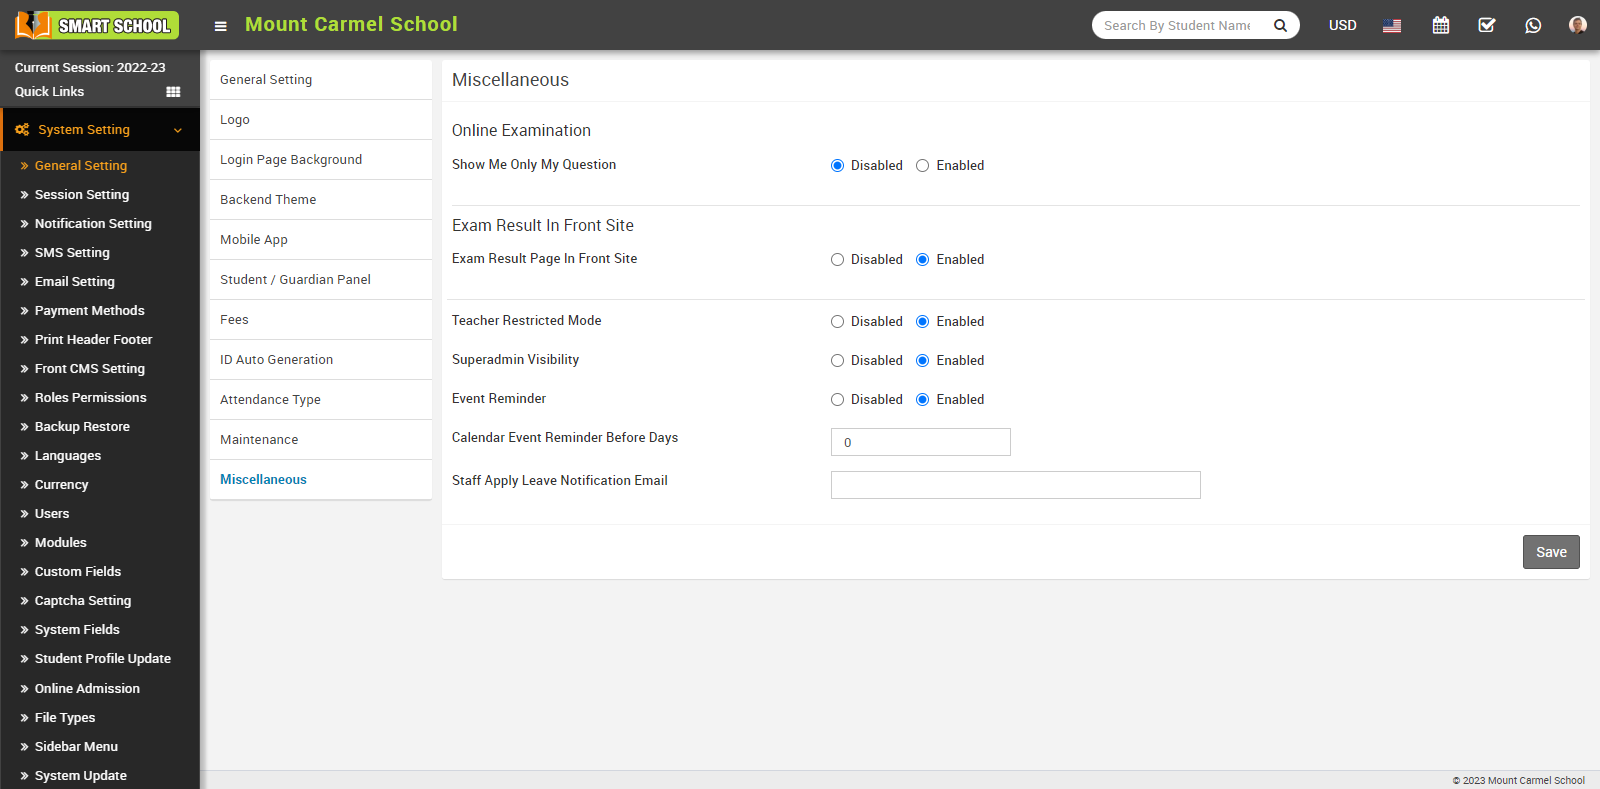
Note - If the 'Show Only My Questions' option is enabled and the Teacher Restricted Mode is disabled, then the teacher can only view the list of questions they have added. If the Teacher Restricted Mode is enabled, and the 'Show Only My Questions' option is enabled/disabled, then the teacher can only add/see the questions list of the class in which they are assigned as the class teacher or subject teacher.
Exam Result Page In Front Site
Go to System Settings > General Setting > Miscellaneous, here you can see Exam Result In Front Site is Disabled.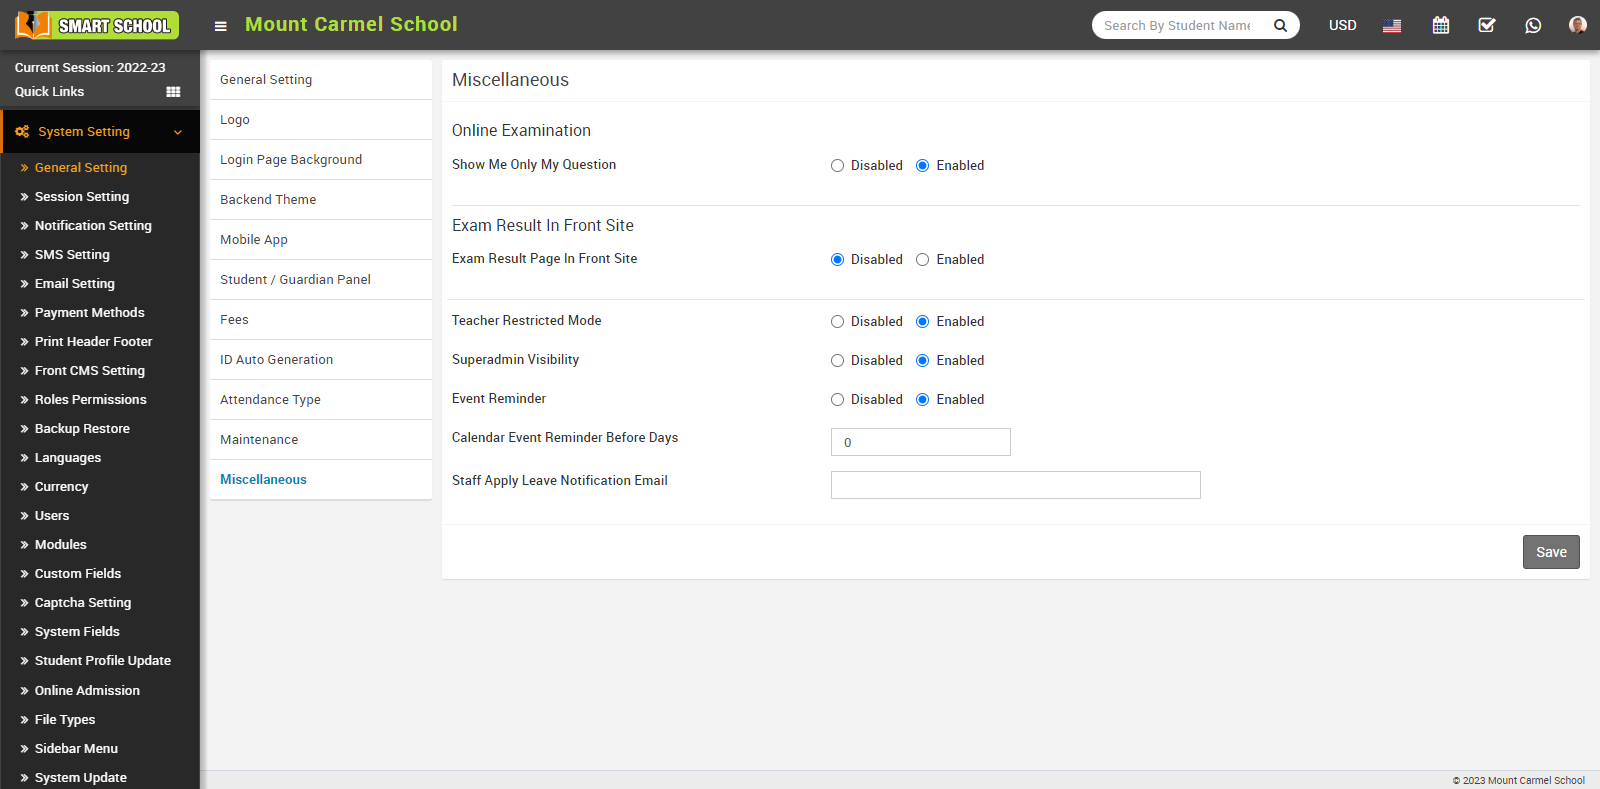
Now click on the enabled button, then click on the Save button.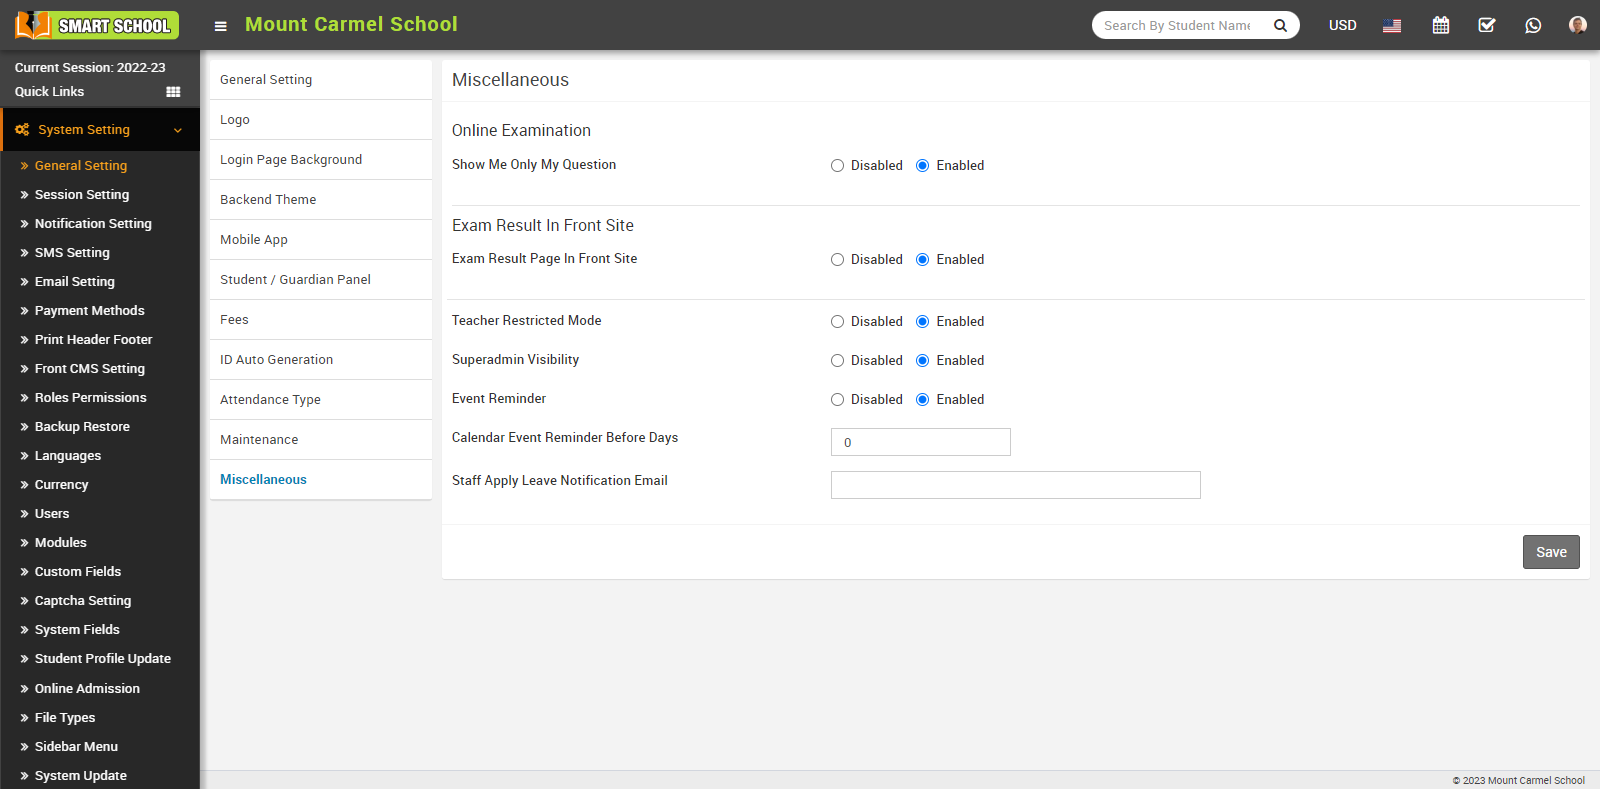
When you Enabled the "Exam Result Page In Front Site," you can view Exam Result on your Smart School's front site. In this module you can see admission number tab and exam drop down available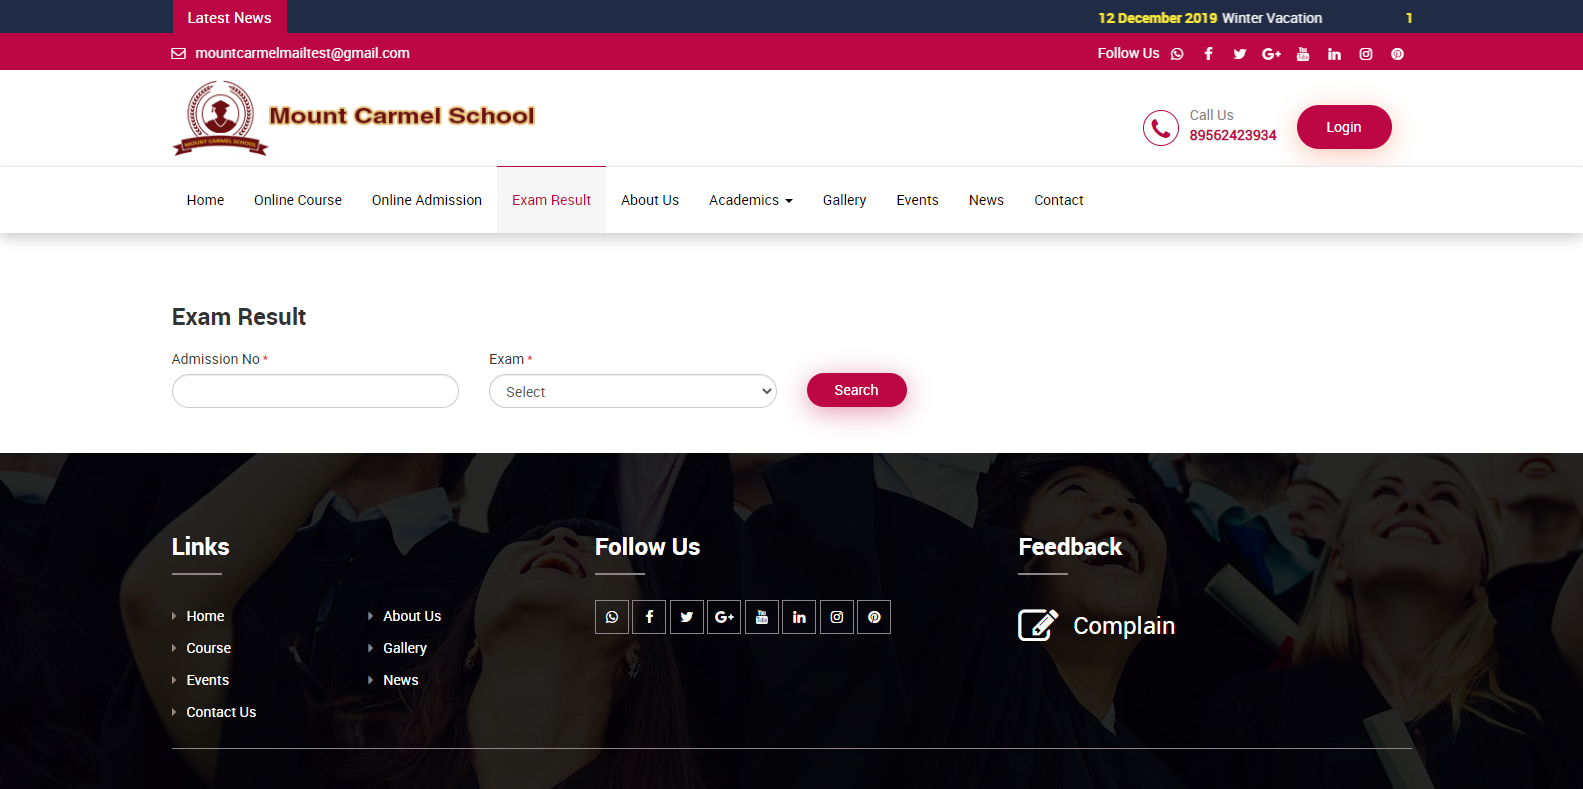
Teacher Restricted Mode
When 'Teacher Restricted Mode' setting is disabled, teachers can access all student data.
However, when 'Teacher Restricted Mode' is enabled, they can only see student data related to their assigned class, section, or subject.
Superadmin Visibility
To superadmin visibility, go to System Settings > General Settings > Miscellaneous. Here you can see the option of Superadmin Visibility. With the help of this superadmin can disable or enable his visibility.
In superadmin visibility setting, superadmin can show and hide his / her name in any smart school module where name of superadmin displaying.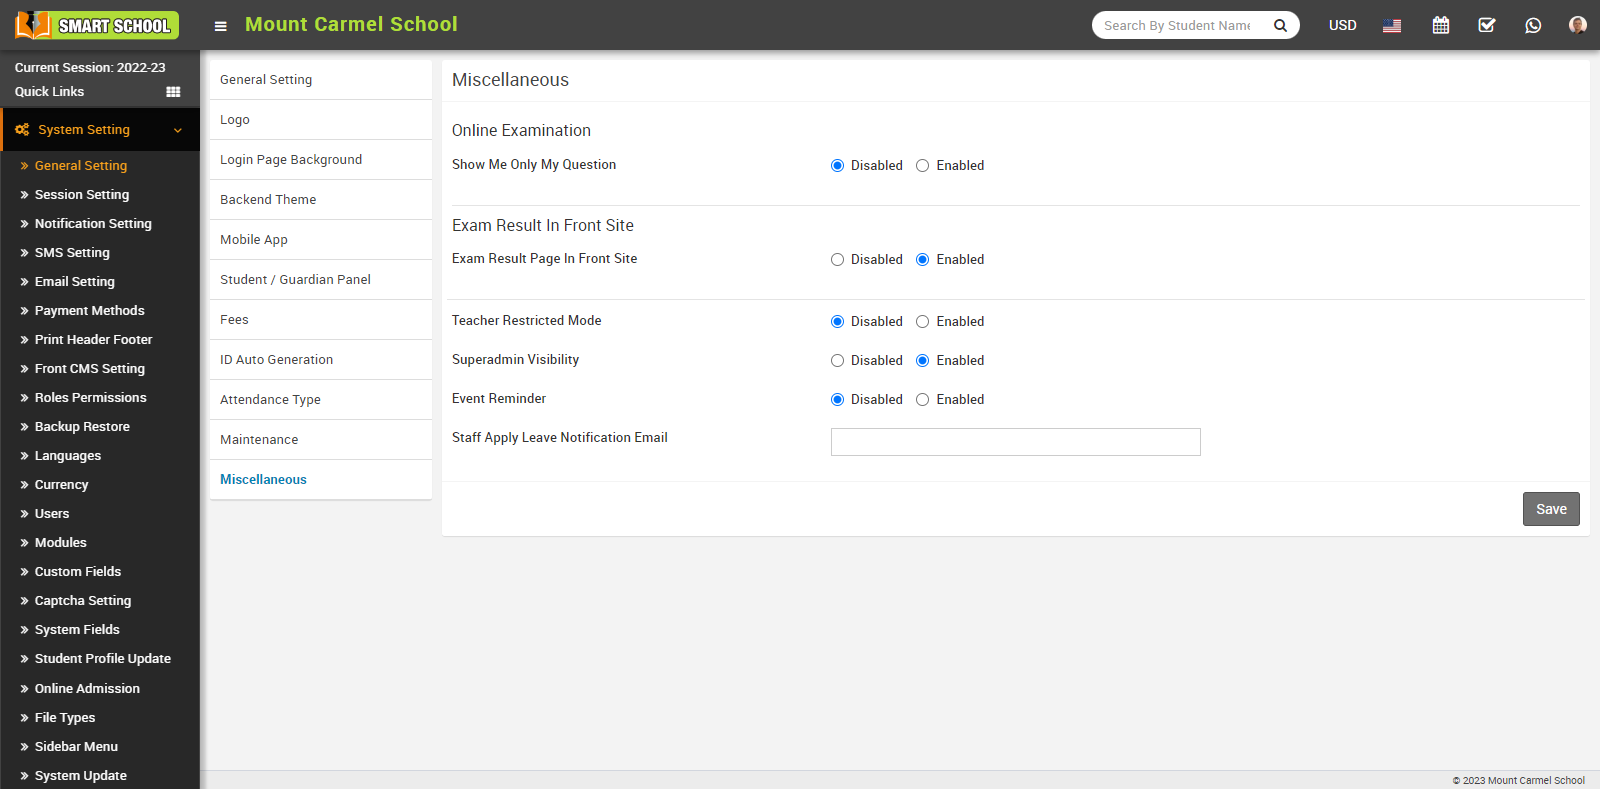
To Enable the visibility of the superadmin, click on the Enable button, then click on the Save button then other users will be able to see superadmin name.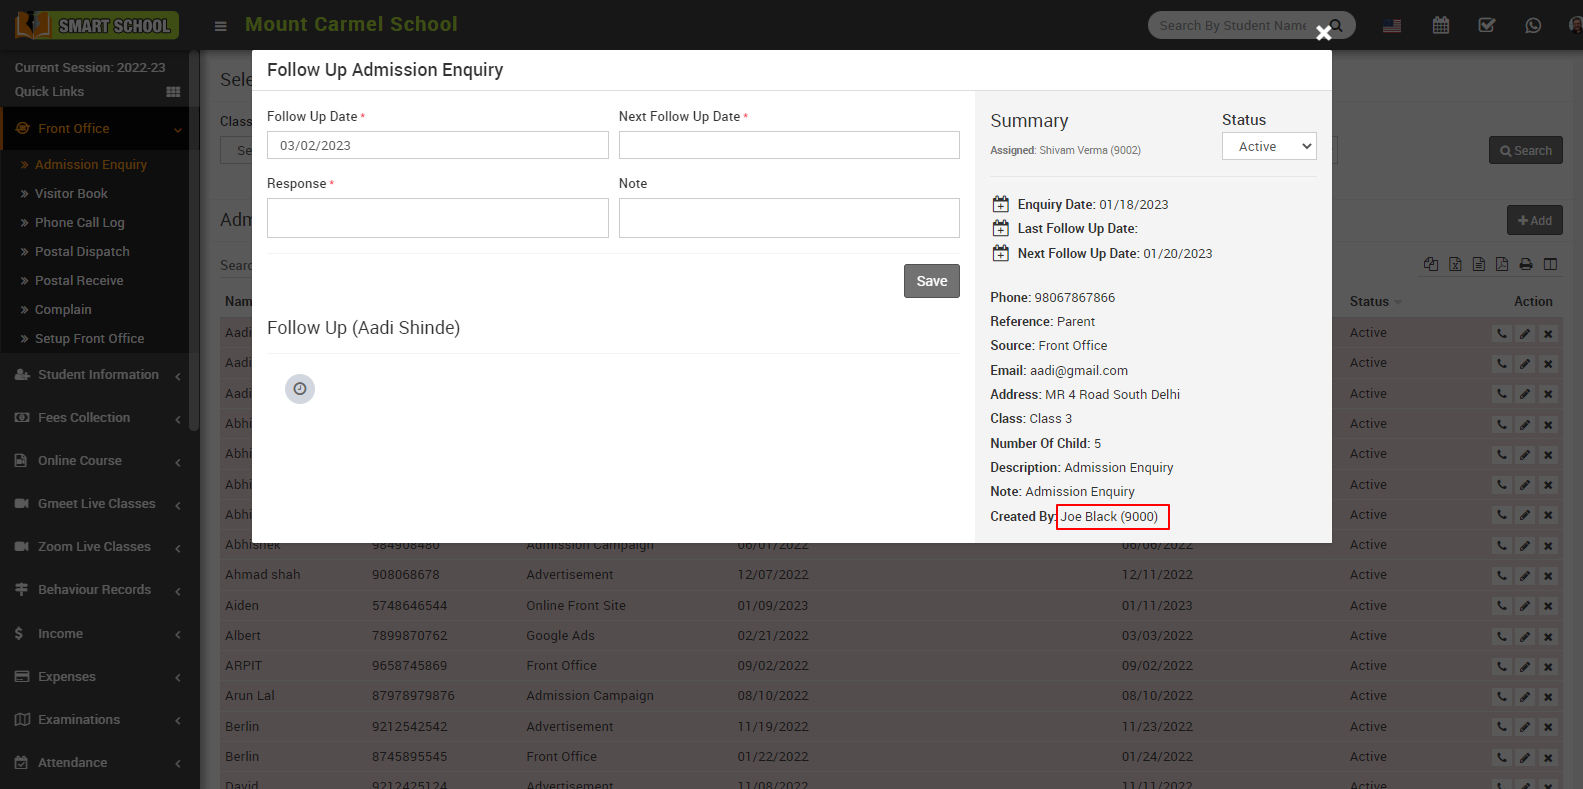
To Disable the visibility of the superadmin, click on the Disable button, then click on the Save button then other users will be not be able to see superadmin name.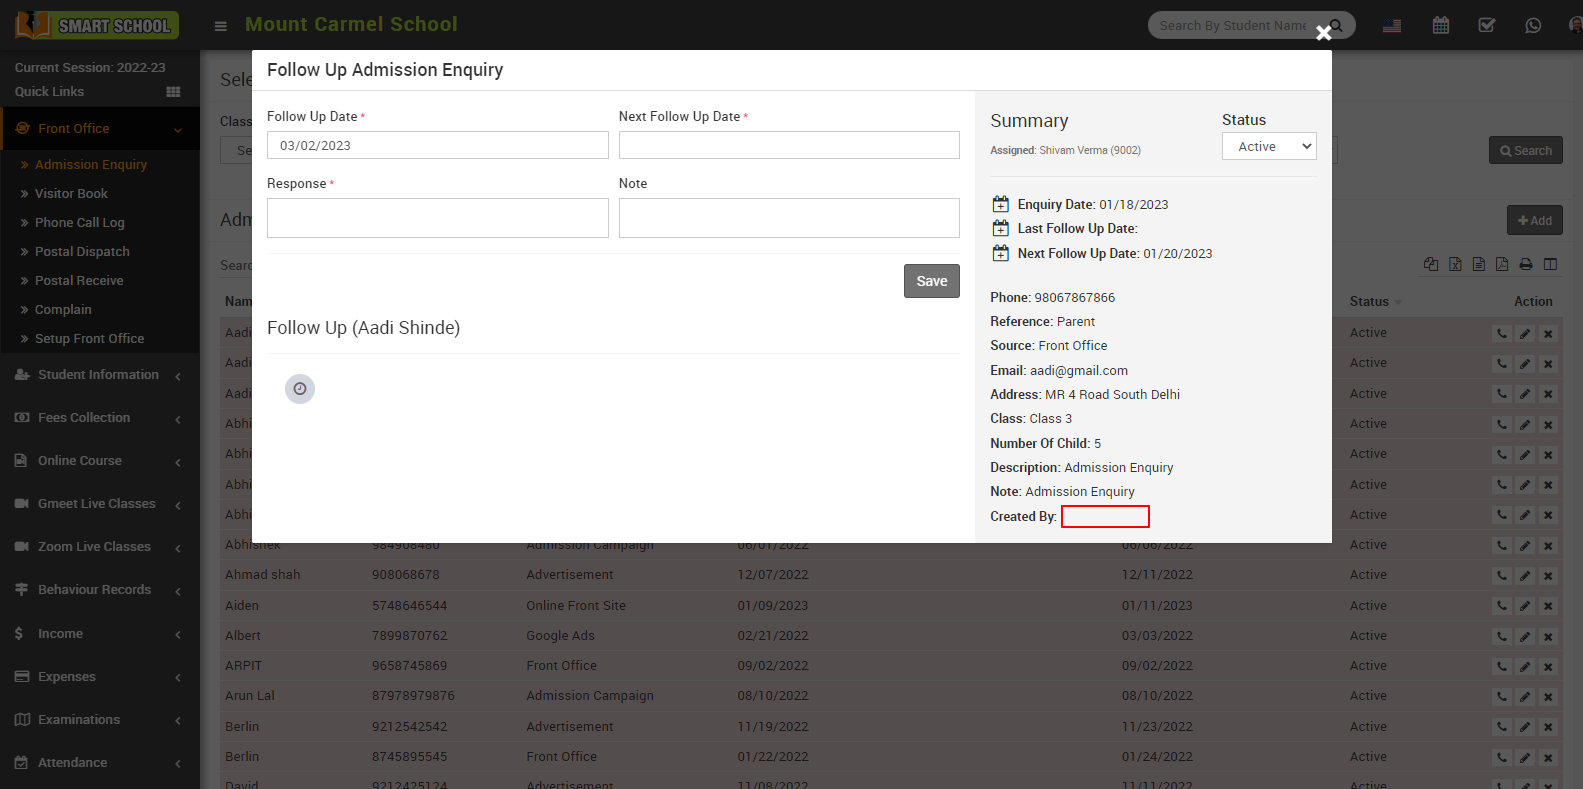
Event Reminder
Event reminders are notifications that you can set up to remind you of upcoming events or tasks in your calendar. These reminders can help ensure that you don't miss important appointments or deadlines, and can be especially useful for individuals with busy schedules.
To Event Reminder, go to System setting > General Setting > Miscellaneous, here you can Disabled or Enabled, the Event Reminder.
If you set the event reminder to Disabled, user will not receive any reminders.
When you Enable an event reminder, the 'Calendar Event Reminder Before Days' field will automatically appear, allowing you to specify the number of days before the event that you wish to receive the reminder and click on Save button.
If you set the 'Calendar Event Reminder Before Days' field to 0, user will receive a reminder on the day of the event. If you set it to 1, they will receive a reminder one day before the event, and if you set it to 2, they will receive a reminder two days before the event. You can set the reminder according to your convenience.
Once you've set up your reminders, you should start receiving notifications according to your chosen settings. It's important to make sure your device is set up to receive notifications from your calendar application, and that your notification settings are properly configured. This will ensure that you receive your reminders on time and don't miss any important events.
Staff Apply Leave Notification Email
To view the staff apply leave notification email, go to System Setting > General Setting > Miscellaneous. Here you can view the Staff Apply Leave Notification Email.

A staff apply leave notification email is a message sent by a staff member to their authorised person in your smart school who will have authority to approve, disapprove, or pending the leaves, so the email addresses of those whose work relates to approve, disapprove, or pending the leaves must be filled in the staff apply leave notification email.
How to manage maintenance?
For maintenance, go to System Setting > General Setting, then Maintenance. Here you can disabled or enabled maintenance mode.
When you keep disabled the maintenance mode, student's can login their panel.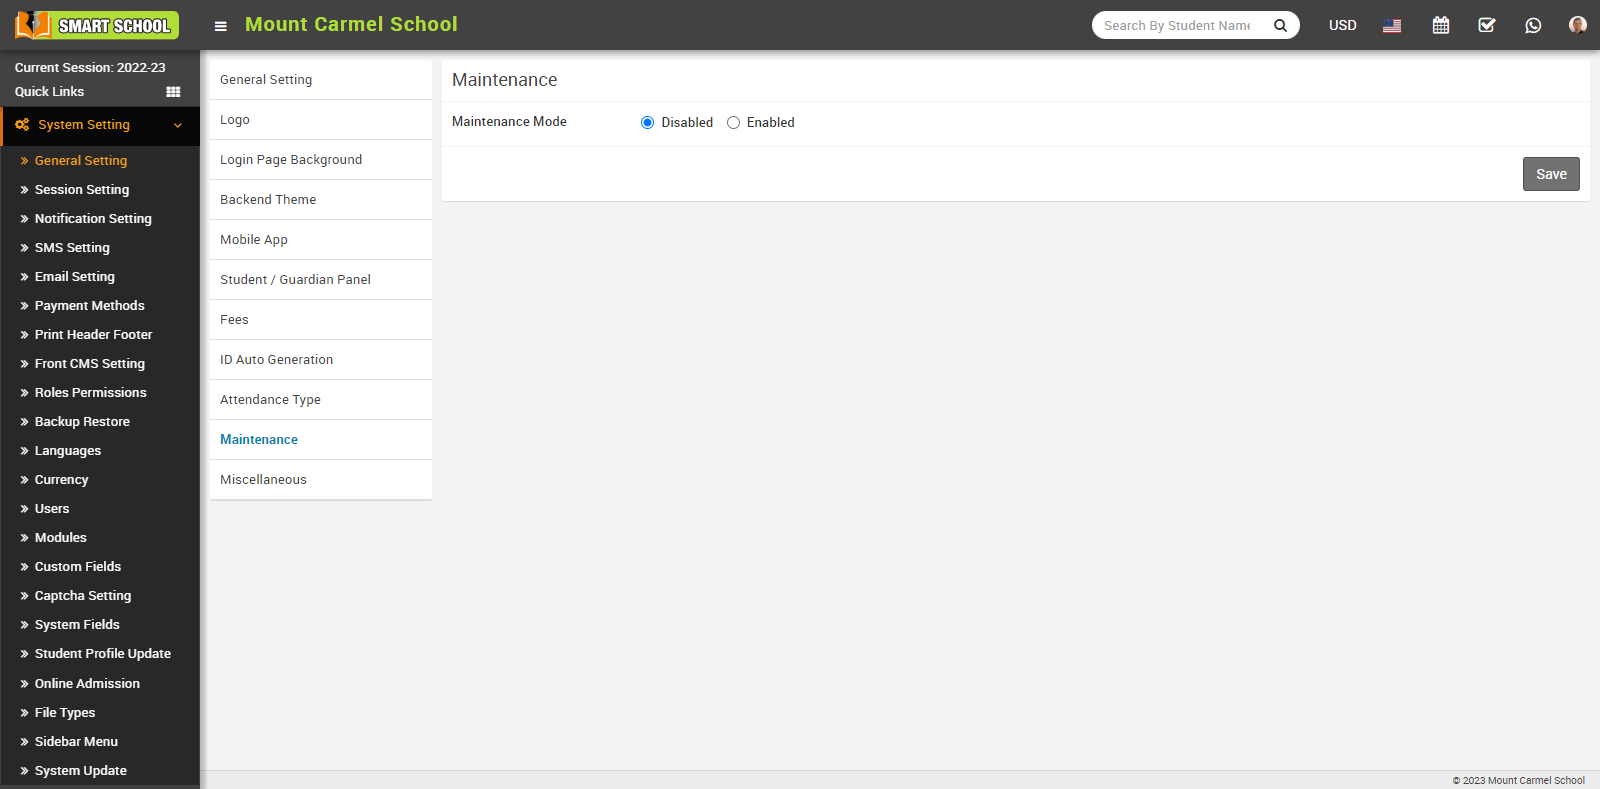
When you Enabled maintenance mode and click the Save button.
The student login page will no longer function, instead, it will display Site Under Maintenance. 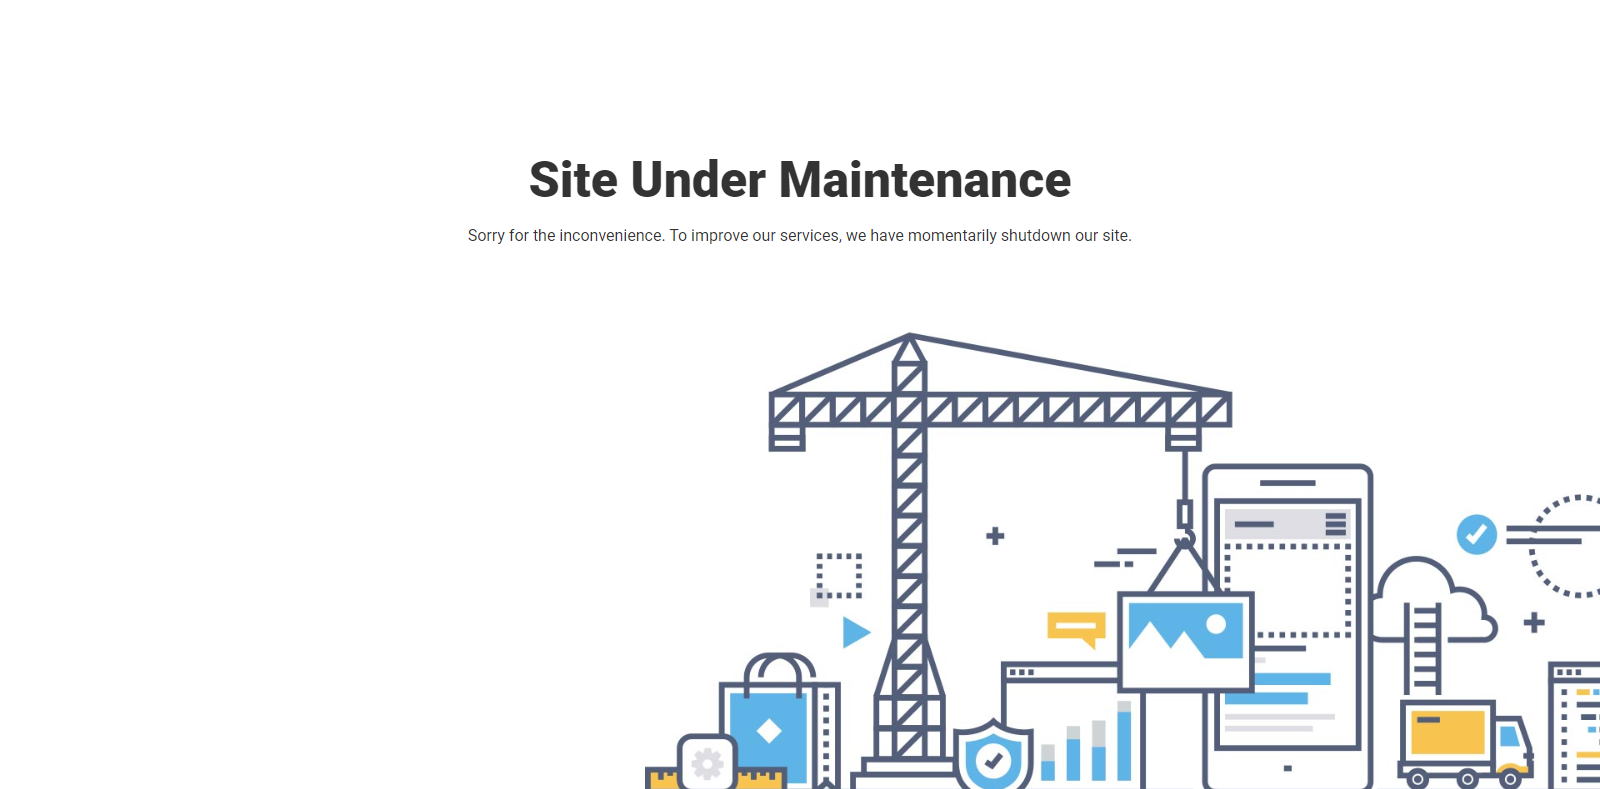
How to manage fees settings?
Offline Bank Payment In Student Panel
For offline bank payment in the student panel, go to System Setting > General Setting, then Fees. Here you can Disabled or Enabled offline bank payment in the Student Panel.
When you Enabled Offline Bank Payment In Student Panel permission, the Offline Bank Payment tab will appears in the student panel, allowing students to pay their fees by offline mode.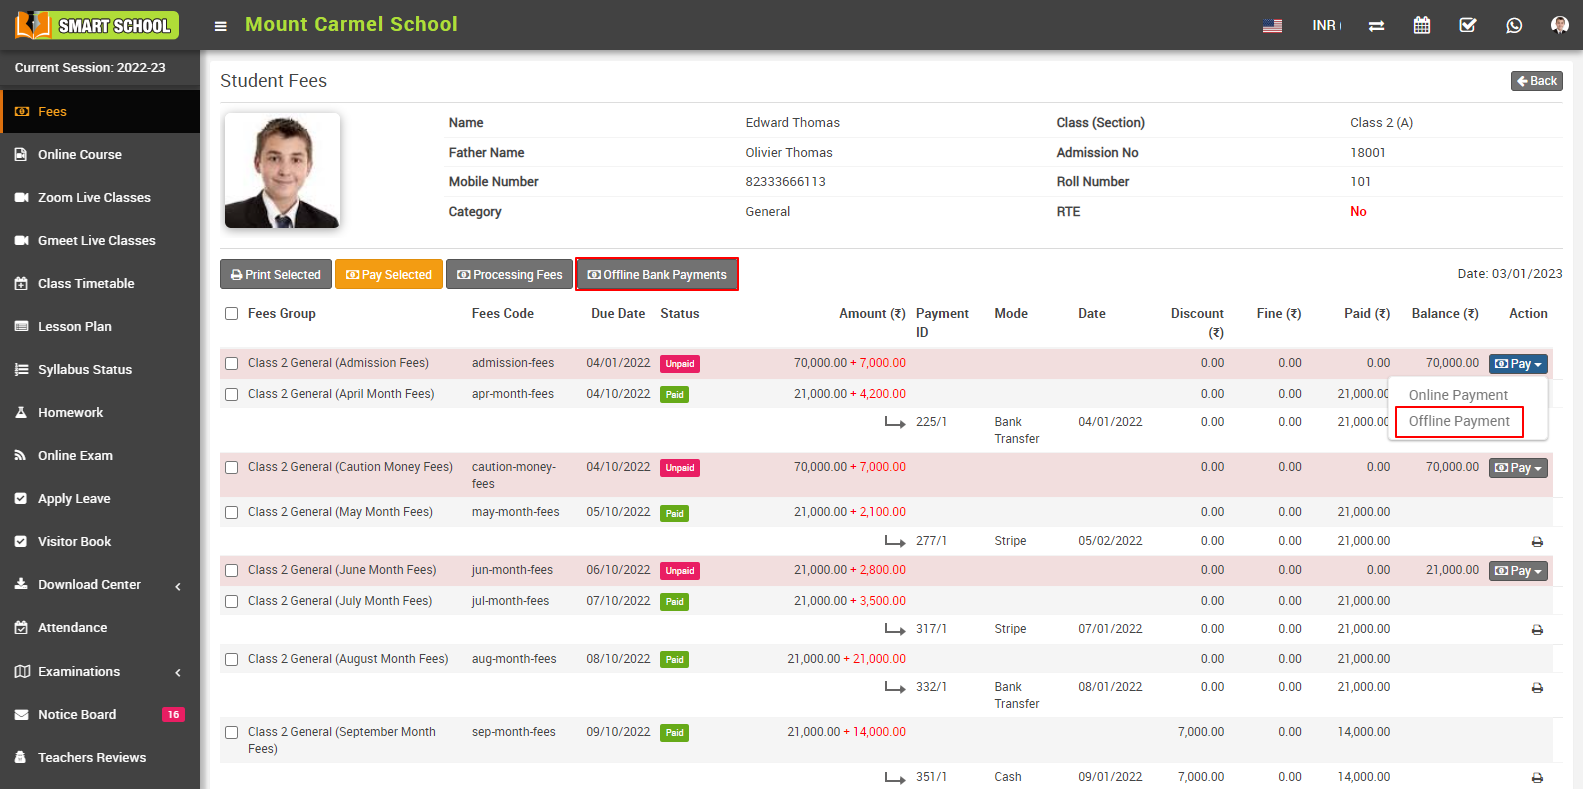
When you Disabled Offline Bank Payment In Student Panel permission, the Offline Bank Payment tab will disappears in the student panel and not allowing students to pay their fees by offline mode.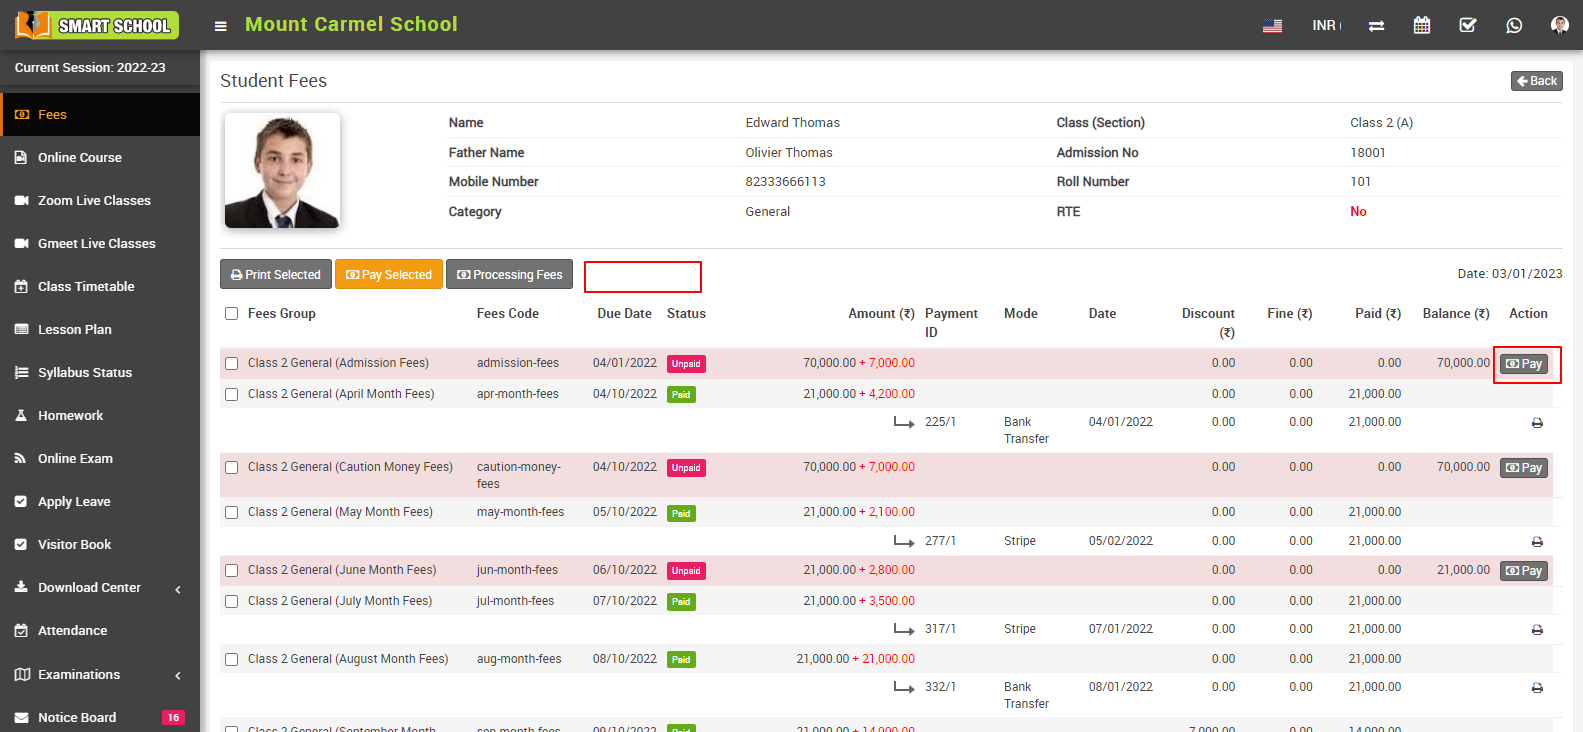
Offline Bank Payment Instruction:
In fees, you can see offline bank payment instruction option available.
When you keeps the above Offline Bank Payment In Student Panel permission enabled, You can give the Instruction as offline modes of payment are cash, DD, Online and Cheques then click on Save button so that it will appear in Offline Bank Payment.
First you need to fill the instruction in the box and click on save button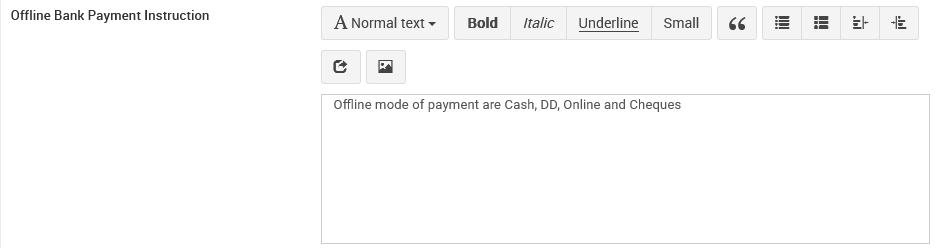
After click on save button, this instruction will be displayed in student side.
For check this instruction, go to Student Panel > Fees, now click on Pay so that online payment and offline payment drop down option available, now click on offline payment option.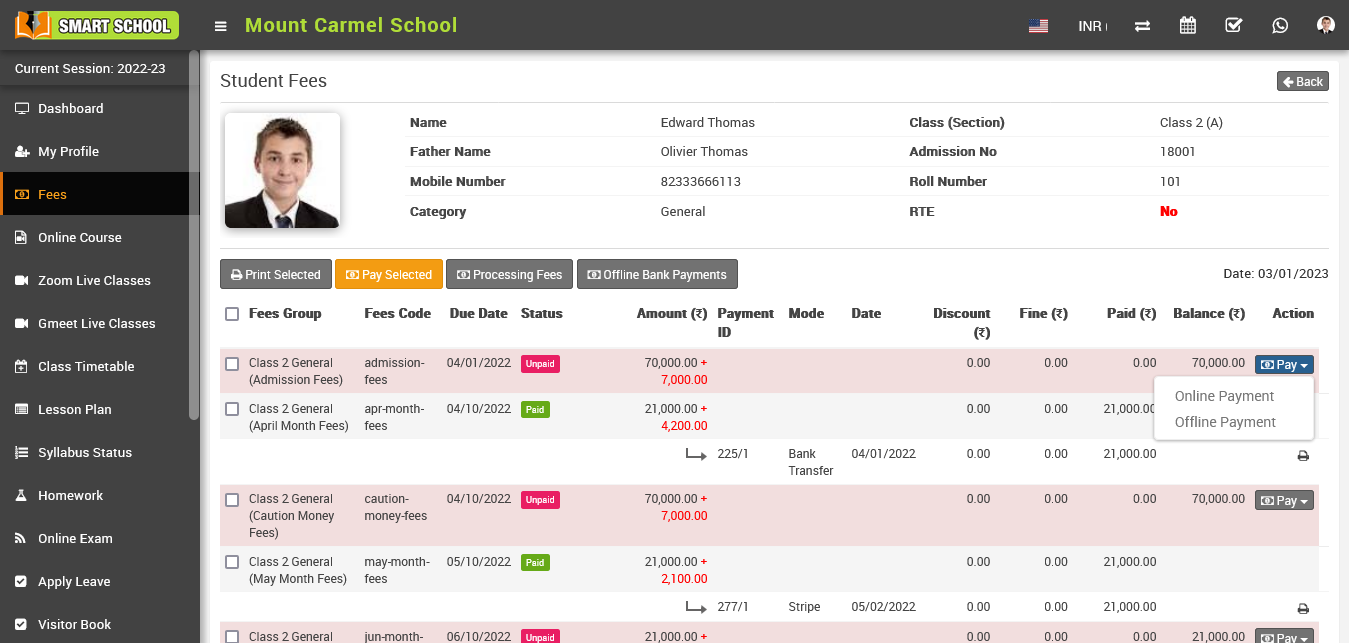
After click on Offline Payment option, Offline Bank Payment page will be open, here you can see the set instruction.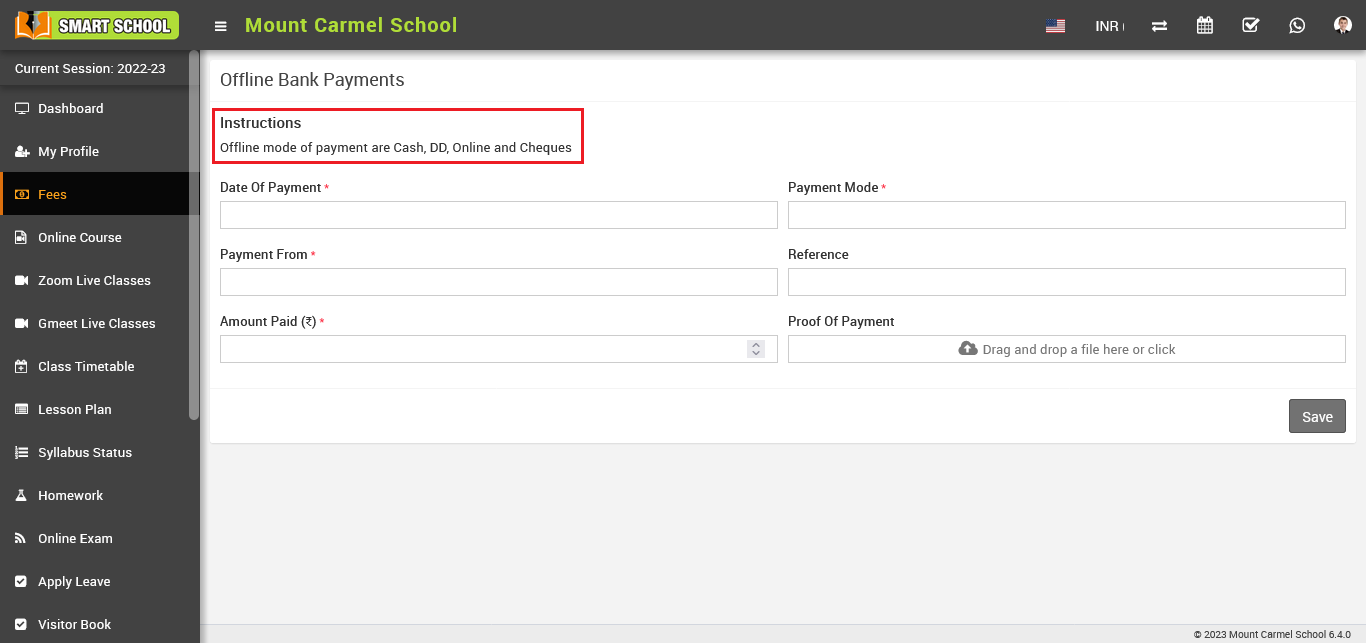
Lock Student Panel If Fees Remaining
Here you can Disabled or Enabled the Lock Student Panel If Fees Remaining.
when you disable the lock student panel if fees remaining so student profile will not be disable and student can access their panel.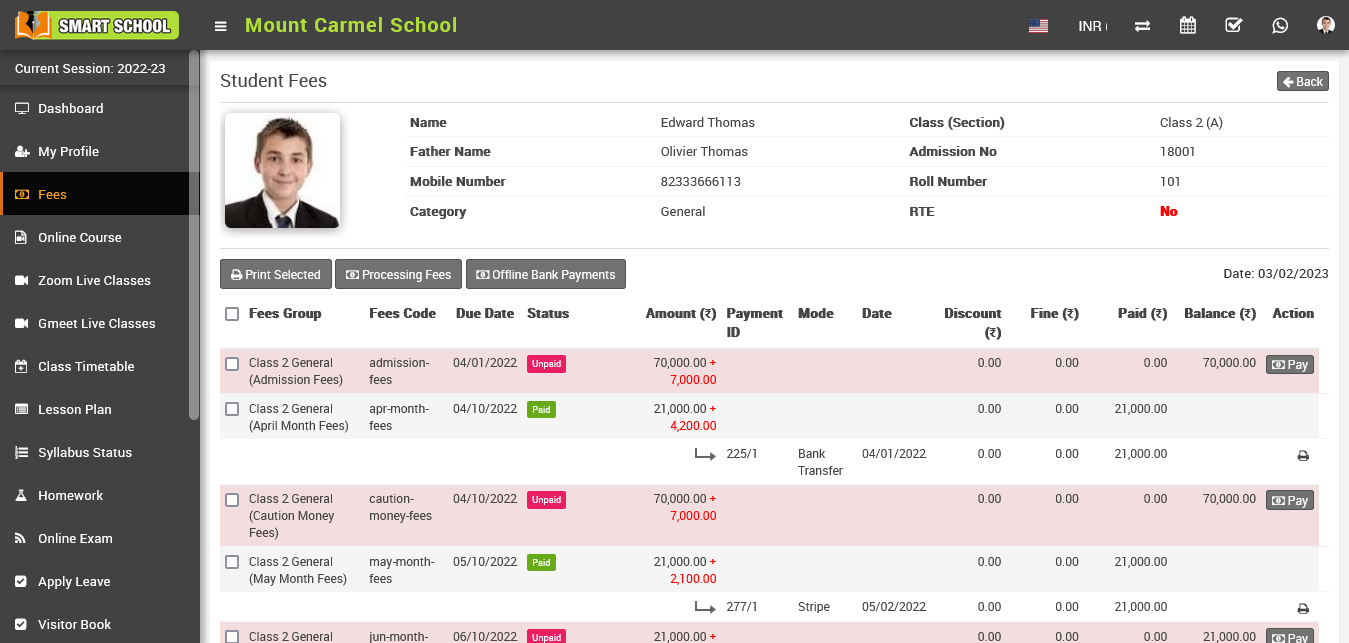
When "Lock Student Panel If Fees Remain" is enabled, Fees Payment Grace Period Days tab will be appear in below, here fill the grace period for fees payment. 
If you do not submit the fees during the grace period, the student or parent's profile will be disabled once the grace period is over. Only the fees page will be accessible when the student panel is opened.
Print Fees Receipt For
In the 'Print Fees Receipt' section, you can find options to print the Office Copy, Student Copy, and Bank Copy. Using these options, you can manage the printing of fees receipts based on the permissions granted by the superadmin.
When you select only the checkbox for 'Office Copy', leaving the others unchecked, you will only get a print of the Office Copy.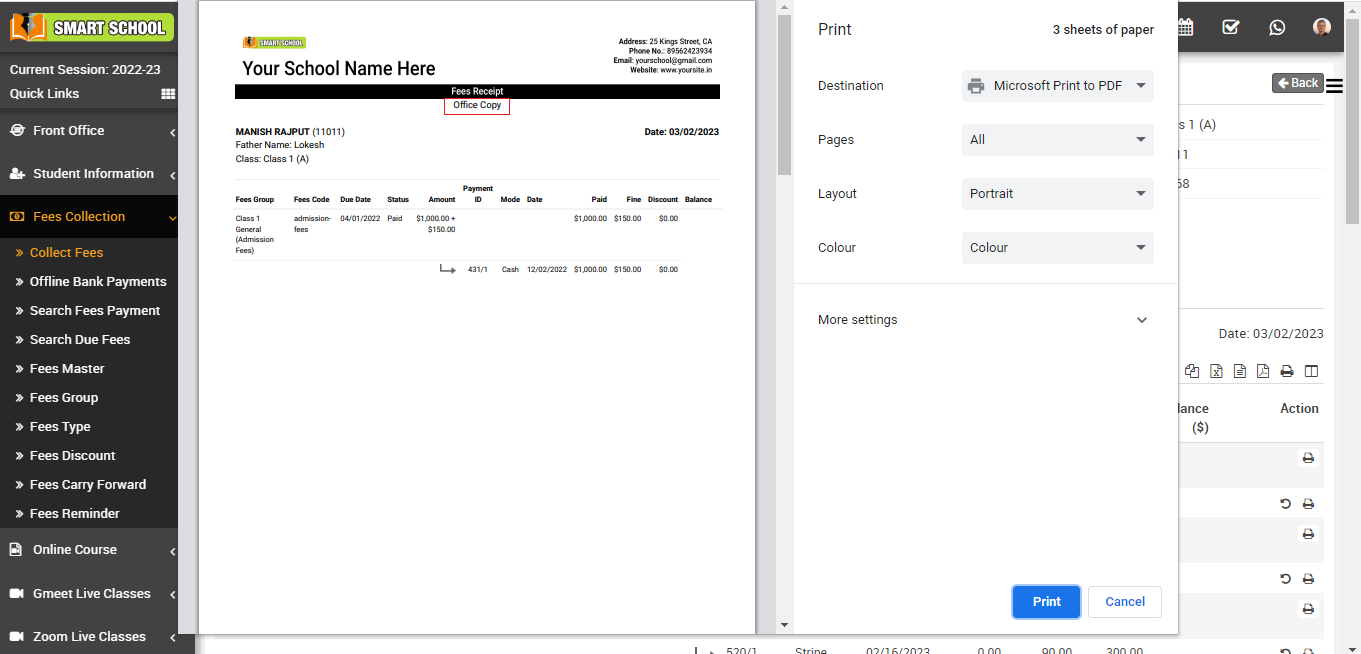
When you select the checkboxes for both 'Office Copy' and 'Student Copy', you will get a print of both the Office Copy and Student Copy.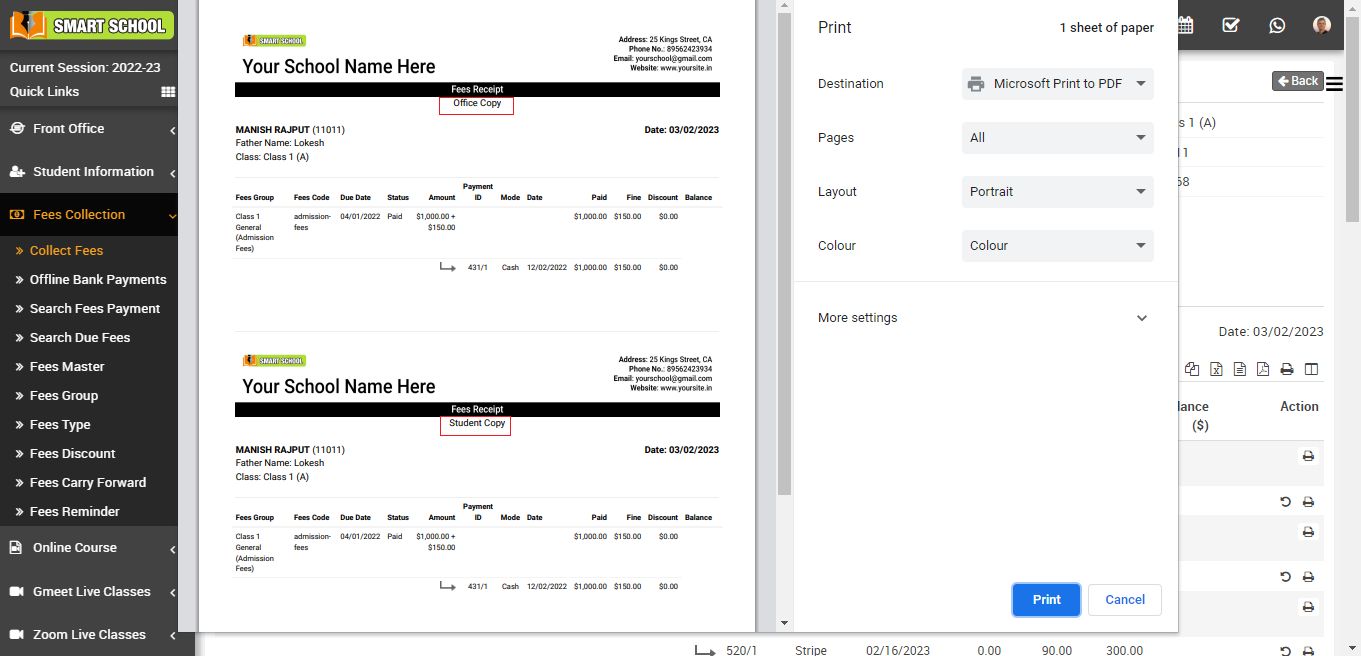
Finally, when you select all three checkboxes for 'Office Copy', 'Student Copy', and 'Bank Copy', you will get prints of all three copies.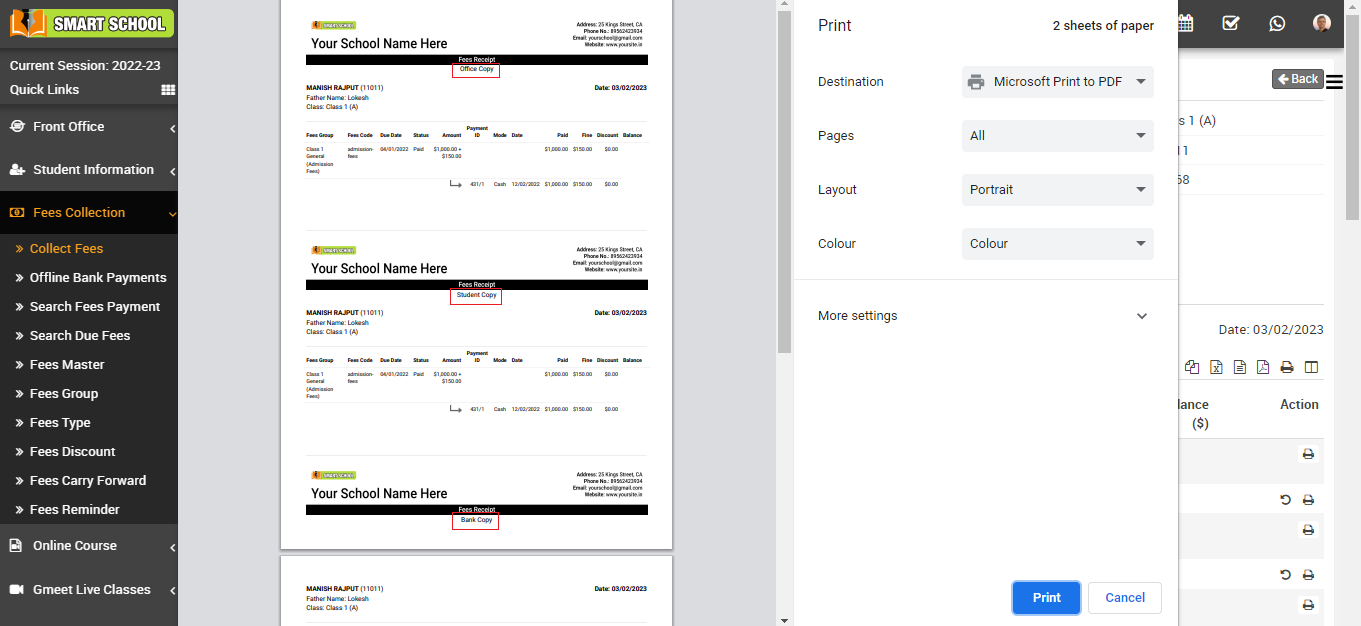
Carry Forward Fees Due Days
To set Carry Forward Fees Due Days, the number of days which you enter here due date will be exceed from current date. Simply fill the days in box and click on the save button.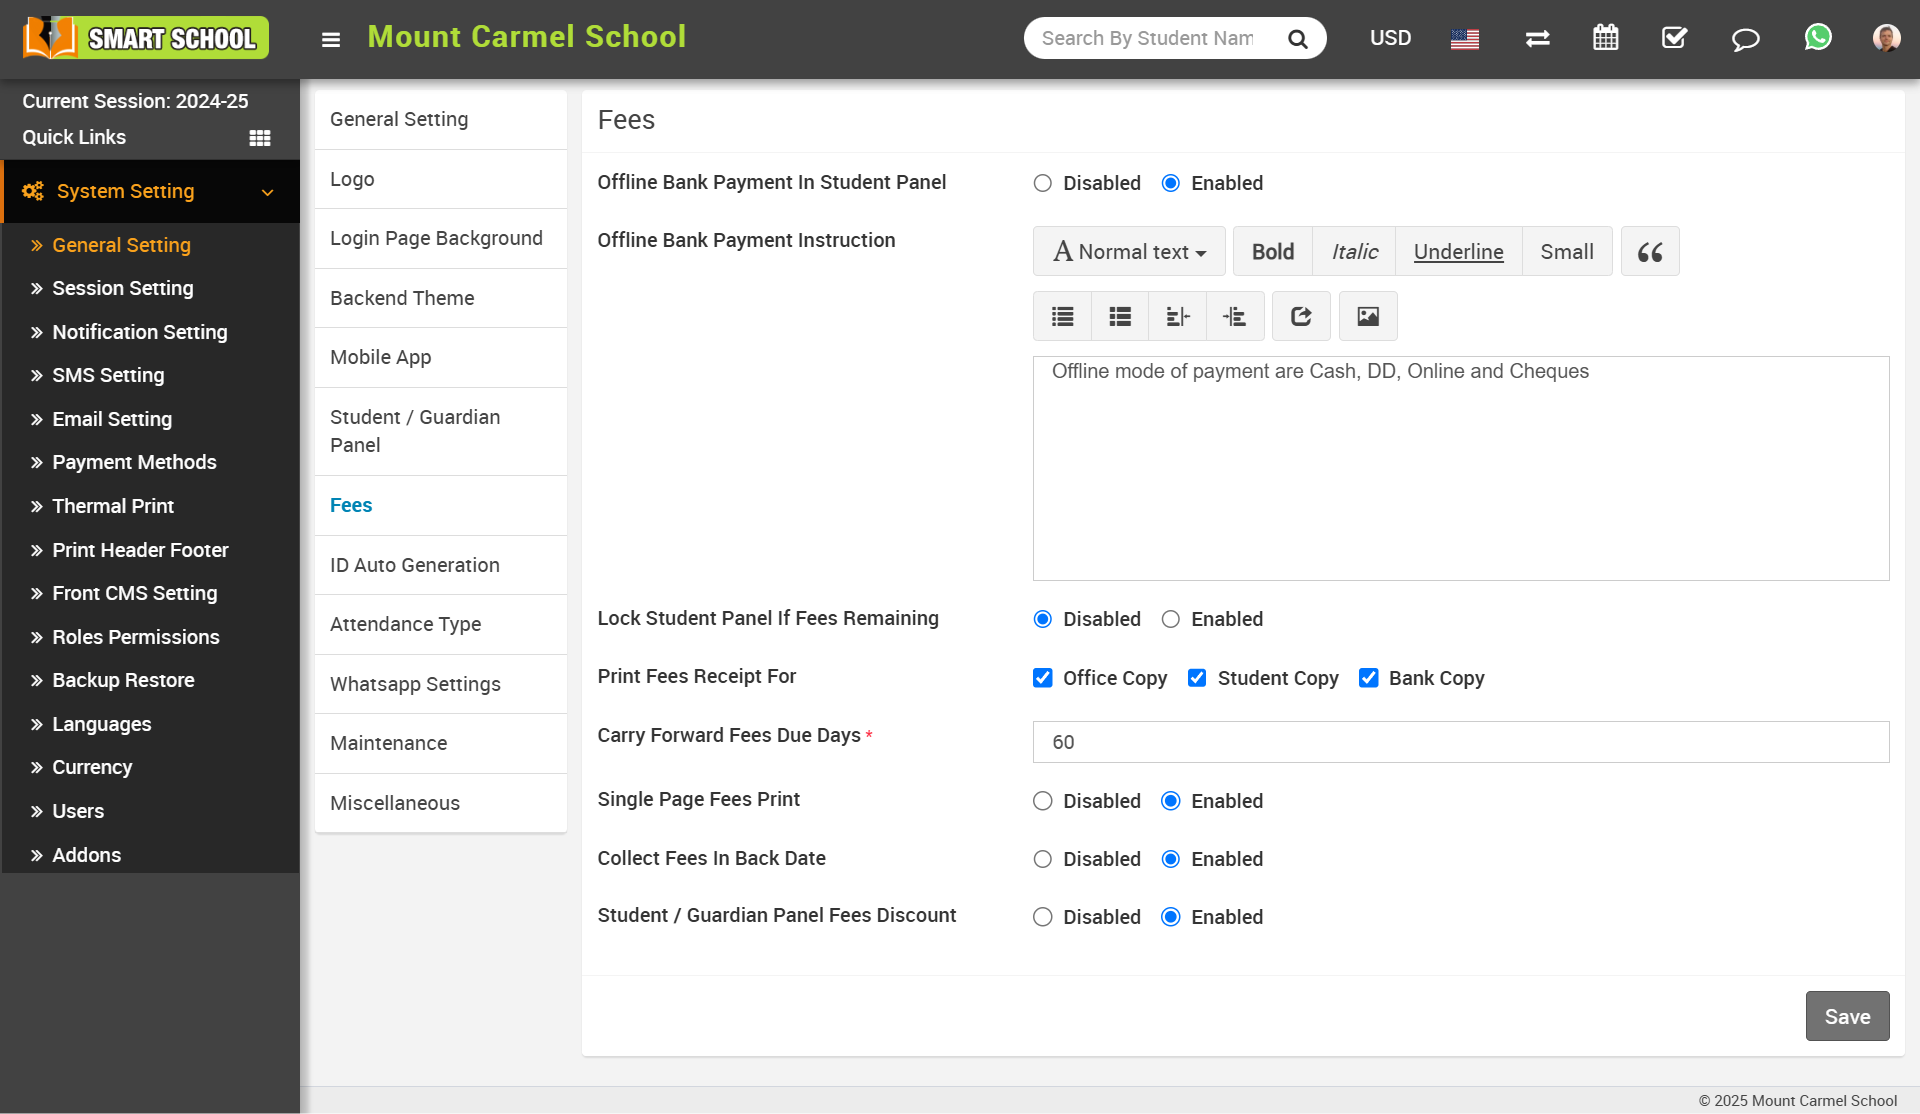
Single Page Fees Print
When you keep single-page fees printing disabled, you will get separate print receipts for office copy, student copy, and bank copy.
If you keep single-page printing enabled, you will get a single-page print of office copy, student copy, and bank copy.

Note: Whether you manage the single page fees to print disabled or enabled, you must select from print fees receipt for at least one of the following options: office copy, student copy or bank copy. 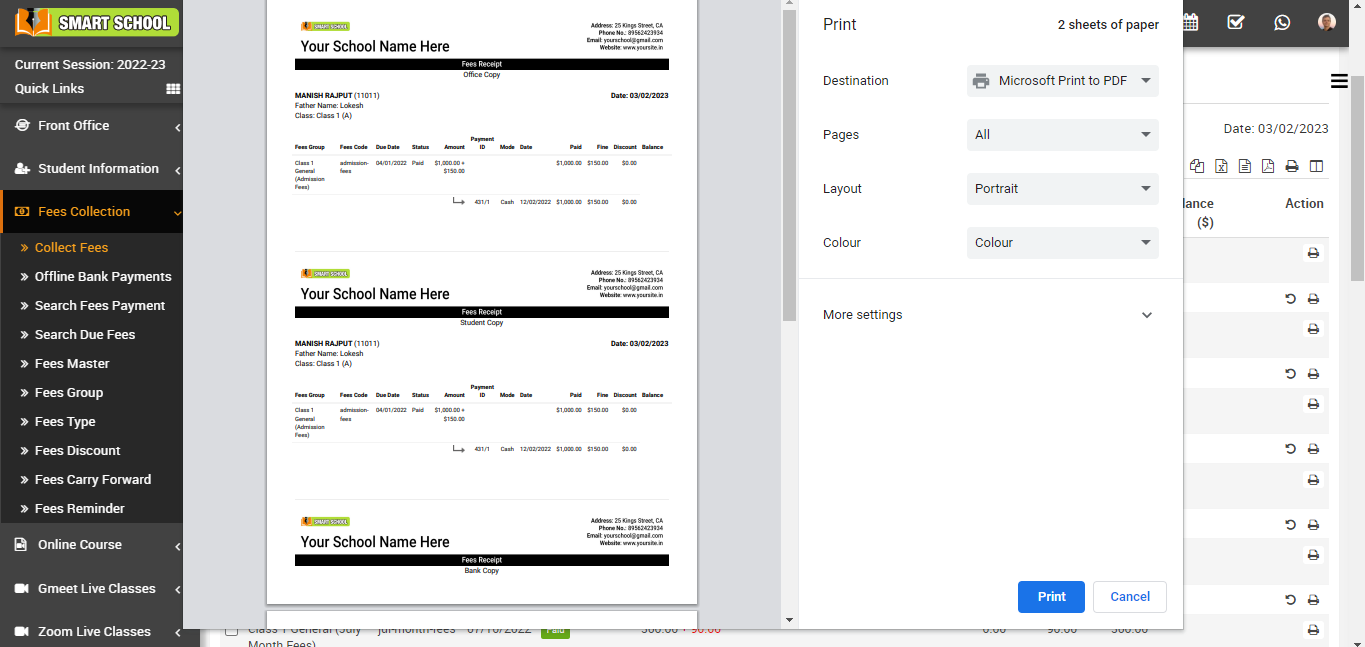
Collect Fees In Back Date
In Collect Fees In Back Date, now click on Disabled or Enabled to manage the fees collection of back date and click on Save button.

You will be unable to collect students' back date fees if you keep the option to collect fees for back dates disabled.
To check, go to Fees Collection > Collect Fees; here, choose Class, Section, or Search By Keyword, then click the Search button, the student list will appear. Now select the student for whom you want to collect fees for back dates and click on "Collect Fees." Now, click on the Add Fees + icon; the collect fees model will open, now, click on the date section; the calendar will open; you can see that the back dates are disabled in this calendar. 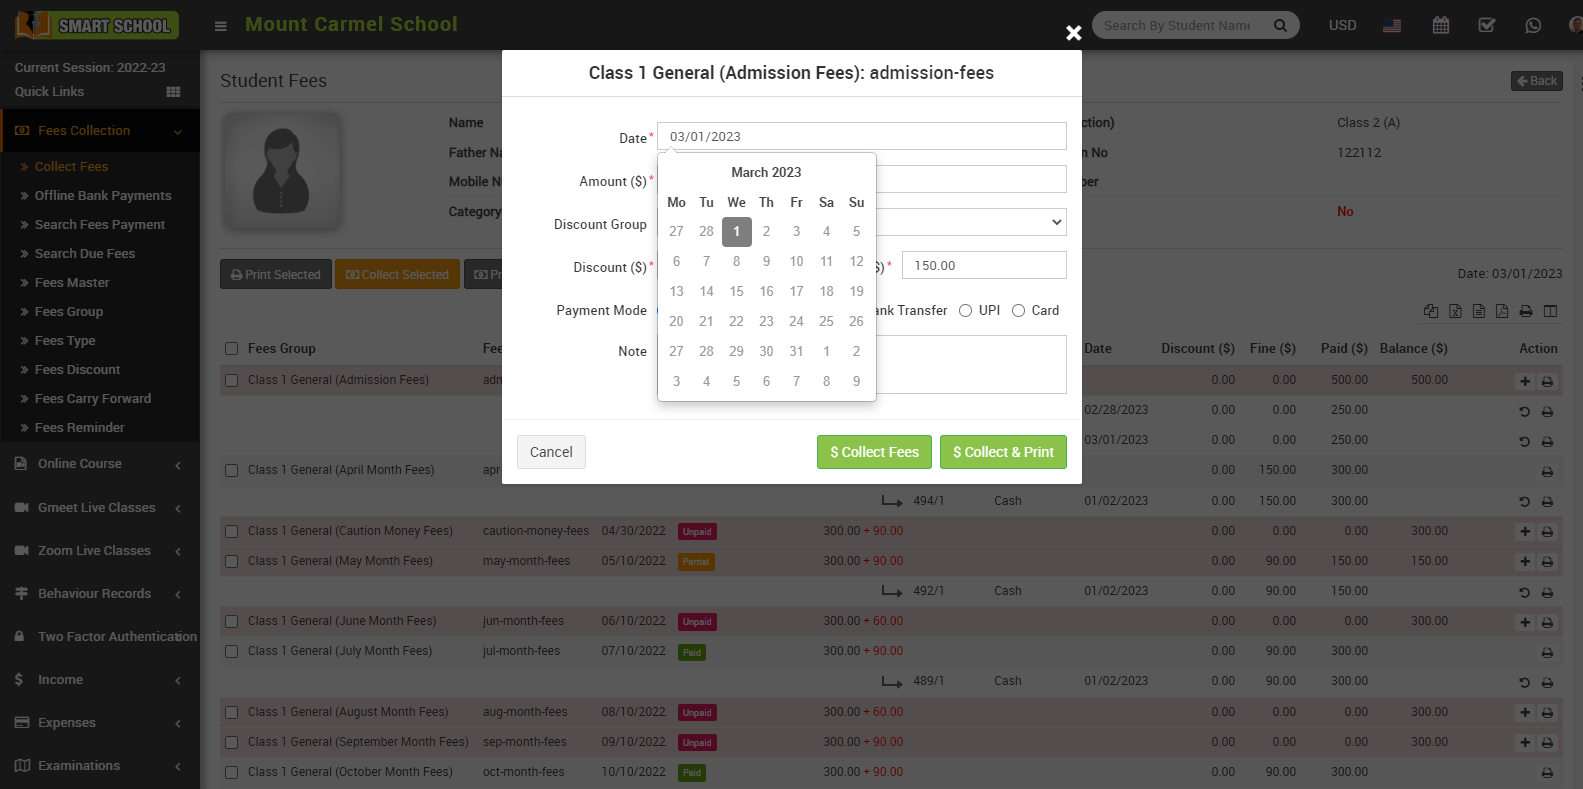
You will be able to collect students' back date fees if you keep the option to collect fees for back dates enabled.
To check, go to Fees Collection > Collect Fees; here, choose class, section, or search by keyword; then click the Search button; the student list will appear. Now select the student for whom you want to collect fees for back dates and click on "Collect Fees." Click on the Add Fees + icon to open the Collect Fees model; now, click on the date section to open the calendar, you can see that the back dates are enabled in this calendar and with the help of this you can collect the student back date fees.
Student / Guardian Panel Fees Discount
Using this setting, you can enable the fee discount on the student side as well. When a student or guardian pays the fees through their panel, the discount applied by the superadmin will also be displayed on that fees. 
Then, go to the student panel where you have already applied the discount. When you pay the fees online, all details, including the discount, will be displayed. Click on the 'Pay' button, and the fees will be paid with the discount applied, if applicable.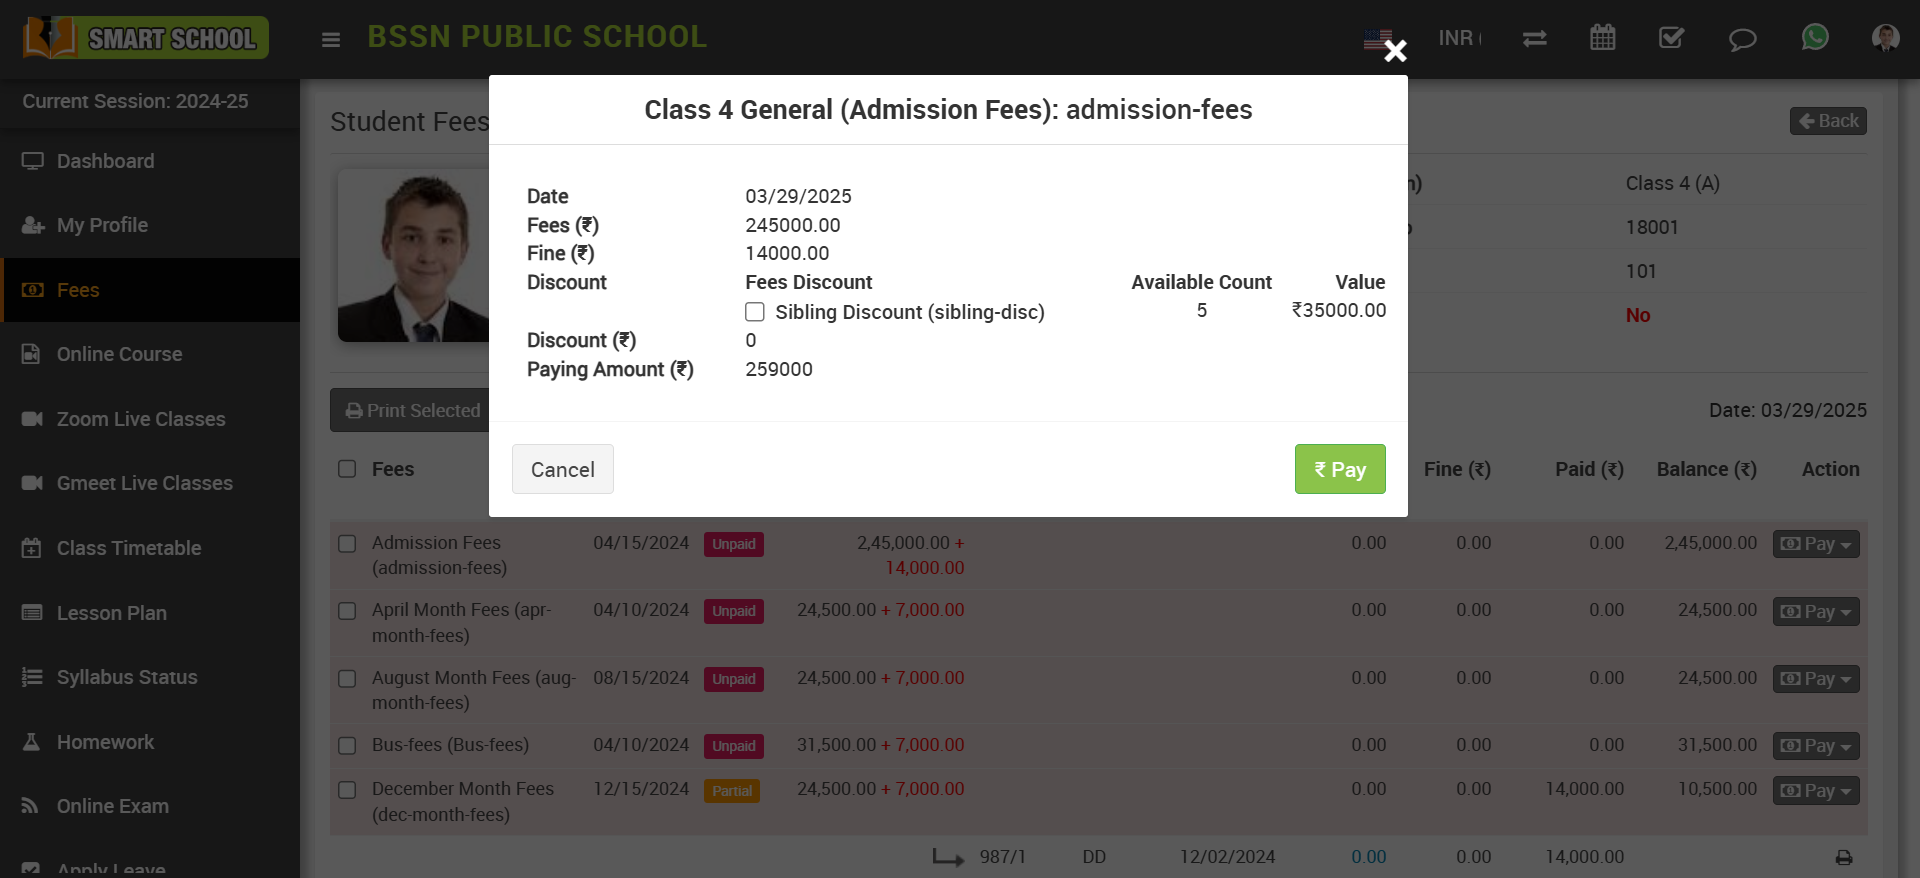
How to manage student / guardian panel?
To access the User Login Option for students and parents, go to System Settings > General Settings. Then, click on the student/guardian panel. Here, in first, you can see the user login option.
By using user login option, you can manage both the student and parent logins. All you need to do is check or uncheck the box next to the student and parent options.
If the student login checkbox is checked, the student will be able to log in to their panel, but if the parent login checkbox is unchecked, the parent will not be able to log in to their panel.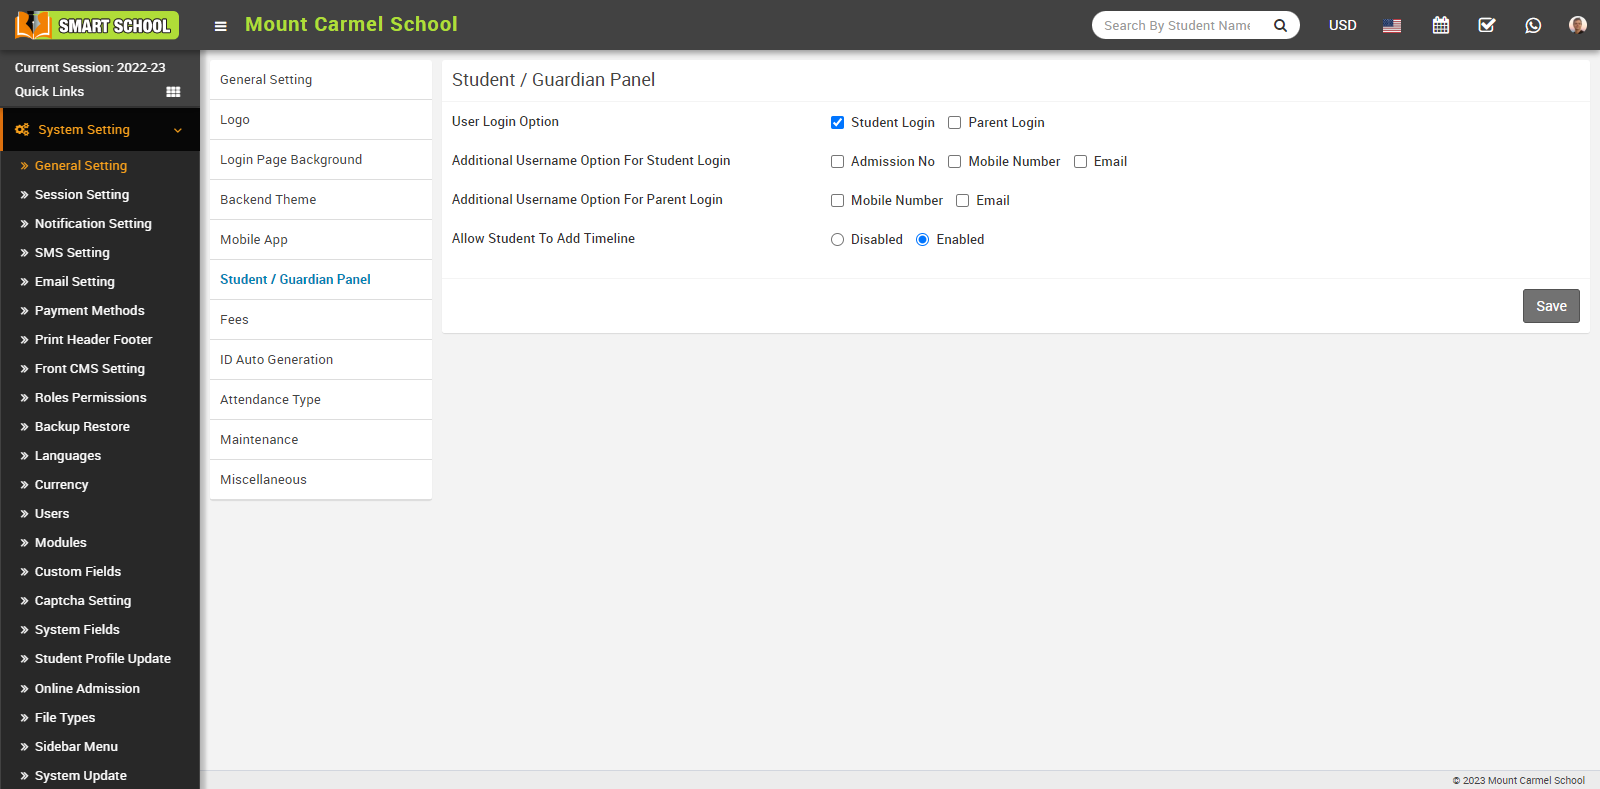
On the other hand, if the student login checkbox is unchecked, the login page will disappear for both the student and the parent and they will not be able to log in to their respective panels. In summary, if a parent wants to log in to their panel, the student must have login permission.
Additional Username Option for Student Login
In the Additional Username Option for Student Login, students can login with their admission number, mobile number, as well as email, with permission from the superadmin, by checking the checkboxes for admission number, mobile number, and email.
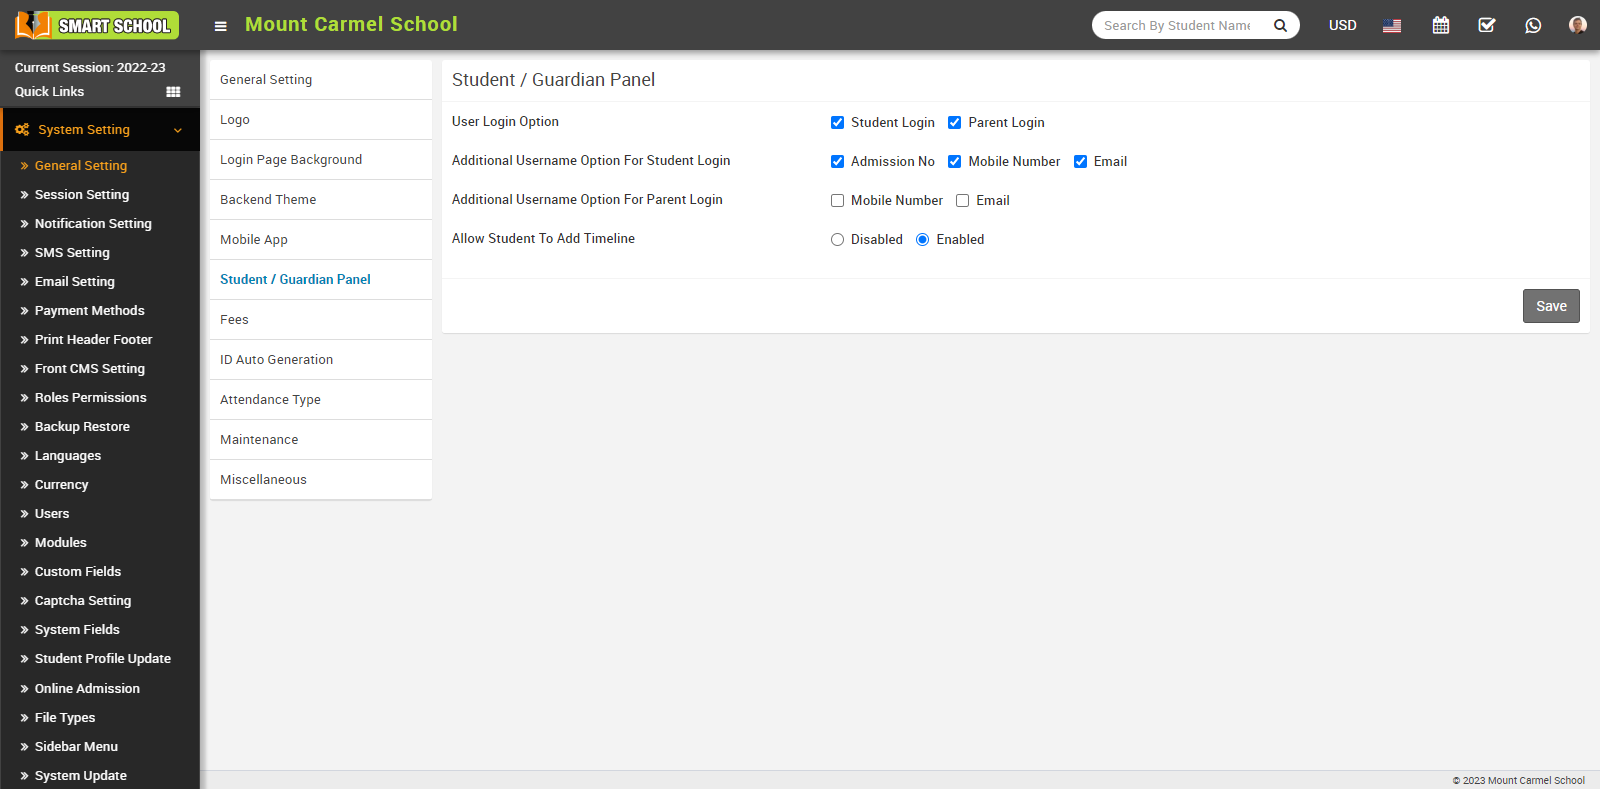
Additional Username Option for Parent Login
In the Additional Username Option for Parent Login, parents can log in with their mobile number and email if the superadmin grants permission by checking the corresponding checkboxes for mobile number and email.
Allow Student To Add Timeline
In last option, you can see the Allow Student To Add Time available, now with the help of this permission you can Enabled and Disabled the timeline permission for the student.
When you enable timeline permissions for students, the 'Add' option appears in the student panel, allowing students to add, edit, and delete their timeline.
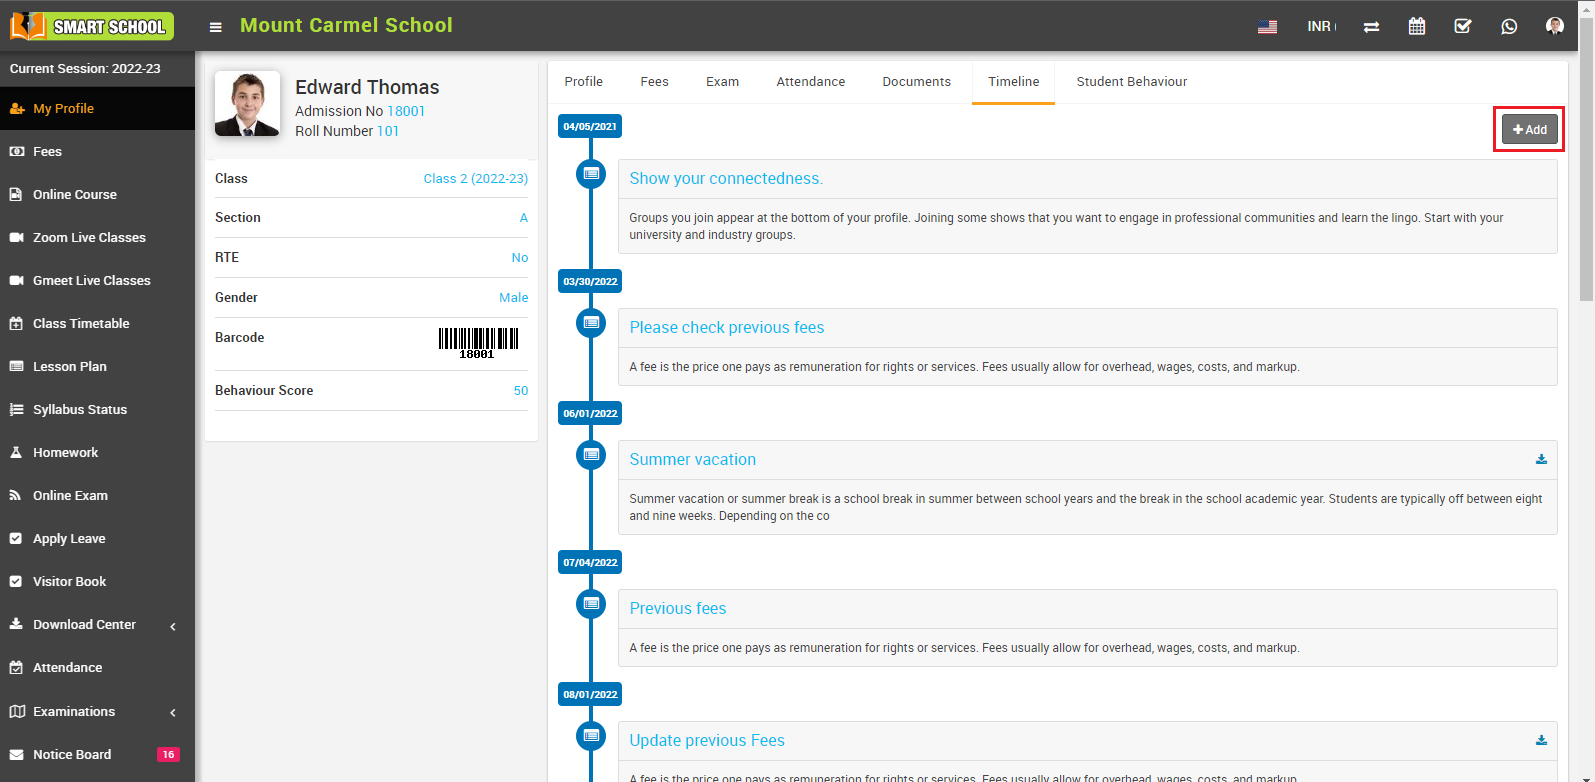
When you disable timeline permissions for students, the 'Add' option disappears in the student panel and not allowing students to add their timeline.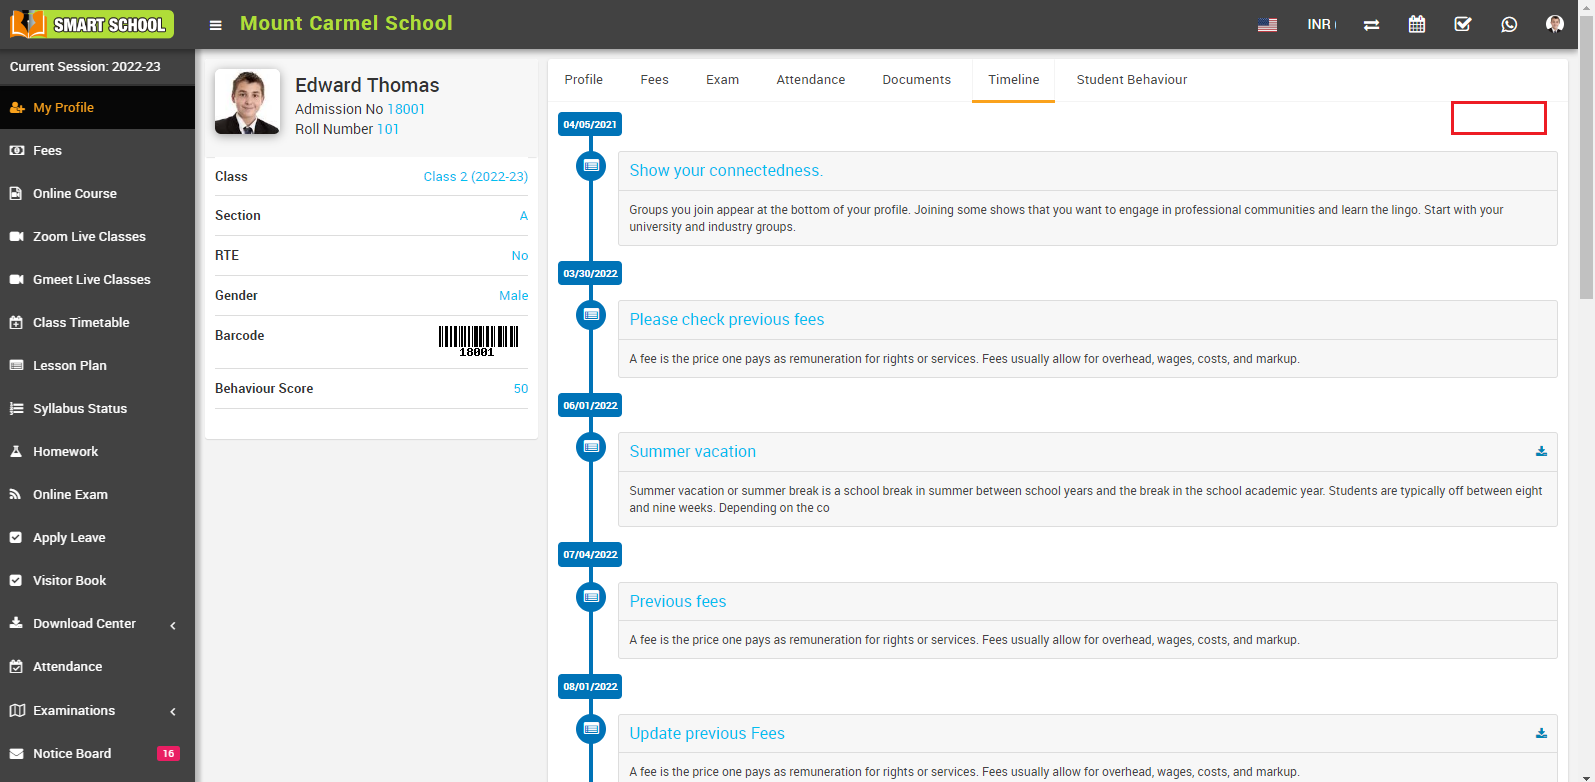
Note:- Overall, students can only edit and delete timelines that they have added themselves. They are unable to edit or delete timelines that have been added by the superadmin
How to Register Android Mobile App?
To register an android mobile app, go to System Setting > General Setting > Mobile App.
For register mobile app click on Register Your Android App when you will click on it pop window of Register your Android App purchase code will be open, here enter Envato Market Purchase Code For Smart School Android App ( How To Find It? ) and Your Email Registered With Envato then click on Save button.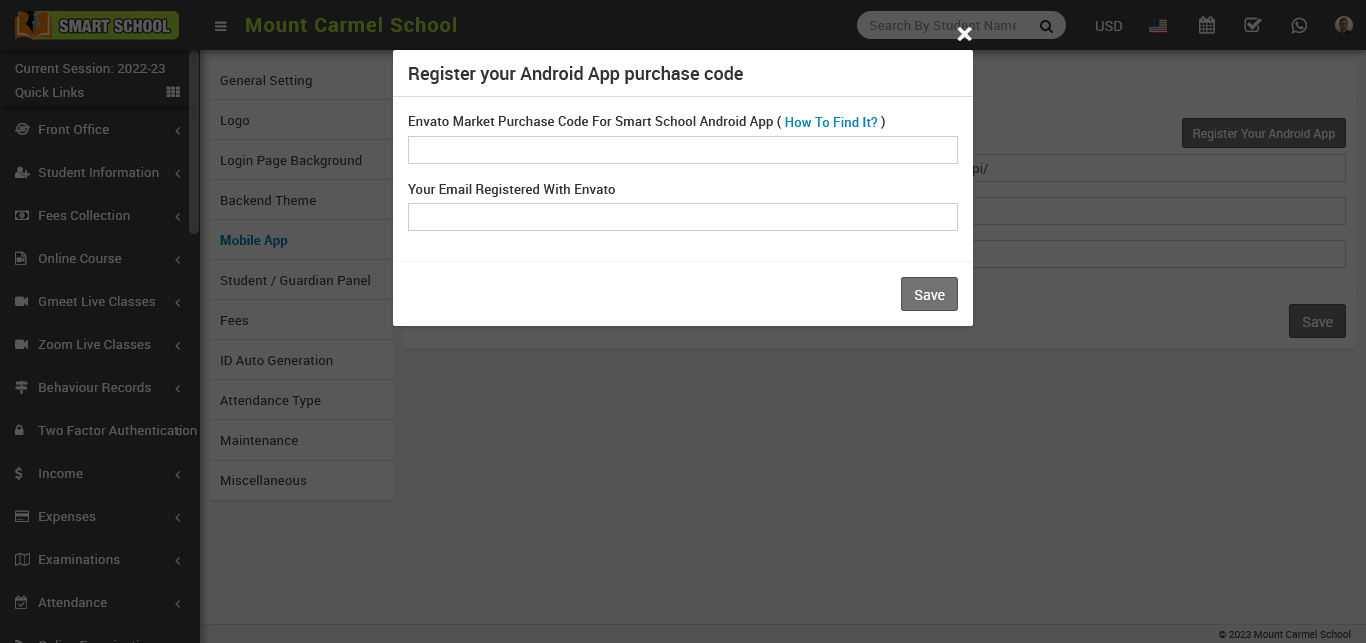
Now enter User Mobile App API URL, User Mobile App Primary Colour Code and User Mobile App Secondary Color Code then Click on Save button.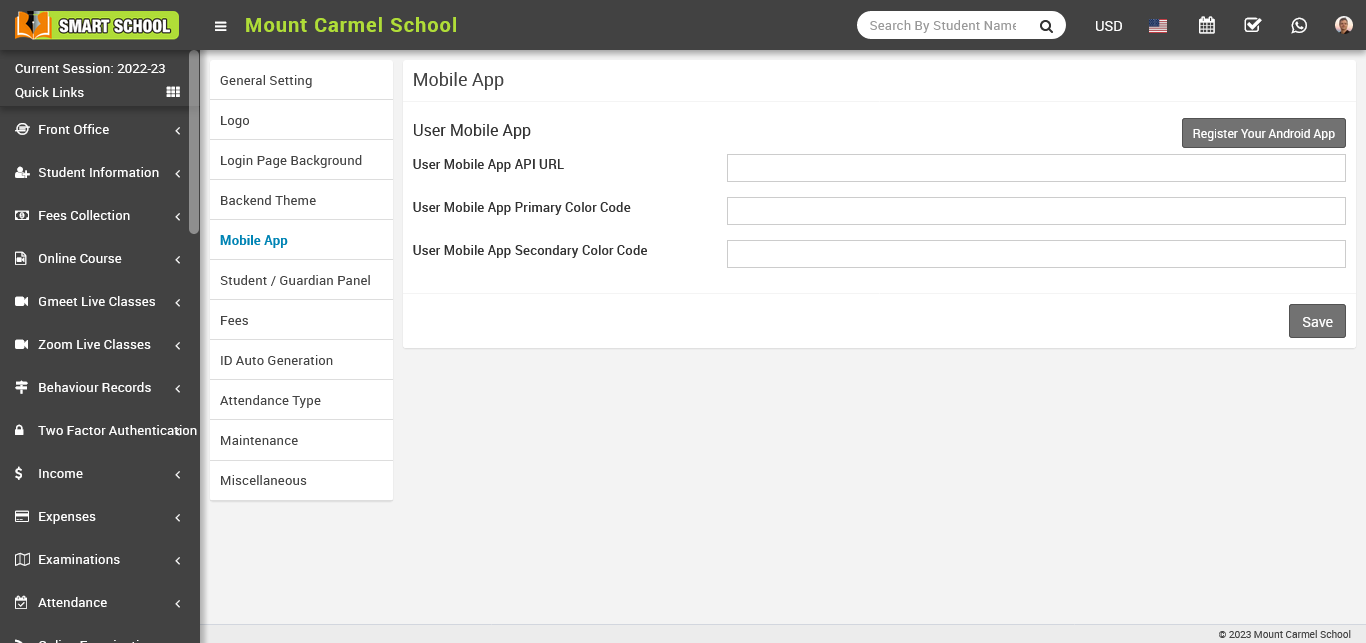
How to manage backend theme?
To change the backend theme, go to System Settings > General Settings > Backend Theme. Here you can see the multiple theme option available as White, Default, Red, Blue and Gary theme, choose one of them then click on save button.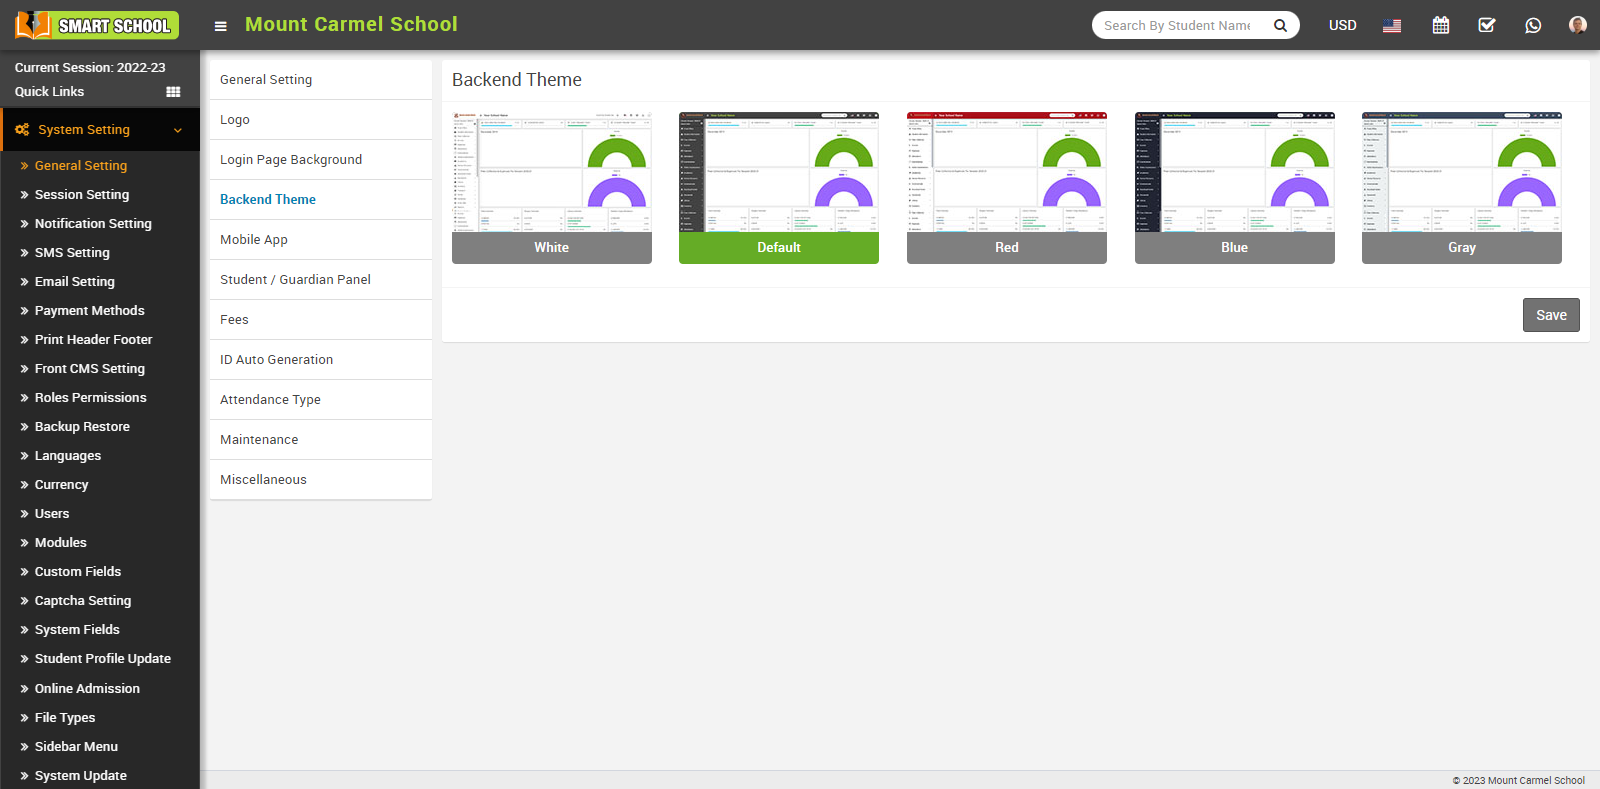
You can keep your preferred backend theme for your smart school by clicking on the theme and it will show "enabled." After you click on the "Save" button, your backend theme has been successfully changed.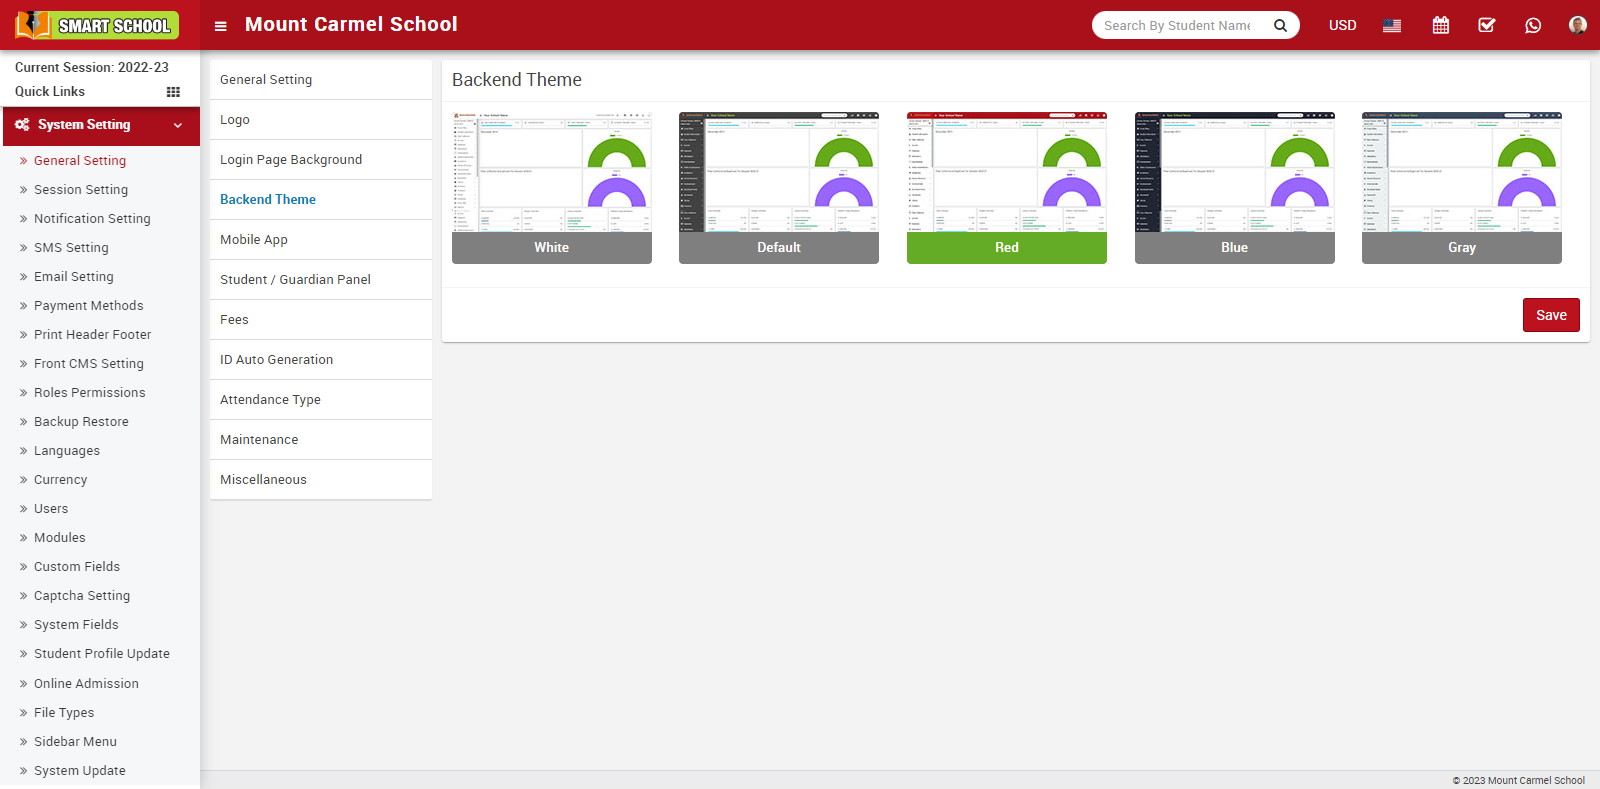
How to change login page background?
To change the background of the Admin Login Panel and User Login Panel, go to the side menu bar and select System Settings > General Settings; in the general settings, you can see the third option, "Login Page Background."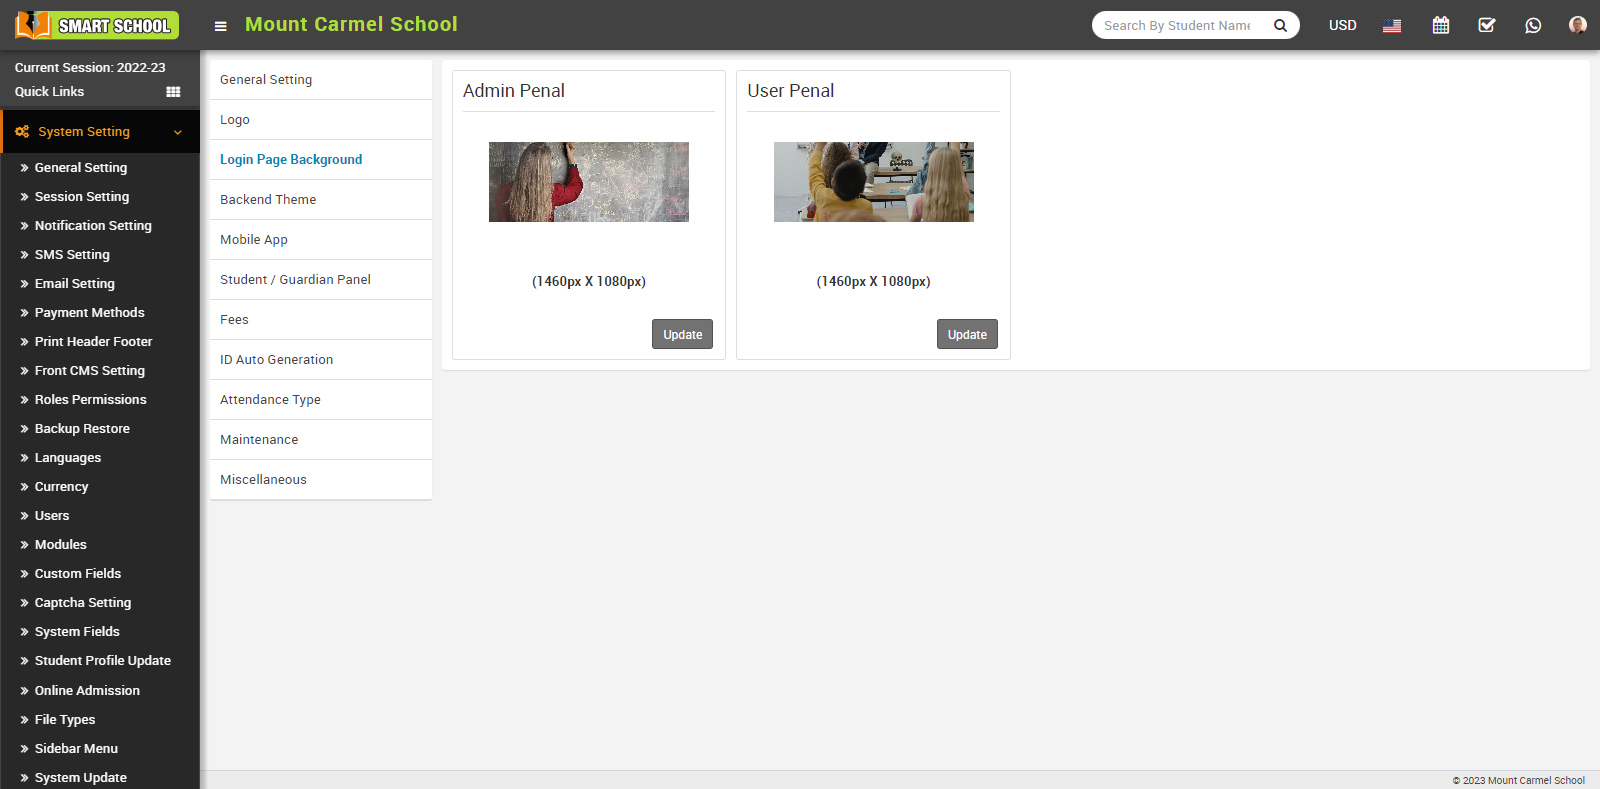
In this feature, you can change the background of the login Admin Panel as well as the User Panel. You just need to click on the Update button for the login background image you want to change, and the admin or user login page background model will be opened. Now choose the relevant image for the background, and your admin and user panel backgrounds will be successfully changed.
How to Update Logo?
To Update logo go to System Setting > General Setting > Logo, here you can update Print Logo, Admin Logo, Admin Small Logo, App Logo.
You can update your logo in Print Logo, Update by clicking on the "Update" button in the right below. The "Edit Logo" modal will open, and you can now select the image that you want to update. Your print logo will be updated.
You can update your logo in Admin Logo Update by clicking on the "Update" button in the right below. The "Edit Logo" modal will open, and you can now select the image that you want to update. Your admin logo will be updated.
You can update your logo in Admin Small Logo Update by clicking on the "Update" button in the right below. The "Edit Logo" modal will open, and you can now select the image that you want to update. Your admin small logo will be updated.
You can update your logo in App Logo Update by clicking on the "Update" button in the right below. The "Edit Logo" modal will open, and you can now select the image that you want to update. Your app logo will be updated.
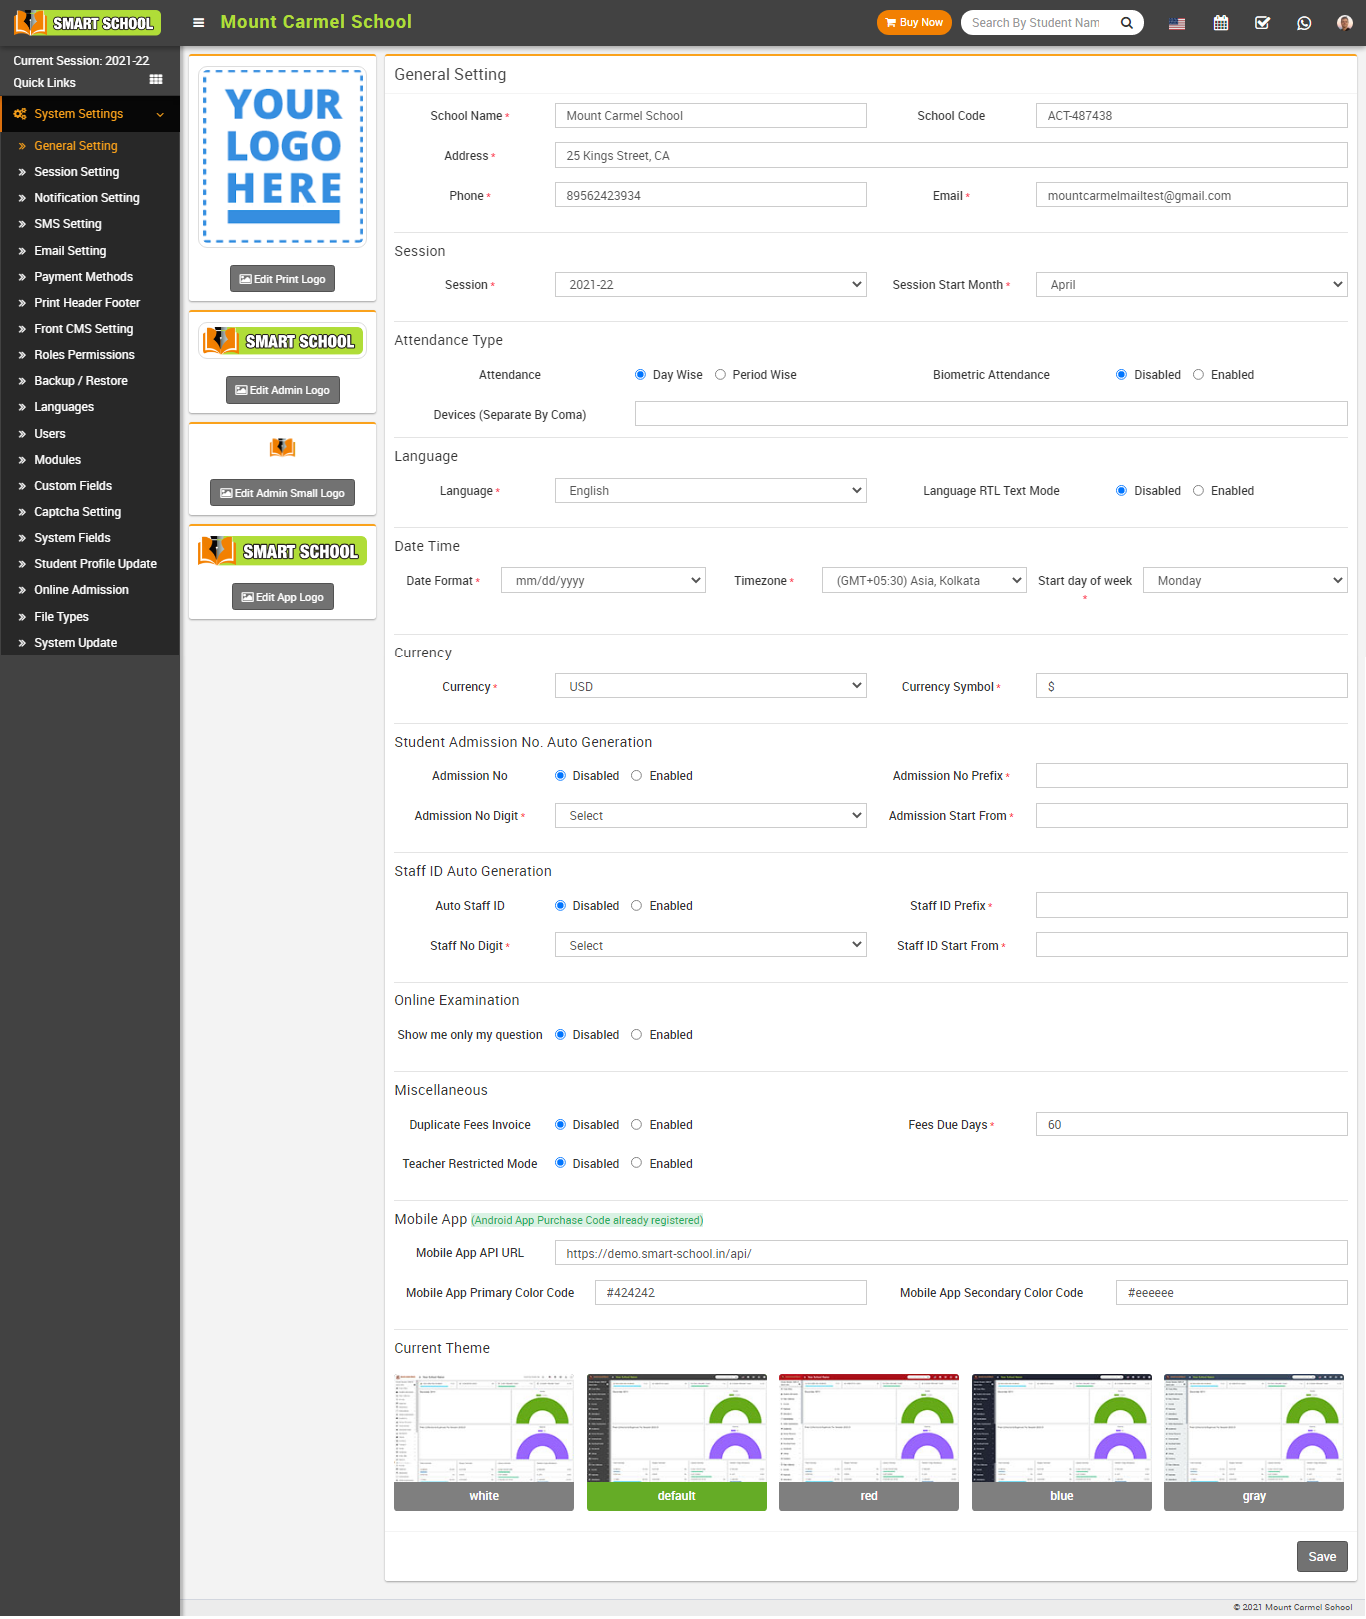
How to manage General Setting?
Go to the side menu bar and select System Settings > General Settings to view the various field settings such as General Setting, Academic Session, Date Time, Currency and File Upload Path.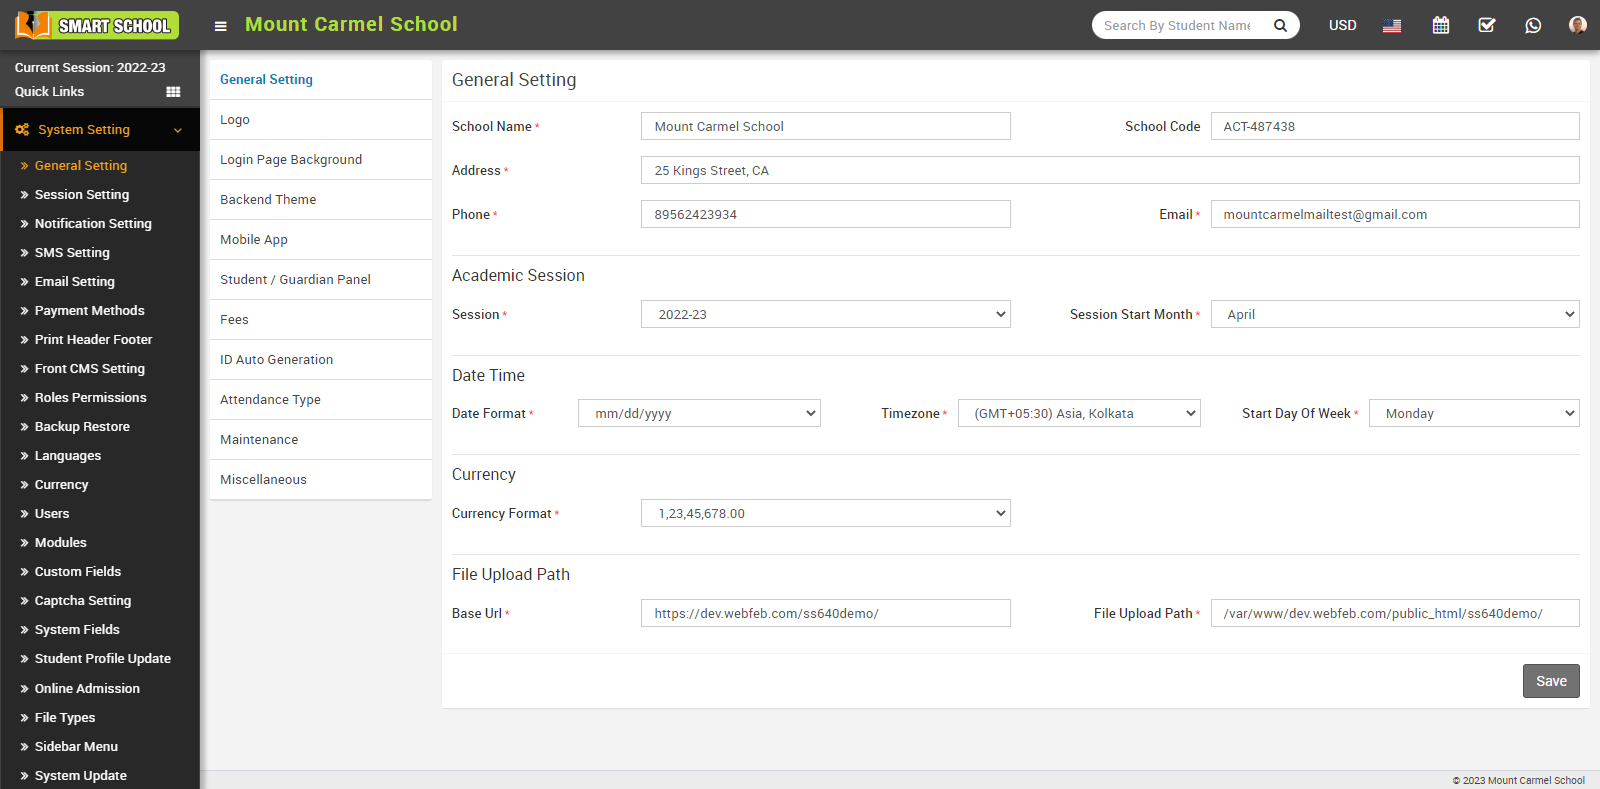
In General Setting field, you can set the school details such as School Name, School Code (Is your affiliation and accreditation no), Address, Phone, and Email. 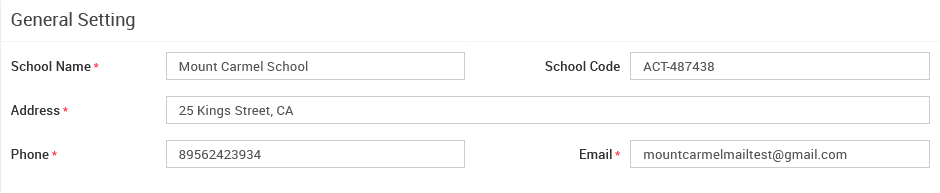
In Academic Session, you can see Session, and Session Start Month option. With the help of Session, (current running academic session for the school) you can set the current session, and with Session Start Month, you can keep the month in which your school's new session month will start.
In Date Time, you can maintain the Date Format, when you click on the date format tab, a drop-down menu will be open where you can see multiple options for date format, just select one and save, the date format will be changed, the same is true for the Time Zone, just select the preferred time zone and save, the time zone will be updated, and in Start Day of Week, you can choose the preferred day where the week will start.
In Currency, when you click on the "Currency Format" tab, you will get the multiple option of "Currency Format." Just select and save, and your currency format will be changed.
You can set the Base URL of your smart school as well as the File Upload Path here, with the help of this, you can find the files where they are saving in your smart school, then click on the Save button. 
How to manage Session Setting?
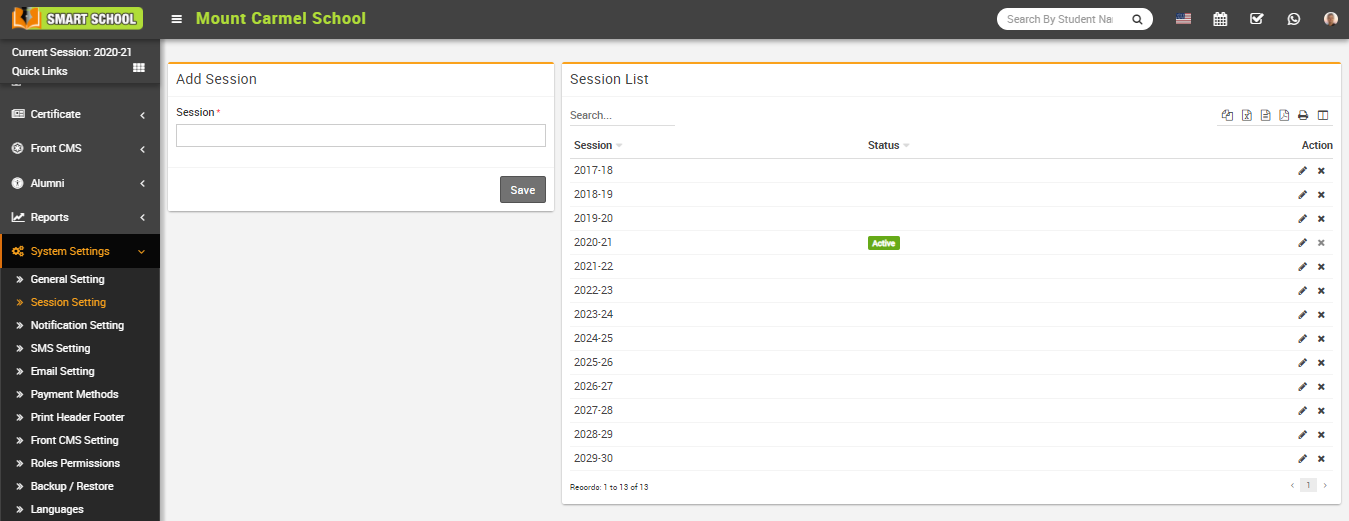
To edit session click on Edit icon and to delete session click on Delete icon present in the session list.
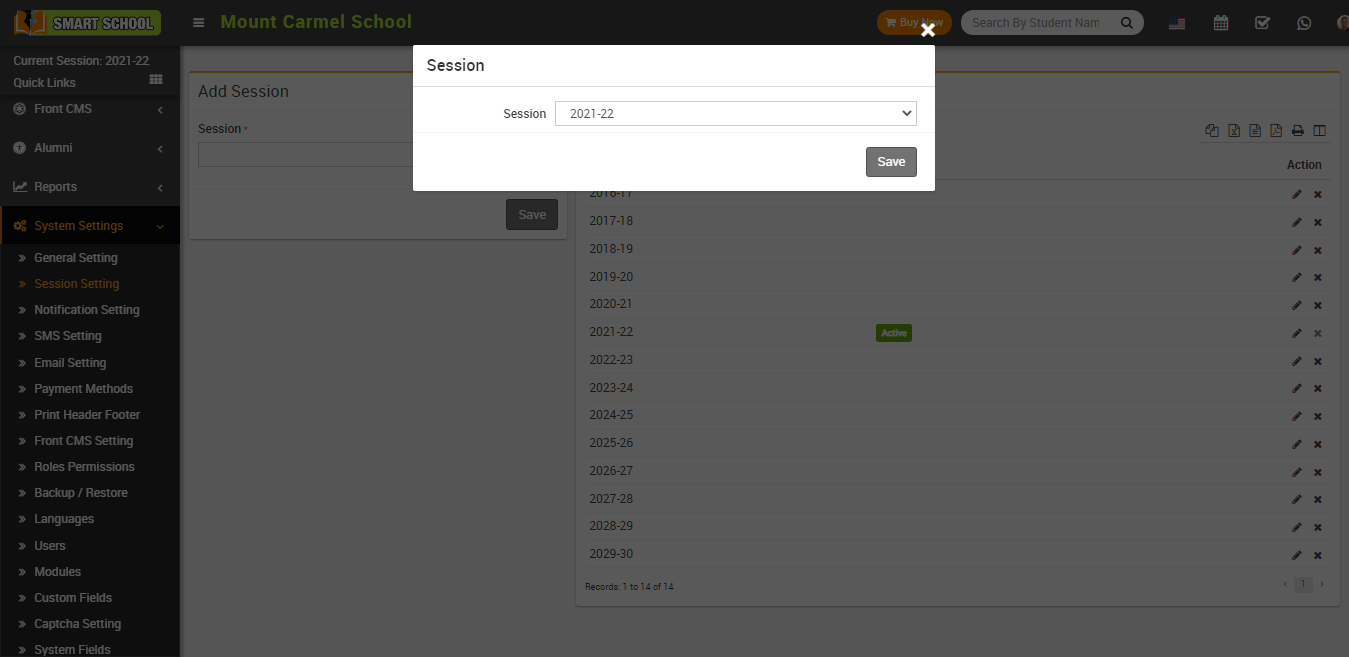
Now to active school current session click on edit icon (show on mouseover) present at top of the left side menus.
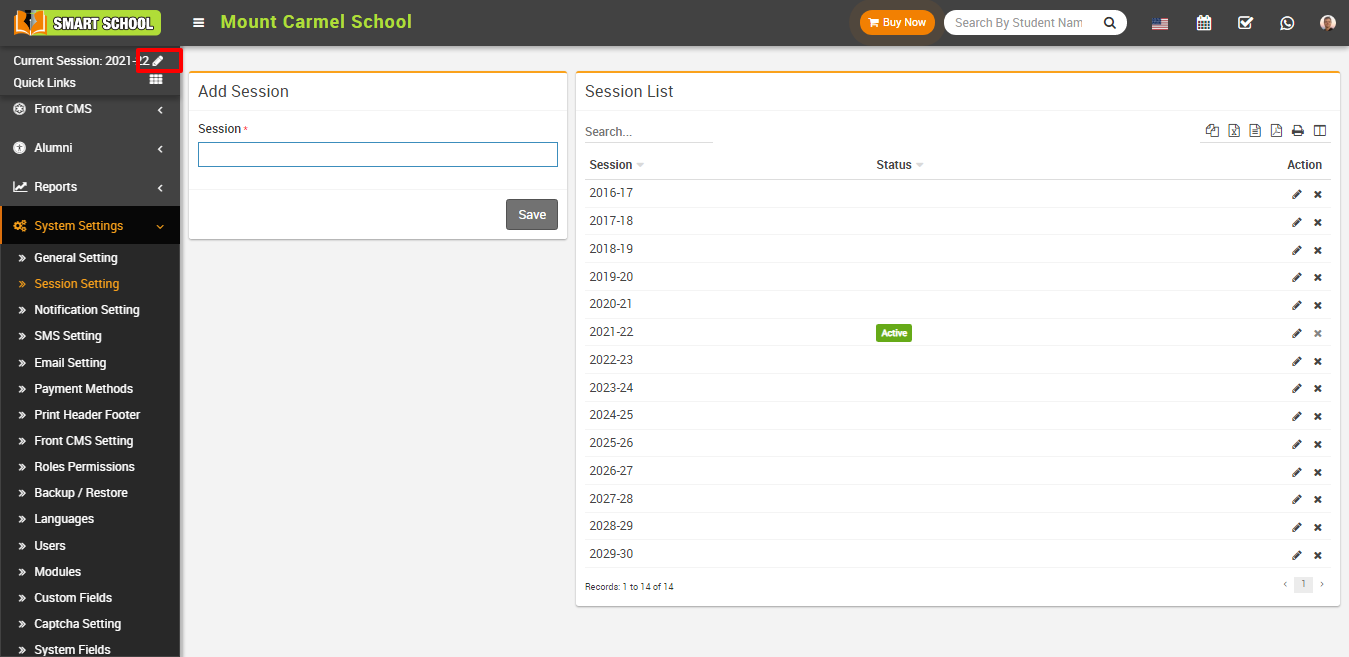
After click on it will open a pop up window where you will see all added sessions. To set your school current session click on drop down button, select session and then click on Save button.
How to manage Notification Setting?
To manage notification setting, go to System Setting > Notification Setting. There are 29 events like Student Admission, Exam Result, Fee Submission, Absent Attendance, Homework, Fees Reminder, Forget Password, Online Examination Publish Exam, Online Examination Publish Result, Zoom Live Classes, Zoom Live Meetings, Gmeet Live Meeting, Gmeet Live Classes, Gmeet Live Meeting Start, Gmeet Live Classes Start, Zoom Live Classes Start, Zoom Live Meetings Start, Online Admission Form Submission, Online Admission Fess Submission, Online Course Publish, Online Course Purchase, Student Login Credential, Staff Login Credential, Fee Processing, Online Admission Fees Processing, Student Apply Leave, Email PDF Exam Mark sheet, Online Course Purchase For Guest User and Online Course Guest User Sign Up. In Notification Setting automated Email / SMS are sending to concerning person's Email / SMS / Mobile number. With the help of notification setting you can manage Destination and Recipient which notifications to send in which Event and select the check box and then click on save button.
Here we are describing that who will receive event notification (Email/SMS/Mobile App notification)-
Student Admission: Student, Guardian
Exam Result: Student, Guardian
Fees Submission: Guardian, Student
Absent Attendance: Guardian, Student
Homework: Student, Guardian
Fees Reminder: Student, Guardian
Forgot Password: Student, Guardian and Staff
Online examination publish exam: Student, Guardian
Online examination publish result: Student, Guardian
Zoom Live Classes: Student, Guardian
Zoom Live Meetings: Staff
Gmeet Live Meeting: Staff
Gmeet Live Classes: Student, Guardian
Gmeet live Meeting Start: Staff
Gmeet Live Classes Start: Student, Guardian
Zoom Live Classes Start: Student, Guardian
Zoom Live Meetings Start: Staff
Online Admission Form Submission: Student, Guardian
Online Admission Fees Submission: Student, Guardian
Online Course Publish: Student, Guardian
Online Course Purchase: Student, Guardian
Student Login Credential: Student, Guardian
Staff Login Credential: Staff
Fee Processing: Student, Guardian
Online Admission Fees Processing: Student, Guardian
Student Apply Leave: Guardian, Staff
Email PDF Exam Mark sheet: Student, Guardian
Online Course Purchase For Guest User: Student
Online Course Guest User Sign Up: Student
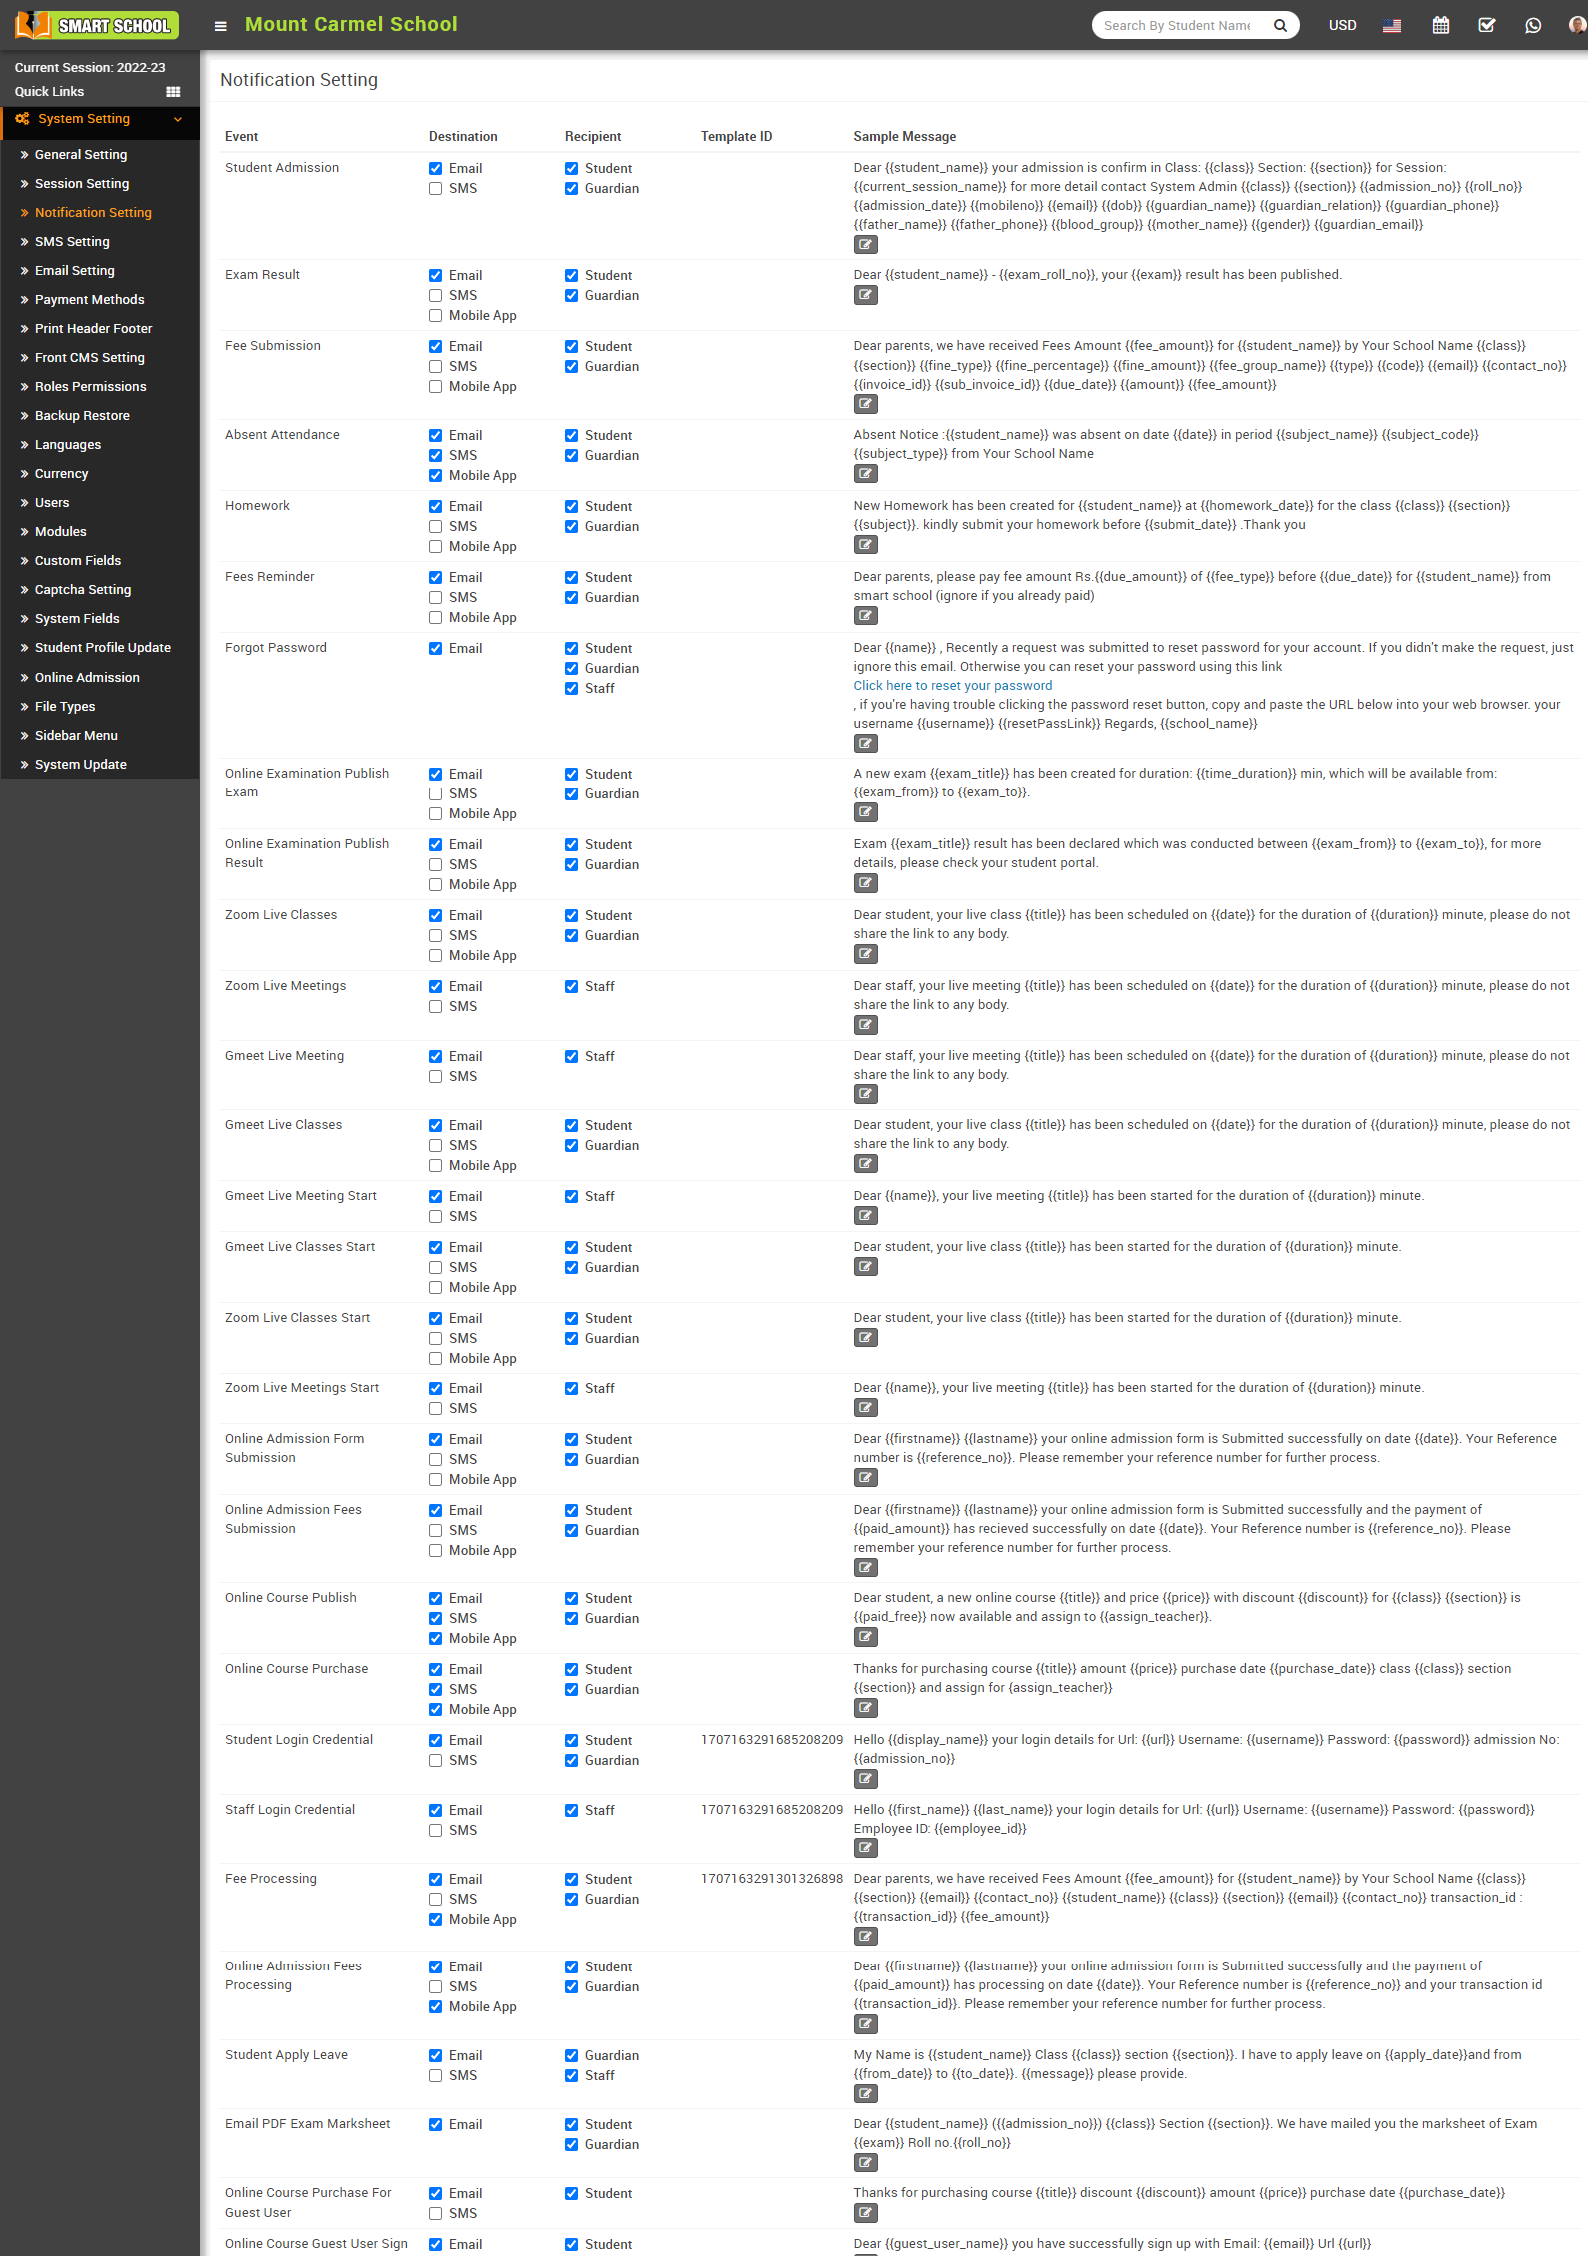
To edit sample message click on Edit icon present in the sample message column, at click of this icon a modal will be open. Here enter Subject, Template ID (here Template ID is your DLT template registration ID which is used only in Indian SMS gateway), Template and then click on Save button.
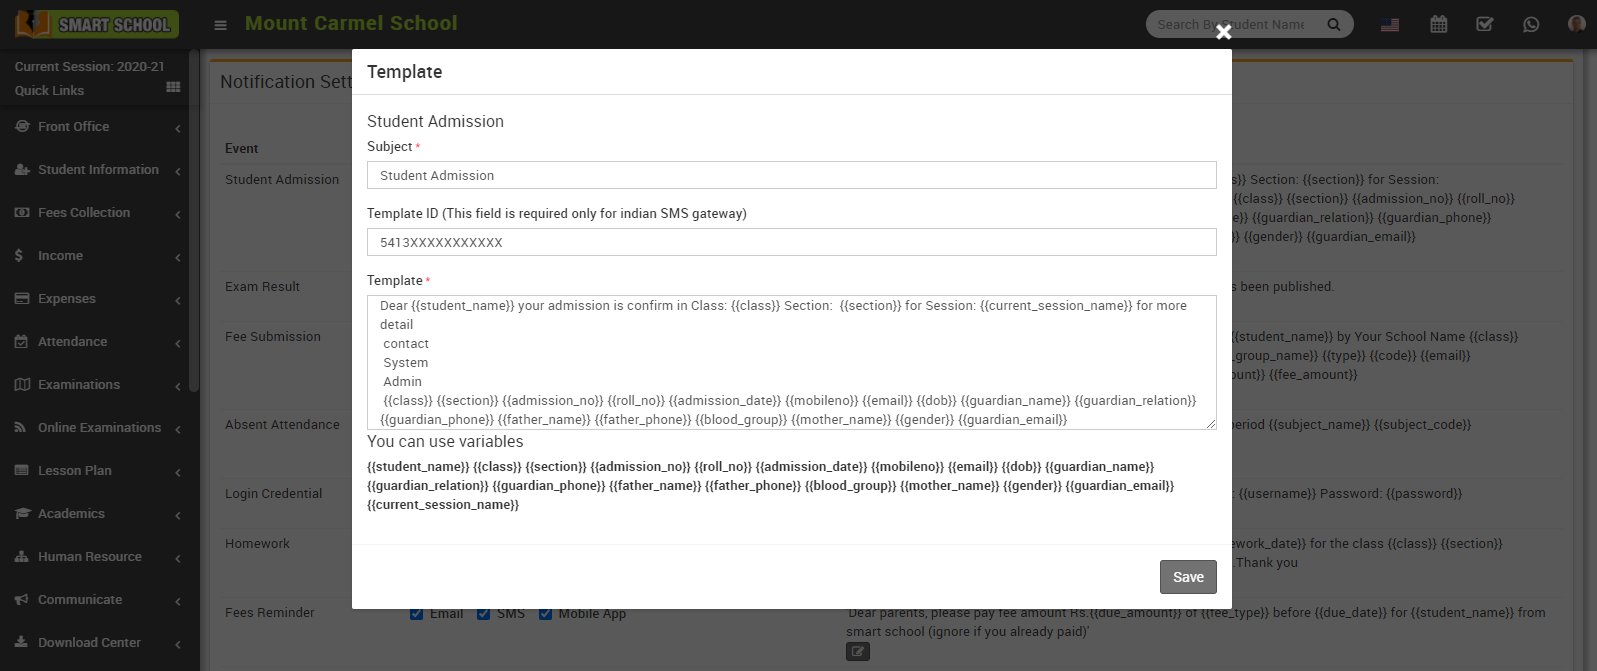
Note - If you are using any Indian SMS gateway then your template content must be match with your DLT registered template content.
How to manage SMS Setting?
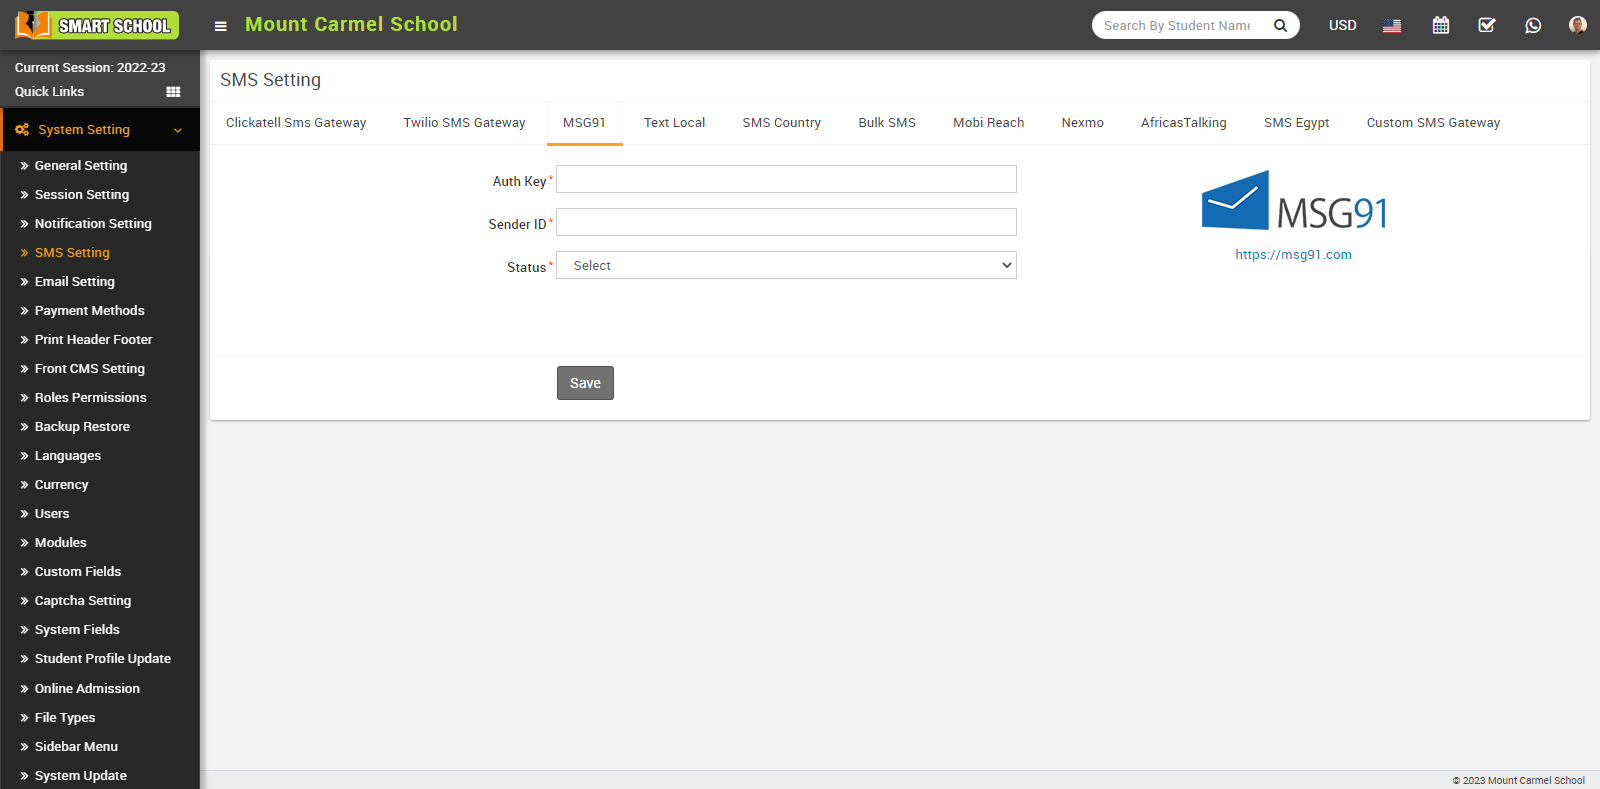
Here we are providing 11 SMS Gateway namely Clickatell SMS Gateway, Twilio SMS Gateway, MSG91, Text Local, SMS Country, Bulk SMS, Mobi Reach, Nexmo, AfricasTalking, SMS Egypt, Custom SMS Gateway in our Smart School.
Custom SMS Gateway-
In Smart School you can integrate any http based SMS Gateway using our Custom SMS library. Please contact to support to get Custom SMS Gateway integration guide. Here enter Gateway Name, select Status (Enabled/Disabled) and then click on Save button.
.png)
Follow same procedure to SMS gateway for Clickatell SMS Gateway, Twilio SMS Gateway, Text Local and SMS Country.
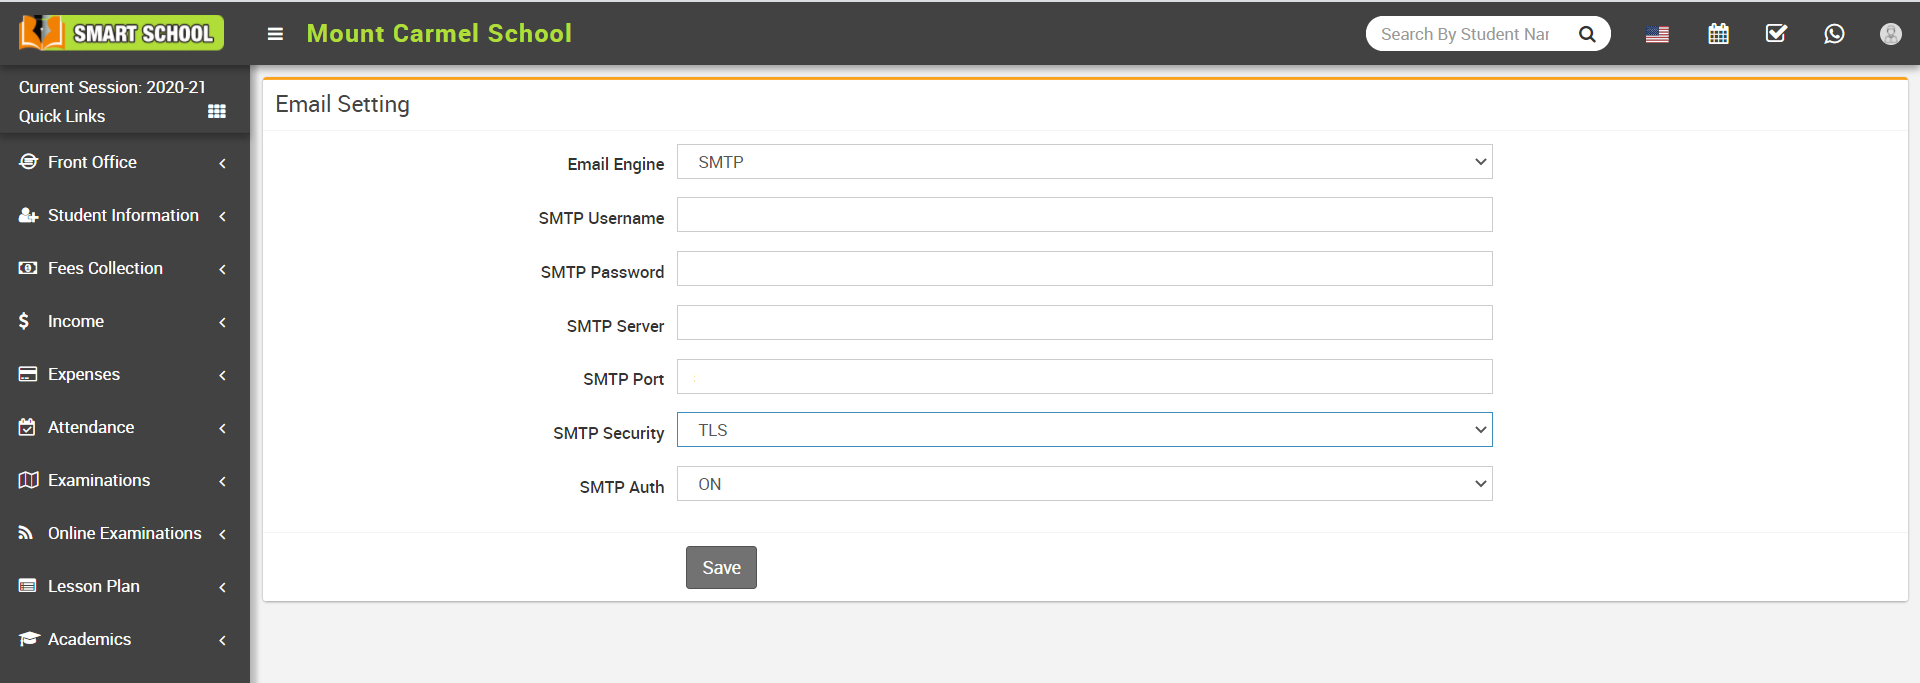
How to manage Email Setting?
.png)
Now select the SMTP option and enter SMTP Username, SMTP Password, SMTP Server SMTP Port and select SMTP Security (TLS/SSL/OFF), SMTP Auth (ON/OFF) and then click on Save button.
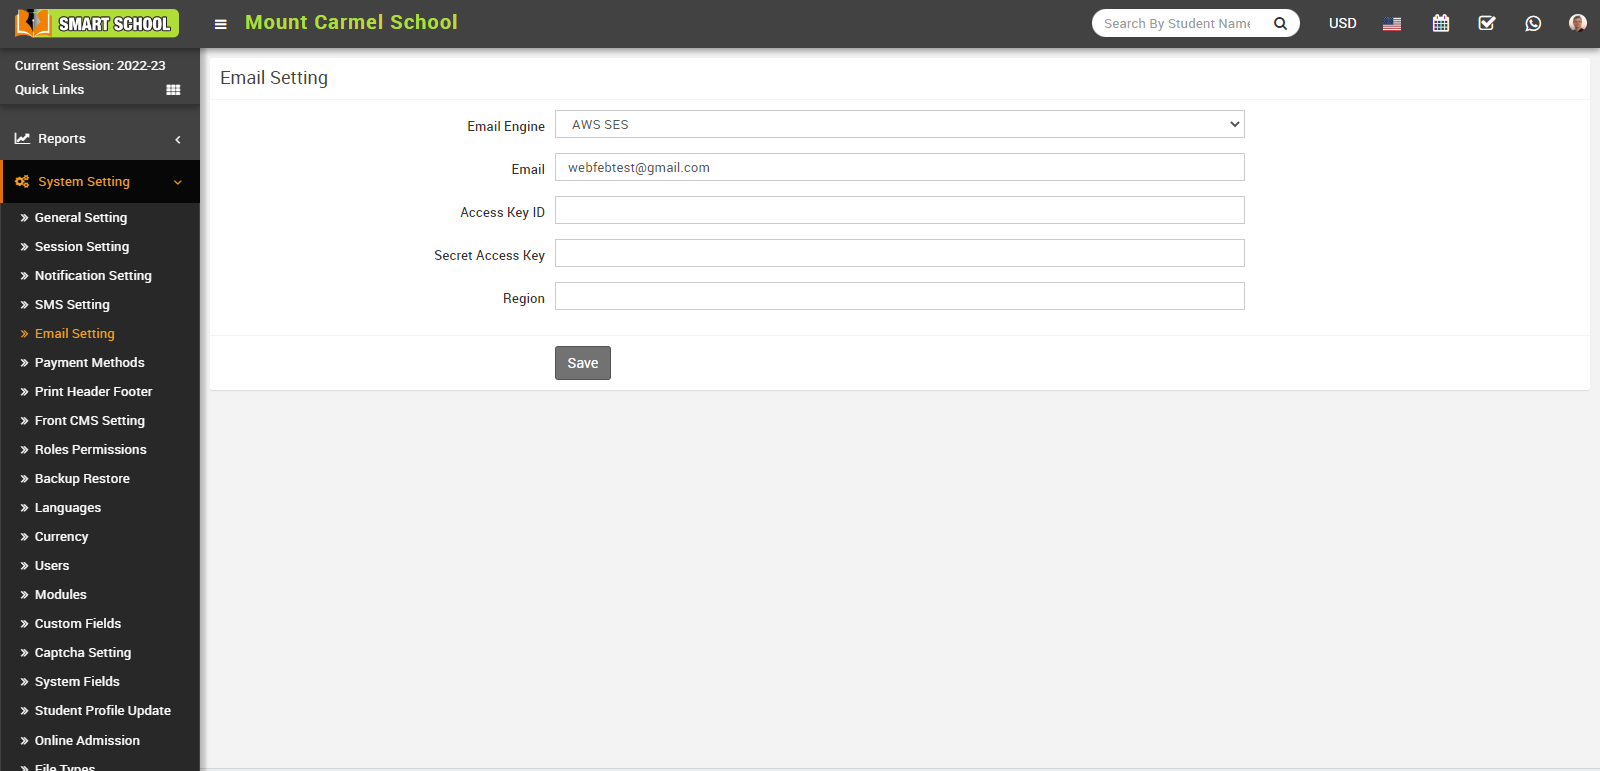
AWS SES (Amazon Simple Email Service) is a cloud-based email service that enables businesses to send and receive emails. It provides a reliable and cost-effective way to send emails to large numbers of recipients. For more information about AWS (Amazon Web Service) and SES (Simple Email Service).
Go through this link:
https://docs.aws.amazon.com/ses/latest/dg/send-email-concepts-credentials.html .
To send emails from Smart School, you need to configure the email settings. For this, go to System Settings > Email Settings, then Email Engine, where you can view SMTP and AWS SES. Click on AWS SES (Amazon Web Service, Simple Email Service). Enter your email address, Access Key ID, Secret Access Key, and region here, then click the Save button.
How to manage Payment Methods Gateway?
For allowing Students/parent to pay their payment online then you must have to enable any one of payment gateway, for this go to System Settings > Payment Methods then select any payment method from top of the page then enter your payment gateway account details in required fields then click on the Save button.
Here we are providing 24 payment method Paypal, Stripe, PayU, CCAvenue, InstaMojo, Paystack, Razorpay, Paytm, Midtrans, Pesapal, Flutter Wave, IPay Africa, JazzCash, Billplz, SSLcommerz, Walkingm, Mollie, Cashfree, Payfast, ToyyibPay, Twocheckout, Skrill, Payhere, Onepay.
Once you saved the record you have to Enable payment gateway from the right side of the page and then click on Save button.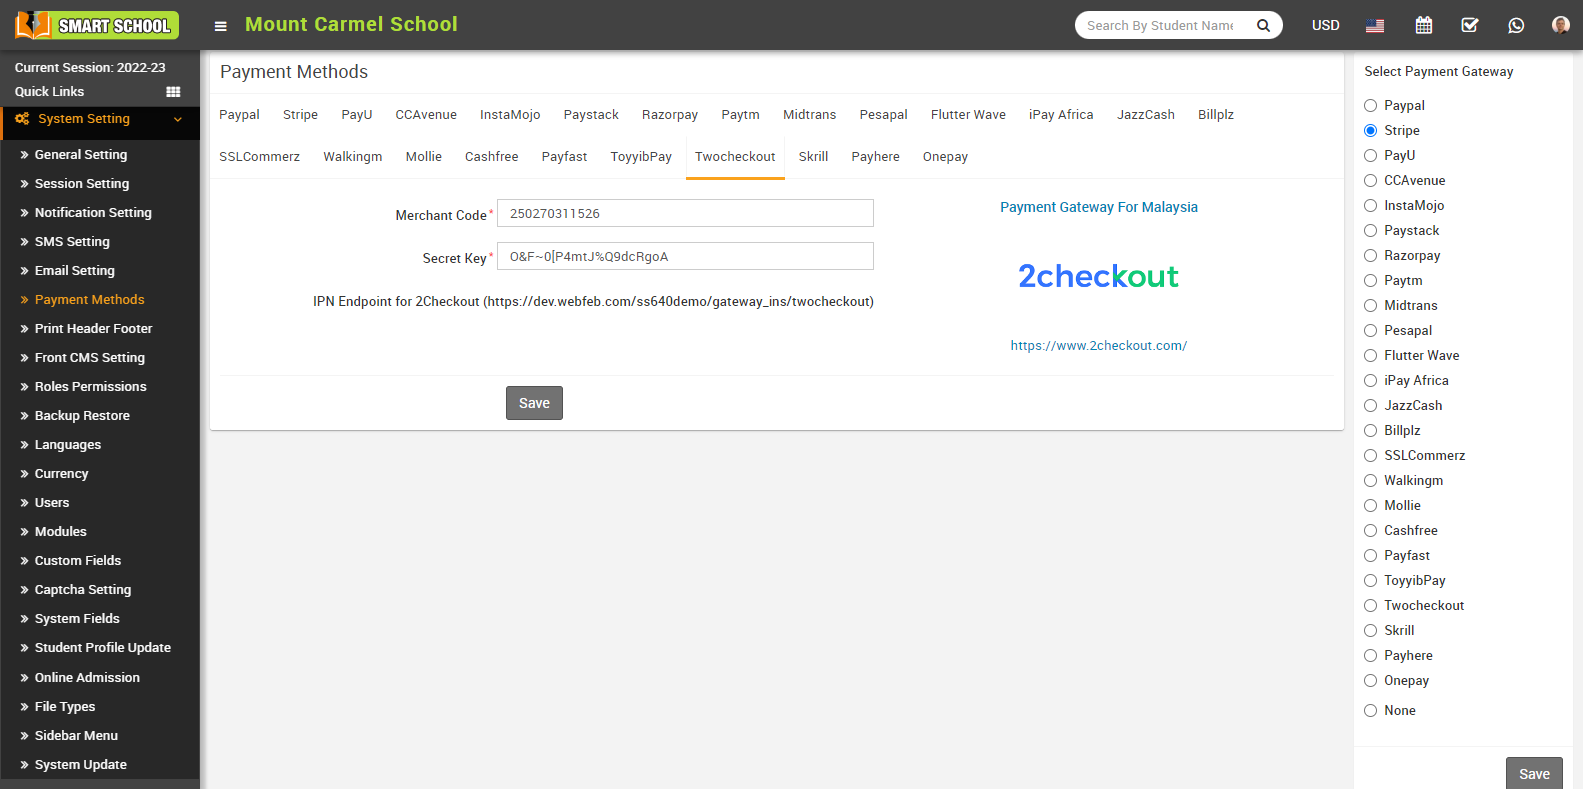
Note -
1. You can add multiple payment gateways details but you can enable only one at a time.
2. Midtrans payment gateway currently supports only credit card method option in Smart School.
How to add Print Header Footer?
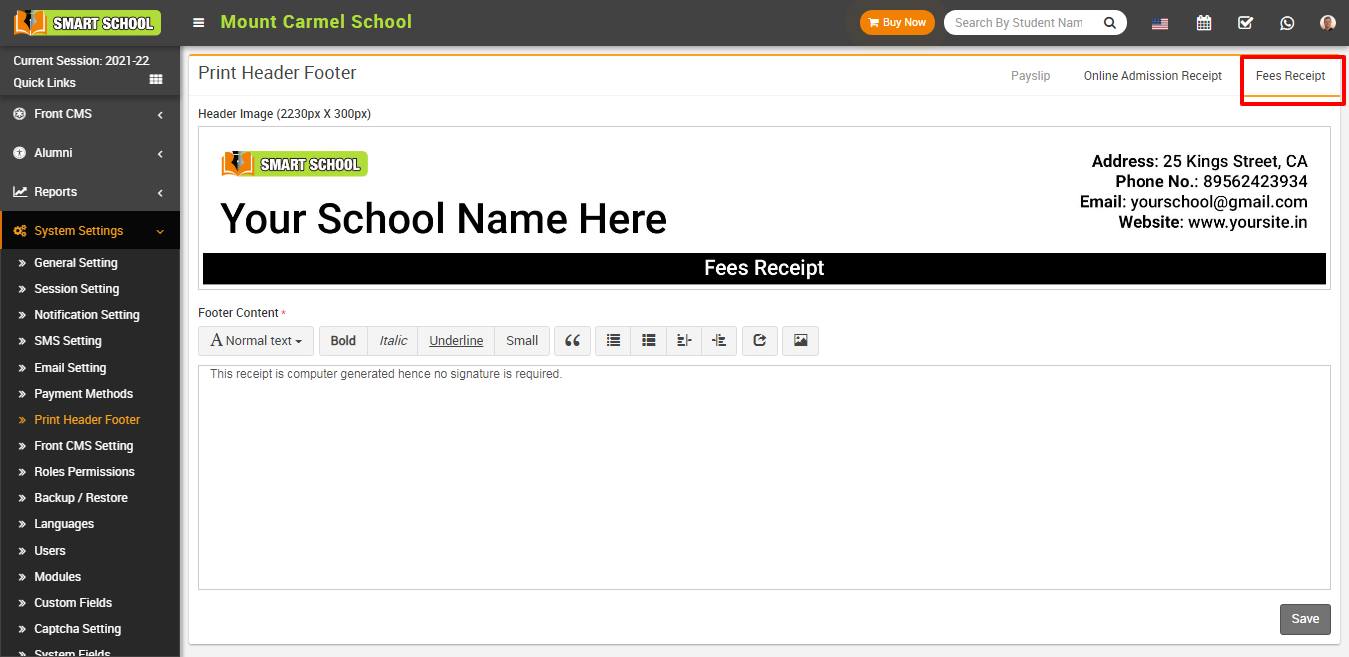
To remove header image click on Remove button present in header image in right corner of the page on mouseover.
To add print header footer payslip (for staff) click on Payslip present at top right corner in the print header footer page. Here you can replace your header image select Header Image and enter Footer Content and then click on Save button.
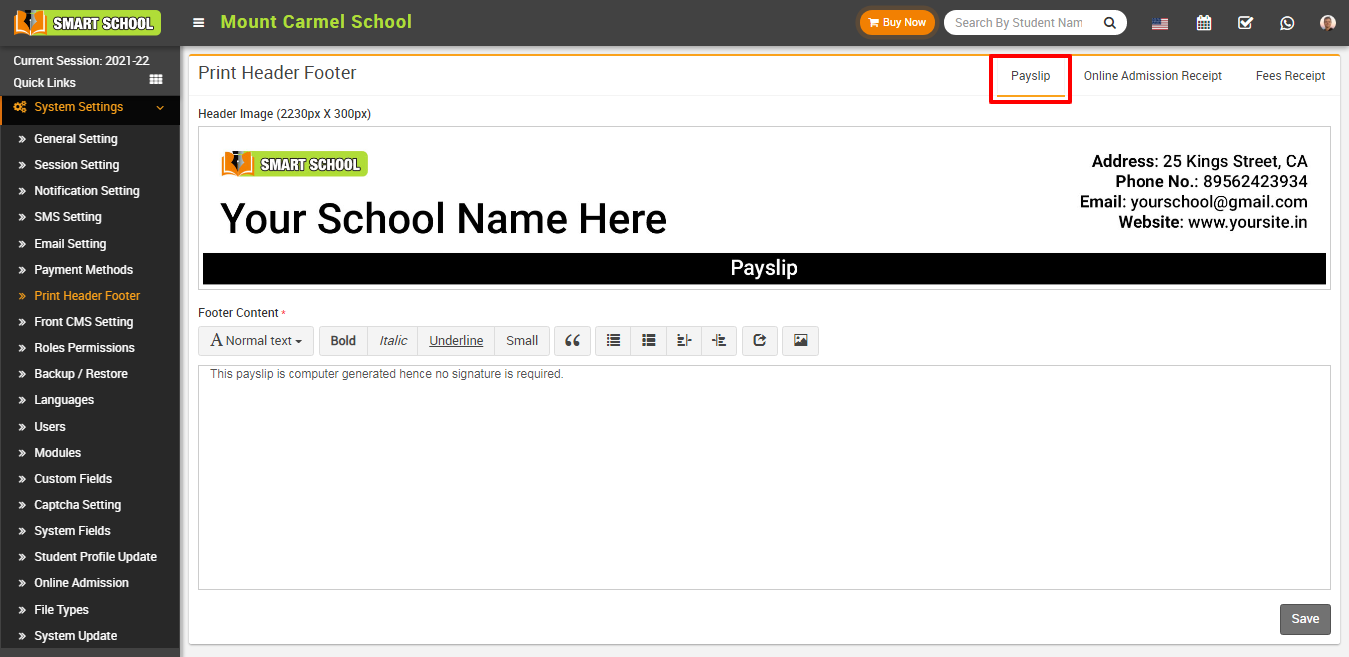
To remove header image click on Remove button present in header image in right corner of the page on mouseover.
To add print header footer Online Admission Receipt (for student) click on Online Admission Receipt present at top right corner in the print header footer page. Here you can replace your header image select Header Image and enter Footer Content and then click on Save button.
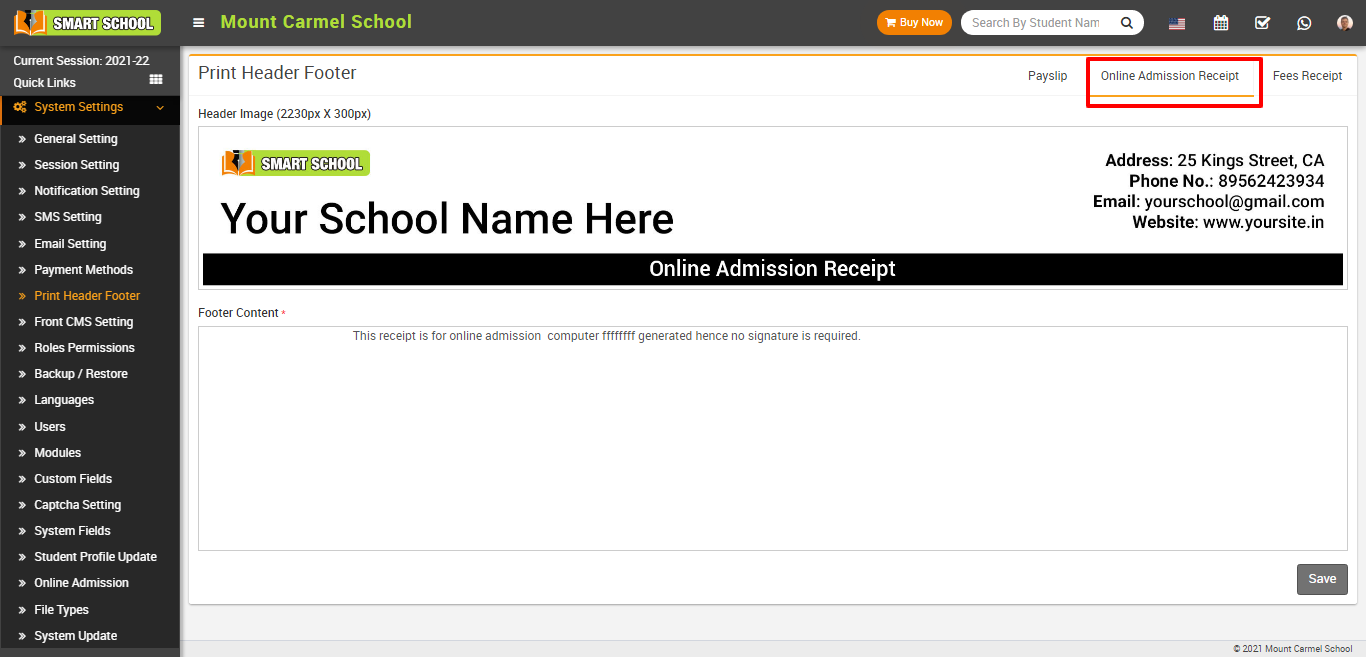
To remove header image click on Remove button present in header image in right corner of the page on mouseover.
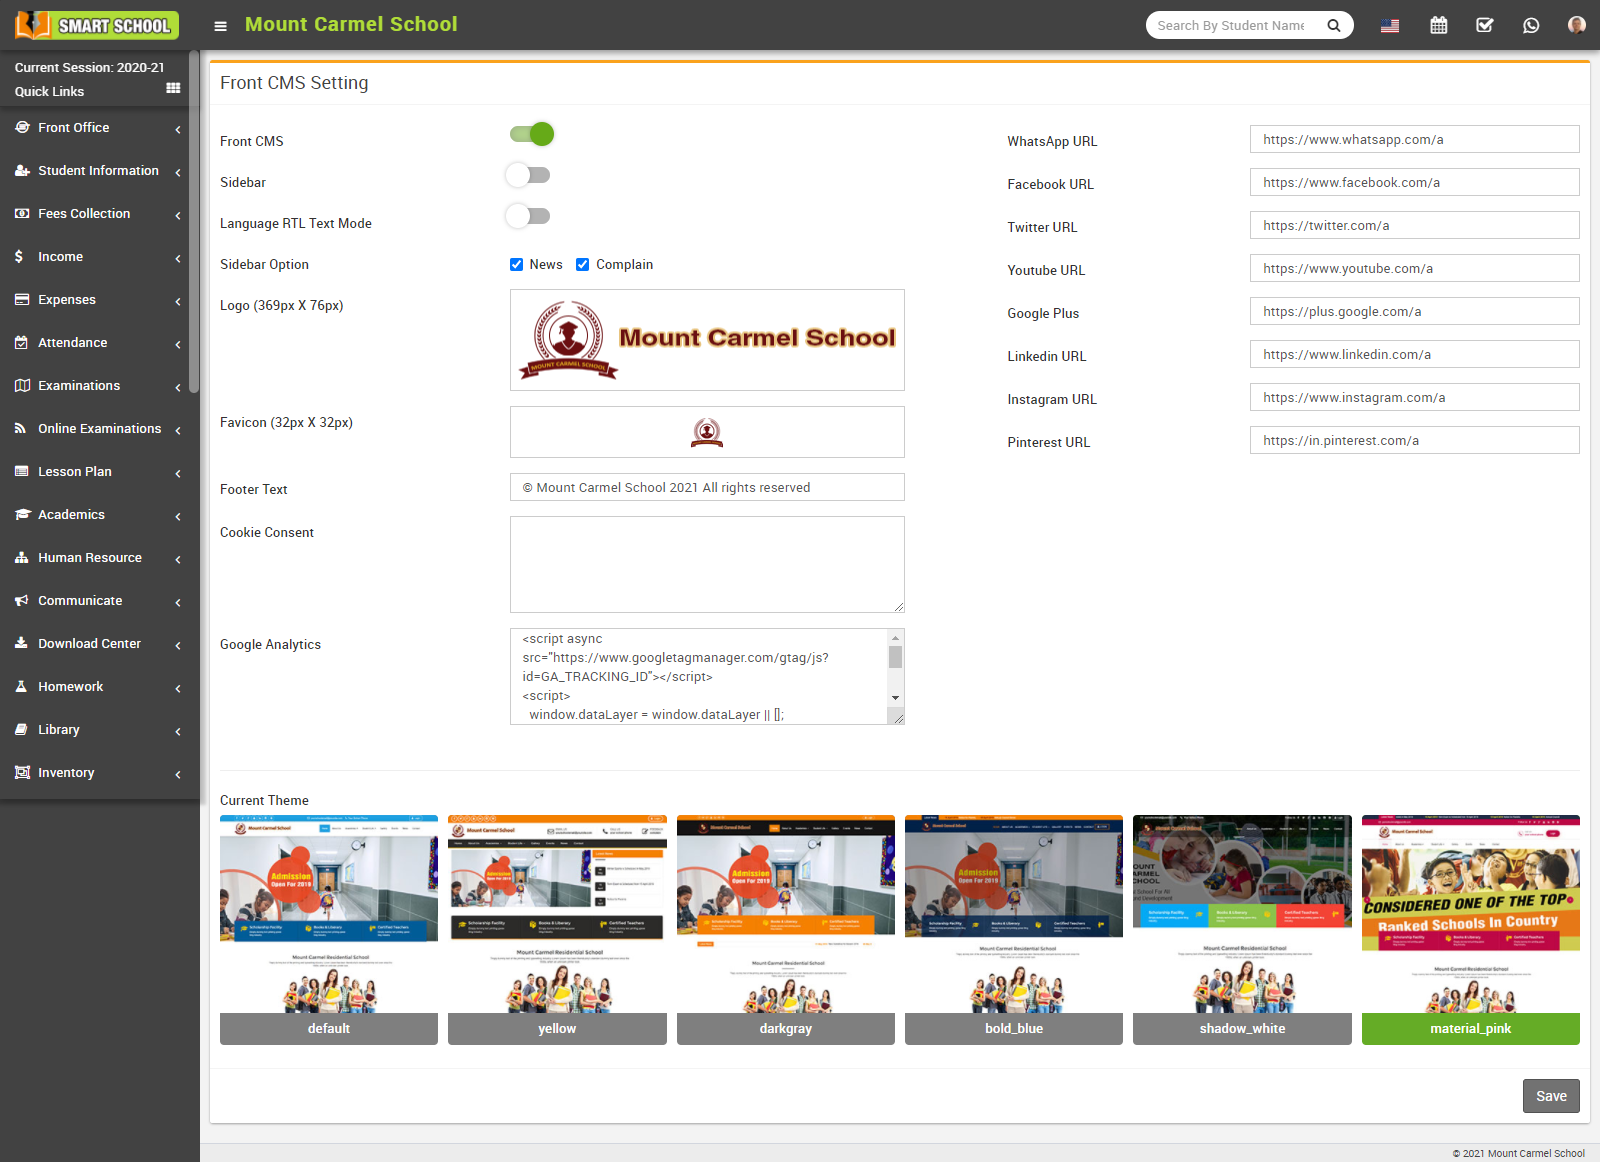
How to manage Front CMS Setting?
How to add Roles Permission?
To add roles, go to System Settings > Roles Permission then enter role Name and then click on Save button. You can view this added record in the Role List on the right side of the page.
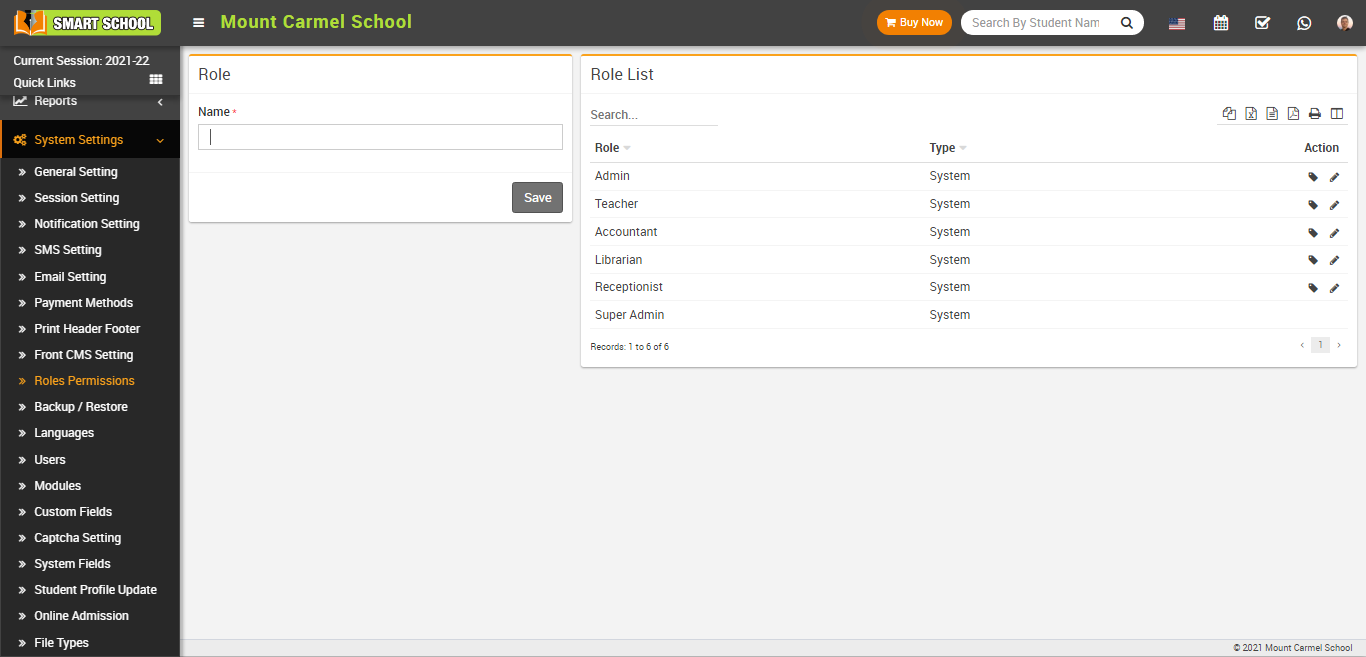
To delete role click on Delete icon present in the role list.
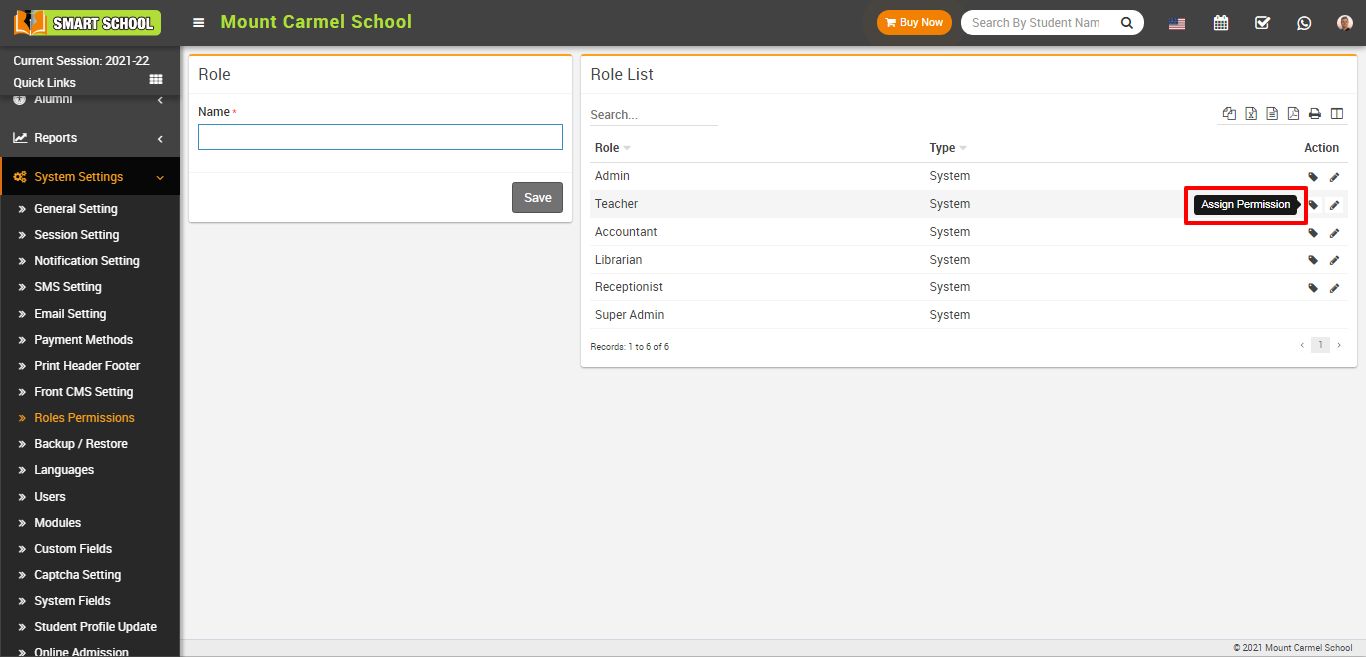
To assign permission click on Assign Permission icon present in role list, at click of this icon Assign Permission page will be open, Here you can assign permission for each module and then click on Save button.
.png)
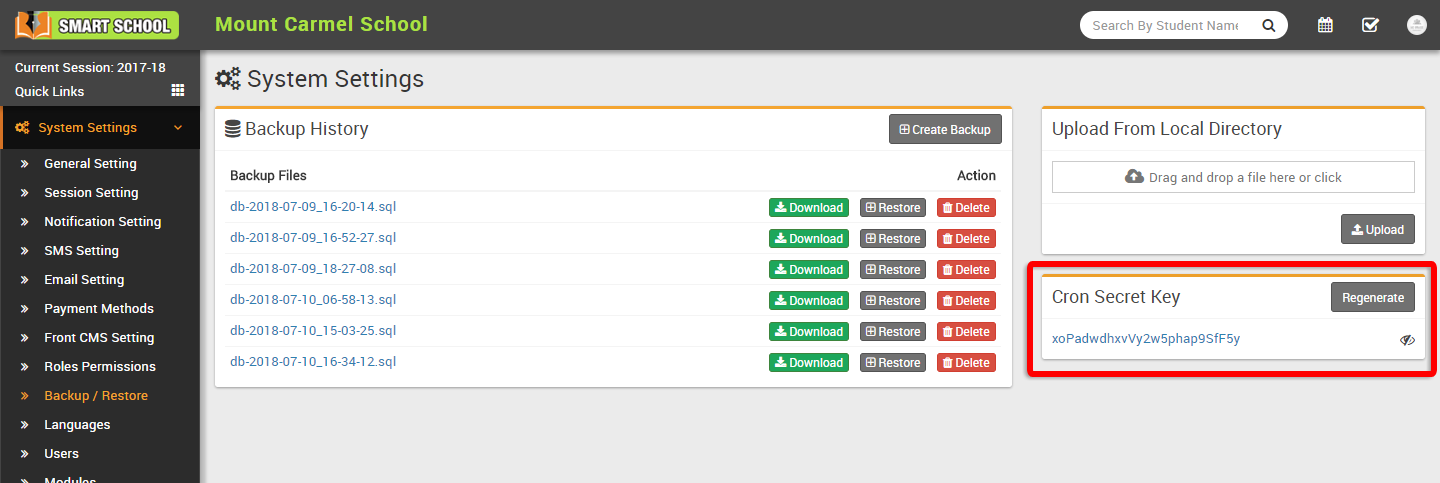
How to manage Backup/ Restore process?
To create backup, go to System Settings > Backup/Restore then click on Create Backup button present at the top of the page, at click of this button backup will be created, you can view this backup in the Backup Files by the name of Today’s Date.
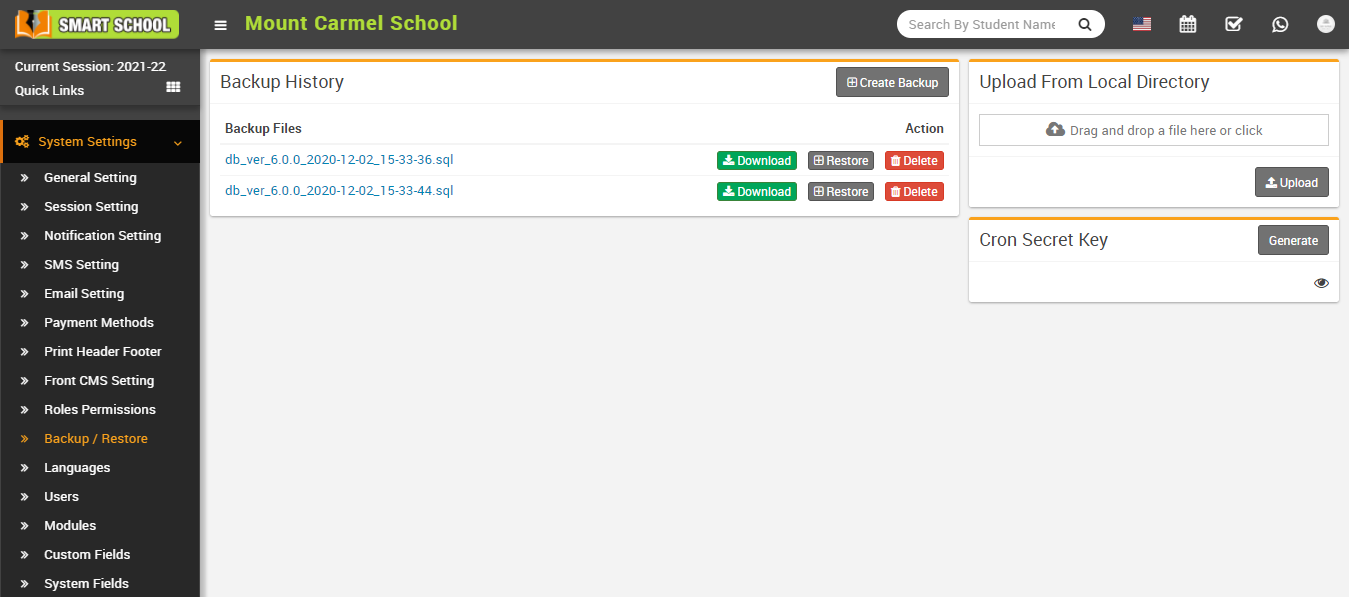
To download backup, click on Download button of the date for which you need backup and to restore backup, click on Restore button of the backup that you want to restore and to delete backup click on Delete button present in the backup history page.
To upload backup from local directory, Drag your file in Upload From Local Directory option present in the right side of the page and then click on the Upload button.
If you want to use auto backup feature and due fees reminder of Smart School then you should configure Cron settings on your hosting server for corn URL http://yourdomain/smartschool/cron/autobackup/<your-cron-secret-key>. To generate/regenerate your cron secret key simply click on Generate/Regenerate button under Cron Secret Key section. To view existing cron secret key click on Eye icon button.
How to manage language?
1. Afrikaans
2. Albanian
3. Amharic
4. Arabic
5. Azerbaijan
6. Basque
7. Bengali
8. Bosnian
9. Catalan
10. Cebuano
11. Chinese
12. Czech
13. Danish
14. Dutch
15. English
16. Esperanto
17. Estonian
18. Finnish
19. French
20. Galician
21. Georgian
22. German
23. Greek
24. Gujarati
25. Haitian (Creole)
26. Hebrew
27. Hindi
28. Hungarian
29. Icelandic
30. Indonesian
31. Irish
32. Italian
33. Japanese
34. Javanese
35. Kannada
36. Korean
37. Kurdish
38. Lao
39. Latin
40. Latvian
41. Lithuanian
42. Macedonian
43. Malagasy
44. Malay
45. Malayalam
46. Maltese
47. Maori
48. Marathi
49. Mongolian
50. Nepali
51. Norwegian
52. Persian
53. Polish
54. Portuguese
55. Punjabi
56. Romanian
57. Russian
58. Scottish
59. Sinhala
60. Slovakian
61. Slovenian
62. Spanish
63. Sundanese
64. Swahili
65. Swedish
66. Tagalog
67. Tamil
68. Telugu
69. Thai
70. Turkish
71. Urdu
72. Uzbek
73. Vietnamese
74. Welsh
75. Xhosa
76. Yiddish
77. Croatian
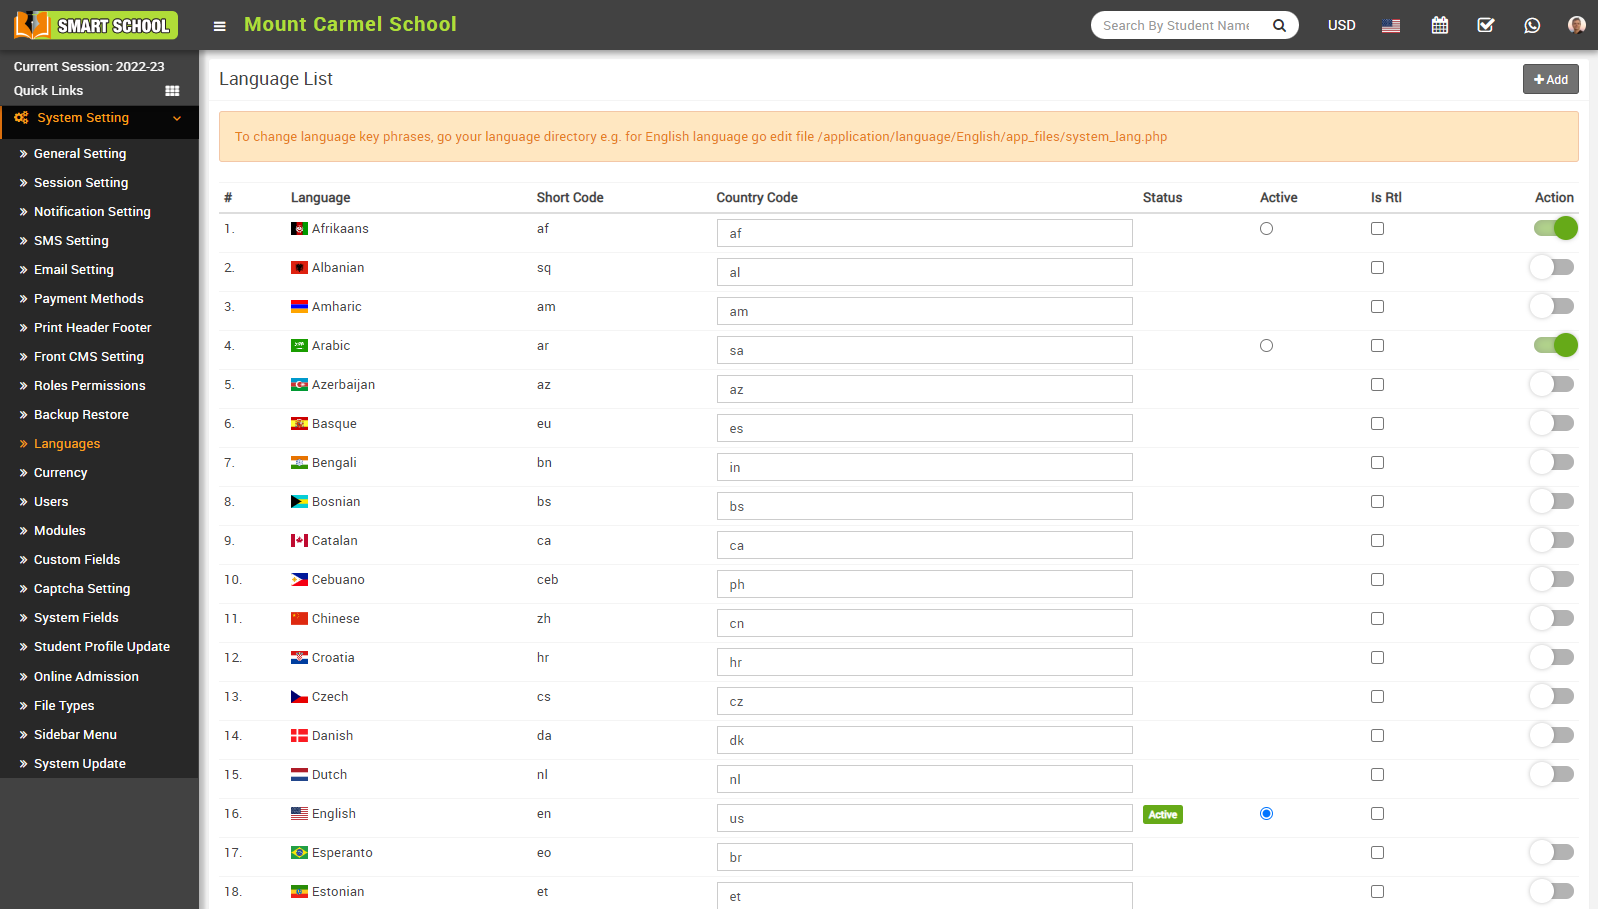
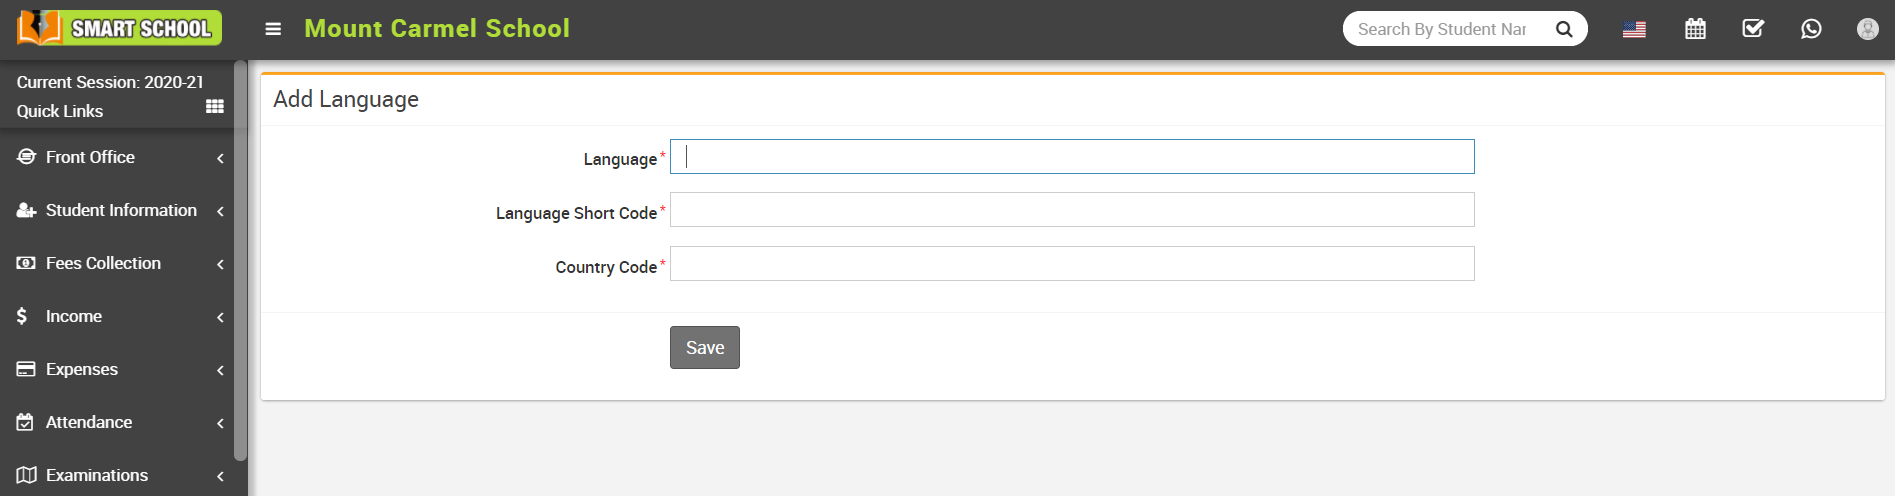
To add language, go to System Settings > Languages then click on Add button present at top right corner on the language list page.
After clicking of this button Add Language modal will be open. Here enter Language, Language Short Code, Country Code and then click on Save button.
To activate any language (In which you want to run Smart School), click on Action button present in the last column.
To edit country codes, go to the System Setting > languages. The language list will be open. Now in the country code column, you can edit the country code, which is already predefined internationally, you can also get these codes from Google. Now fill in the country code next to the relevant country and click outside the column. Then refresh the page, and your country code will be successfully changed. The country flag will also be changed automatically based on the country code change.
Note - You can not Edit default languages.
To delete language click on the Remove icon.
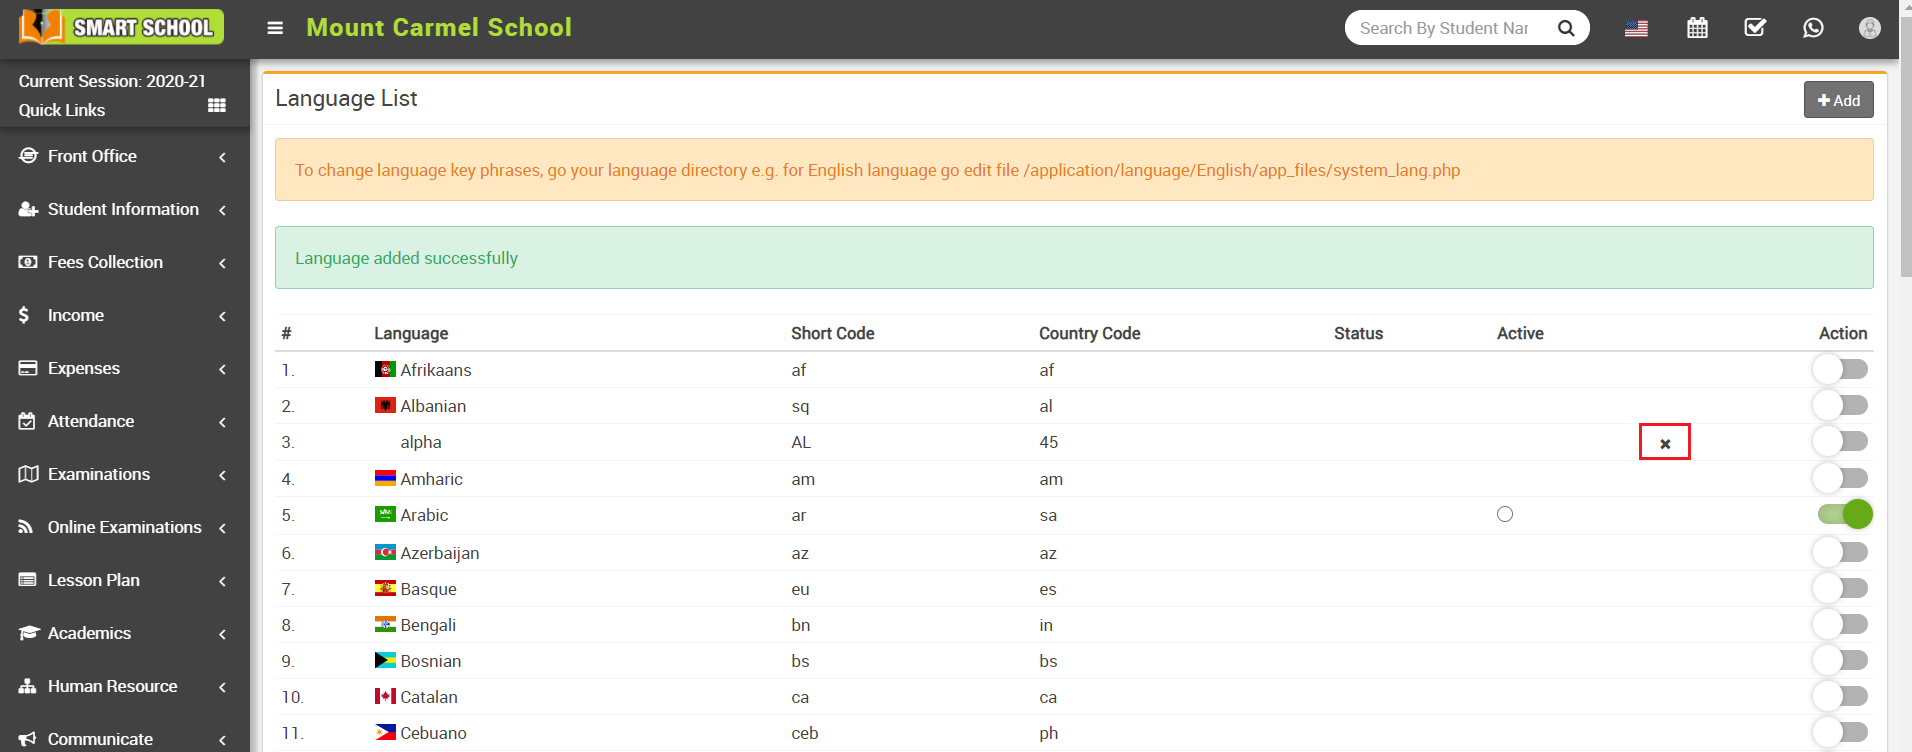
Note - You can not delete default languages.
In Smart School, RTL mode refers to a feature that enables the platform's interface to display content correctly for users who read and write in RTL languages, such as Arabic and Hebrew. When RTL mode is enabled, the interface and layout of the platform are adjusted accordingly, so that text, images, and other elements are aligned and displayed from right to left, rather than left to right.
Enabling RTL mode in Smart School can be particularly useful for schools and educational institutions that have students, teachers, or staff who primarily use RTL languages. It helps to ensure that the platform's content and features are accessible and easy to use for these users, improving their overall experience with the platform.
To Enable RTL mode, go to System Settings > Languages, then on the right side you can see the "Is RTL" column showing. Simply click on the checkbox in which language you want to see your smart school in RTL mode.
How to enable/disable Users?
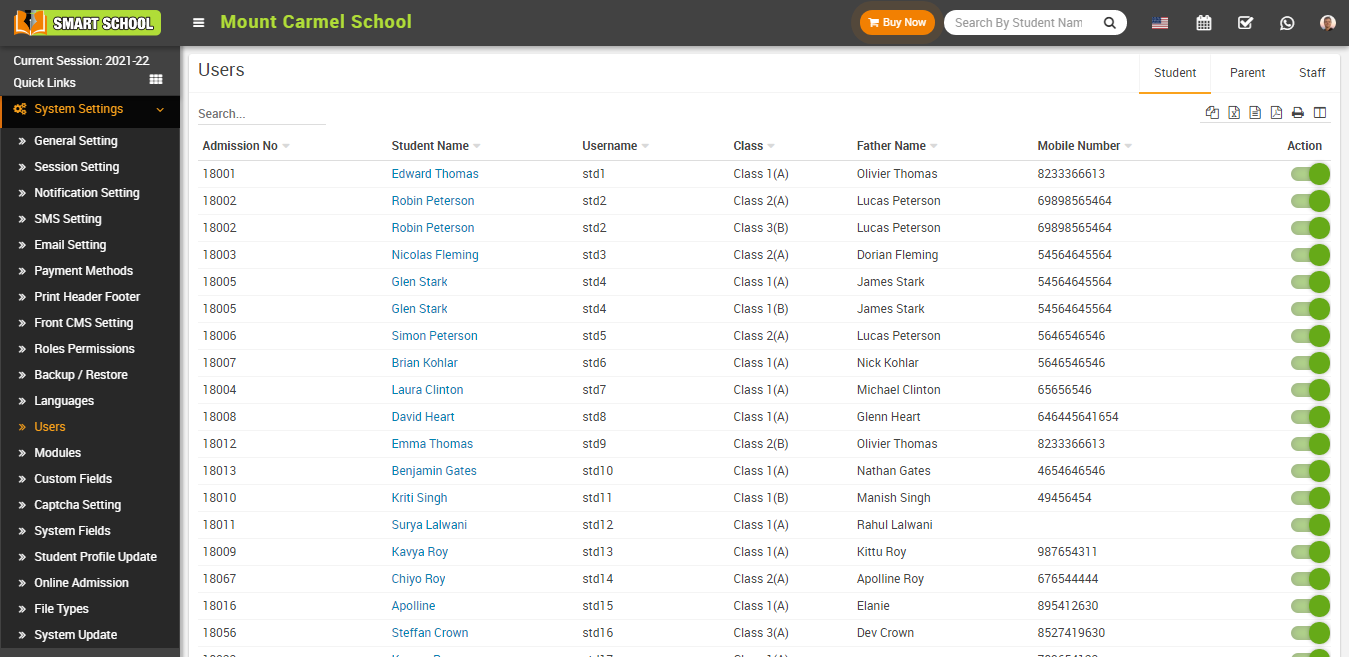
By default you will see student list. To enable/disable staff's , select Staff tab, to enable/disable student, select Student tab and to enable/disable parent select Parent tab from top of the page.
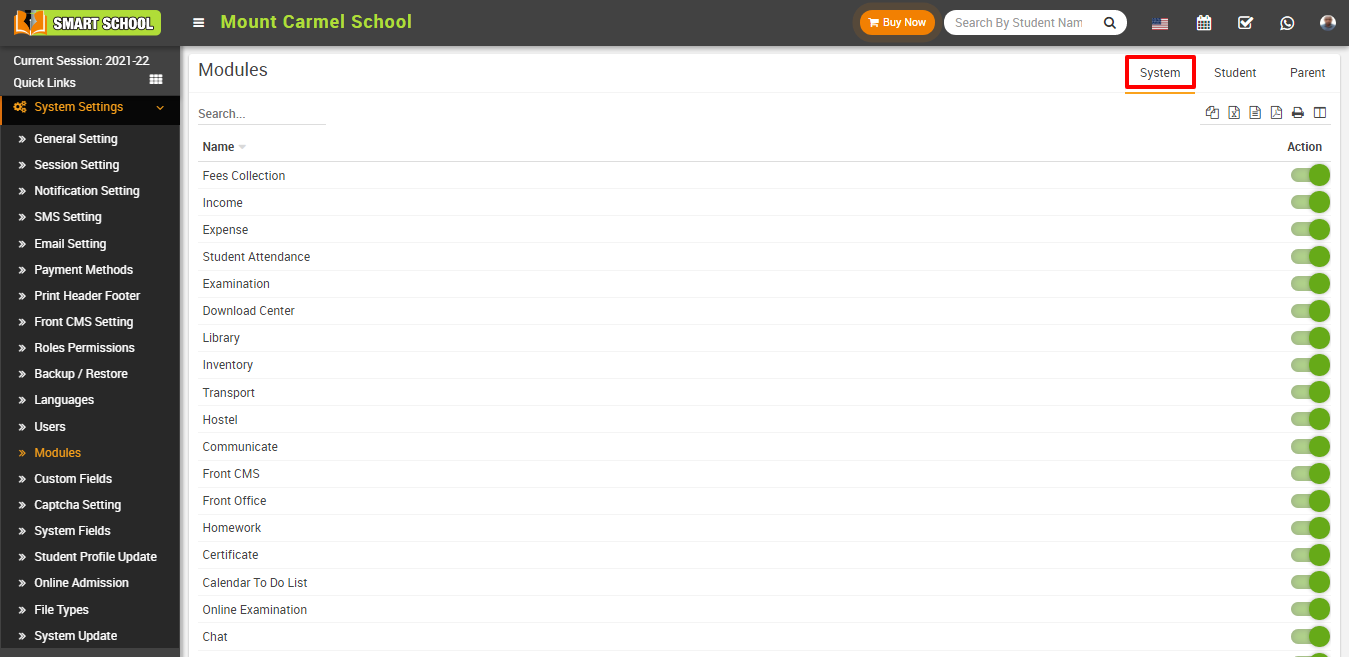
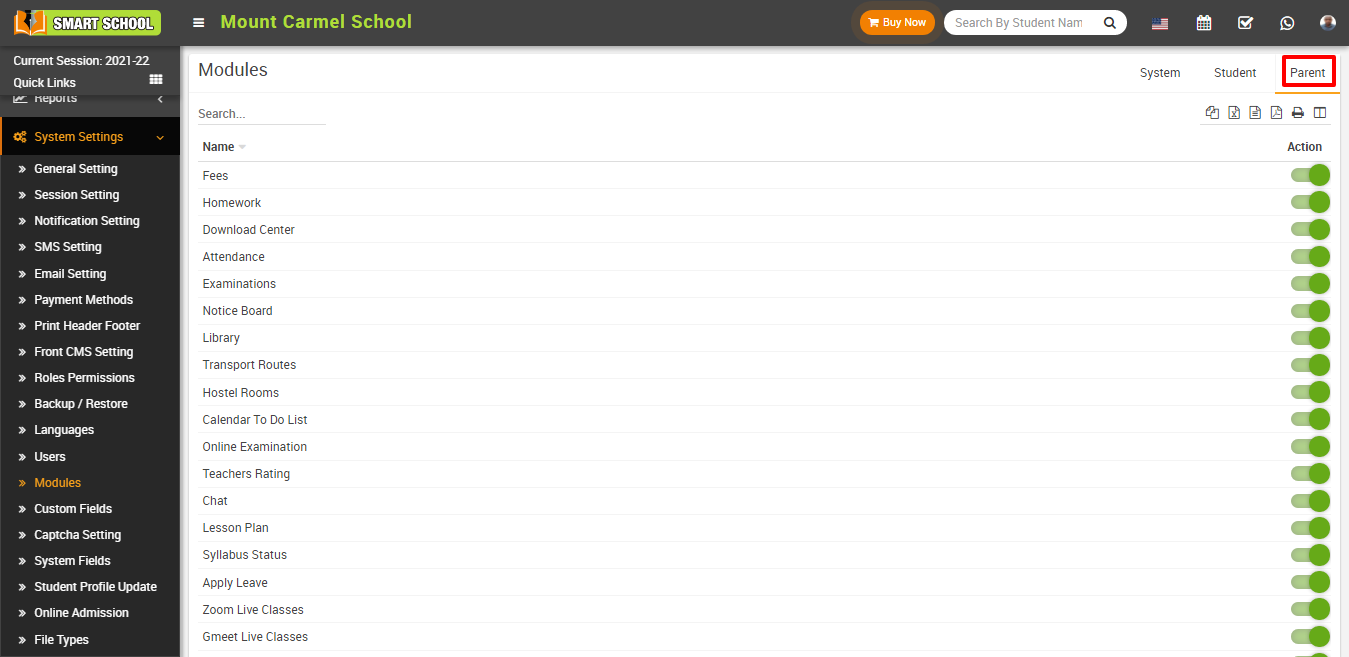
How to manage Modules?
System-
Student-
.png)
Parent-
How to add Custom Field?
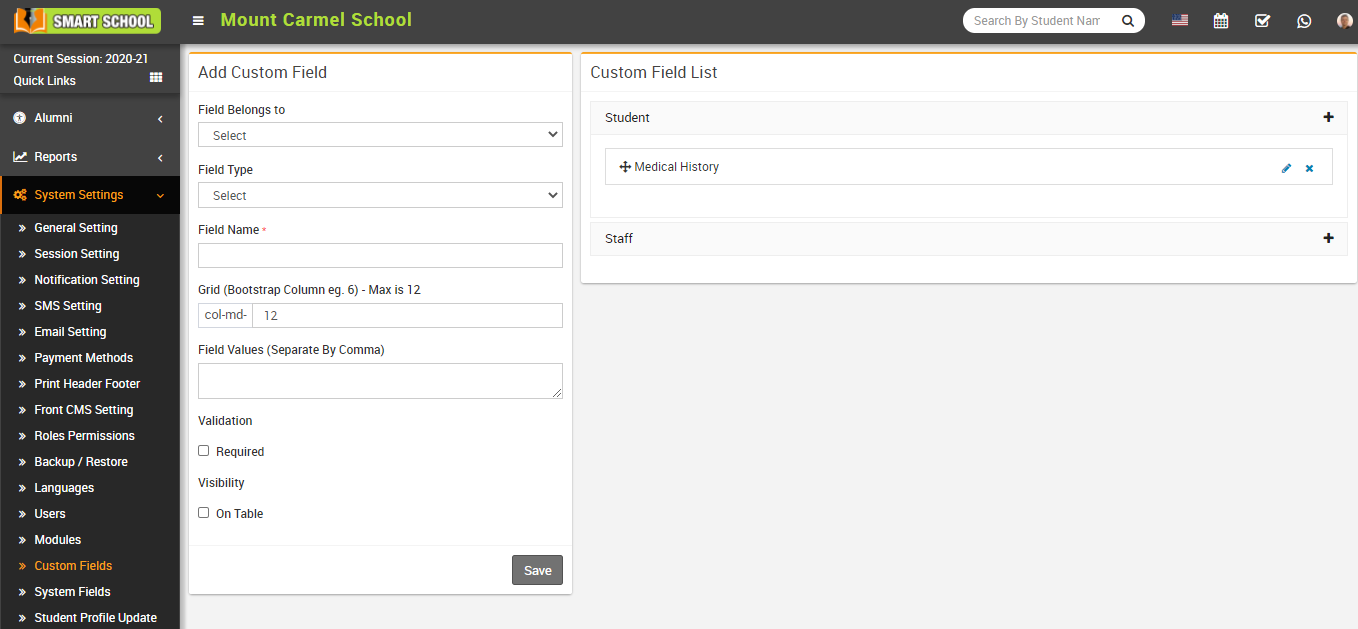
To edit custom field click on Edit icon and to delete custom field click on Delete icon present in the custom field list.
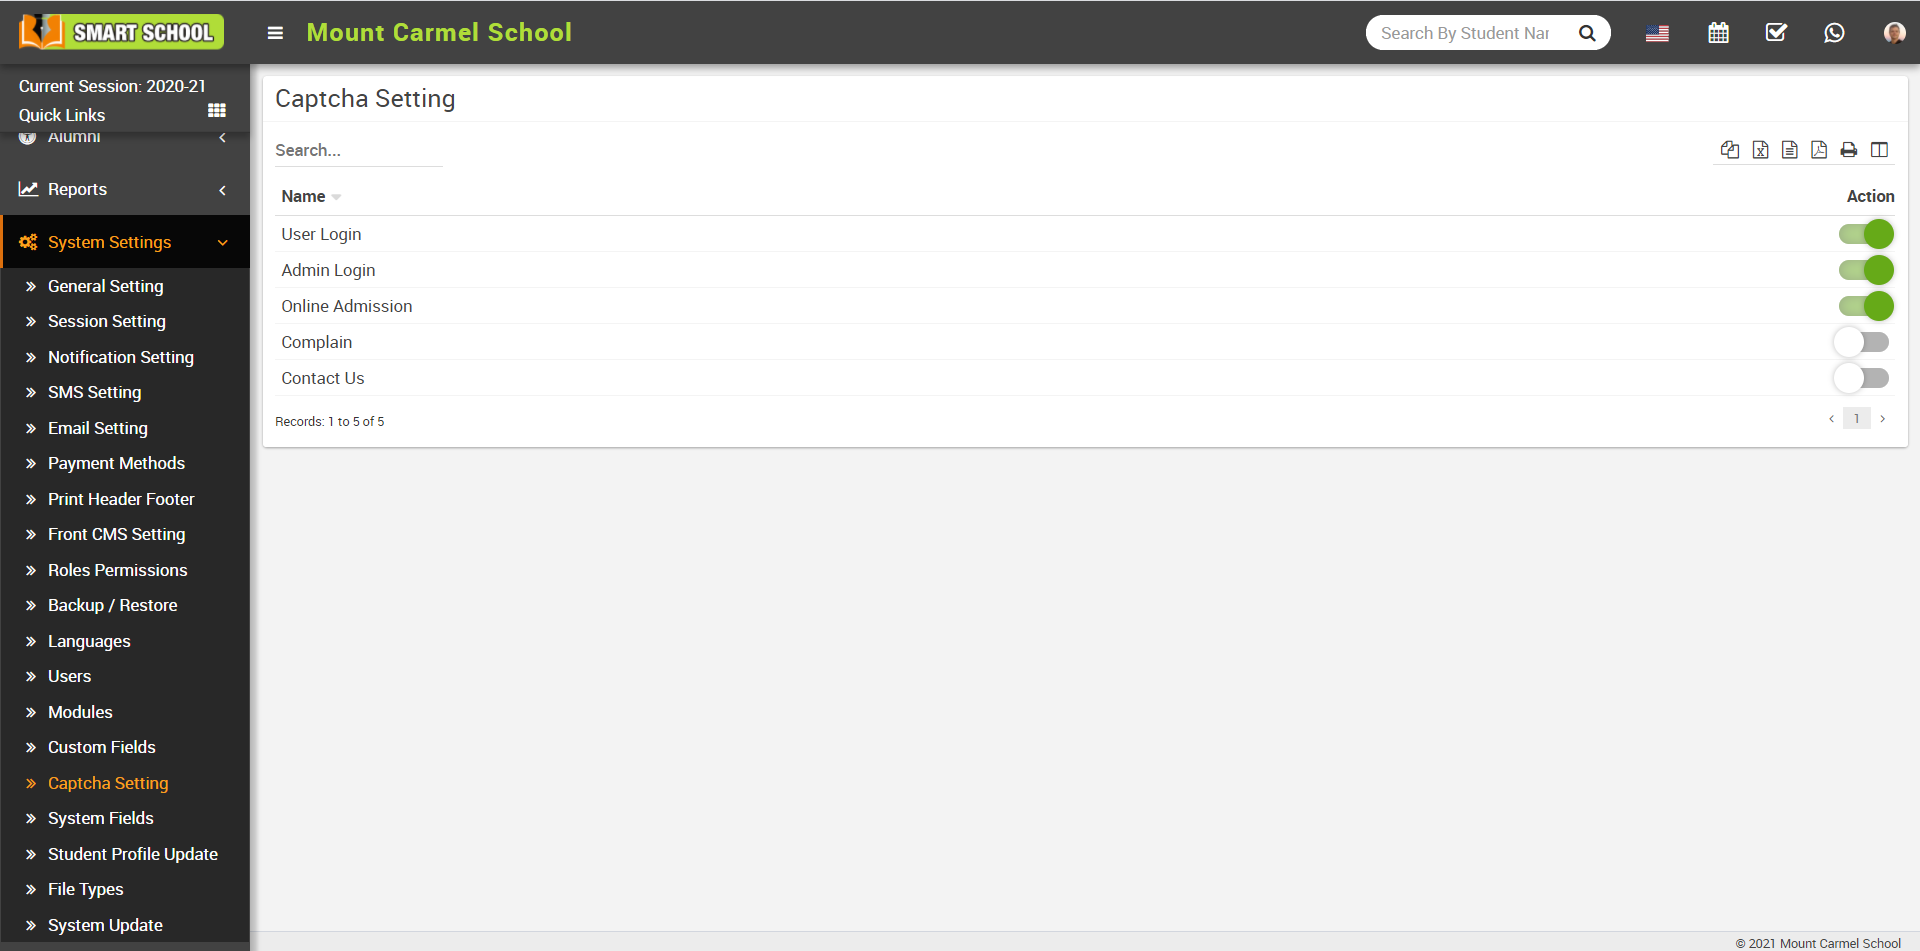
How to enable Captcha in Smart School?
Here we are using text-based captcha. Text based captcha are usually known words or random combinations of letters and digits. In order to continue, a user has to decrypt the code represented in the captcha box and enter the solution into the text box.
Here in the smart school we are providing captcha code verification in the 5 event User login, Admin login, Online Admission, Complain and Contact Us.
To enable captcha go to System Setting >> Captcha Setting, from here you can enable those event in which you want to use captcha code verification.
Once you enable captcha it would be shown as follow –
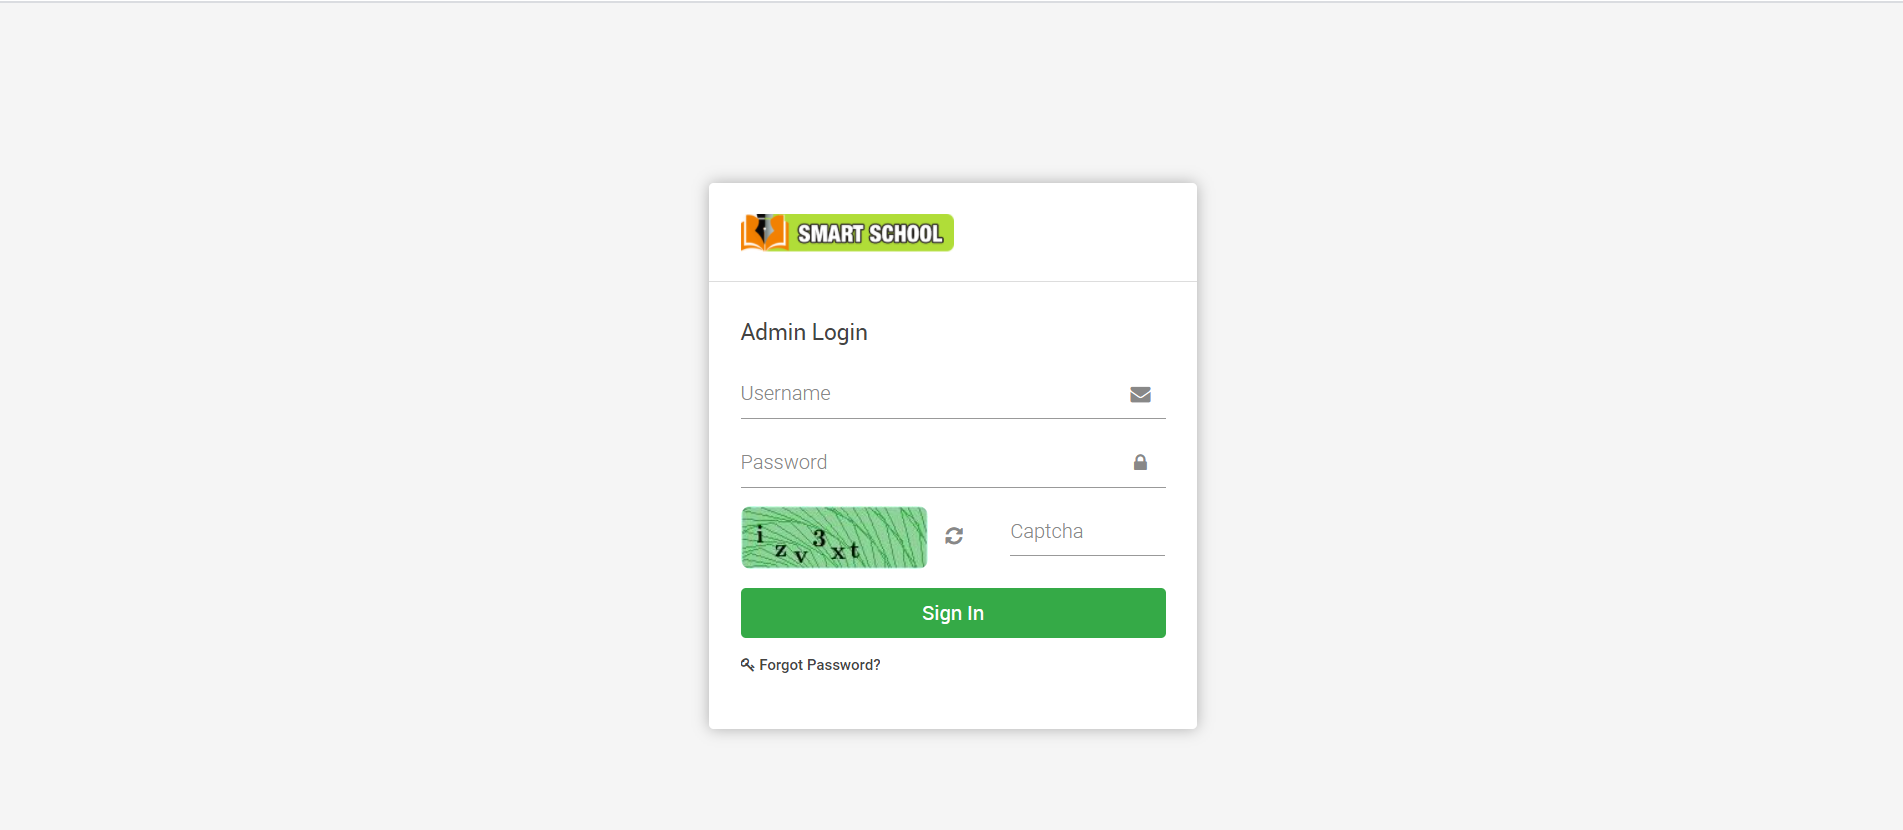
Here user need to fill the correct captcha code then only he/she can login in Smart School. User can also get new captcha code by clicking Refresh icon.
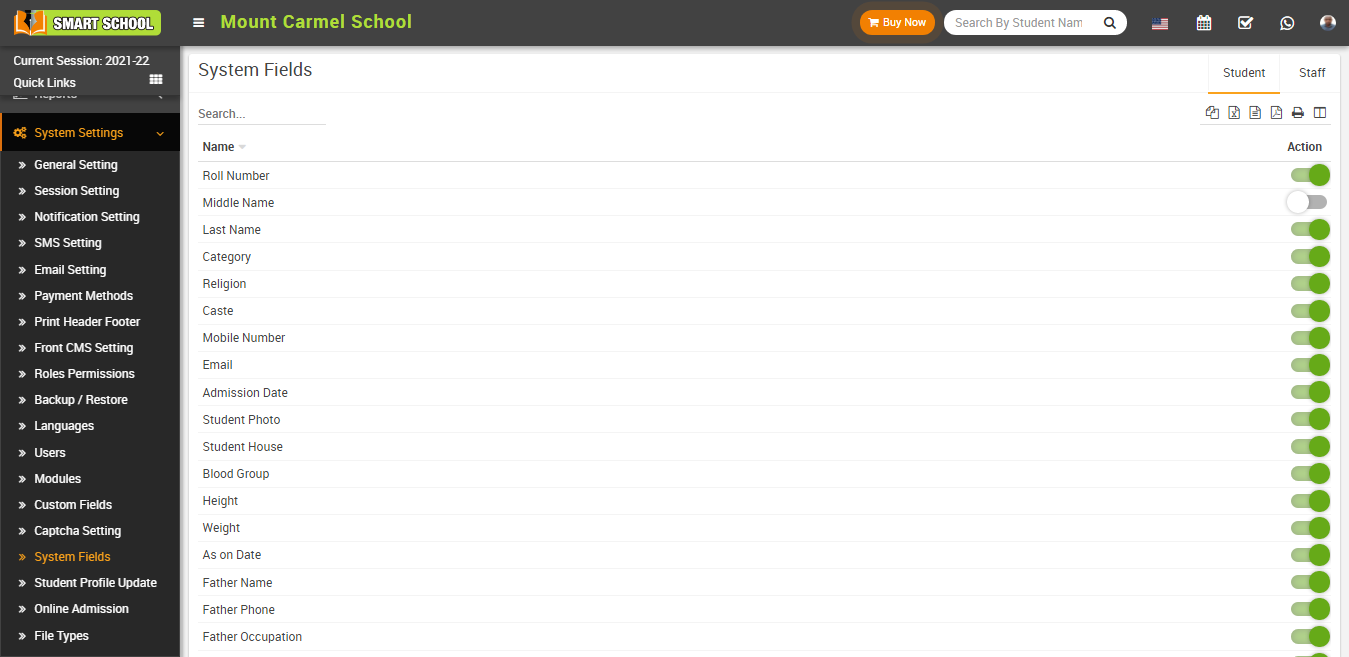
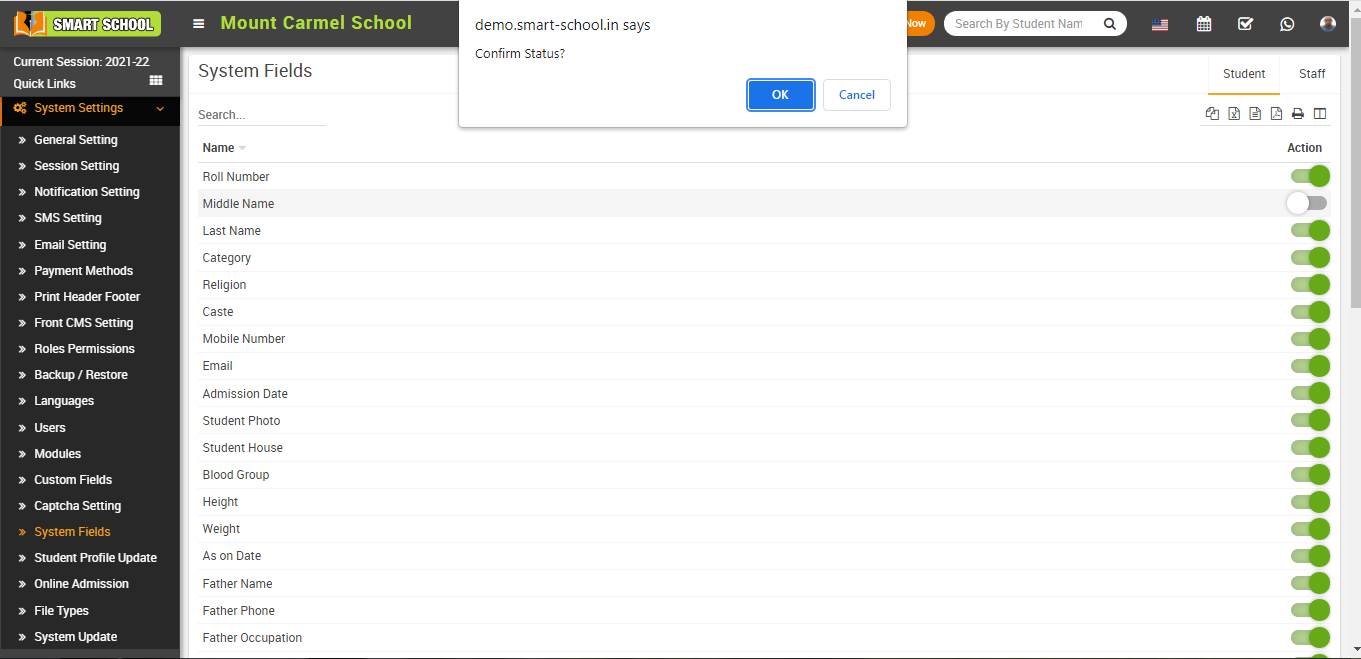
How to Disable System Field?
To disable system field, click on Toggle button present in Action column, at click of this button it will ask you to confirm, after your confirmation system field will be disabled and this will not be visible in the form.
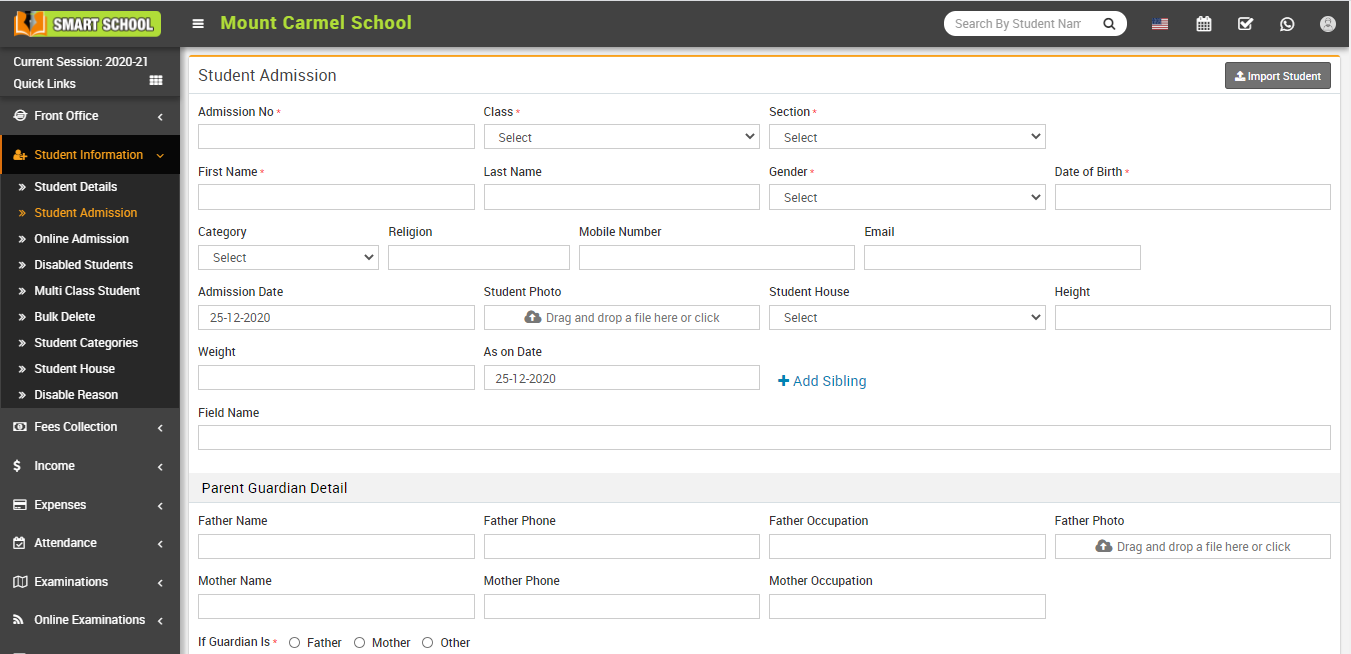
Student Profile Update
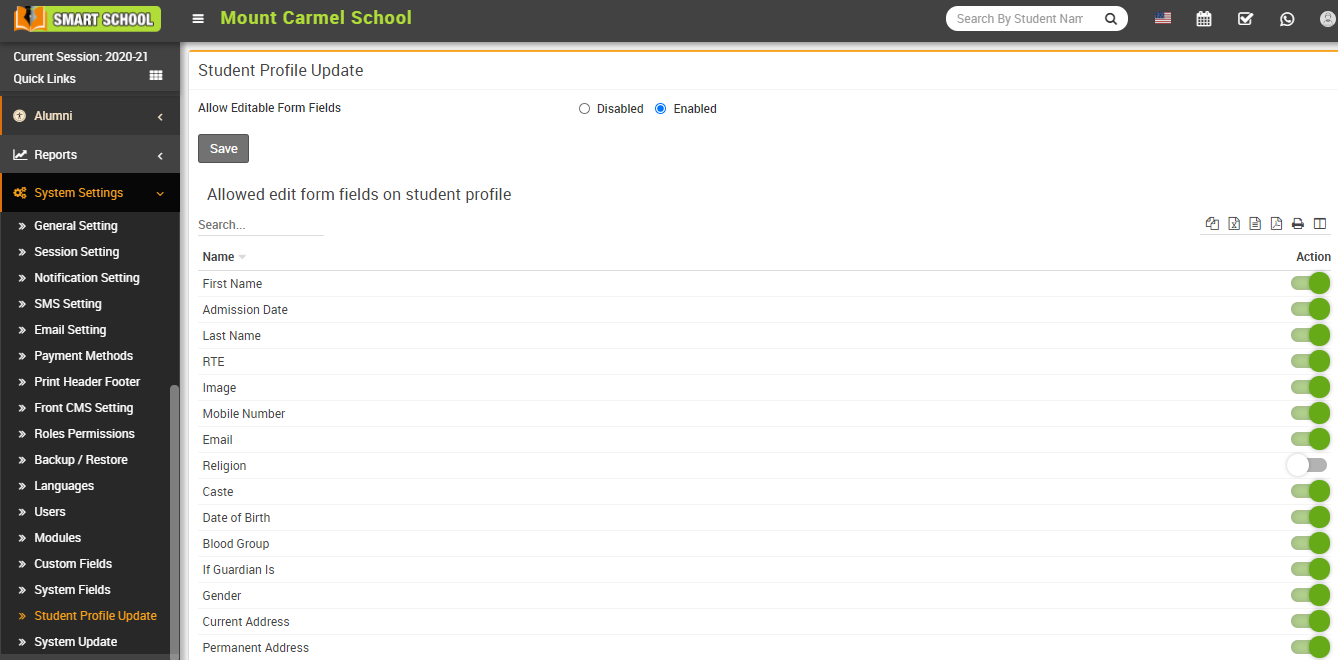
After Enabling Allowed editable form fields, an Edit icon will appear in the student profile page.
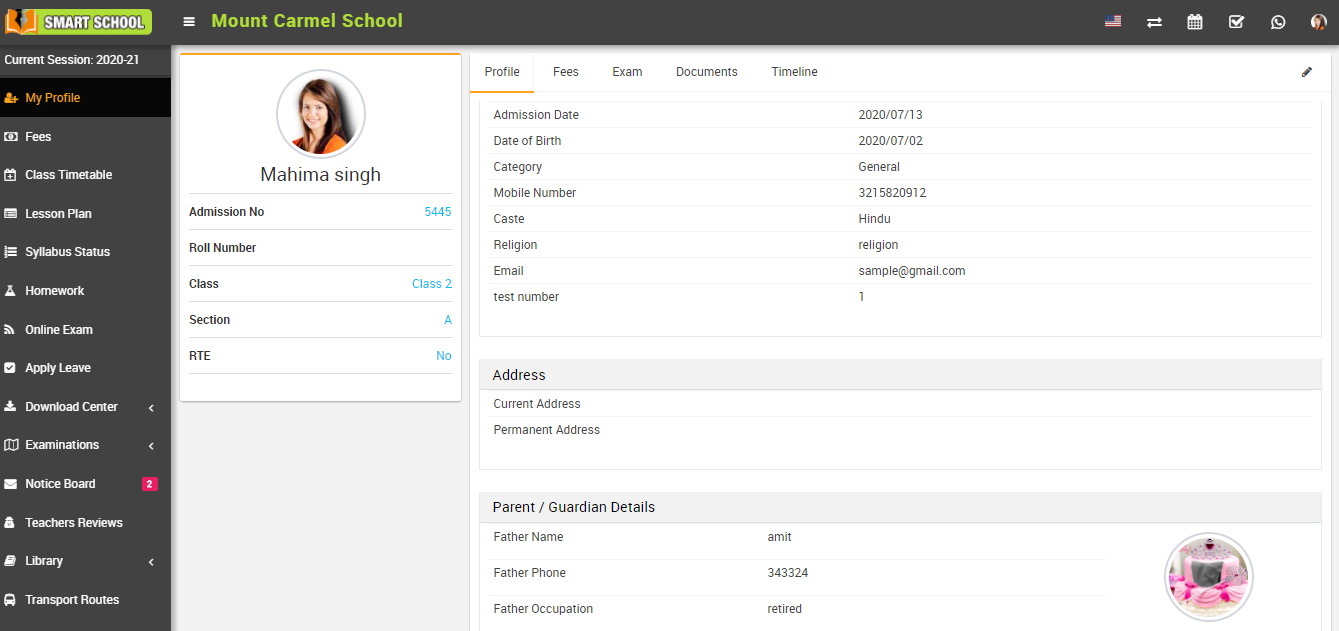
To update student profile login from the student panel and click on the My Profile link present at sidebar menu. This will redirect you in the student profile page, here click on the Edit icon present in the top right corner. This will redirect you in the edit student profile page.
Here update student information and then click on the Save button.
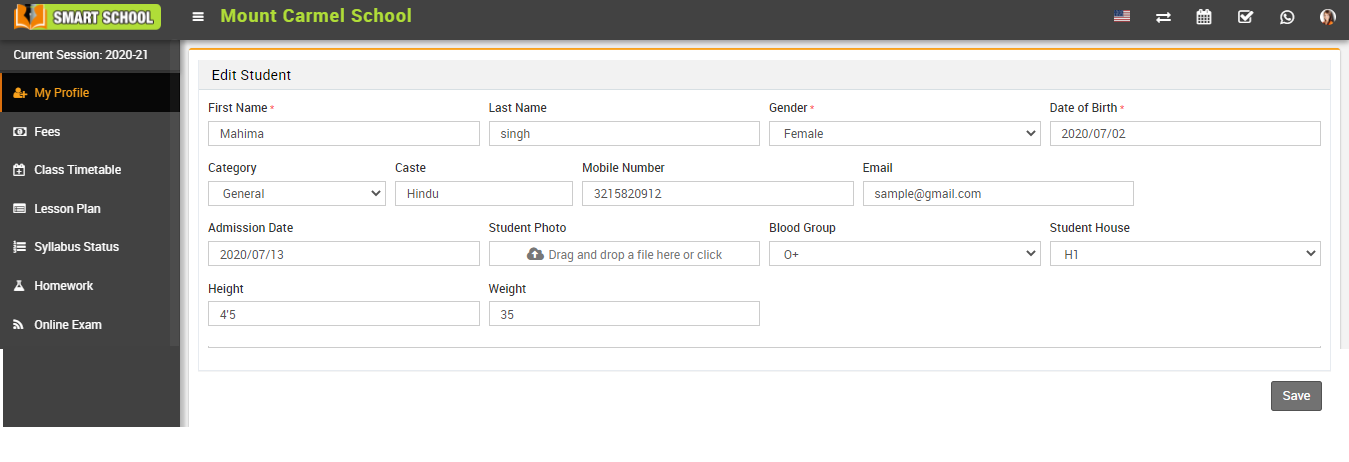
In the above image Religion field has been inactivated by Supradmin, hence it will not be visible in the edit student profile page.
How to allowed File/Image type extension?

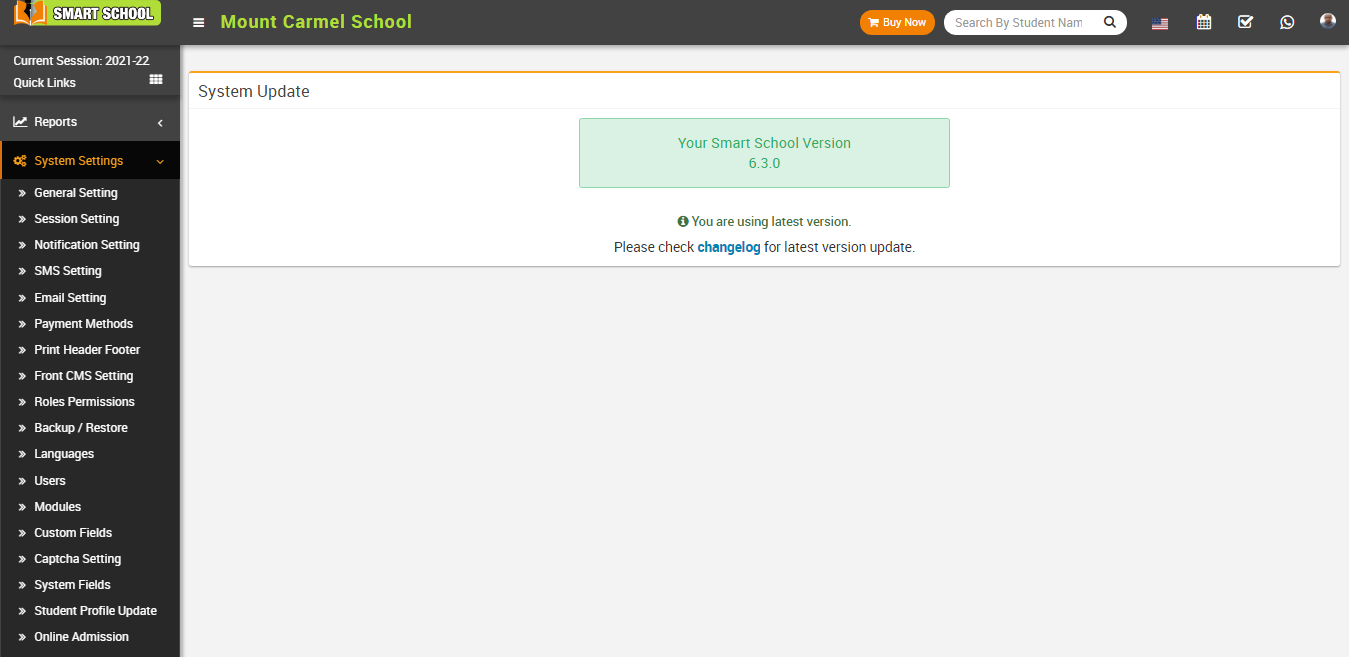
How to check System Update?