About Student Information
Student information module workflow- First we will add Student Categories, Student House and then take Student Admission and then Online Admission, Student Details. If you want to add additional fields in student admission form then you can use Custom Fields feature for this go to System Settings > Custom Fields and add your desired fields in Student. If you also don't want any default fields in student admission then you can disable it from System Settings > System Fields and disable student system fields.

How to check Student yearly (session) Attendance in his profile page from the superadmin side?
To student's attendance, go to Student Information > Student Details. Here select student’s Class, Section or Search By Keyword and click Search button. Here you can view students' lists will be open in below. Now click on the students' View option showing in the action column or click on student name, student profile will be open, now click on the "Attendance" tab. Here you can view the student yearly attendance.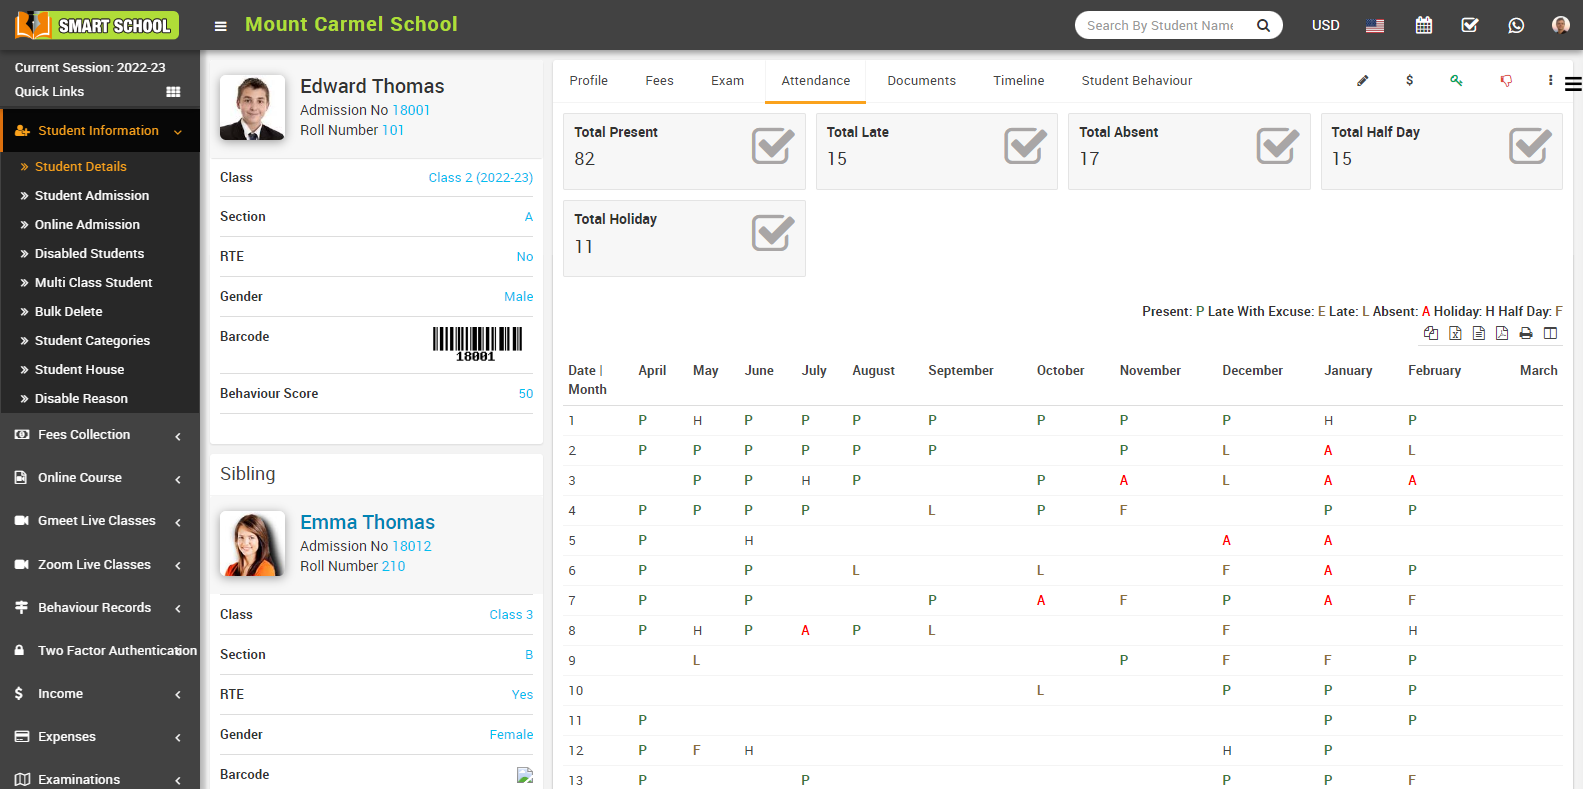
In attendance tab you can view whole year attendance from 1st to 31st and April to March. You can view every month’s attendance on a single page. You can view Total Present, Total Late, Total Absent, Total Half Day and Total Holiday. when student will be Present then it will show P, when student is Late With Excuse then it will show E, when student is Late then it will show L, when student is Absent then it will show A, when student is in Holiday then it will show H, when student is in Half Day then it will show F. You can view every attendance related detail in the attendance tab.
How to check Parent Login Credential Report?
To check Parent login credential report, go to Reports > Student Information Report click on Parent Login Credential. 
Now, select Class and Section and then click on Search button, you can see Parent's login credential details as Admission No, Student Name, Parent Username and Parent Password.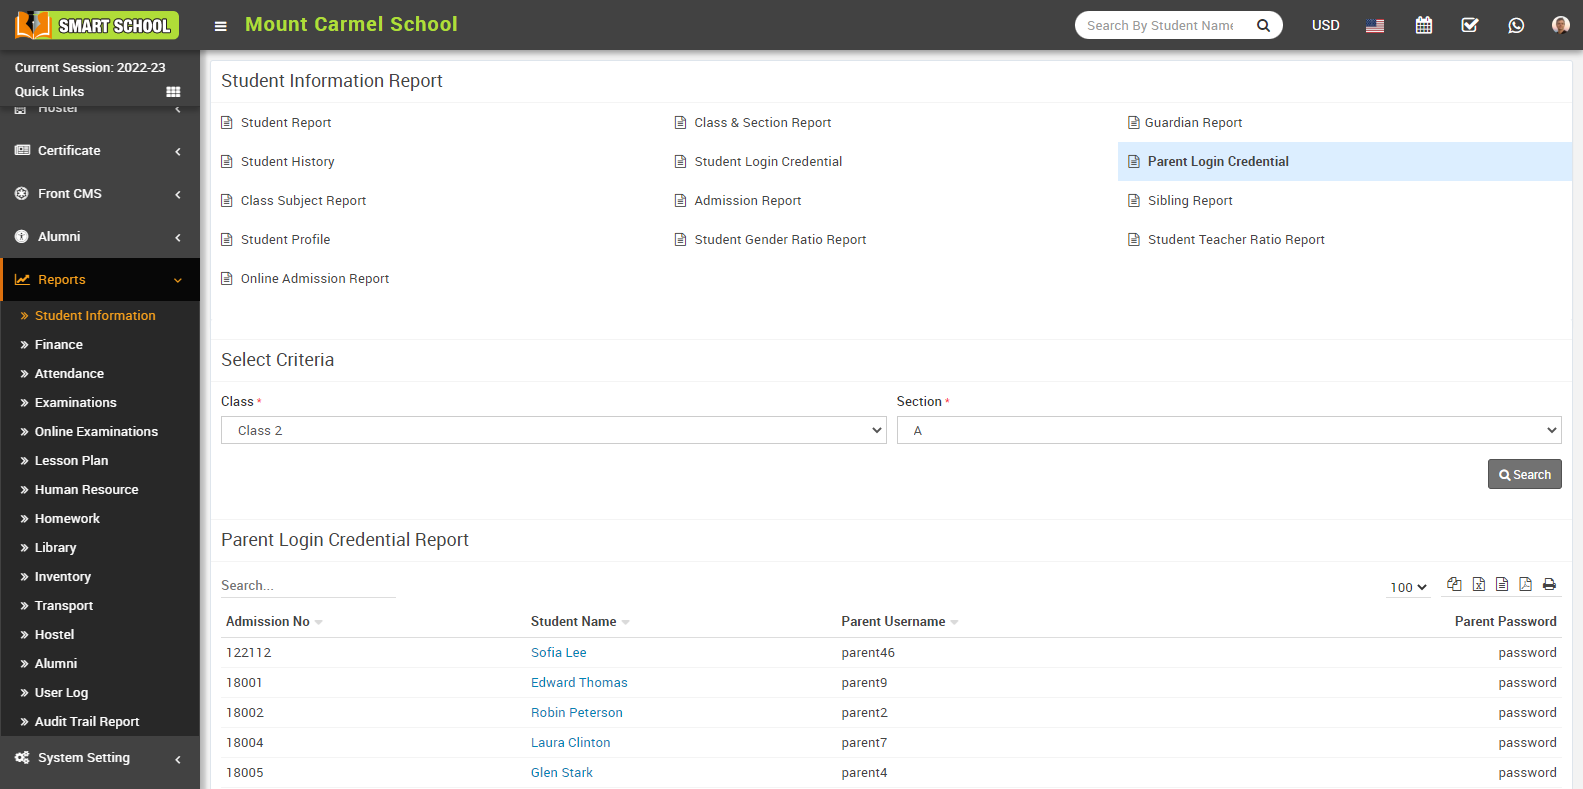
How to Assign Fees during Student Enrolment?
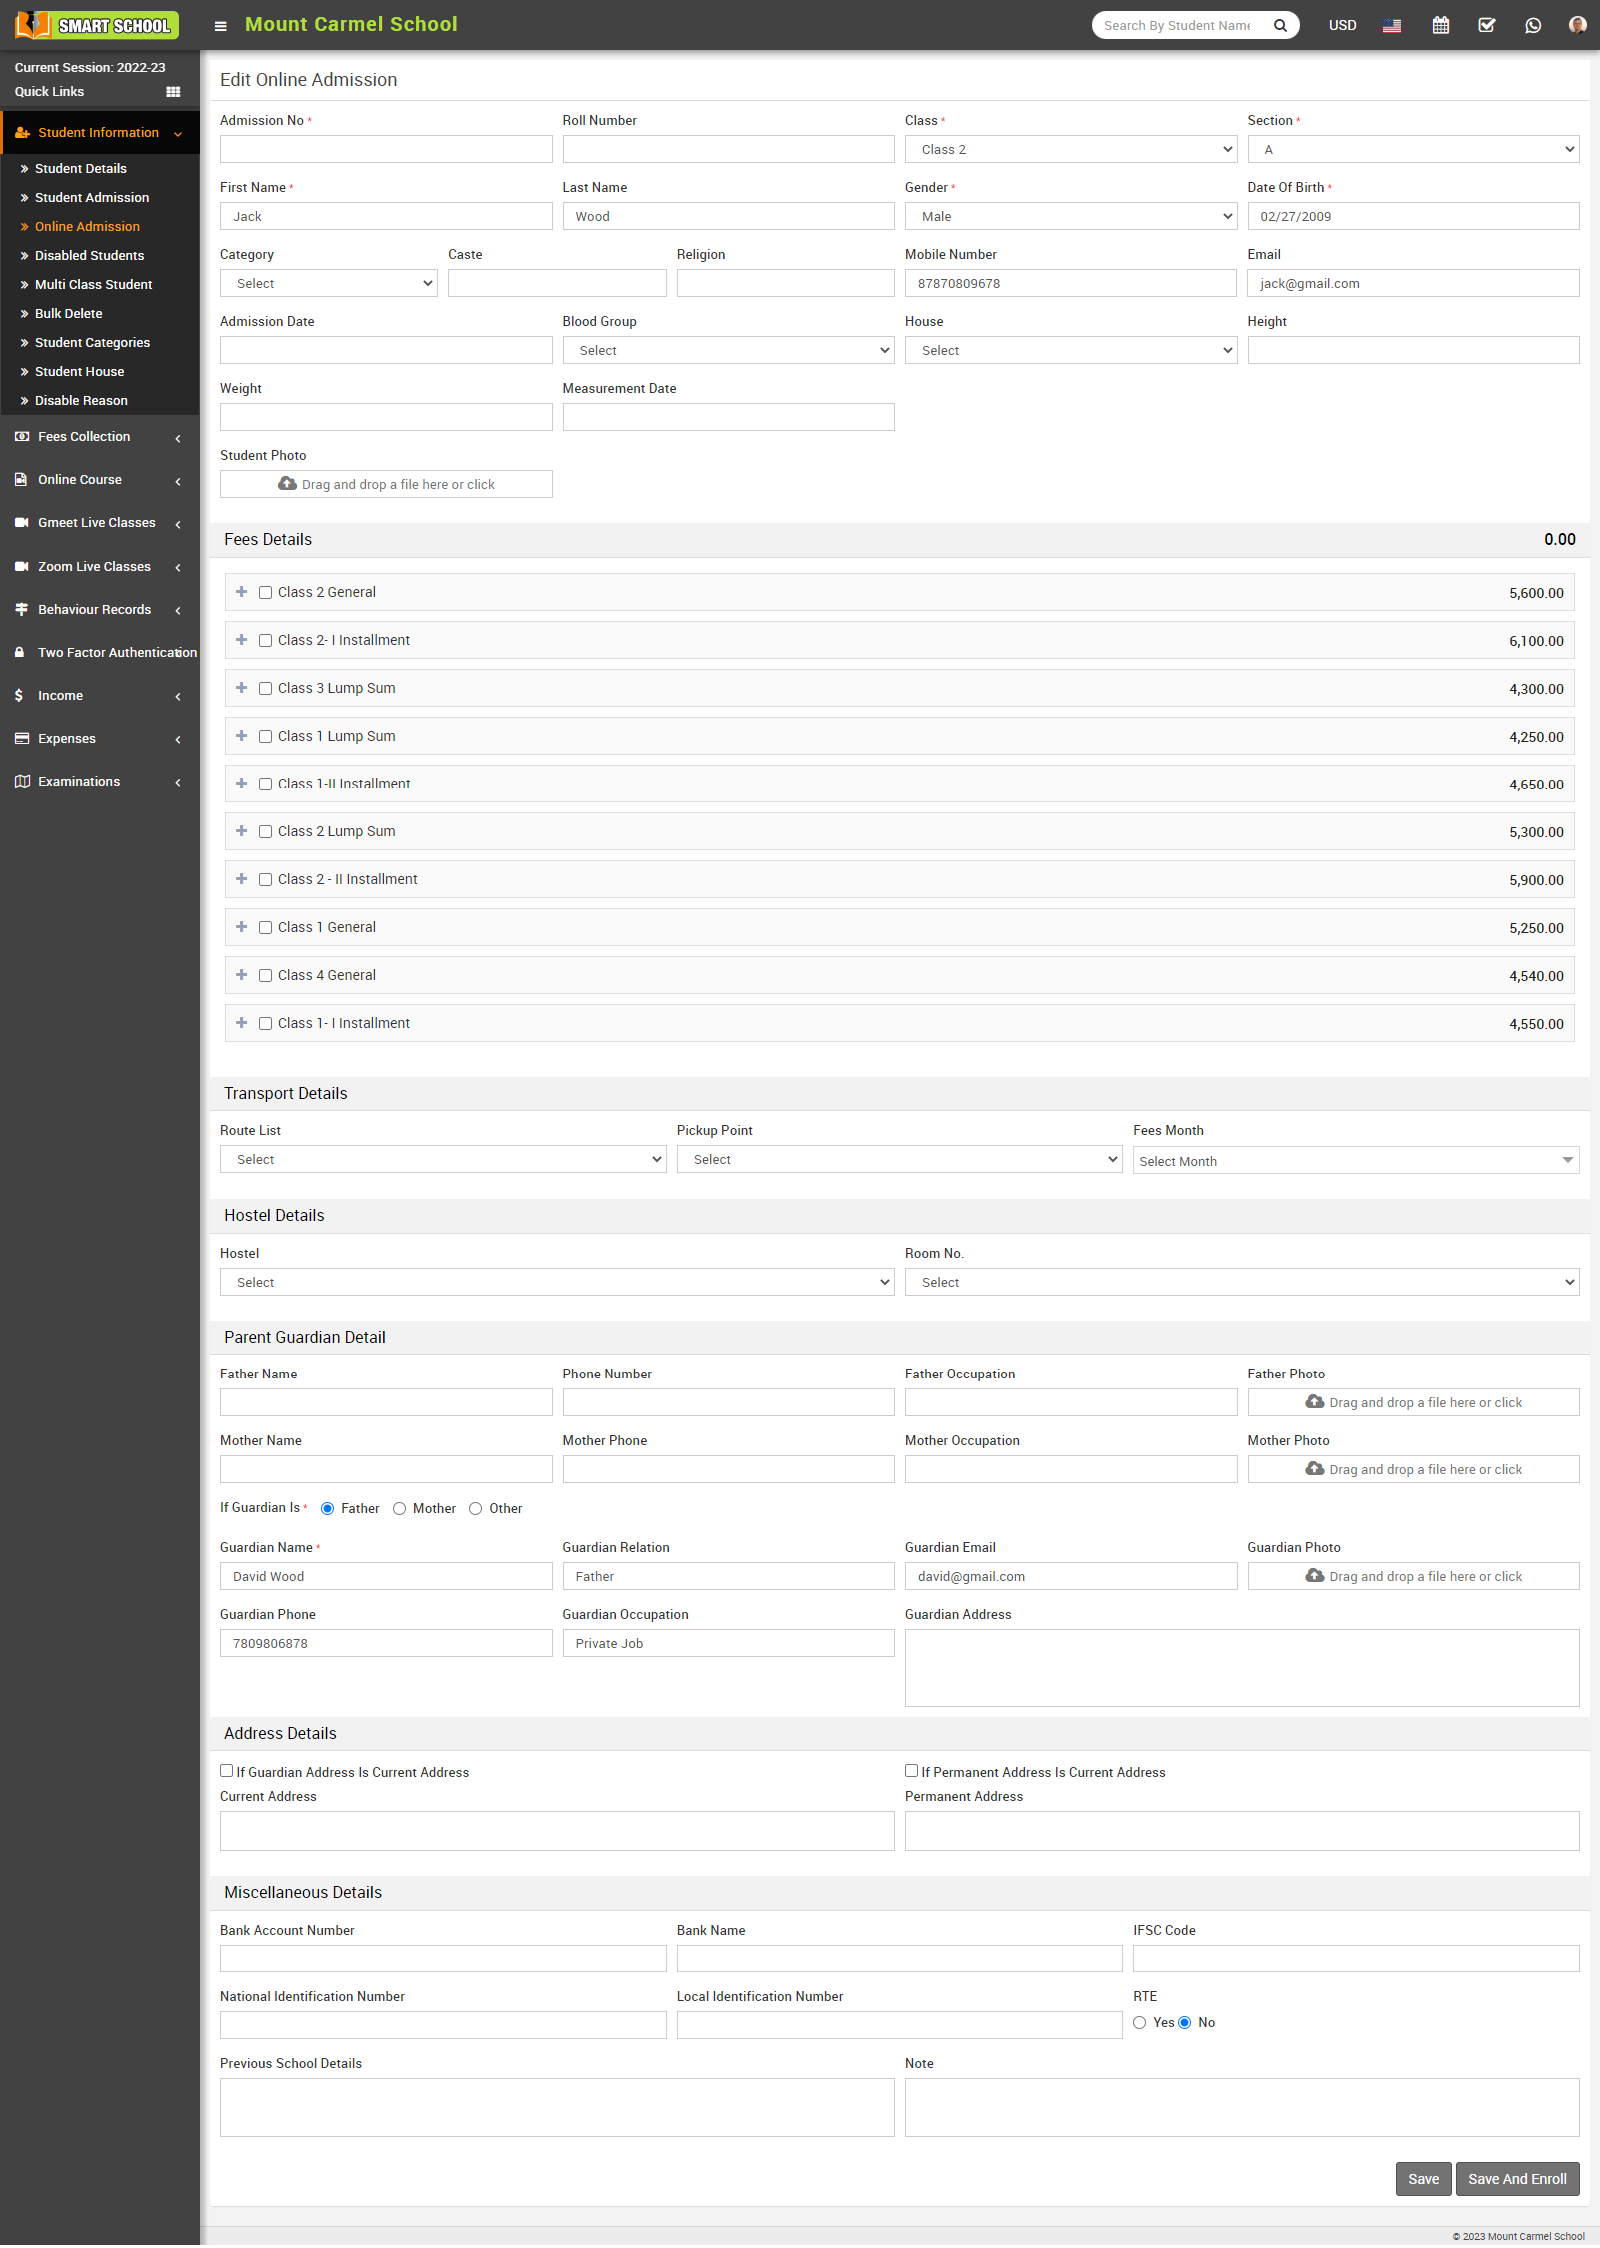
To assign fees at the time of Student Enrolment, go to Student Information > Online Admission, the student list will be open, and the Edit icon will be visible in the Action column. 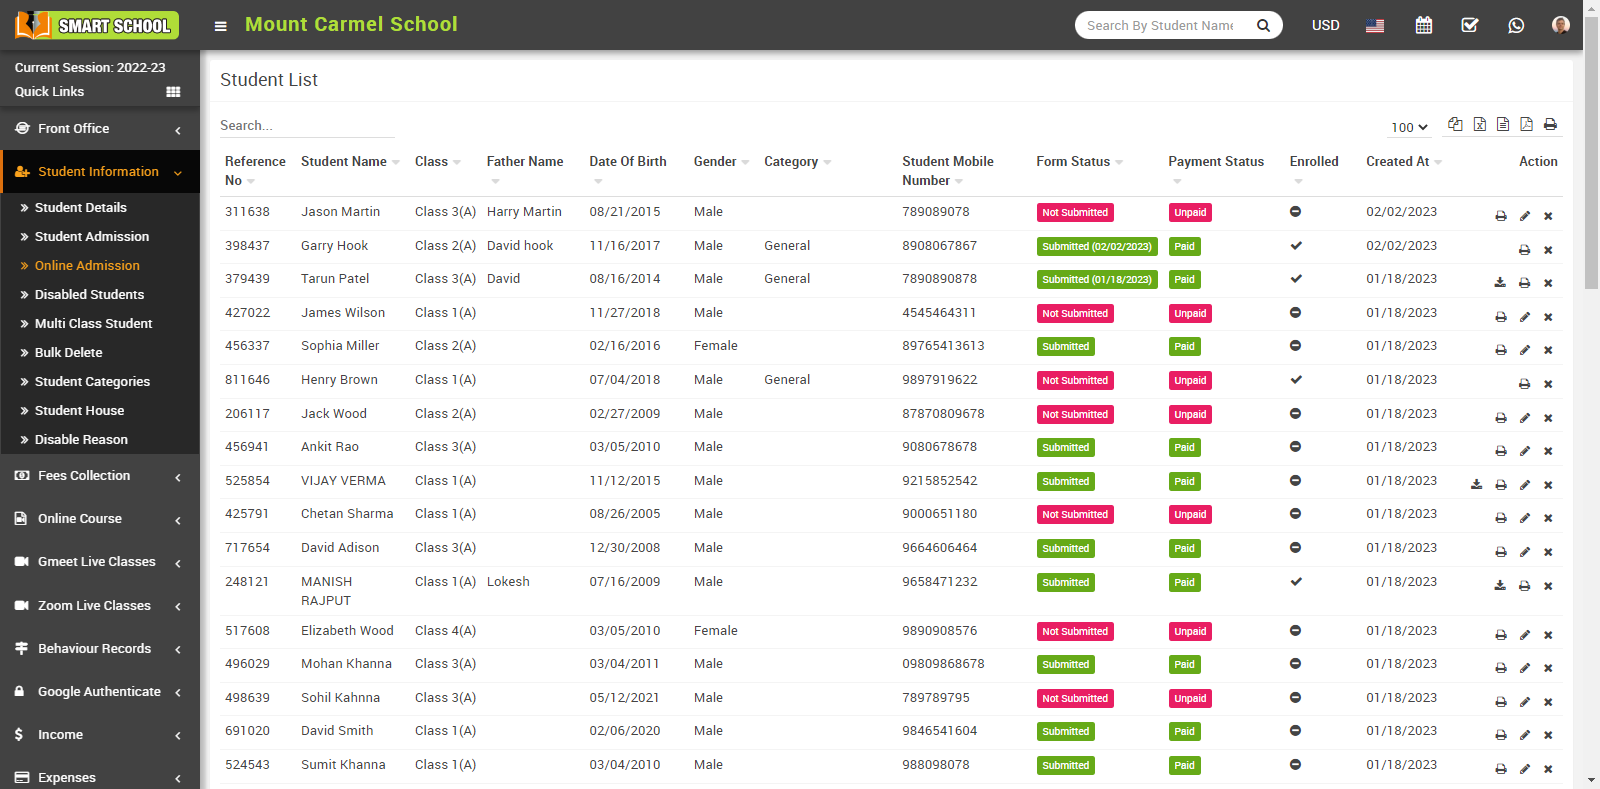
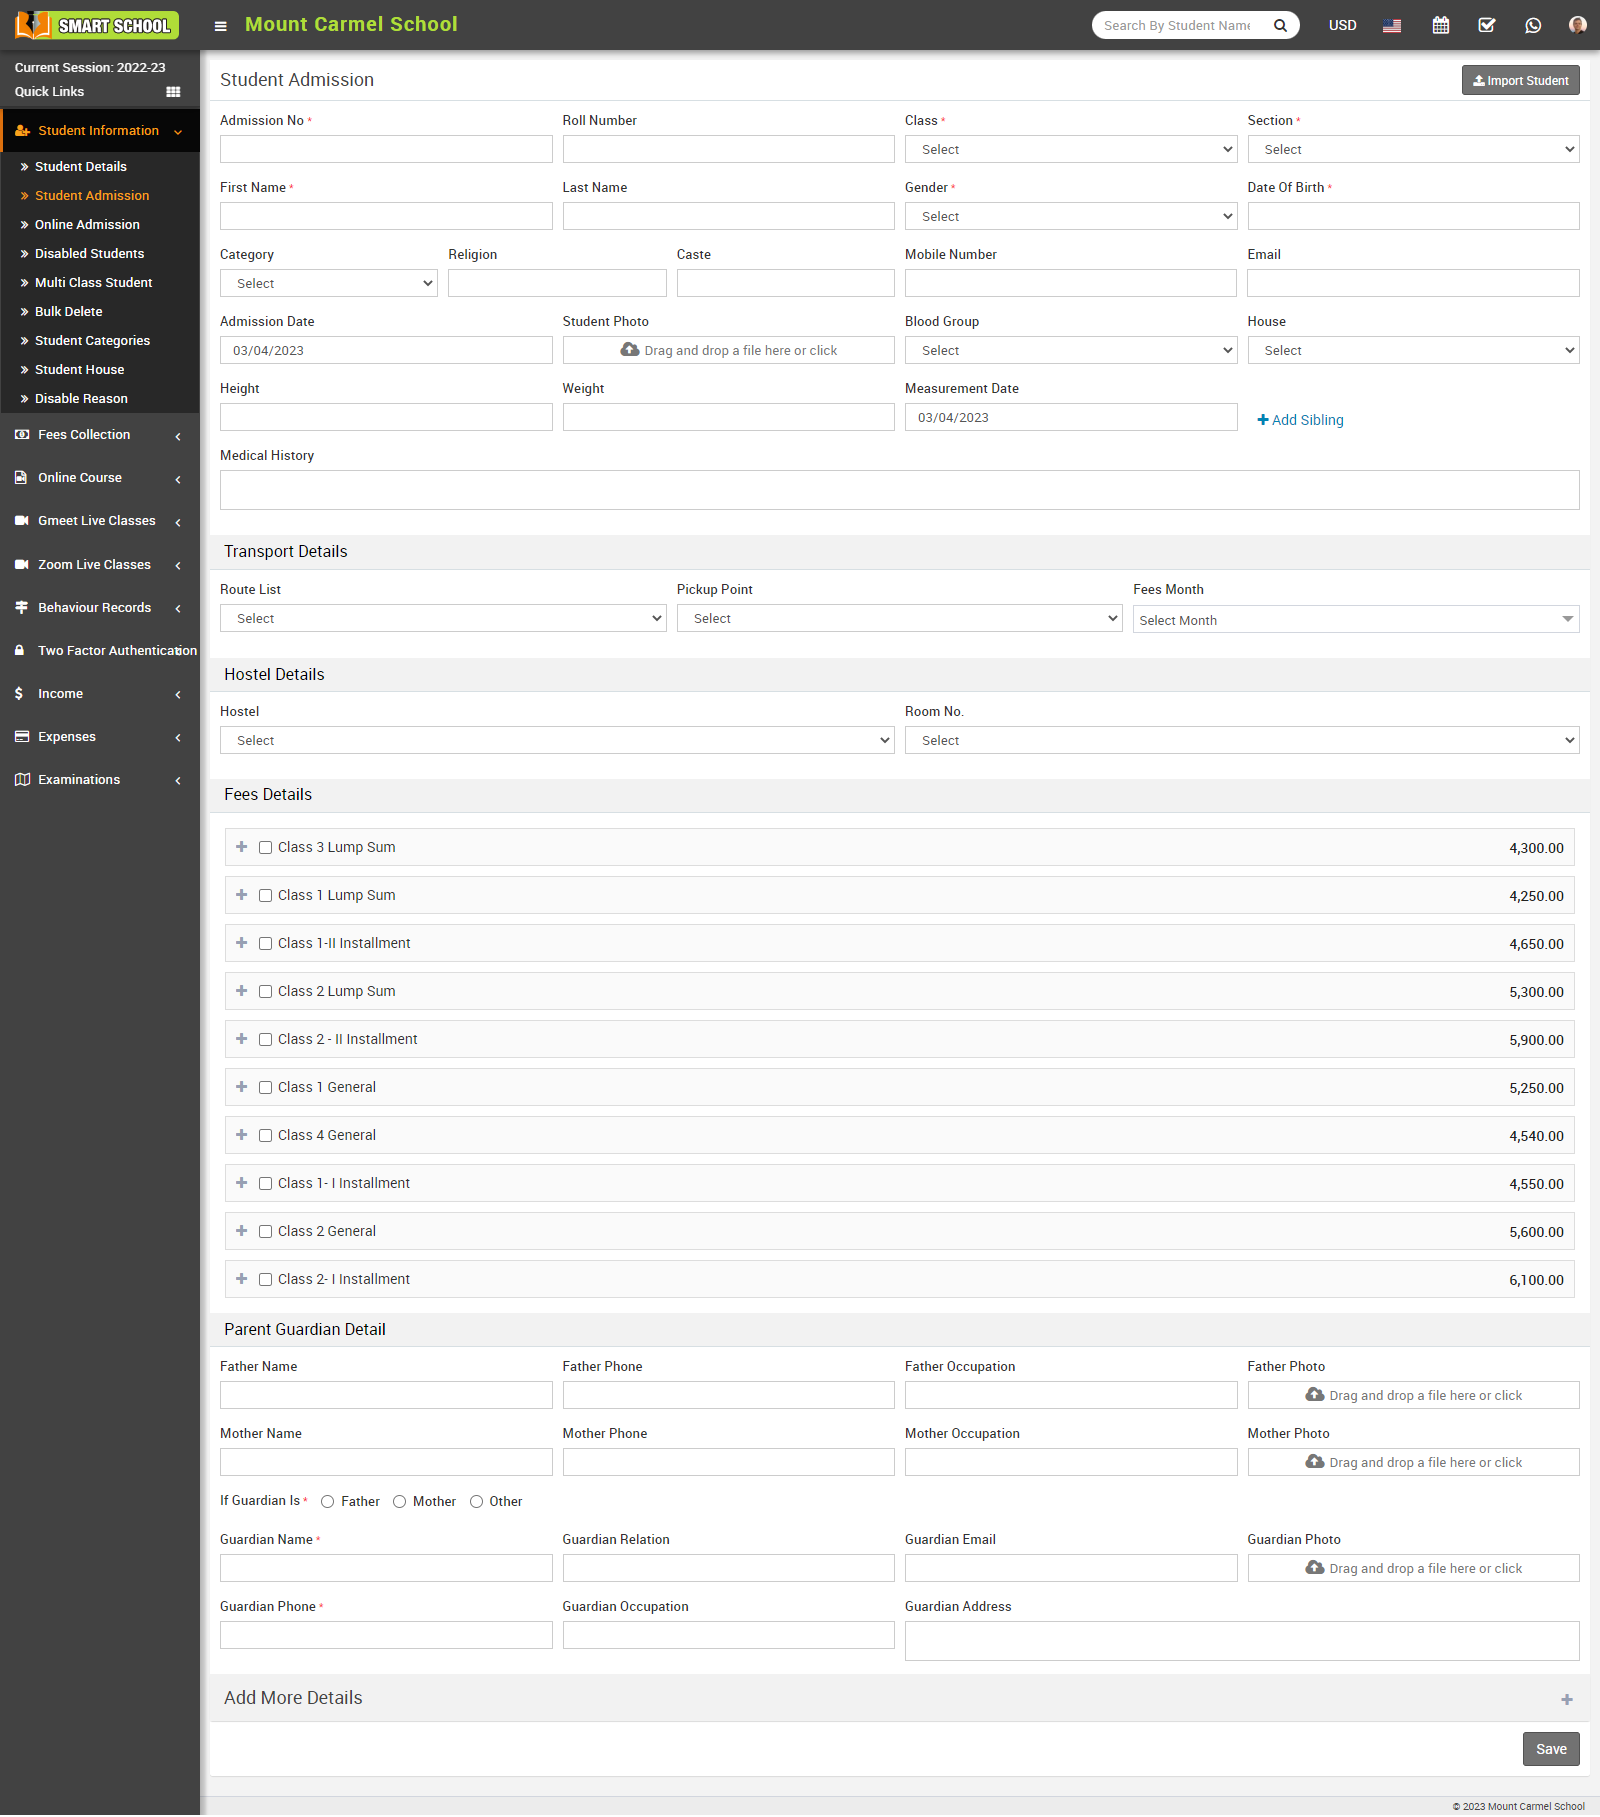
If you did not pay the fee at the time of online admission, you need to enrol that student. For that, just click on the Edit icon, which is showing in the Action column, so that the Confirmation Model will appear. When you click on the OK button, the Student Admission form will open, where you can easily assign multiple fees from the Fee Details, and you can also assign the transport fees from the Transport Details.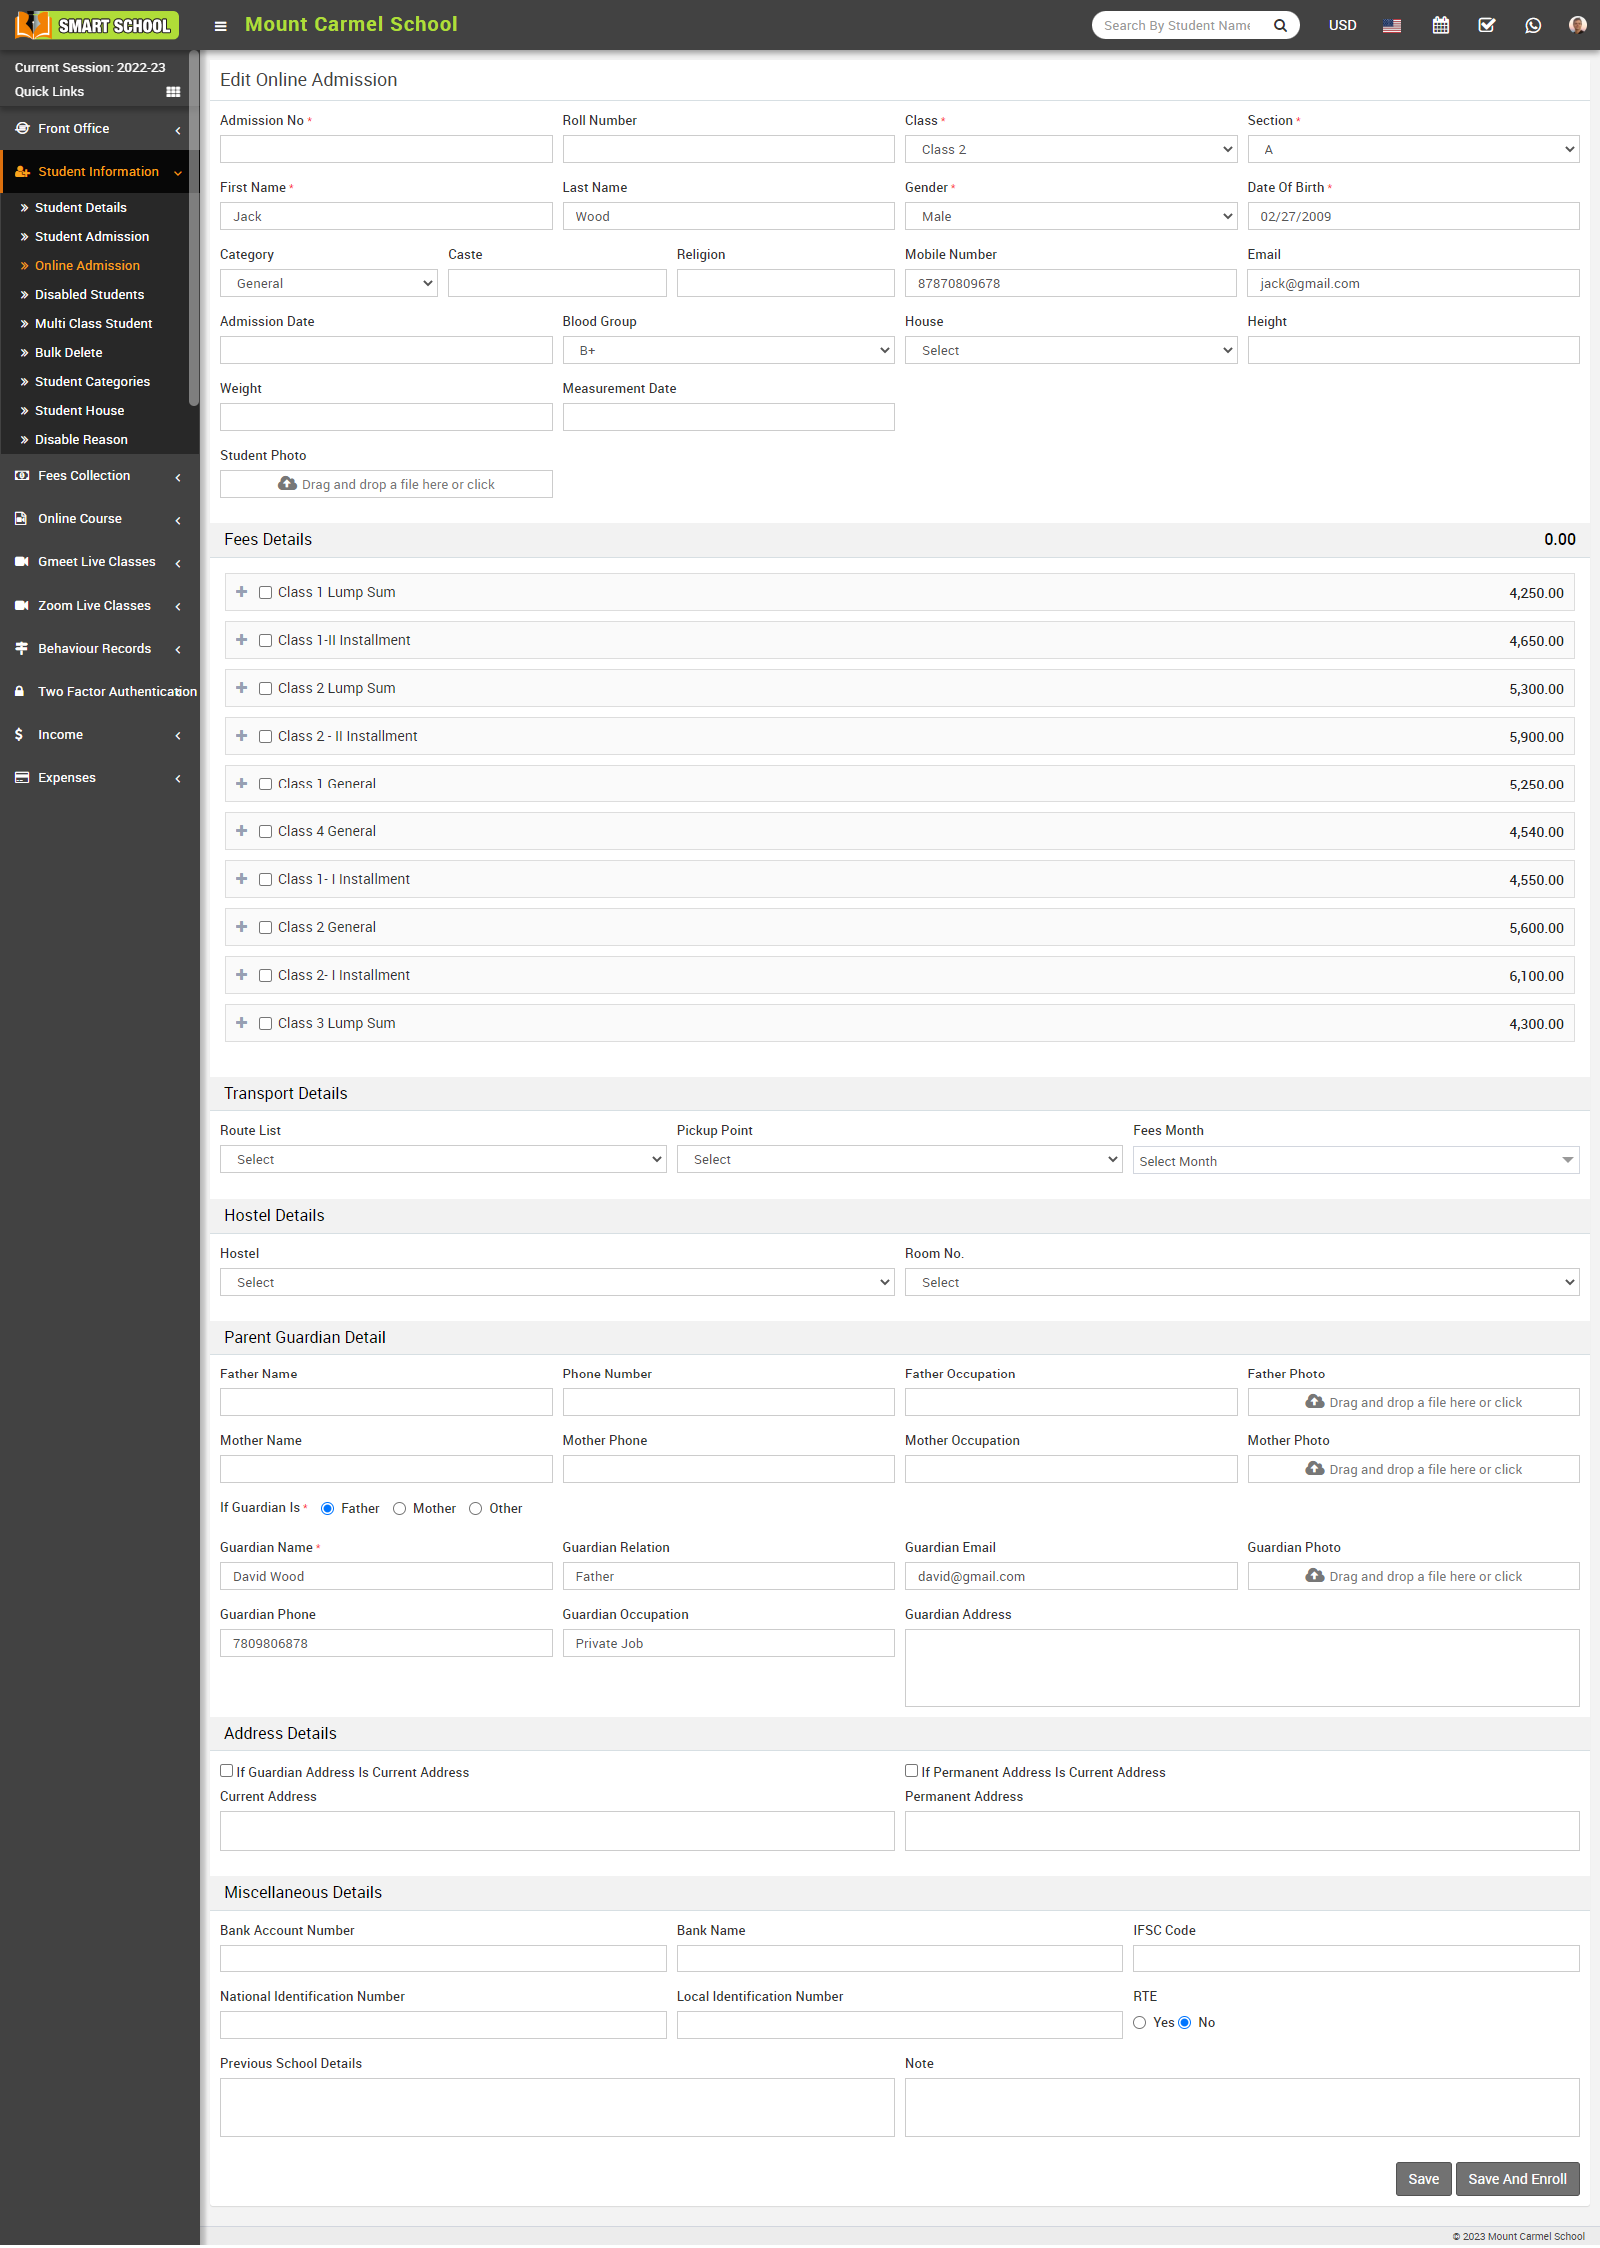
Multiple fee options are displayed in the Fee Details field. A plus icon and a check box are displayed next to the fee name. You can expand the fee details, such as fee type, due date, and amount, by clicking the Plus icon, and you can assign those specific fees to that student by checking the appropriate check box.
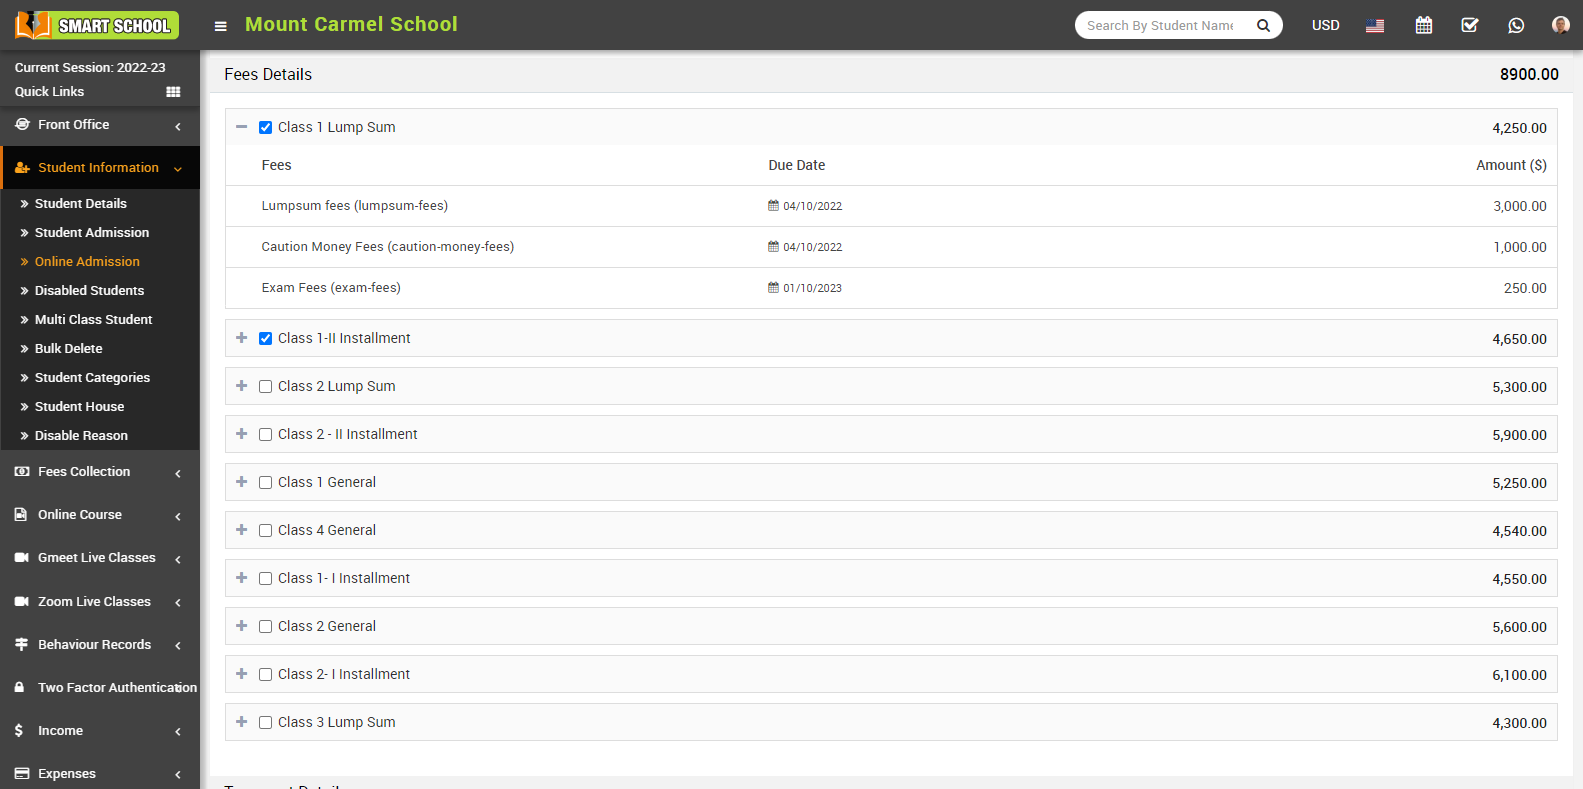
You can also assign the transport fees to the student from the Transport Details field, which is shown in the student admission form. For this, first you need to select the route from the route list as well as the route pickup point, and then select the fee month. When you click on the fees month drop-down here, all months are displayed, and you simply check the checkbox for that month's fees to be assigned to that student.
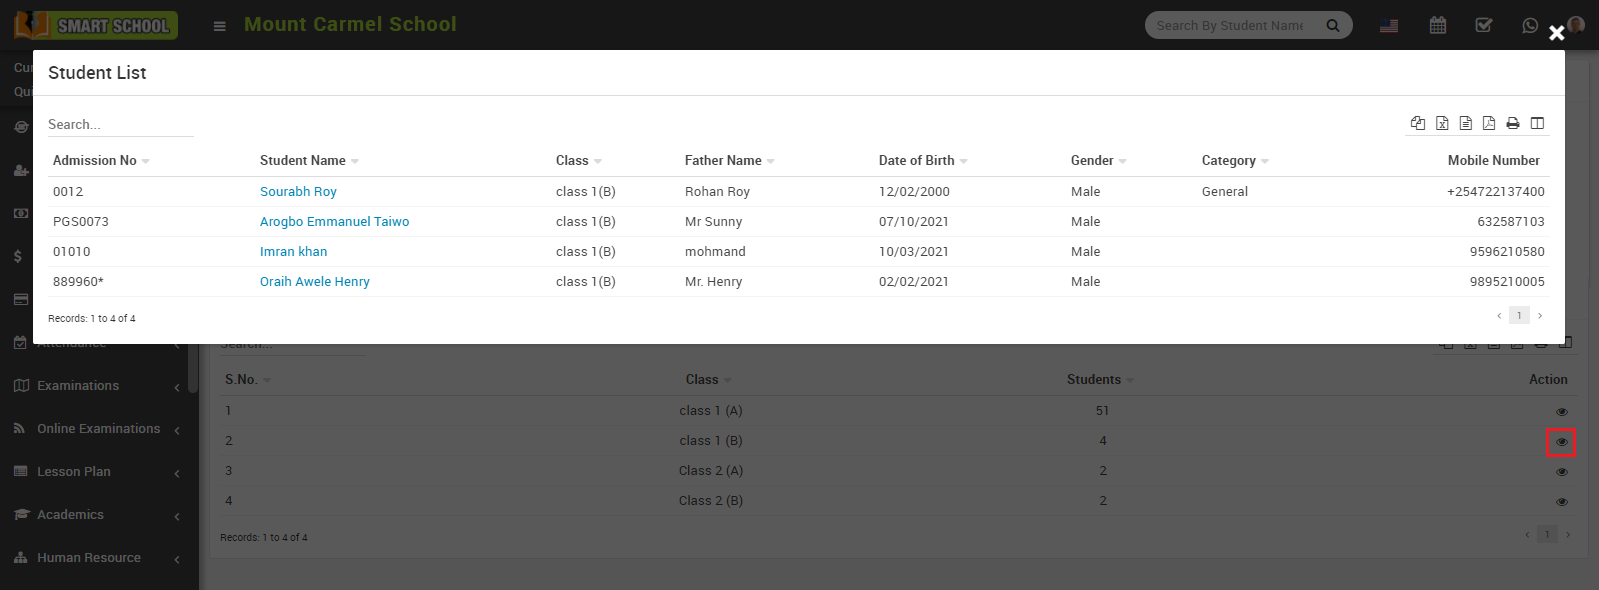
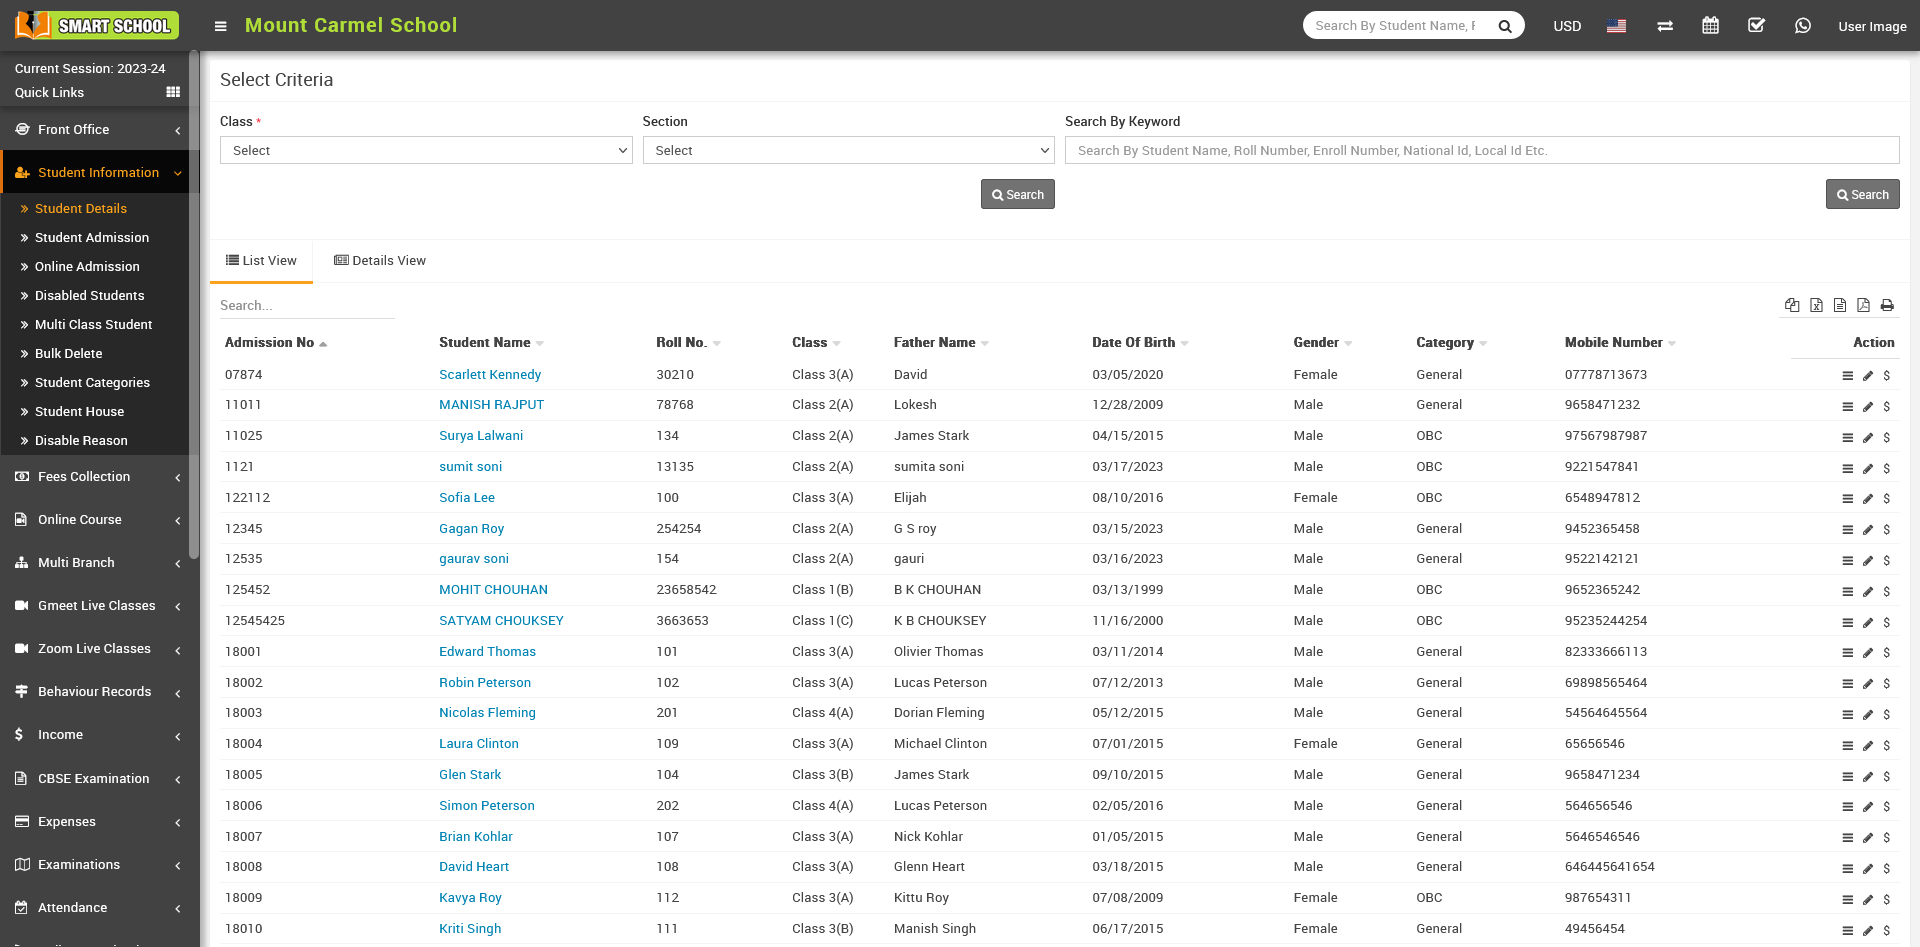
How to check class & section report?
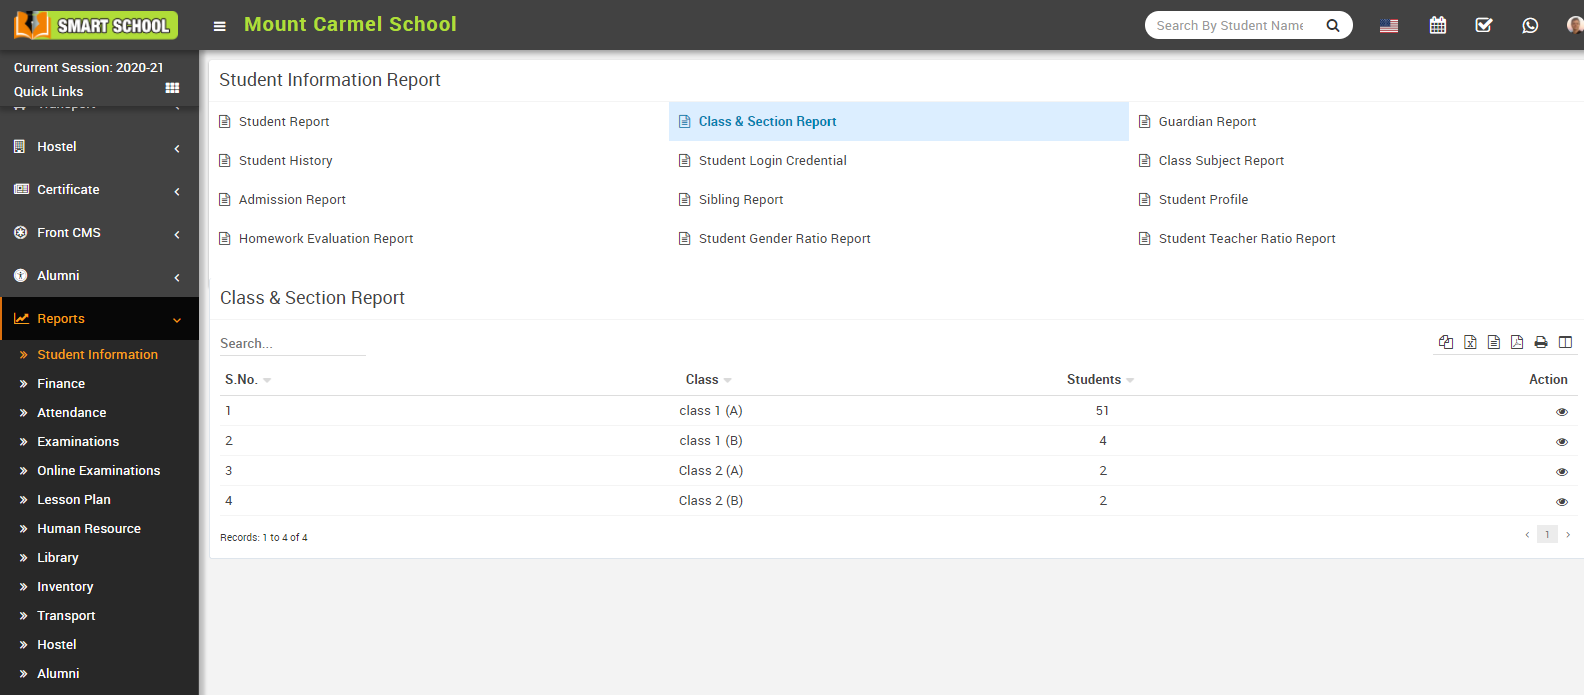
To view student list , click on the View icon present in the Action column, at click of this icon a modal will open where you can see student's details like Admission No, Student Name etc.
How to create Student Categories?
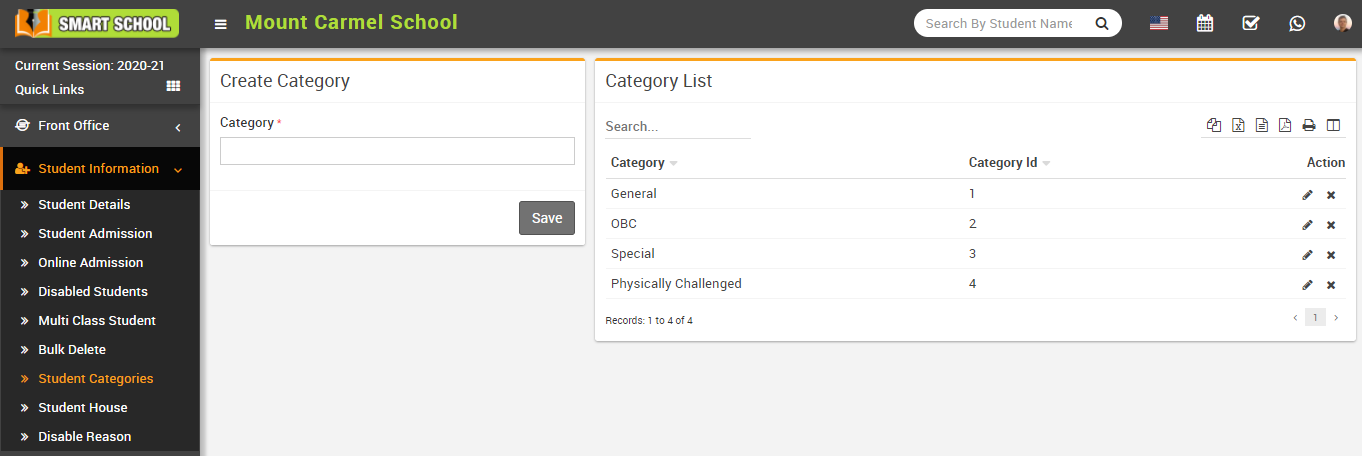
To edit student category click on Edit icon and to delete student category click on Delete icon present in the category list.
How to add Student House?
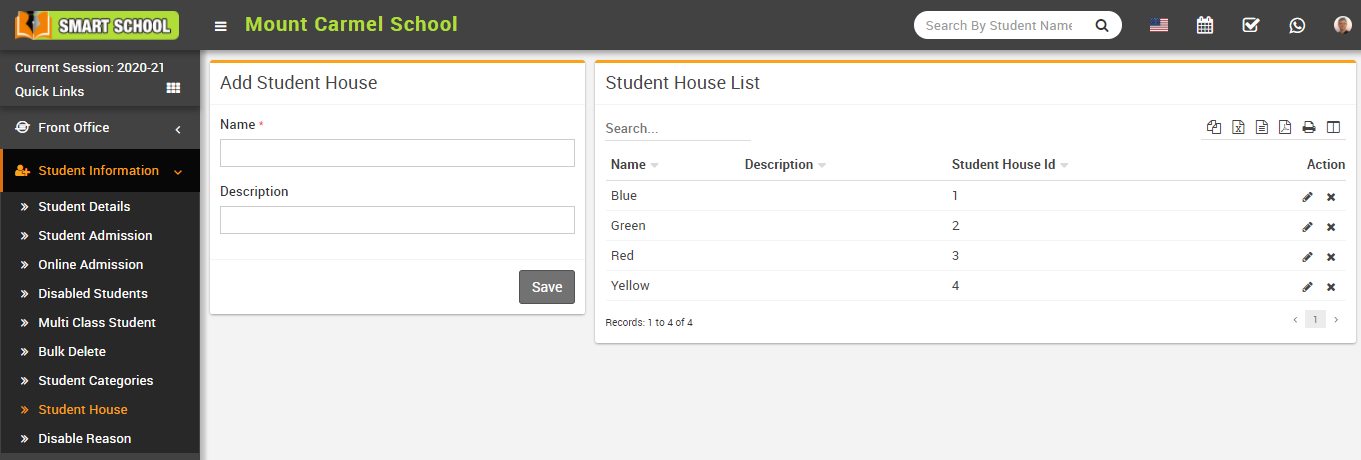
To edit student house click on Edit icon and to delete student house click on Delete icon present in the student house list.
How to conduct student admissions offline?
Add sibling- click on Add Sibling, sibling modal will be open. Here select Class, Section and Student and then click on Add button (note that if student has more than one sibling study in school then you do not have to select all the siblings just select any one sibling and system automatic detects other siblings).
To add student Parent Guardian Detail, Fill the details Father Name, Father Phone, Father Occupation, Father Photo, Mother Name, Mother Phone, Mother Occupation, Mother Photo and fill the Guardian Details and click on Save button.
If you want to add more details of the student, then click on the Add (+) icon. Here you fill all the details Student Address Details, Transport Details, Hostel Details and Miscellaneous Details and Upload Documents and then click on Save button.
How to add Siblings?
- Select student to which you want to add sibling e.g. if you want student B as sibling of student A so select student A profile (note: student A should not have any sibling).
- Go to student A profile and click on Edit button, then add sibling, student B here and click on Save button.
- Now, edit student C profile and add student A or student B as sibling here and click on Save button.
- Same as edit student D profile and add student A or student B or student C as sibling here and click on Save button and so on.
How to Import Student?
You have to follow all the necessary instructions given here to create CSV file. Here you can also add multiple students at the same time for this, you have to create a CSV file format. You can also download the sample file from top right corner by clicking on Download Sample Import File button.
You shouldn’t delete the first row of CSV file. It is necessary to fill the required field in this file. You can not use duplicate admission number and always fill the unique number in this file because even if you have enabled auto generation of student admission number.
After completing the file, here select the Class and Section and then you have to select this CSV file on Select CSV File option and then click on Import Student button.
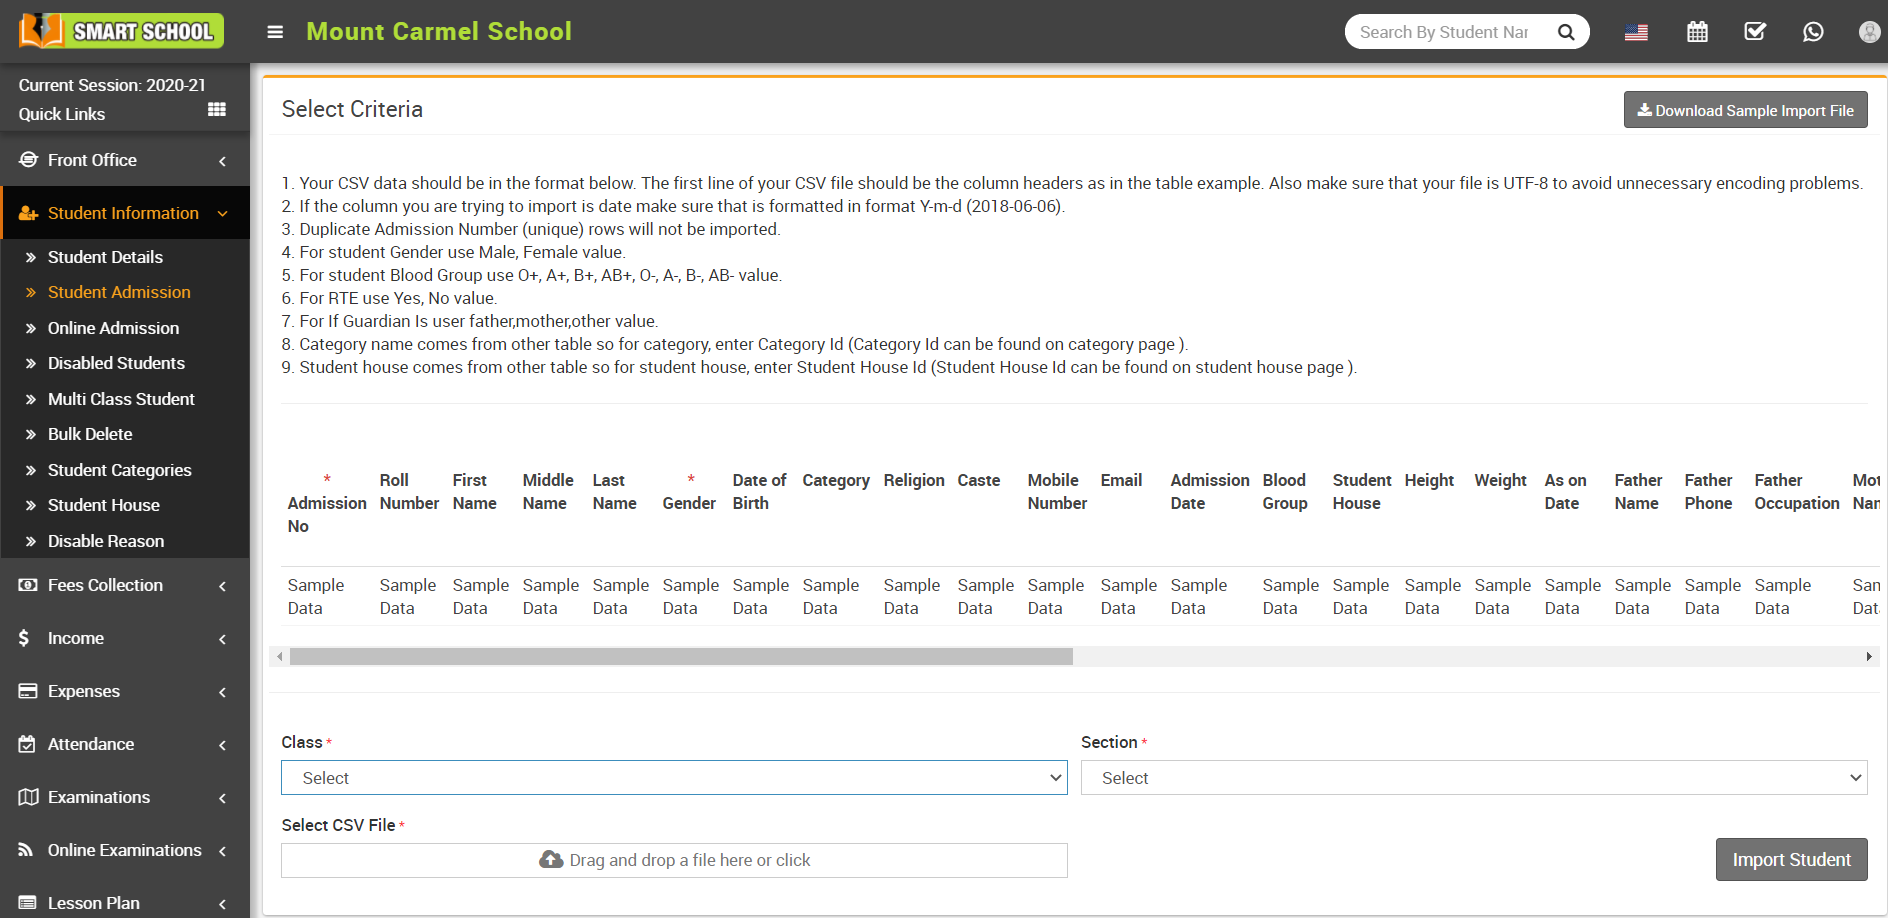
Note - In the student import page instructions are given for preparing csv files, be careful for admission number and date format Duplicate "Admission Number" (unique) rows will not be imported and you can get the message of record already exist.
How to Online Admission?
Fill all entries here select the Class, First Name, Last Name, Gender, Date of Birth, Mobile Number, Email, Parent Guardian Detail, Upload Document and then click on Save button.
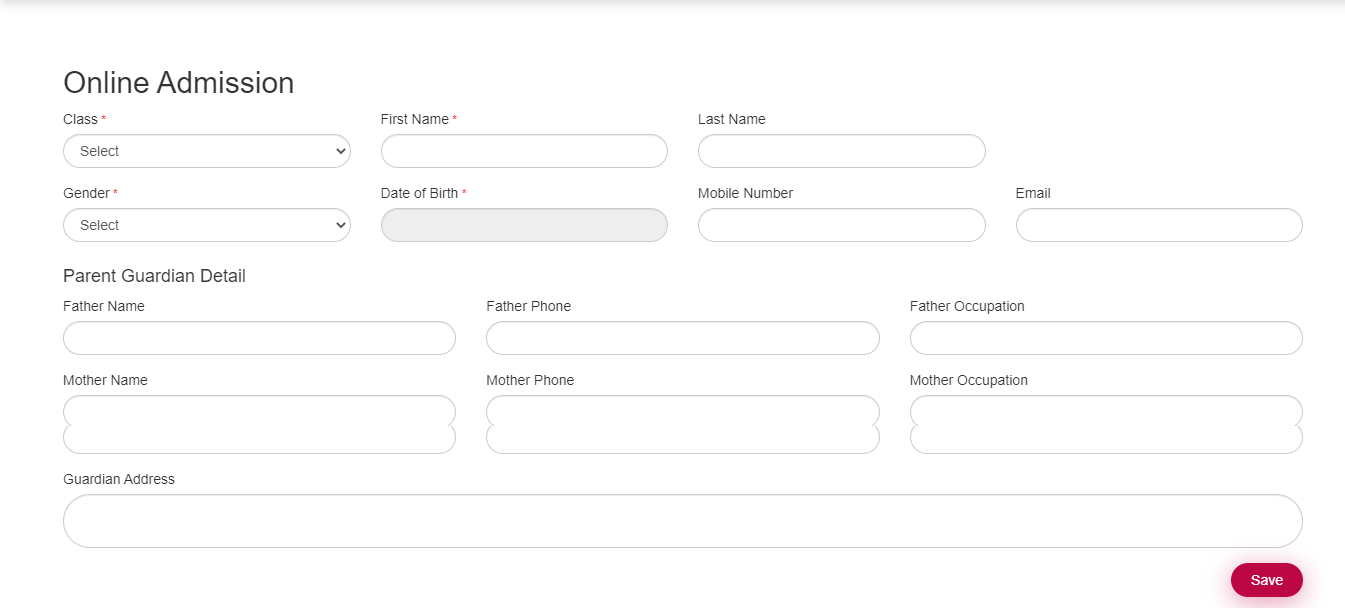
You can view this added record, Student Information > Online admission.
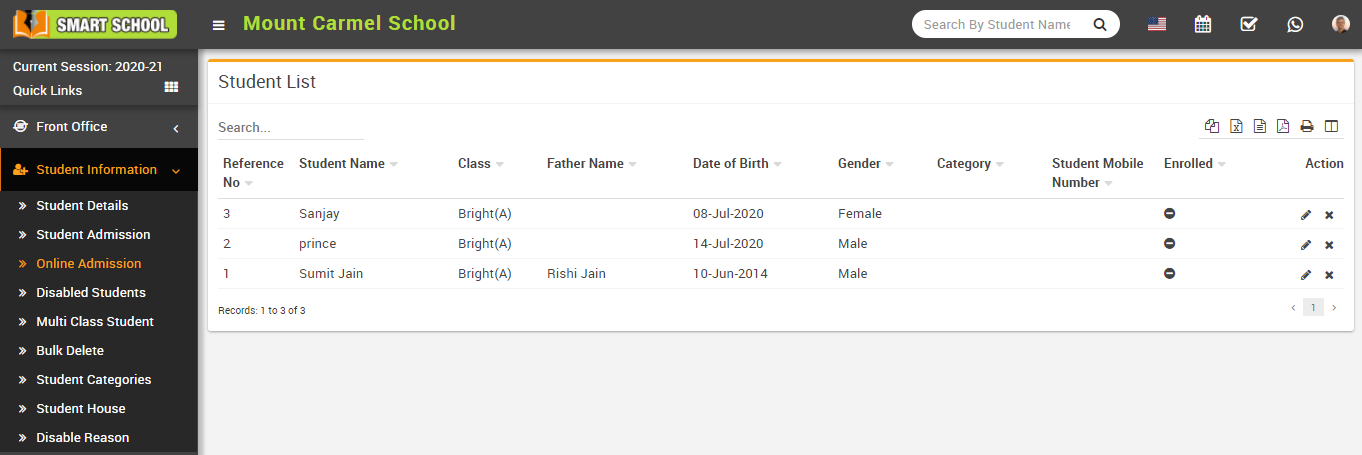
To admit/enroll student click on Edit icon present at Action column in the student list page, at click of this icon Edit Student page will be open. Here enter required details of student then click on Save button and if you just want to save student submitted record but to admit / enroll student you must click on Save And Enroll button. To delete admit student click on Delete icon present in the student list page.
After this student will be admitted and can be view in Student Admission > Student Details.
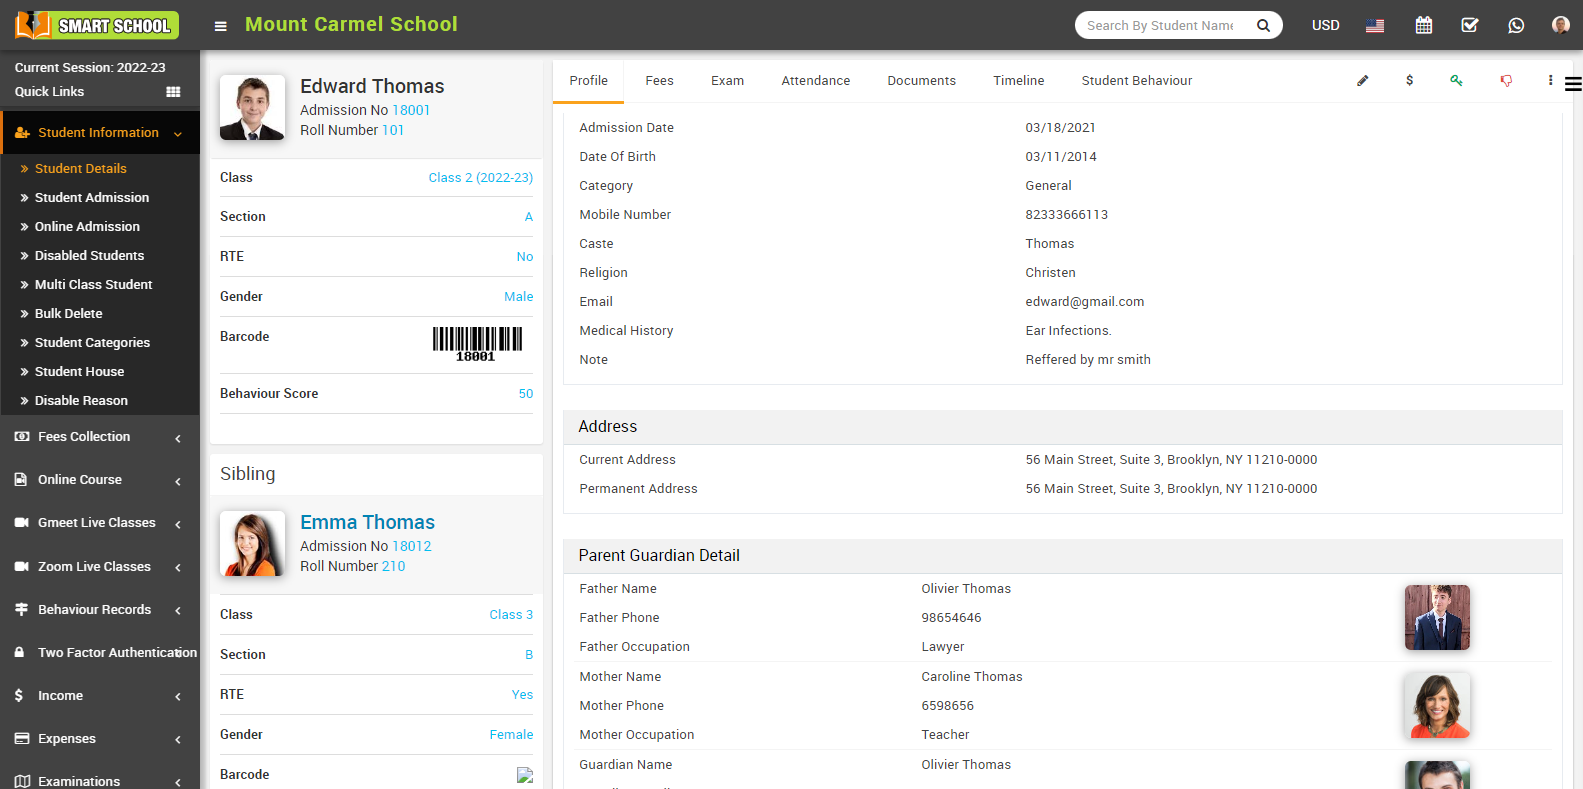
How to view Student Details?
To view student’s detail click on Show icon present at Action column in the student list, at click of this icon student profile page will be open. Here you can view basic details of student like Class, Section, Address Details, Parent/Guardian Details, Hostel Details and Miscellaneous Details.
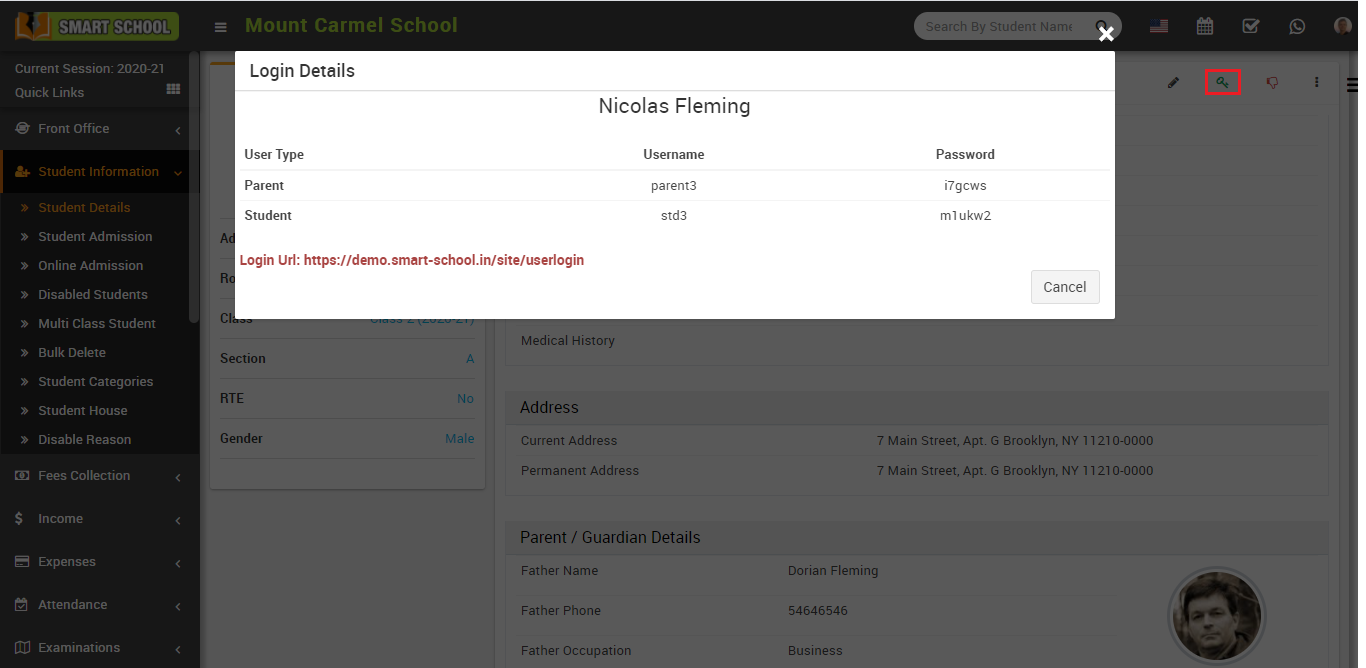
To check student's and their guardian login credentials click on Login Details icon present at right side in the student profile page, at click of this icon login detail modal will be open. Here you see the student’s and parent’s credentials.
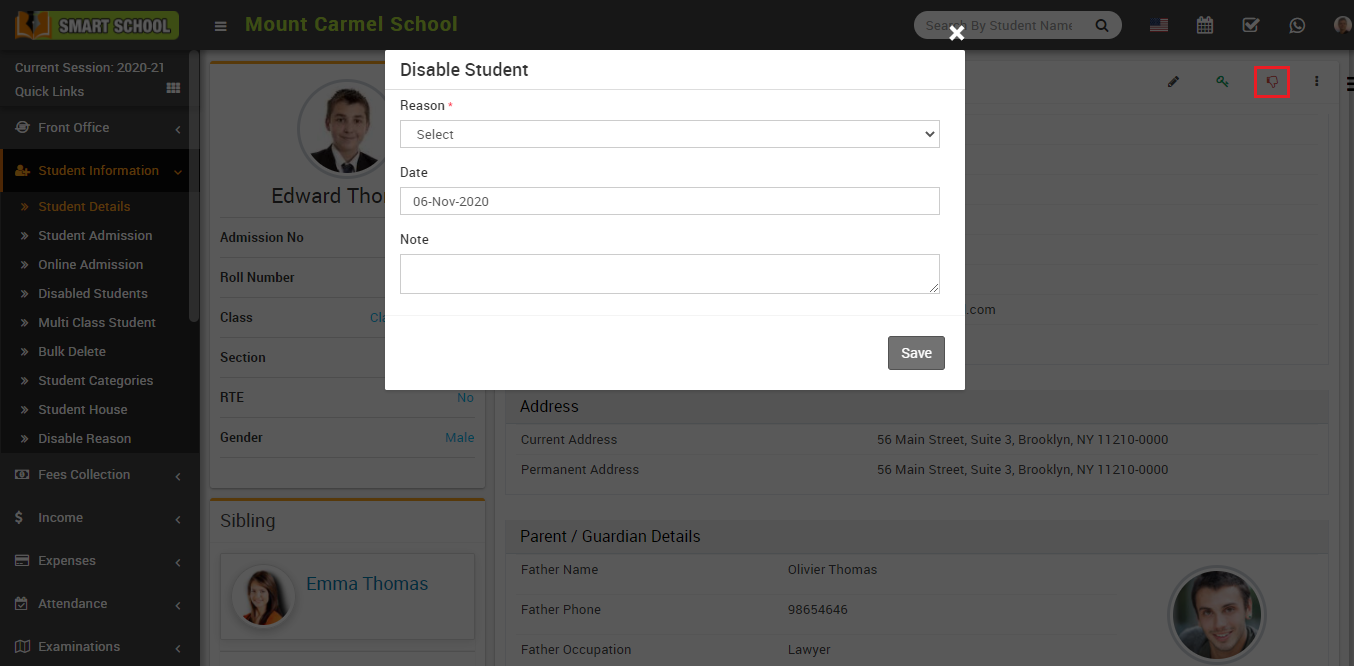
If you want to disable a student then click on the Disabled icon present at right side in the student profile page, at click of this icon it will ask you to confirm, after your confirmation disable student modal will be open. Here select the Reason, Date and Note and then click on the Save button. Student will be disabled.
How to view Disabled Student?
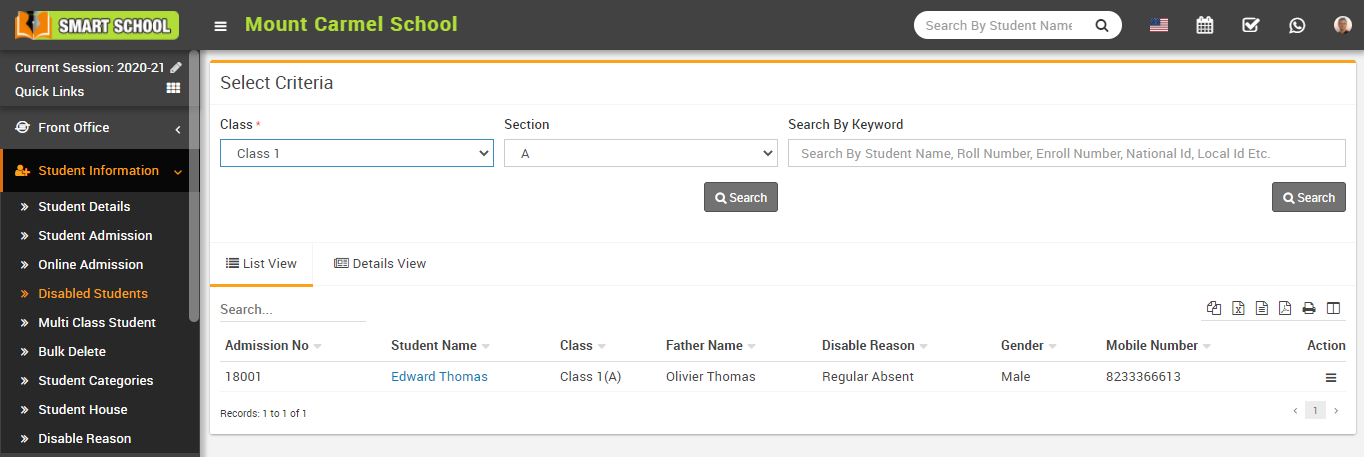
To view student profile click on Show icon present in the student list.
How to add Multi Class Student?

To add more classes and sections, click on the Add icon and to delete class and section click on Remove button and to update record click on Update button.
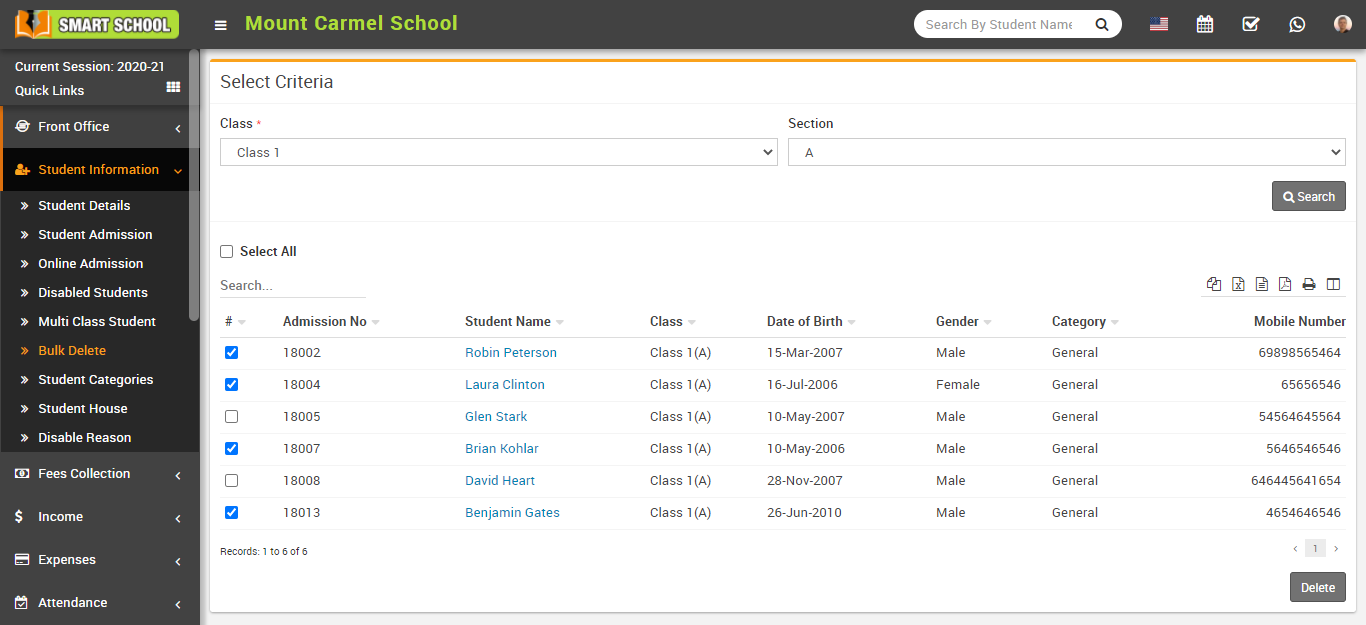
How to delete student in Bulk?
How to add Disable Reason?
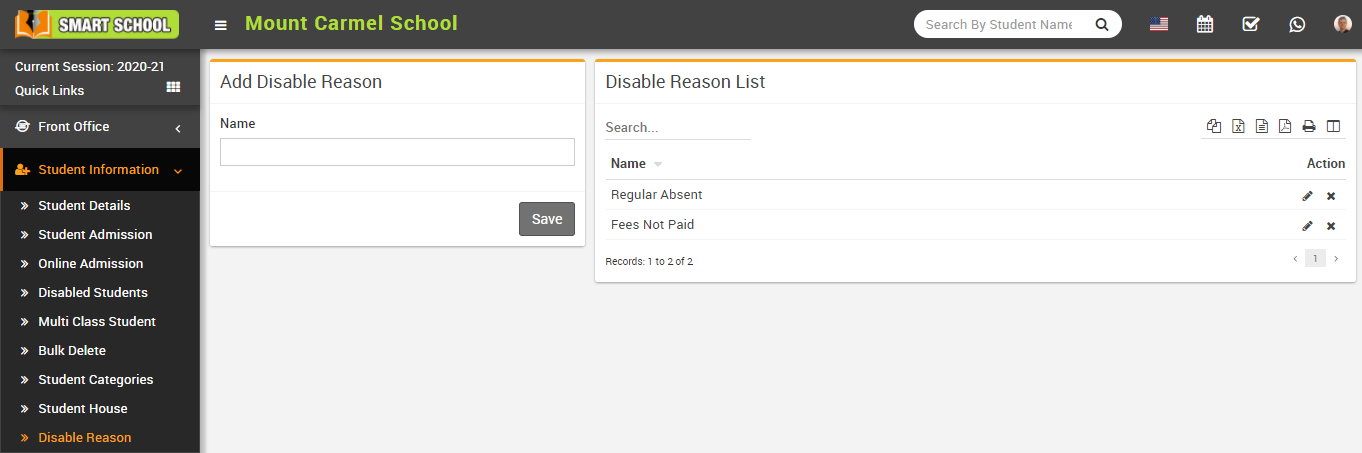
To edit disable reason click on the Edit icon and to delete disable reason click on the Delete icon present in the disable list.
How to check Student Report?
To check student report, go to Reports > Student Information Report click on Student Report. Here select the Class, Section and Category, Gender, RTE and then click on Search button. Here you can see student details like Section, Admission No, Student Name, Father Name, Date of Birth, Gender etc.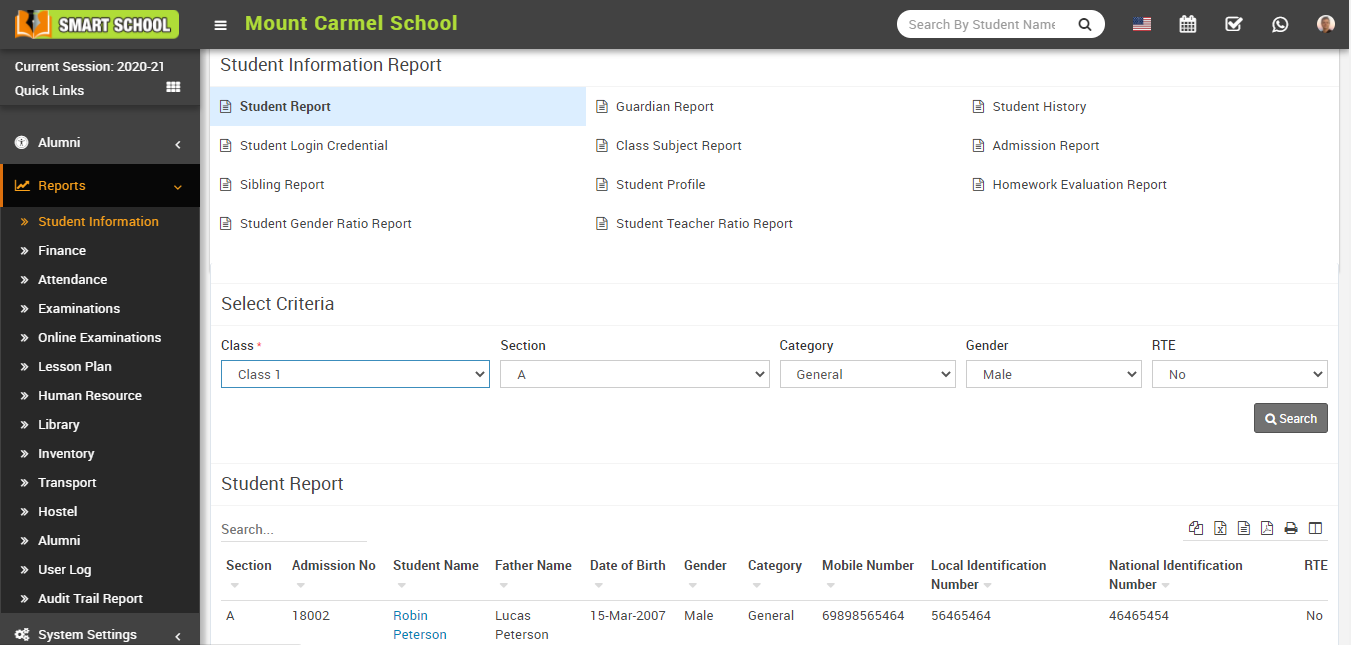
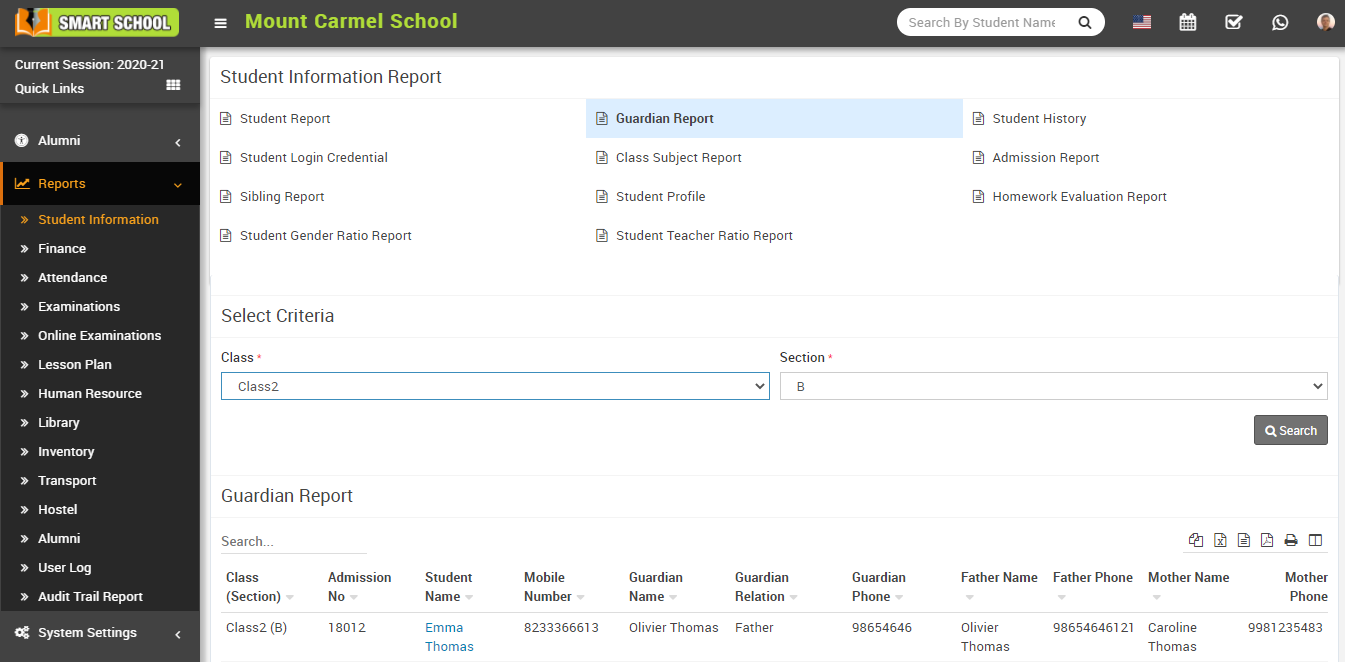
How to Check Guardian Report?
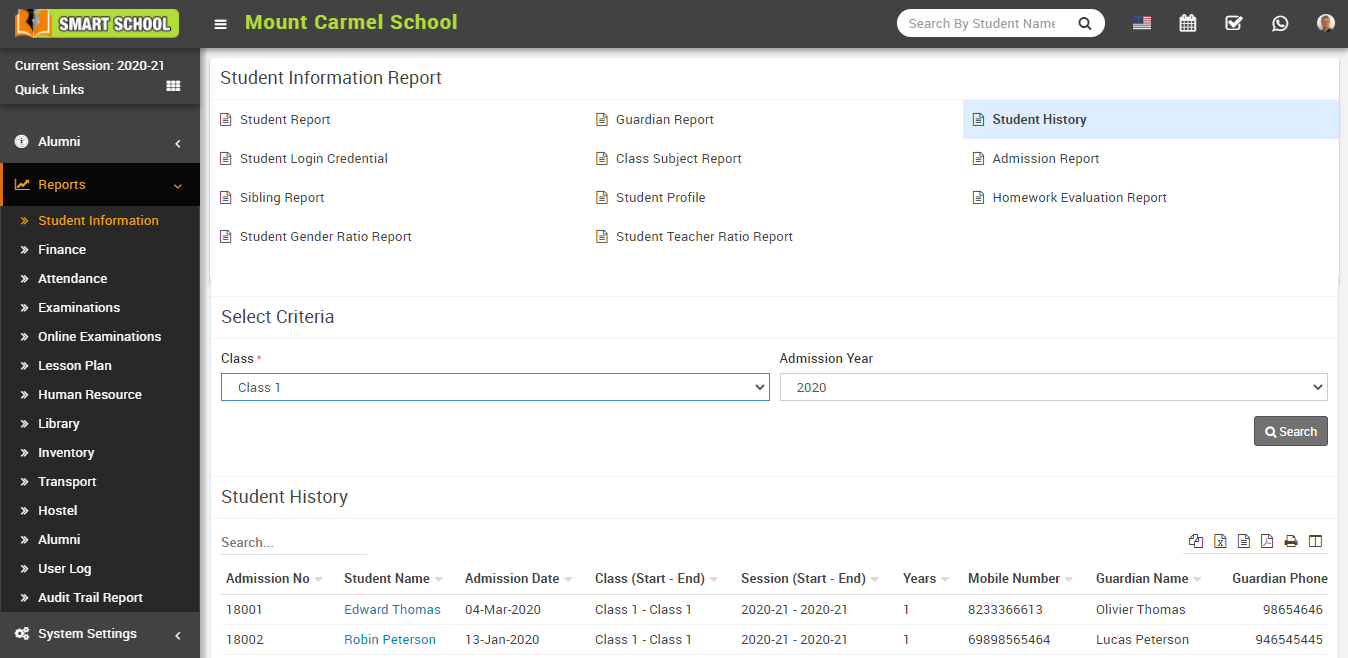
How to check Student History report?
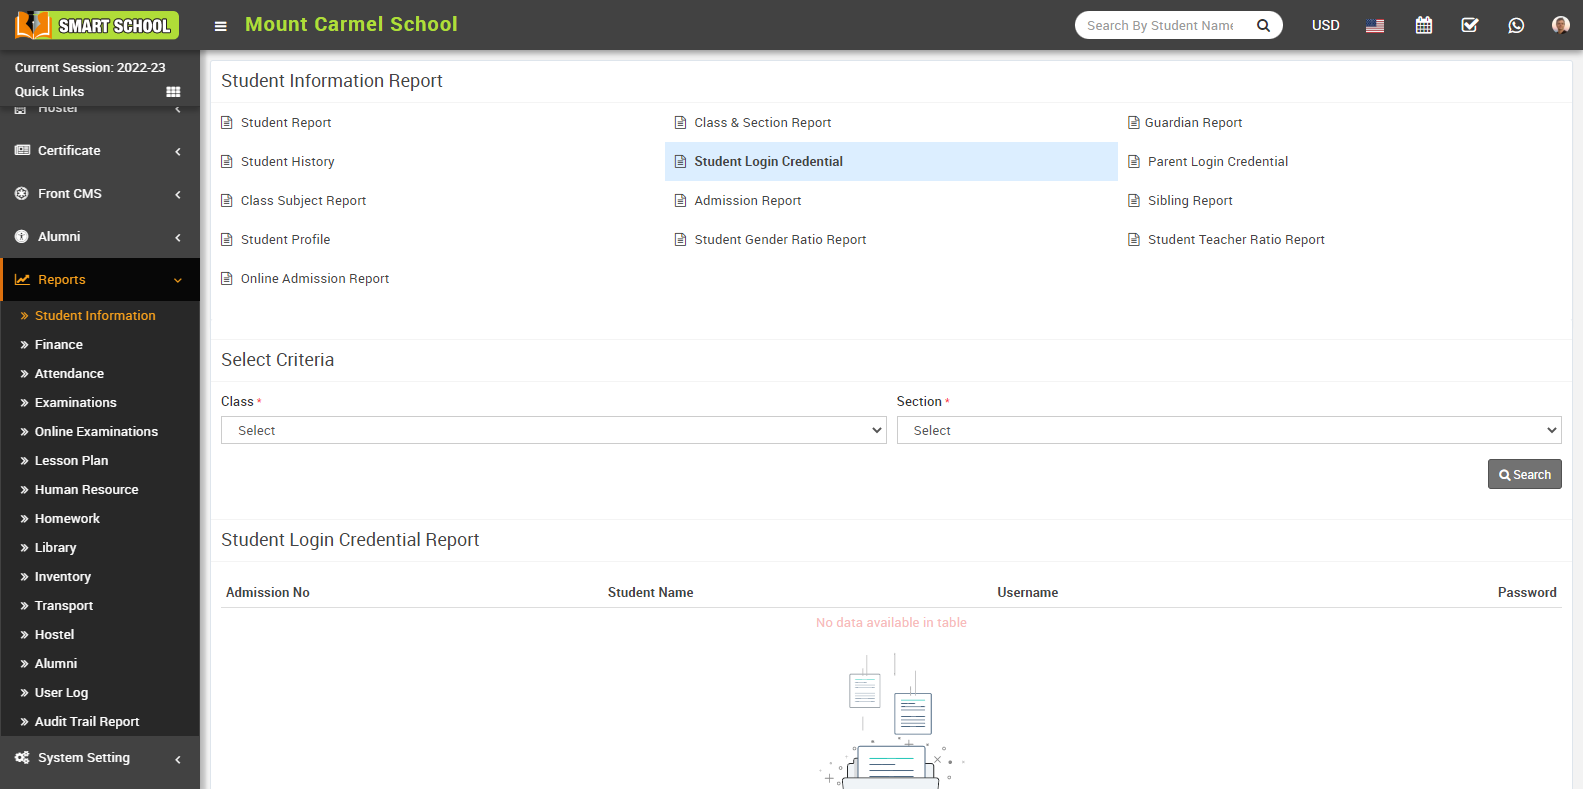
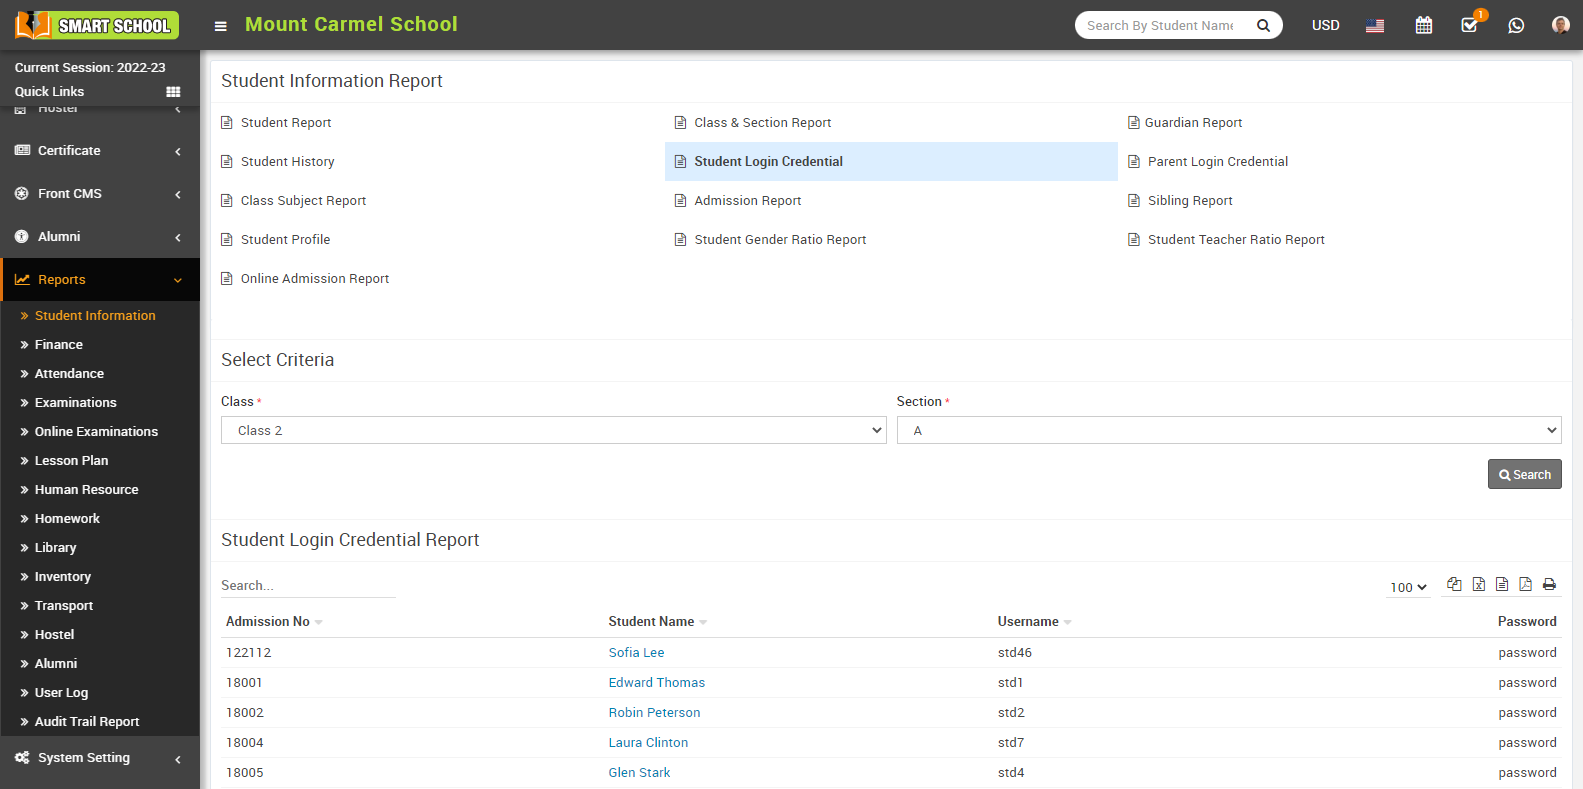
How to check Student Login Credential report?
Here select Class and Section and then click on Search button. Here you can see student's login credential details as Admission Number, Student Name, Student Username, Student Password.
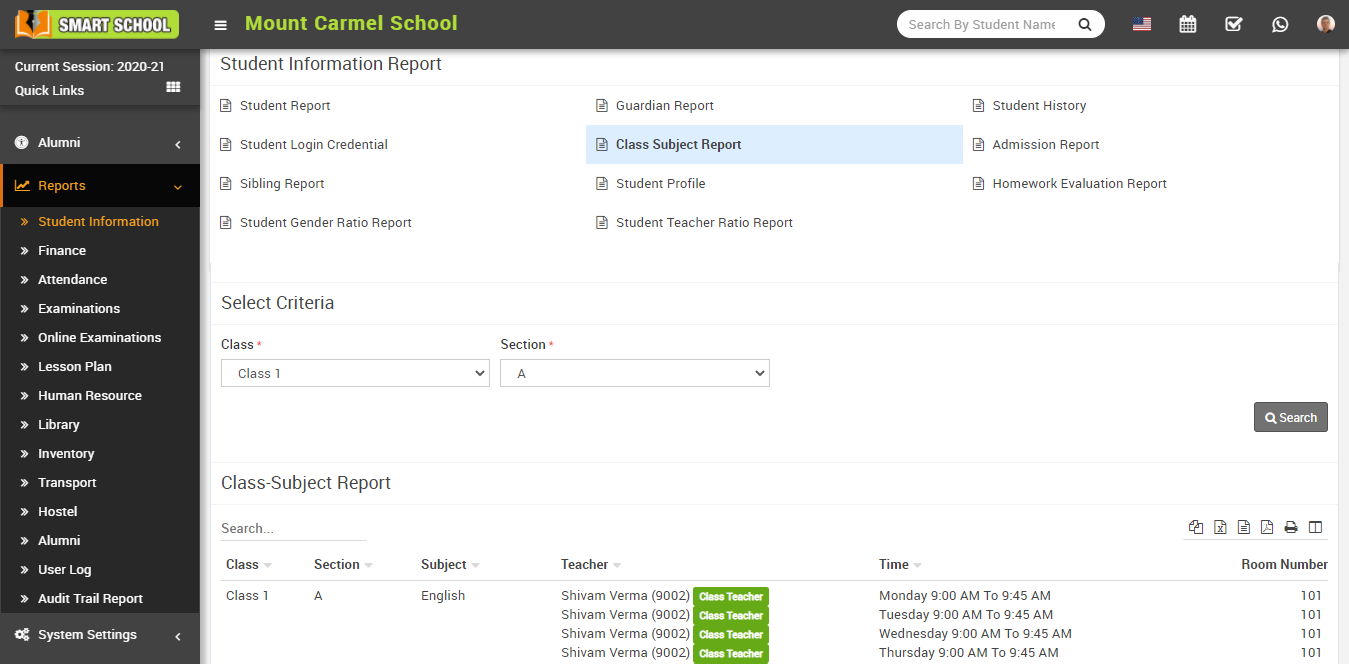
How to check Class Subject Report?
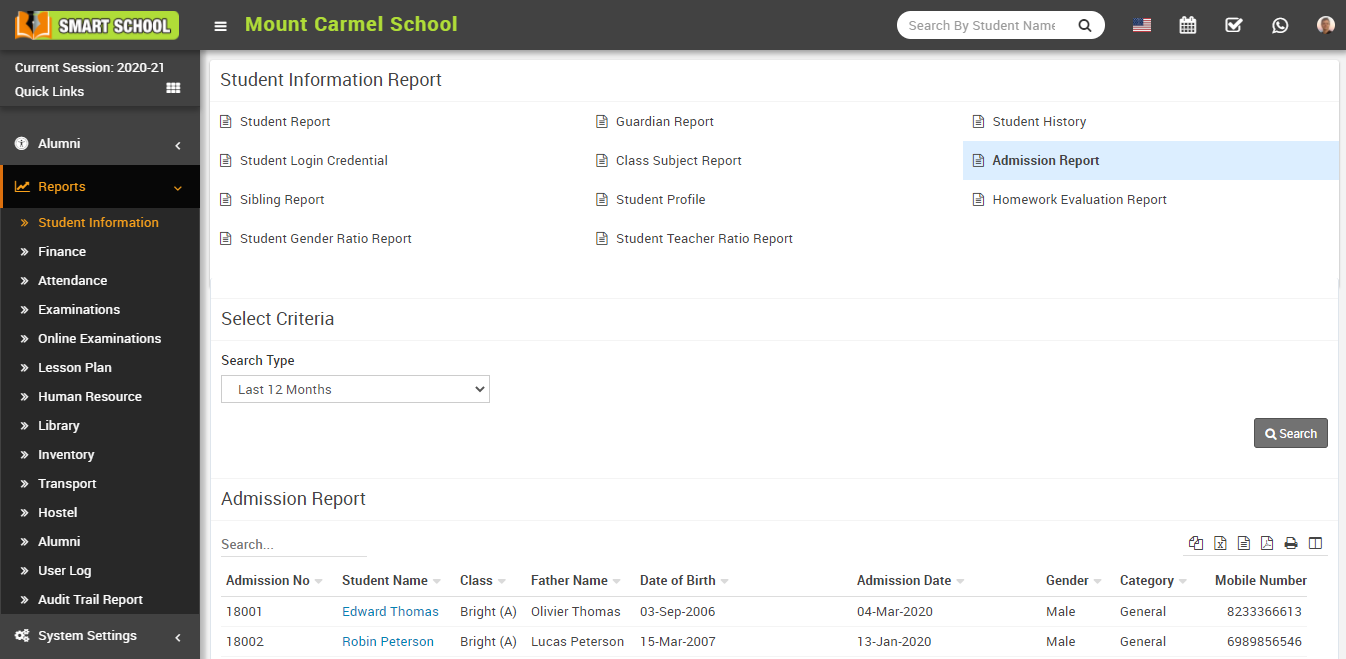
How to check Admission Report?
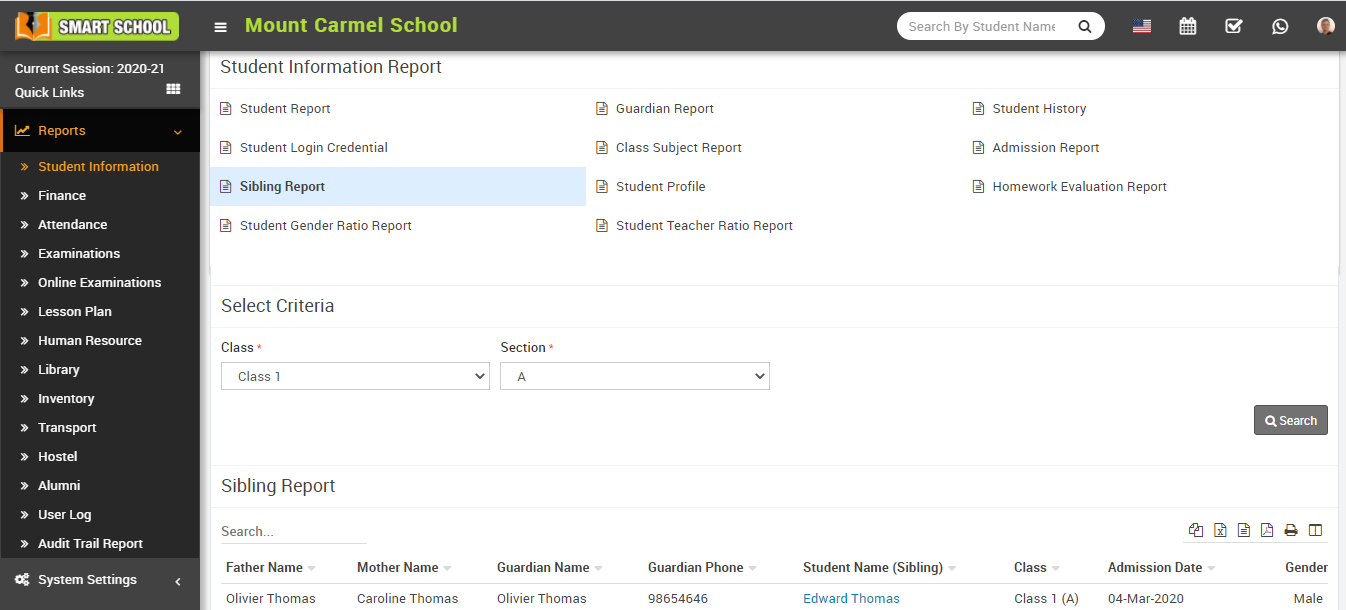
How to check Sibling report?
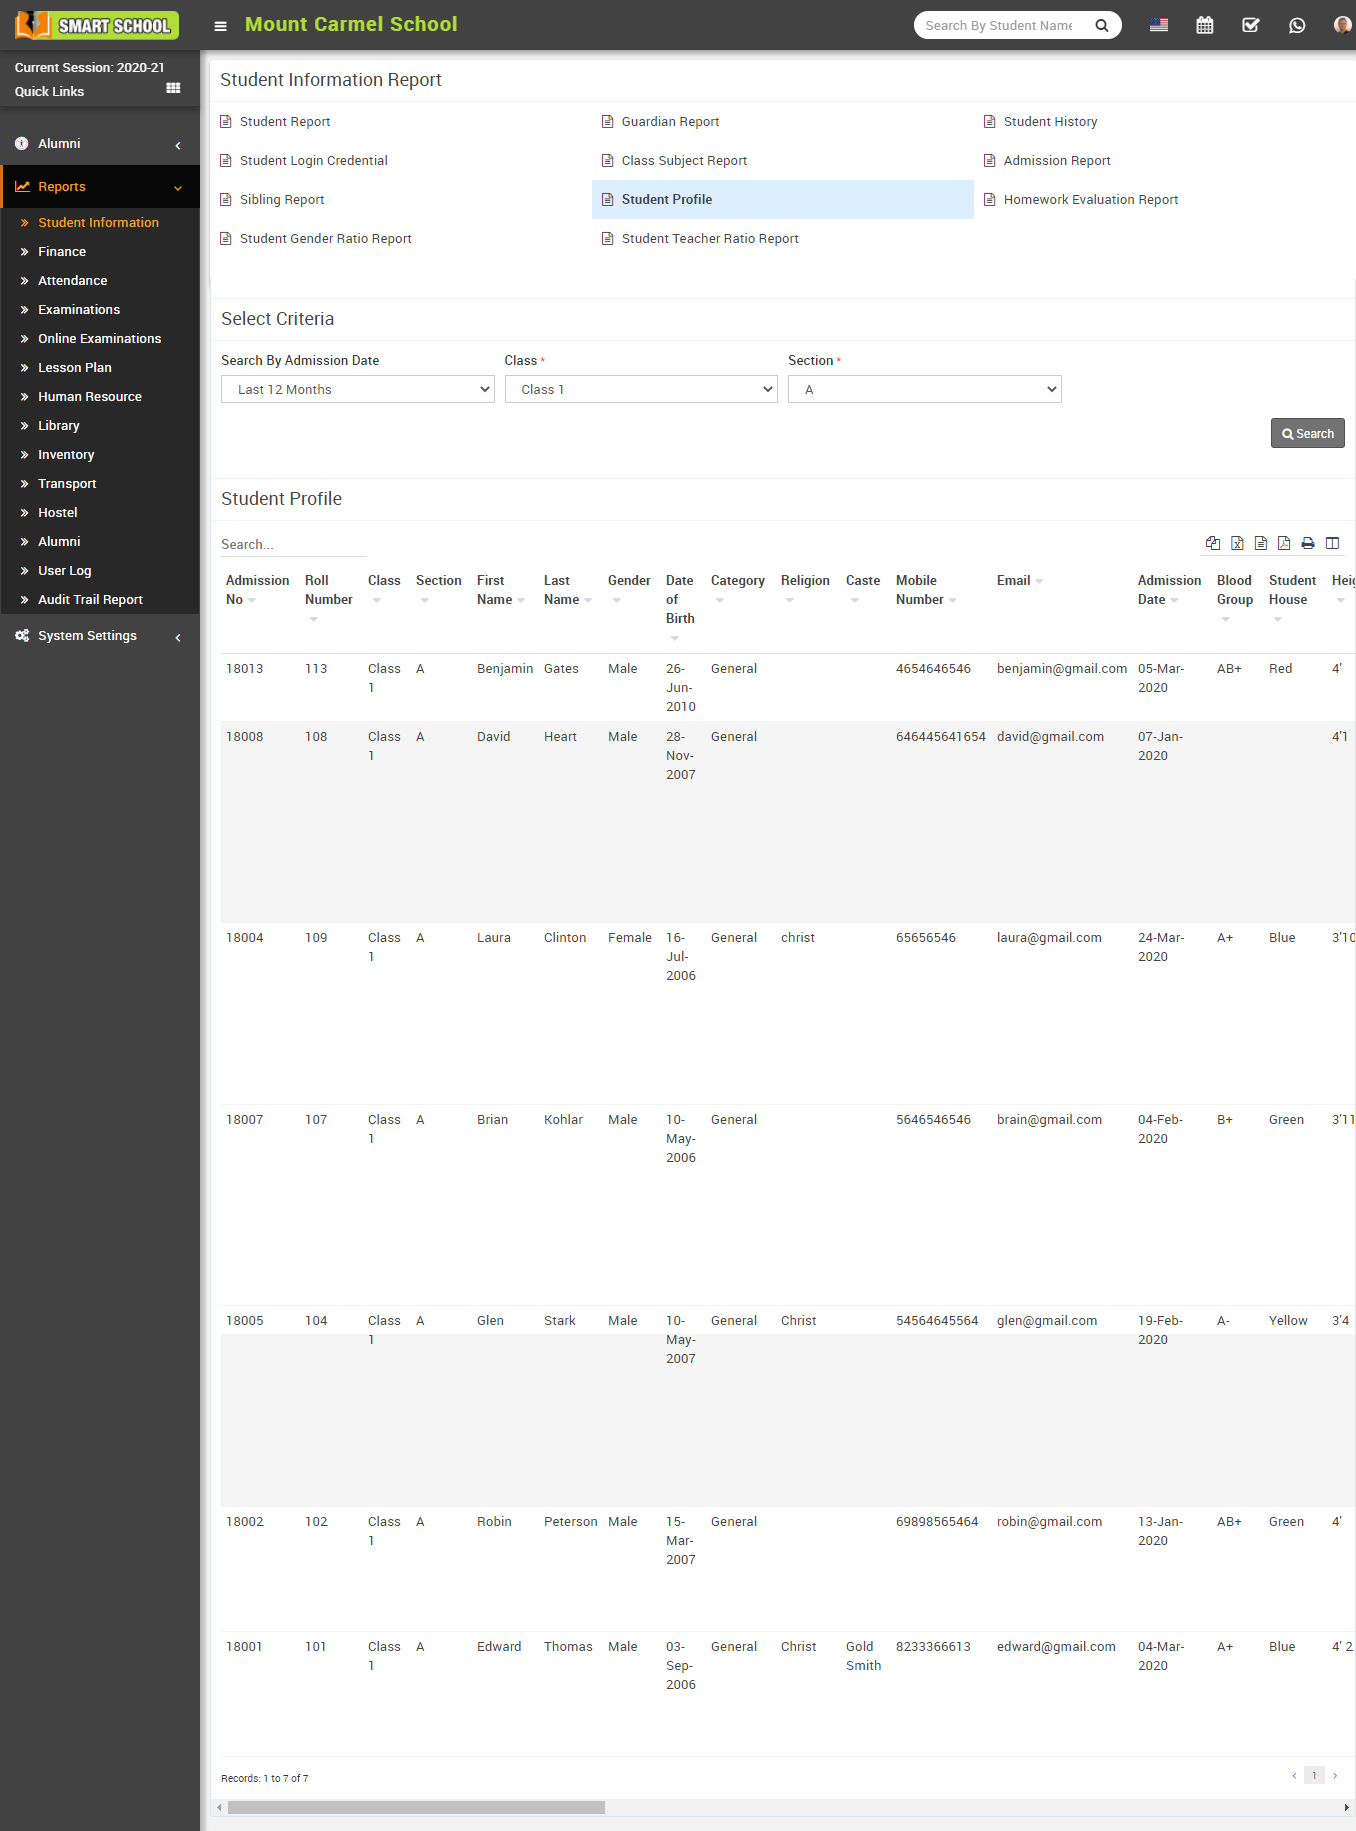
How to check Student Profile Report?
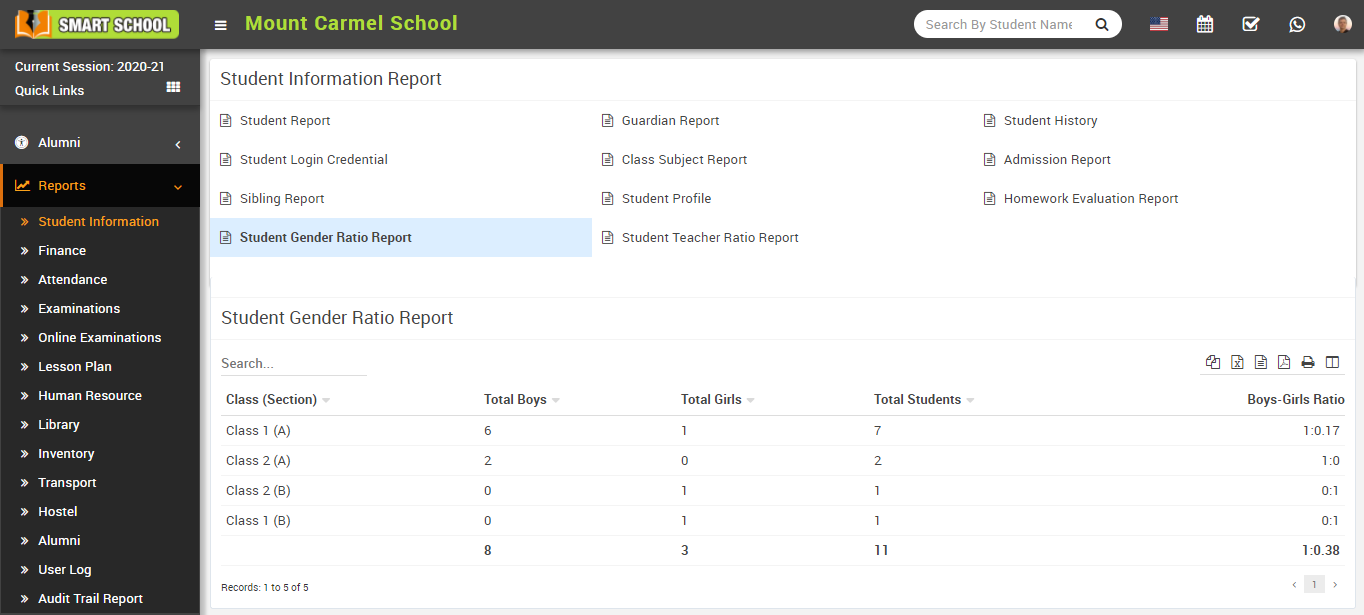
How to check Student Gender Ratio Report?
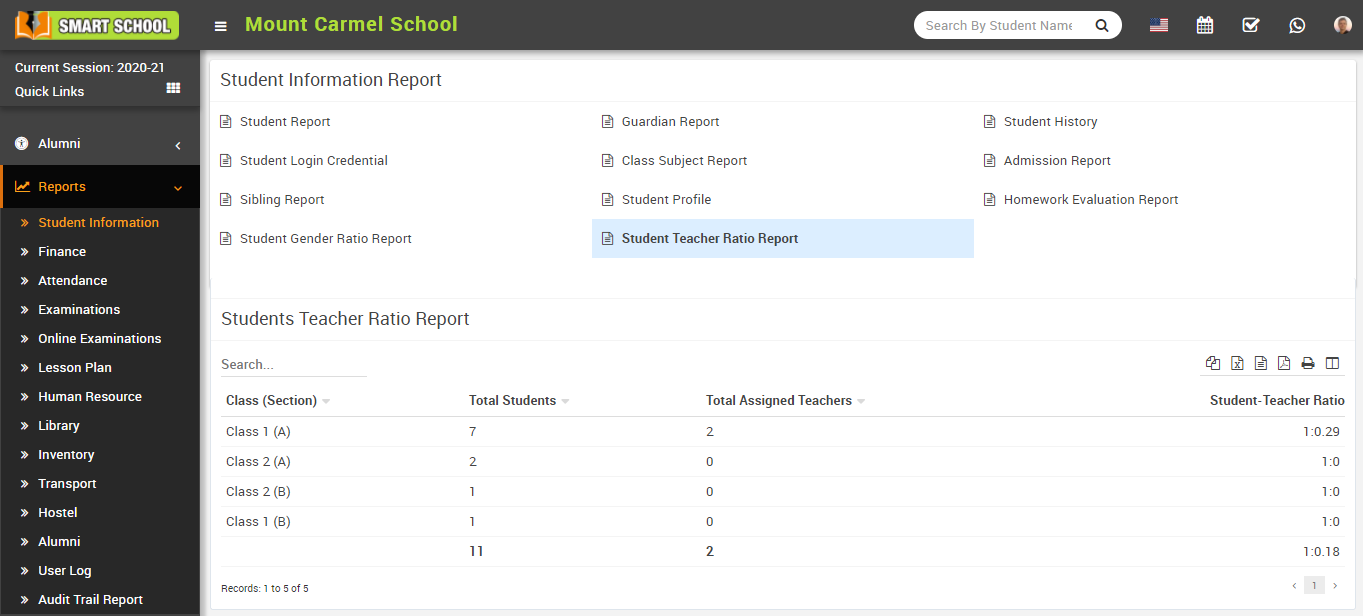
How to Check Student Teacher Ratio Report?
To check student teacher ratio report, go to Reports > Student Information Report click on Student Teacher Ratio Report. Here you can see teacher student ratio in the class section.