About Online Examination
Online examination module workflow: first we will add questions in question bank and then create online exam and check the all online examination report and student can give online exam from student panel and check the exam result publish.
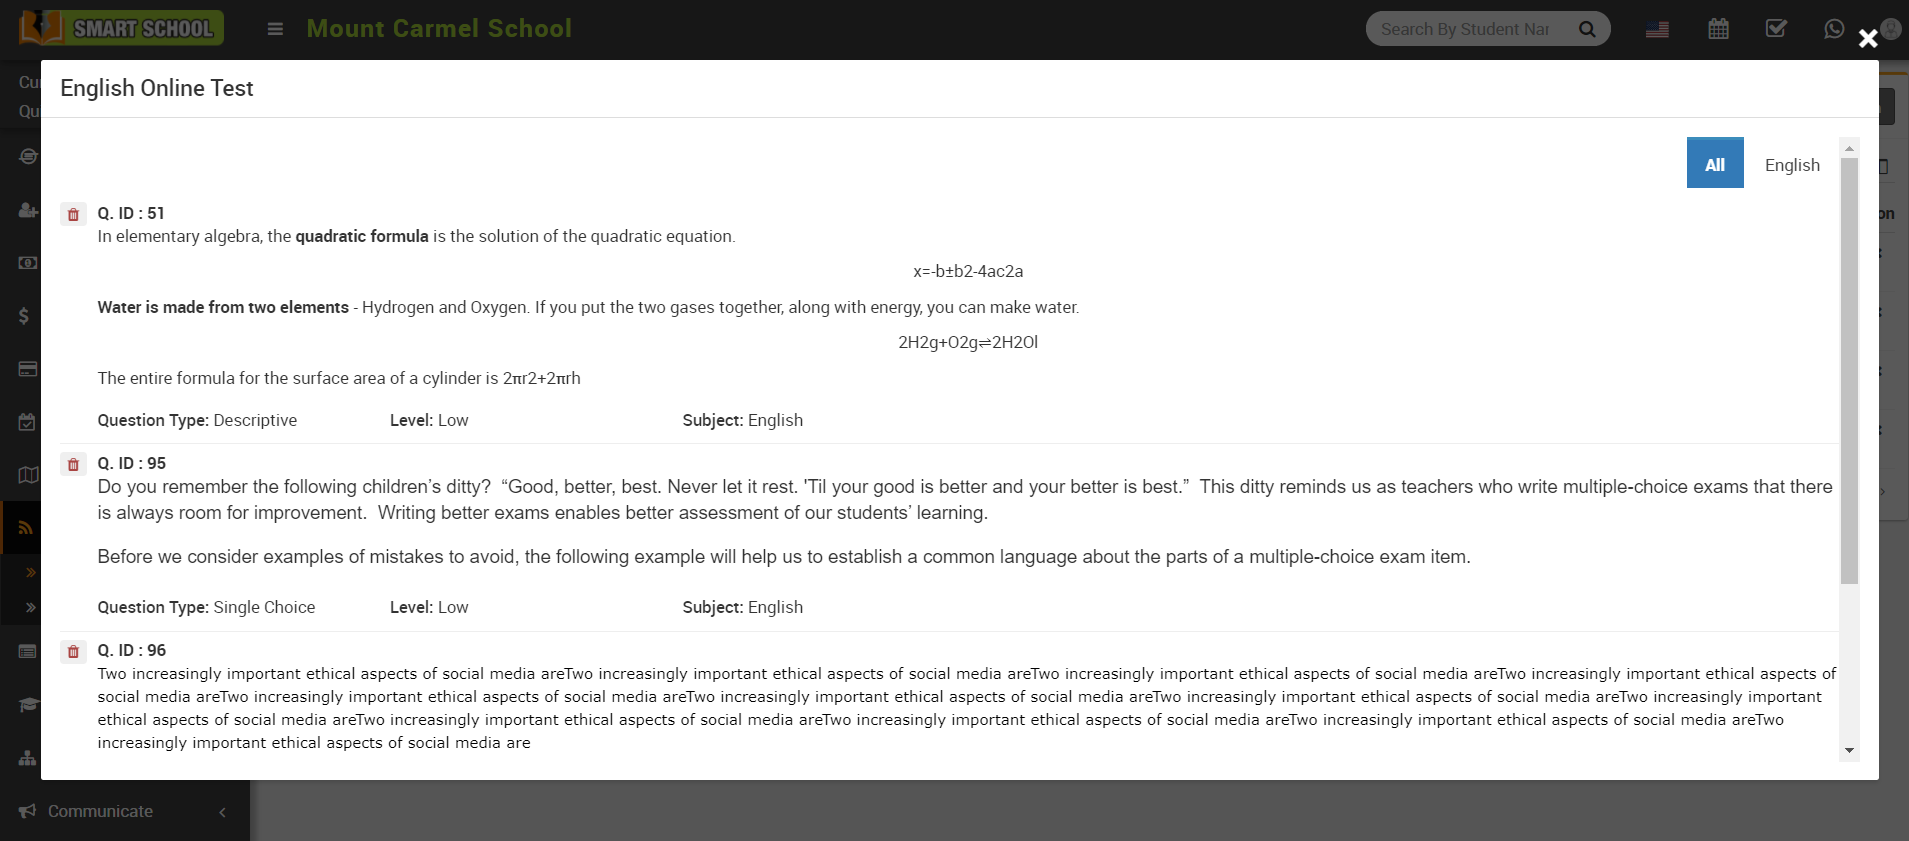
How to add Question Bank?
Here select the Subject, Question Type, Question Level, Class, Section and Question then click on Save button. You can view this added record in Question Bank page.
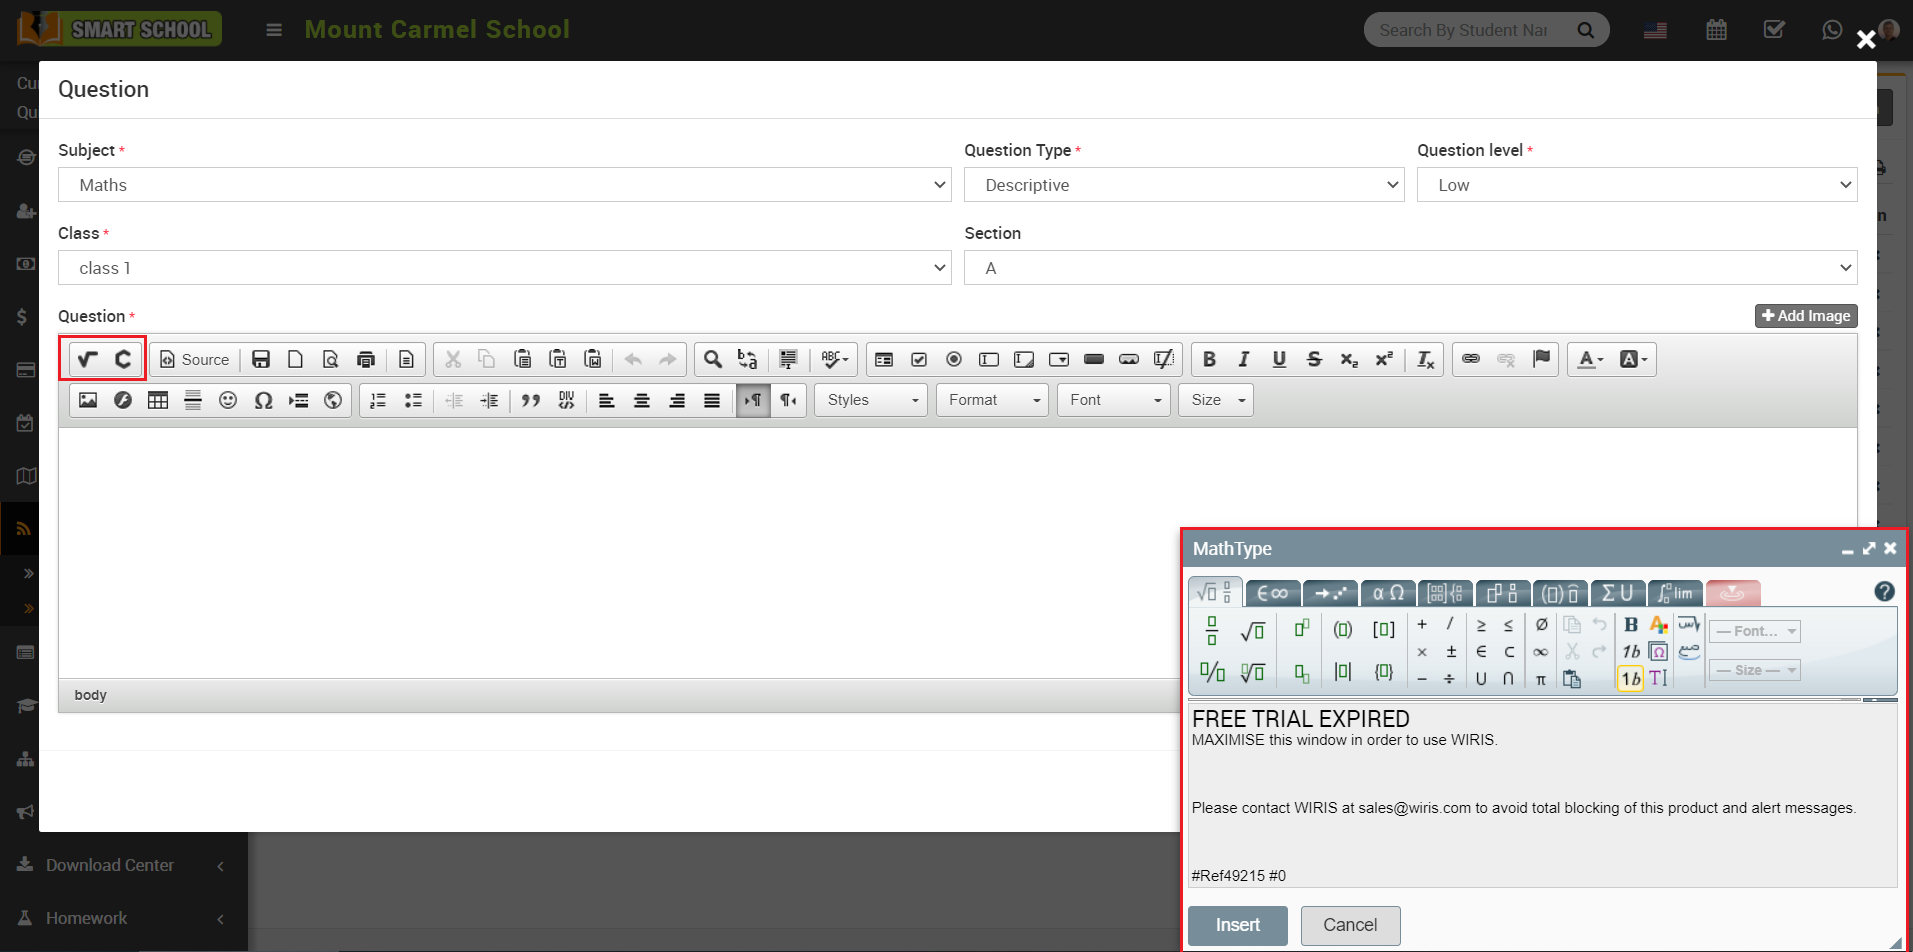
Note - Math type plugin is a paid plugin so to use it you should purchase its license from https://www.wiris.com/
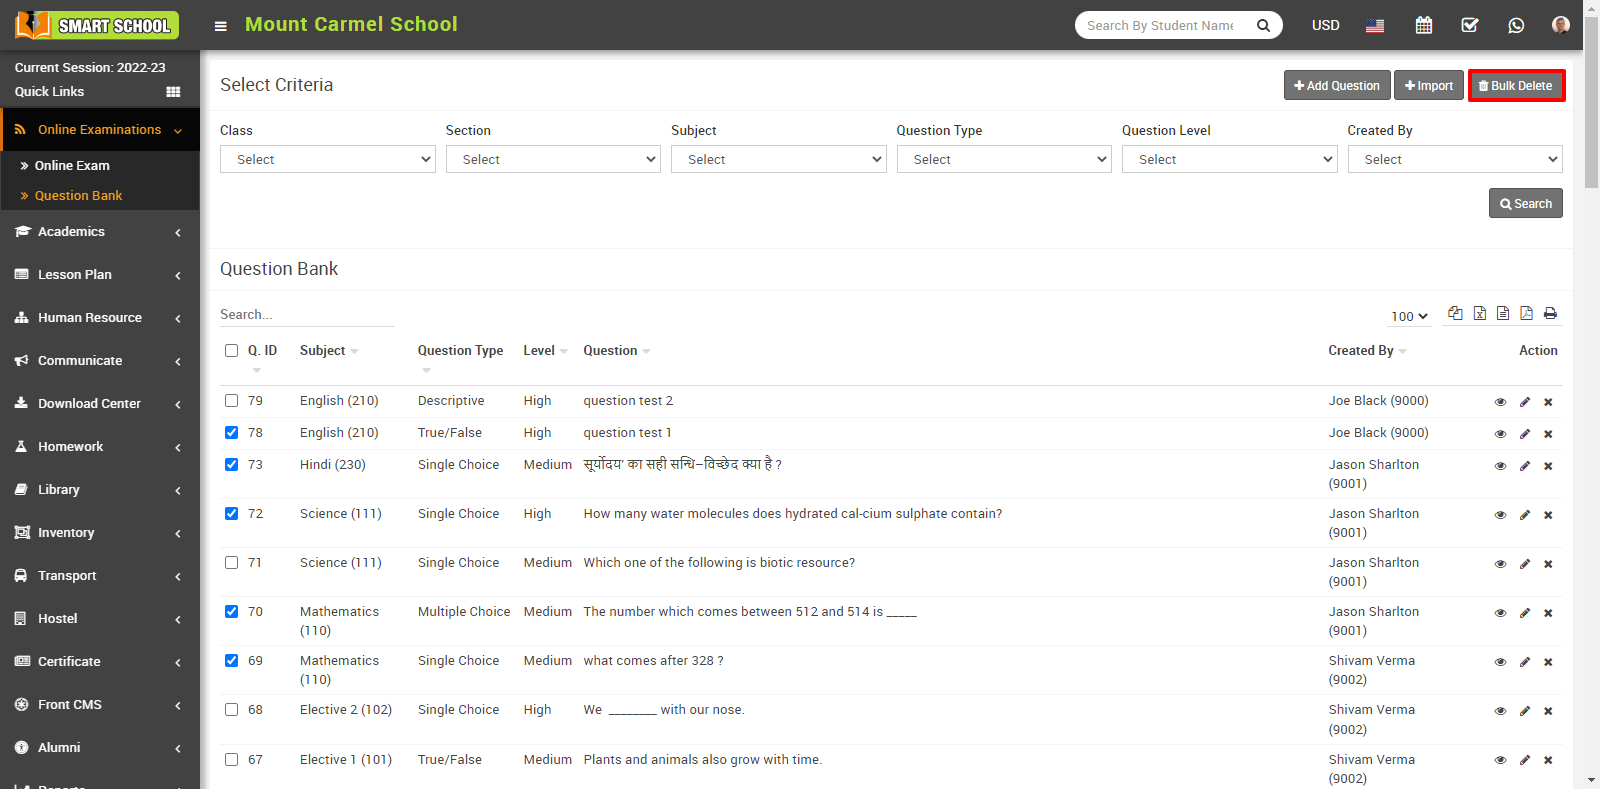
Here you can search any record by entering the class, section, subject, question type, and question level. The list of searched records will be shown below the page.
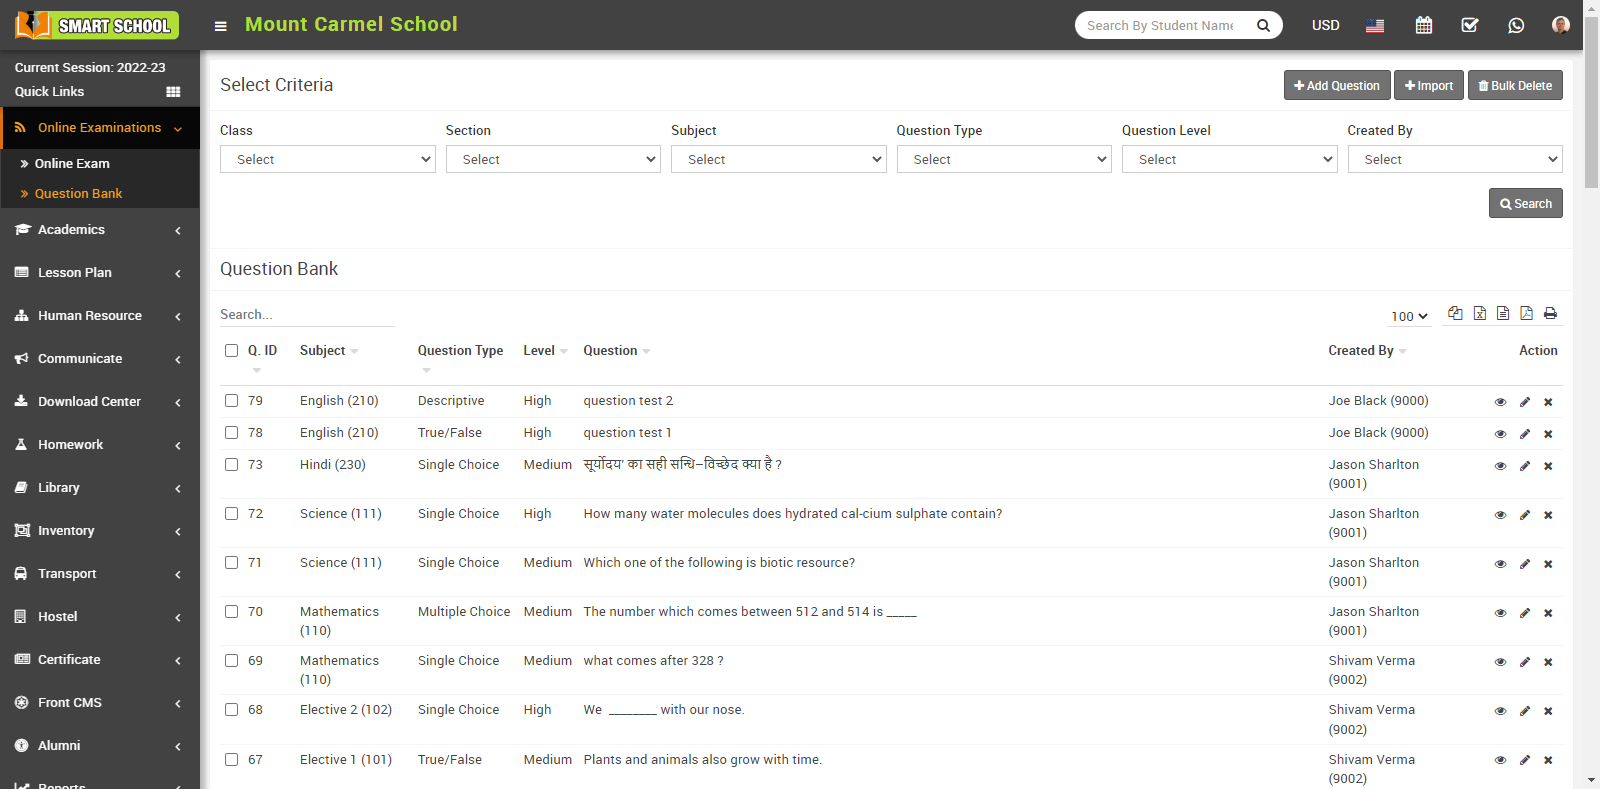
To View question in detail, you can click on View icon which is showing in the Action column.
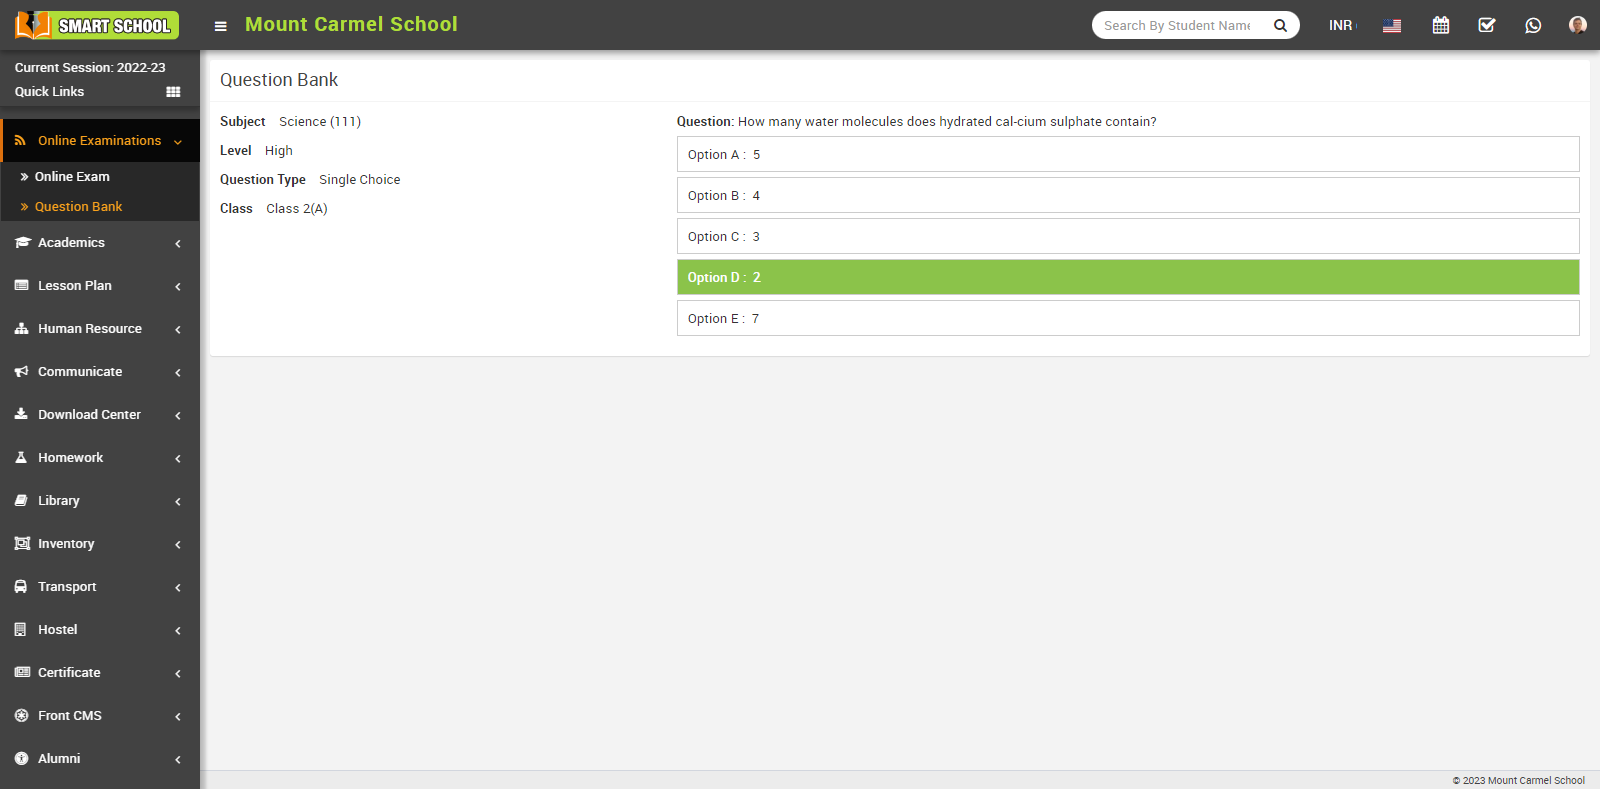
To edit question click on Edit icon and to delete question click on Delete icon present in the question bank page.
You can also delete more than one record at a time by using bulk delete feature. To delete bulk record click on the Bulk Delete button present at the top right corner in the page and confirmation model will be open then click on OK button so that question in bulk be delete successfully.
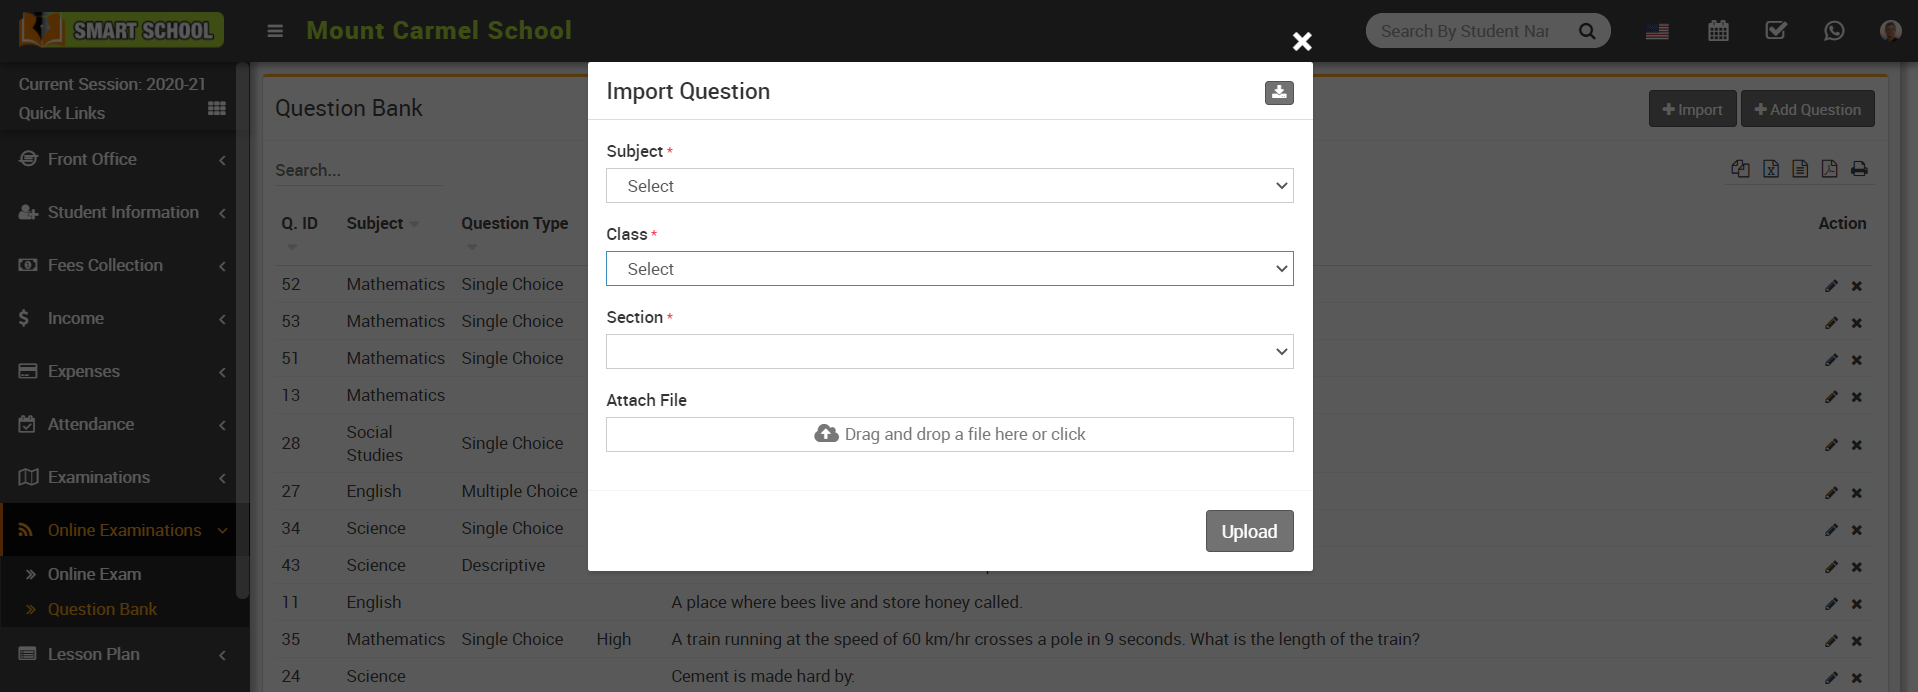
How to import question in question bank?
You can also download sample CSV file by clicking Download icon present at the top right corner of the model.
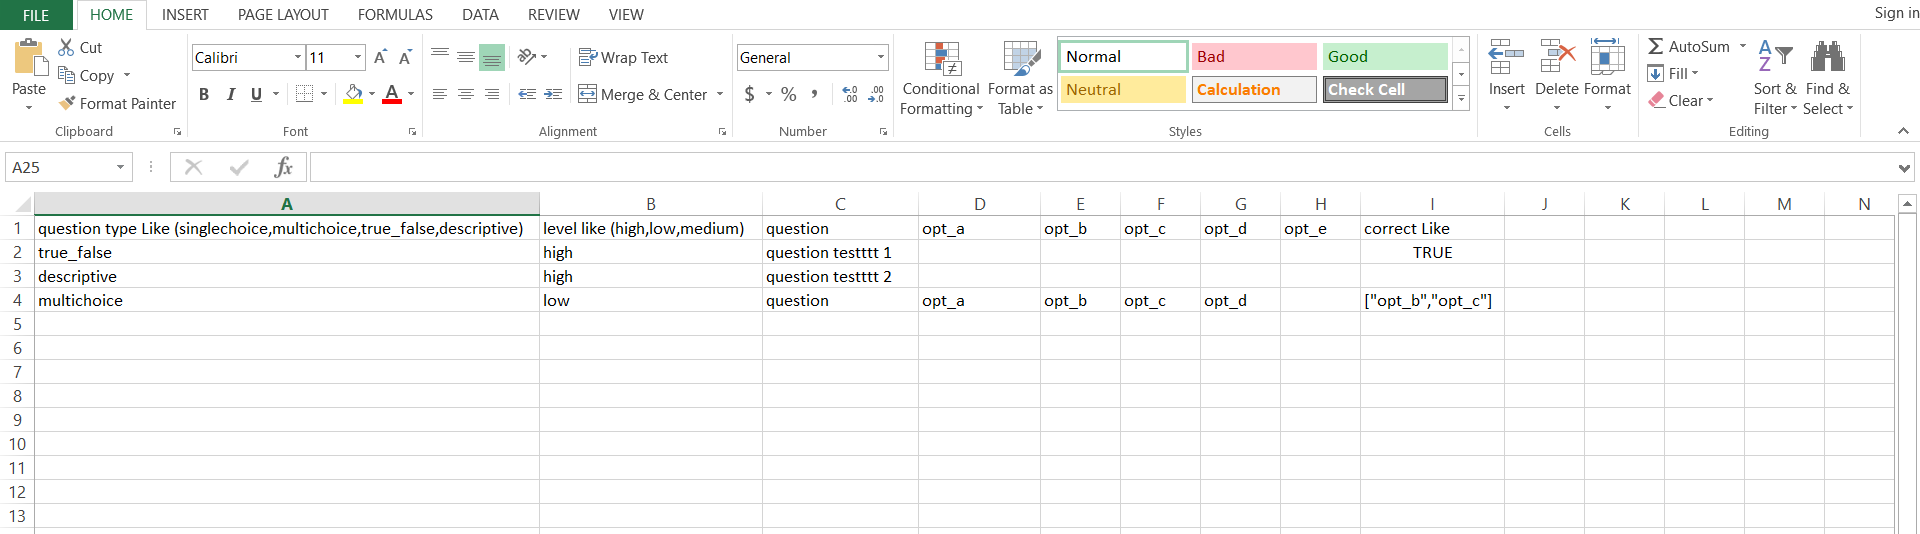
Once sample CSV file is downloaded please follow all the instruction given in the sample CSV file. In the following step we are providing an overview so you can easily understand what to fill in which field
question type - singlechoice, multichoice, true_false, descriptive (any one)
level - high, low, medium (any one)
question- your question
opt_a - Your option a
opt_b - Your option a
opt_c- Your option c
opt_d - Your option d
opt_e - Your option e
correct - opt_a, opt_b, opt_c, opt_d (choose any one if question type is not multichoice)
for true false - true or false
for multichoice - ["opt_b","opt_c"]
Note -
1. If format instruction not show in downloaded sample csv file and open it using MS Ofice Excel so we will suggust you that please open sample csv file on Notepad++ or any other text editor and read the instruction carefully and then enter question in csv file.
2. When you open sample csv file on Notepad++ or any other text editor, it will may add extra double quote in your answer option ([""opt_b"",""opt_c""]) , so please remove these extra double quote before importing csv file and import it in actual format (["opt_b","opt_c"]).

After uploading the csv file, the number of questions successfully imported will be displayed on the screen.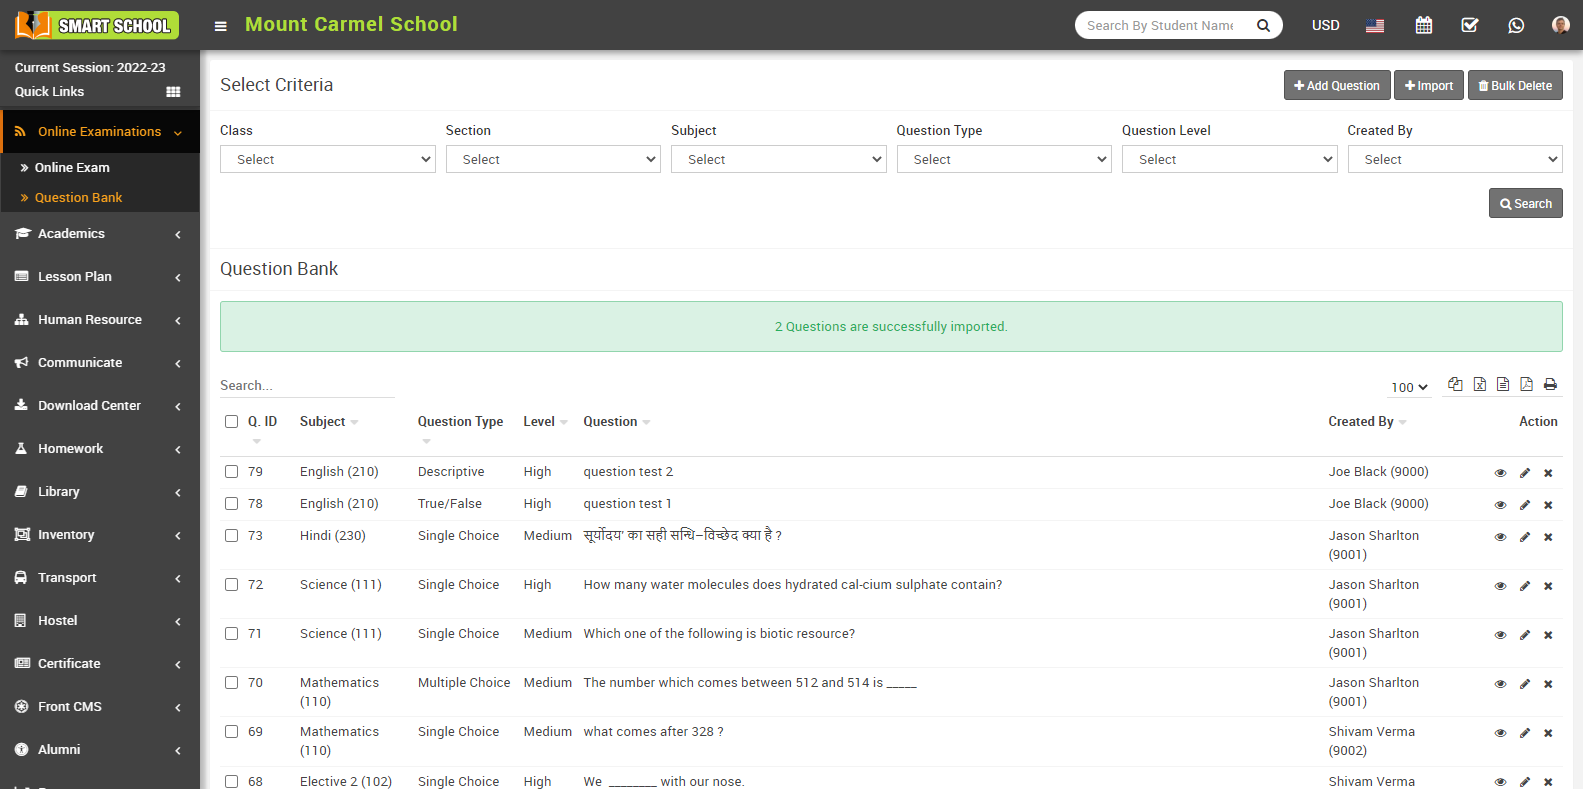
How to import question in question bank?
You can also download sample CSV file by clicking Download icon present at the top right corner of the model.
Once sample CSV file is downloaded please follow all the instruction given in the sample CSV file. In the following step we are providing an overview so you can easily understand what to fill in which field
question type - singlechoice, multichoice, true_false, descriptive (any one)
level - high, low, medium (any one)
question- your question
opt_a - Your option a
opt_b - Your option a
opt_c- Your option c
opt_d - Your option d
opt_e - Your option e
correct - opt_a, opt_b, opt_c, opt_d (choose any one if question type is not multichoice)
for true false - true or false
for multichoice - ["opt_b","opt_c"]
Note -
1. If format instruction not show in downloaded sample csv file and open it using MS Ofice Excel so we will suggust you that please open sample csv file on Notepad++ or any other text editor and read the instruction carefully and then enter question in csv file.
2. When you open sample csv file on Notepad++ or any other text editor, it will may add extra double quote in your answer option ([""opt_b"",""opt_c""]) , so please remove these extra double quote before importing csv file and import it in actual format (["opt_b","opt_c"]).
After uploading the csv file, the number of questions successfully imported will be displayed on the screen.
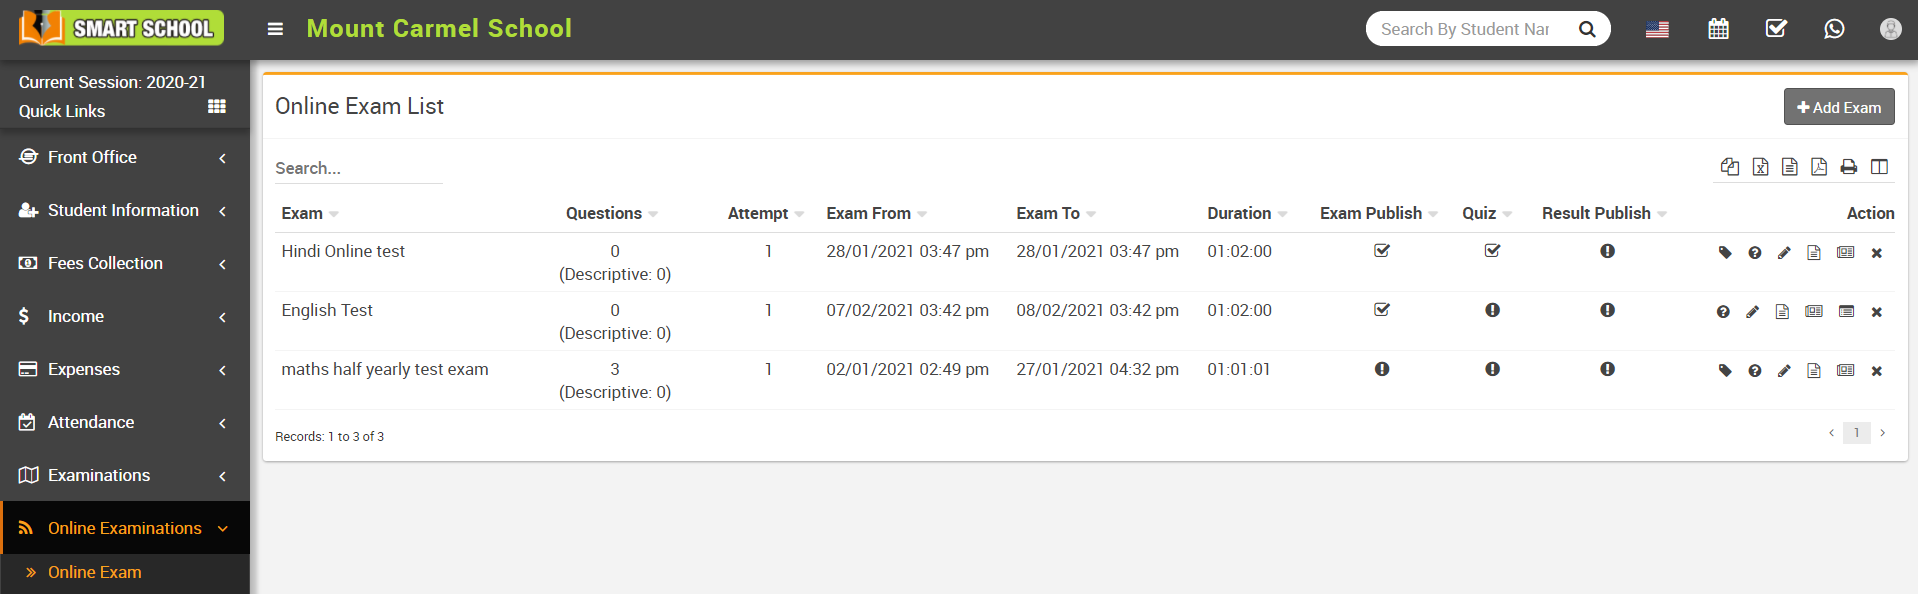
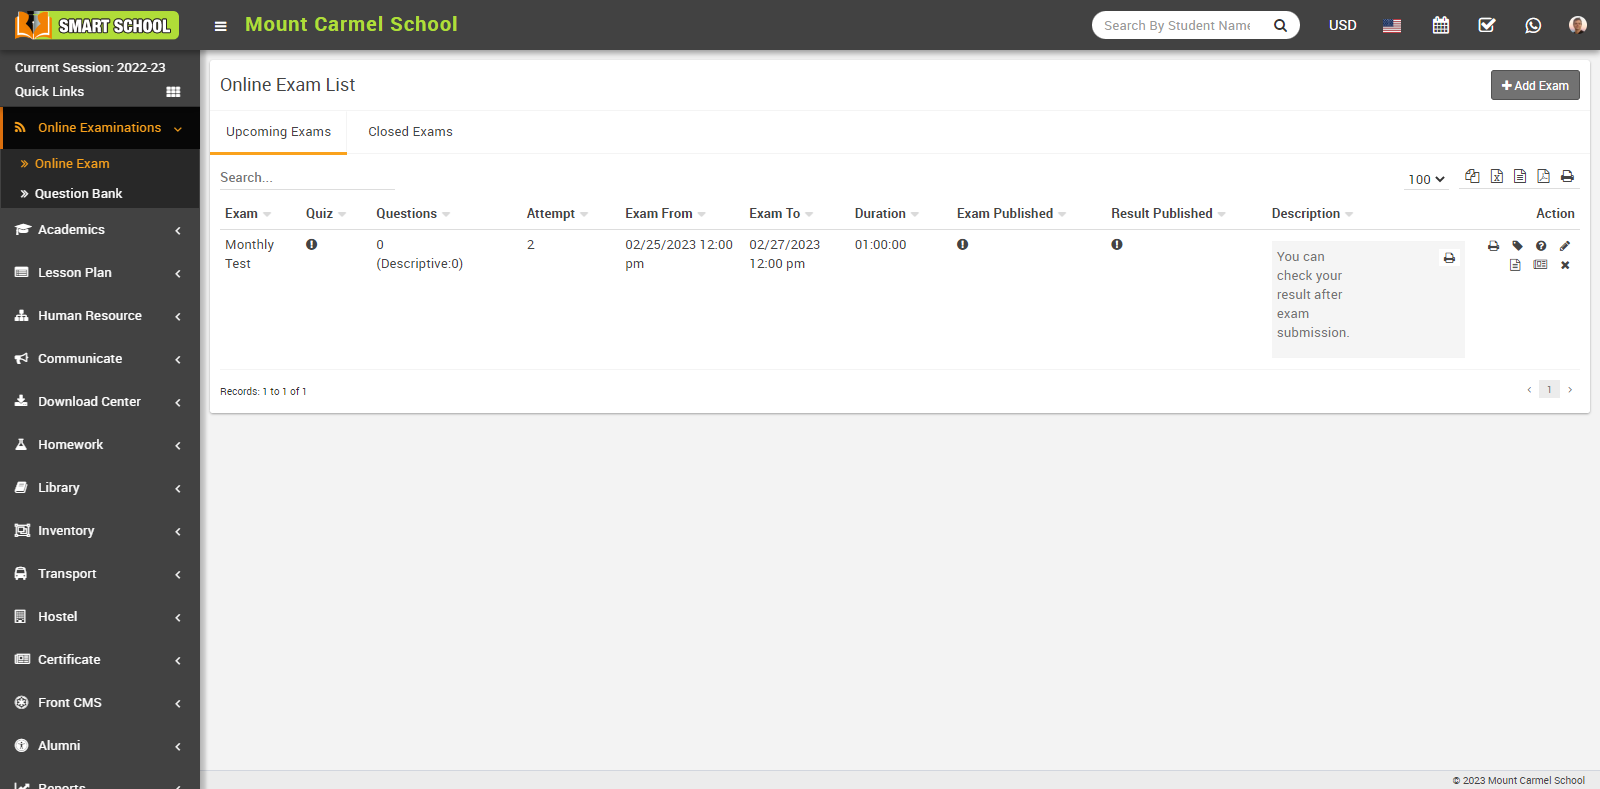
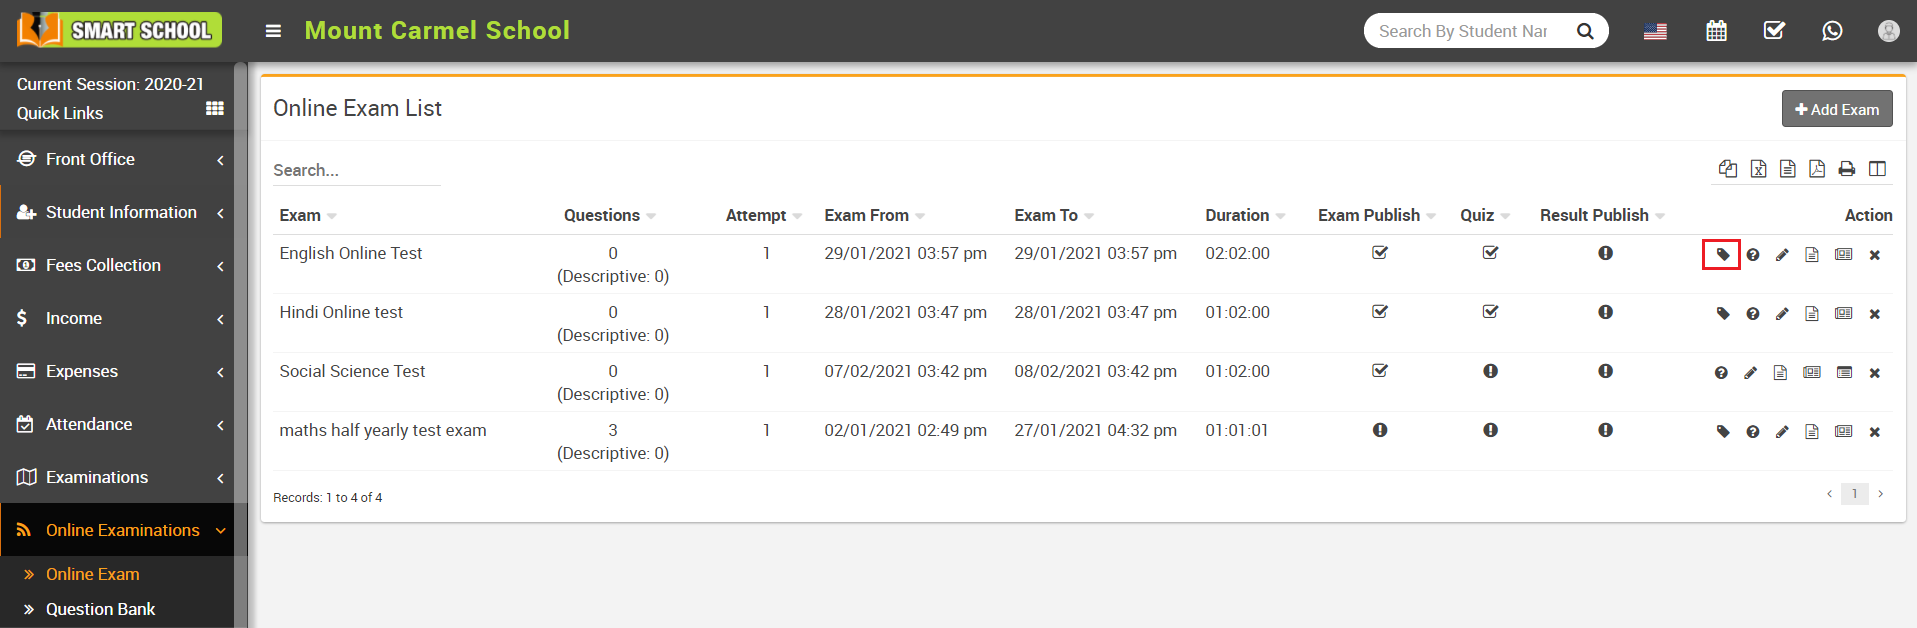
How to add Online Exam?
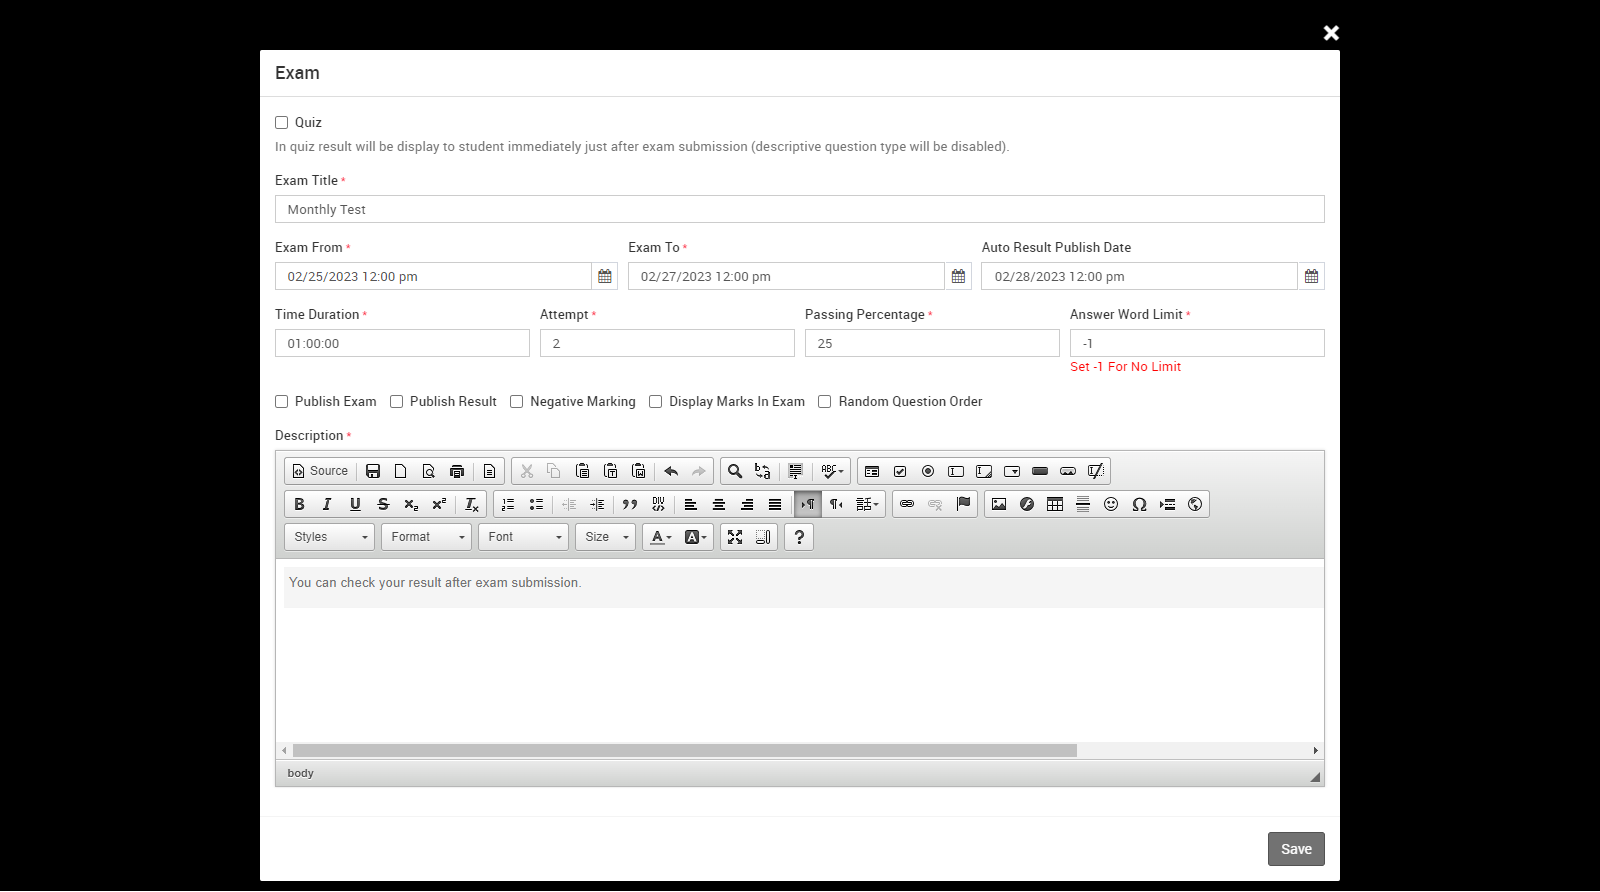
then click on Add Exam button present at top right corner of the online exam list page, at click of this button Add Exam modal will be open.
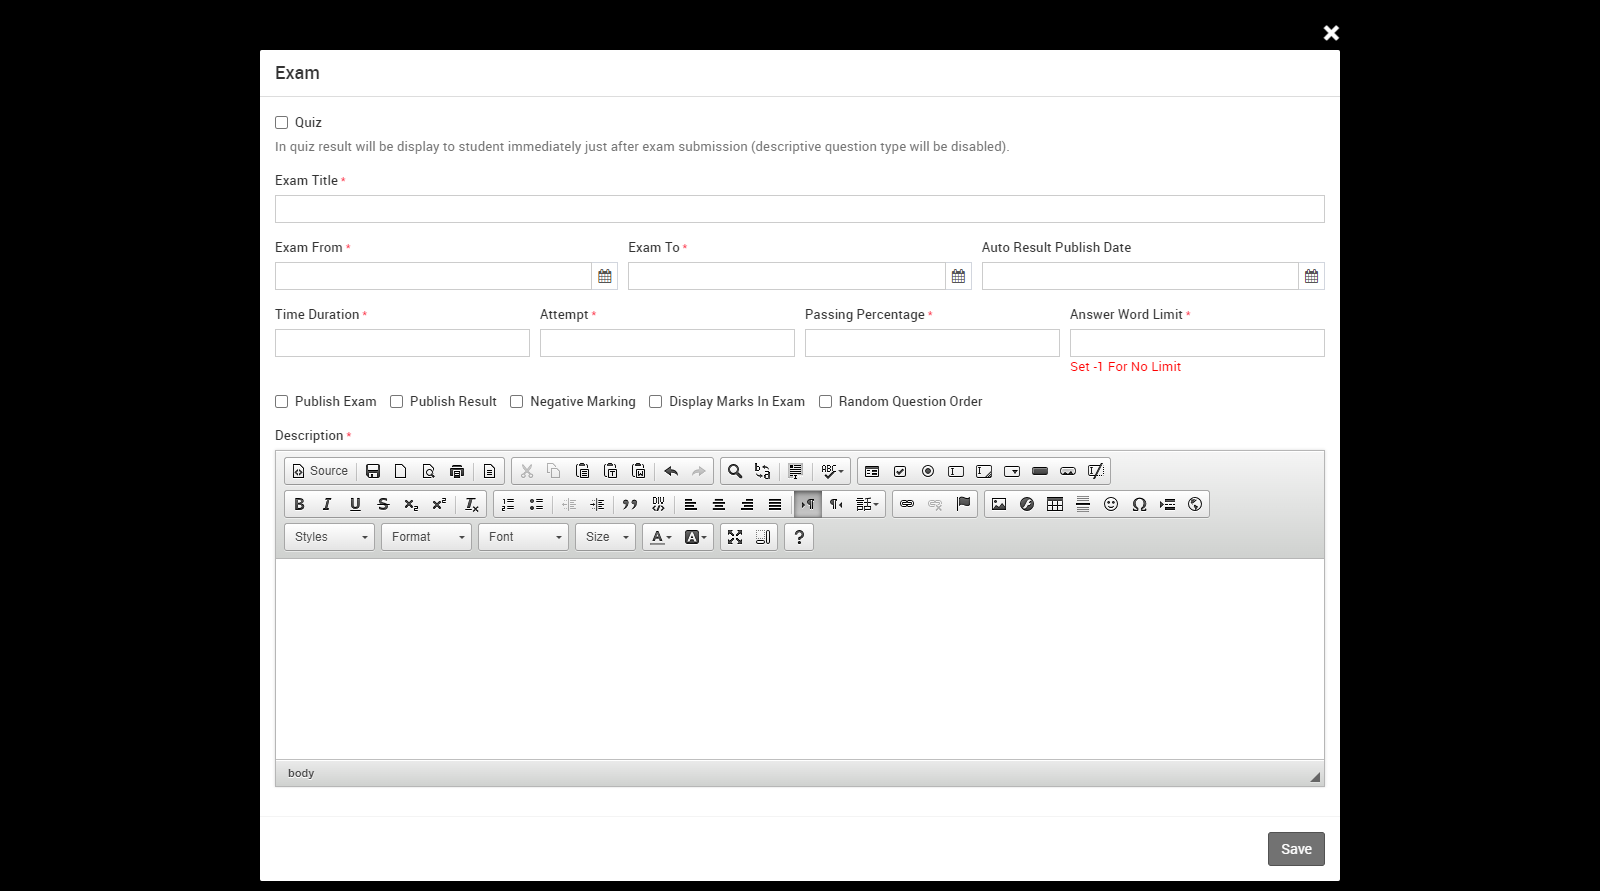
Here enter the Exam Title, Exam From, Exam To, Time Duration and select Attempt (its maximum attempt limit of particular student exam for every assigned student), Passing Percentage, Publish Exam (if the exam is published, it will appear in exam schedule list and also in the student panel) and Publish Result (if the exam result is published, it will appear in the result list and also result will appear in the student panel. This option will be disabled if exam type is Quiz ), Auto Result Publish Date ( if exam type is Quiz then this option will be disabled), Answer Word Limit (Set -1 for No Limit) : Suppose if you manage one online exam where 10 questions will be available with their 10 descriptive answers, so that all 10 descriptive answers have no limitation on their description, overall if you set -1 for the answer word limit, you can manage the description in unlimited words. Negative Marking ( if this option is checked then negative mark will be show next to the question ), Display marks in Exam ( if this option is checked then question mark will be show next to the question ), Random Question ( if random question is checked then the question will show in different order in different students ) and Description and then click on the Save button. You can view this added record in the Online Exam list page.
After click on Save button your question will be save in upcoming exam and if you want to see that question, simply go to the online examination > online exam.
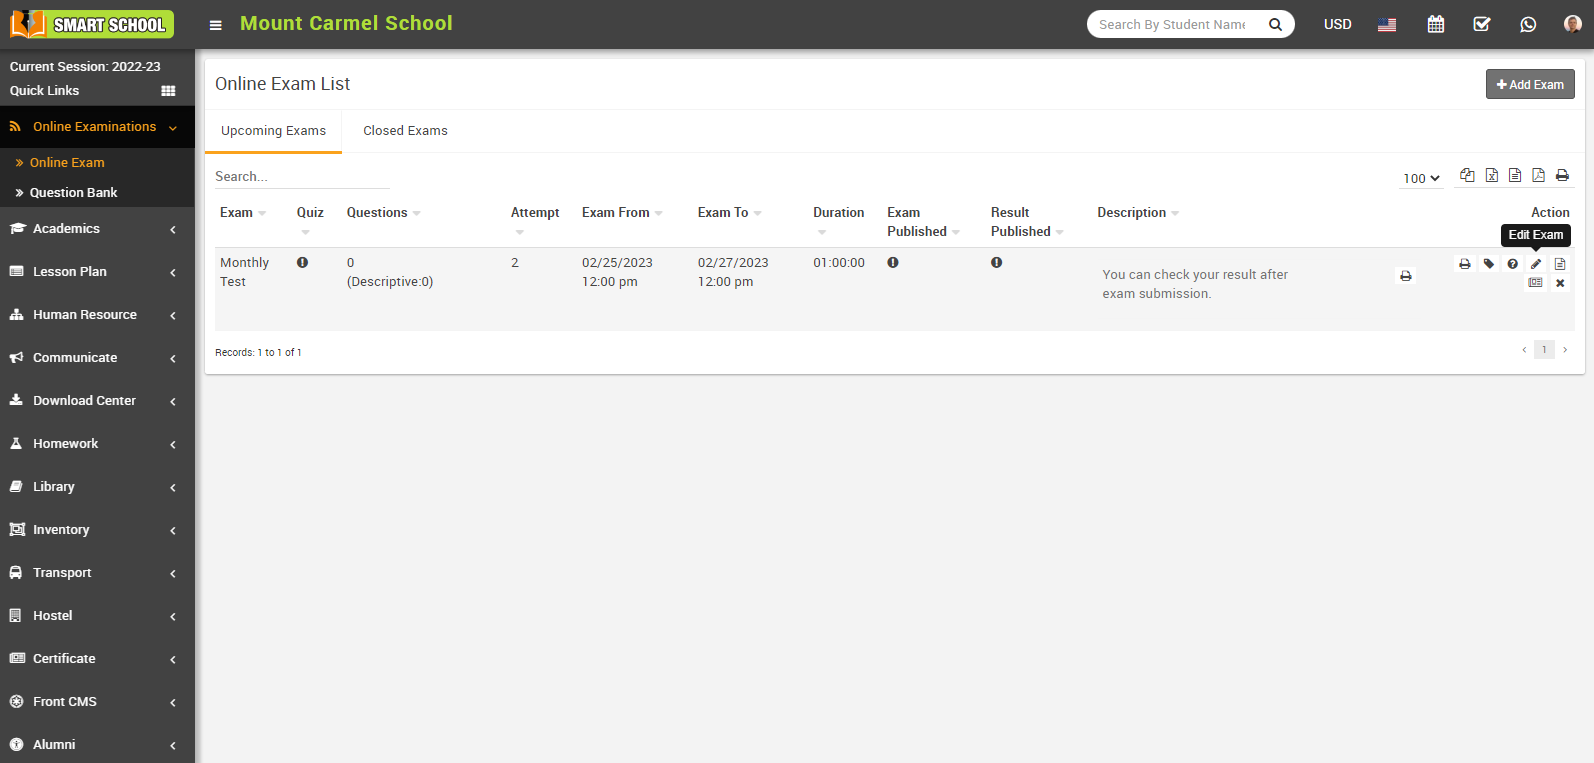
In Upcoming Exams, you can see those exam, whose exam dates are currently available till the exam to set.
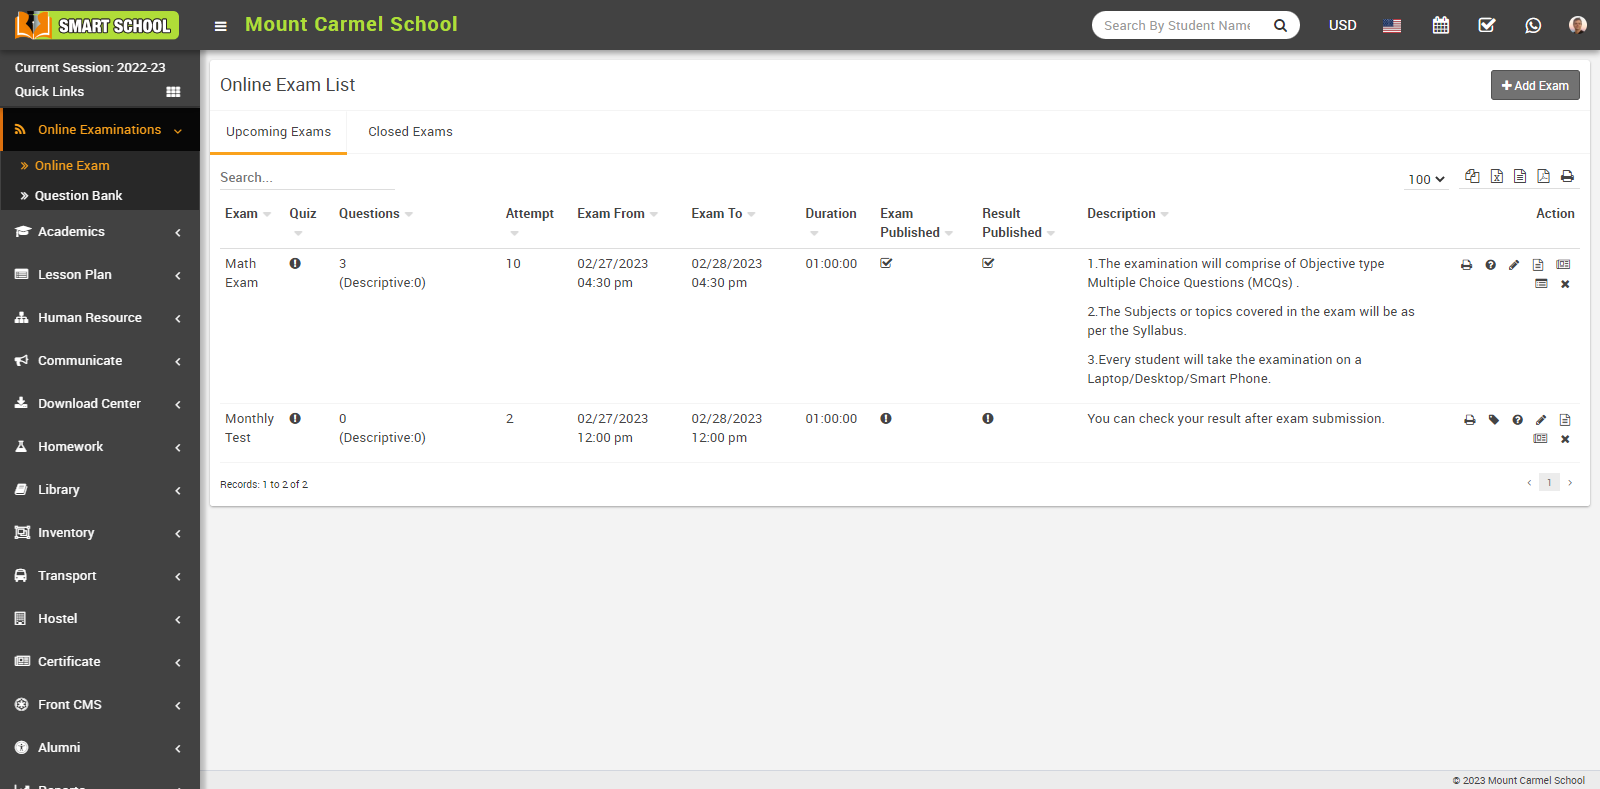
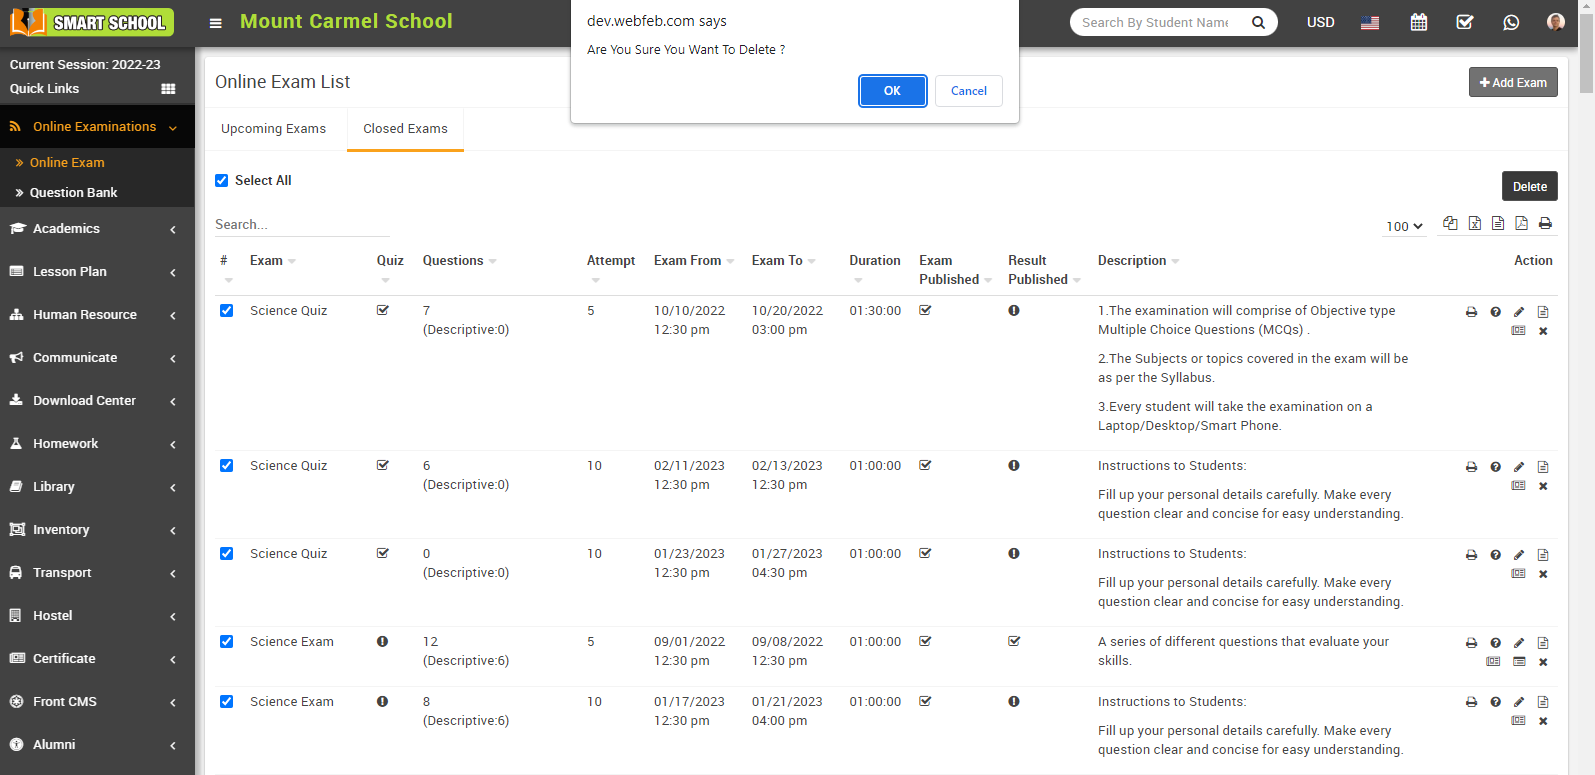
In Closed Exams, you can see those exam list whose exam dates are passed till the exam to set.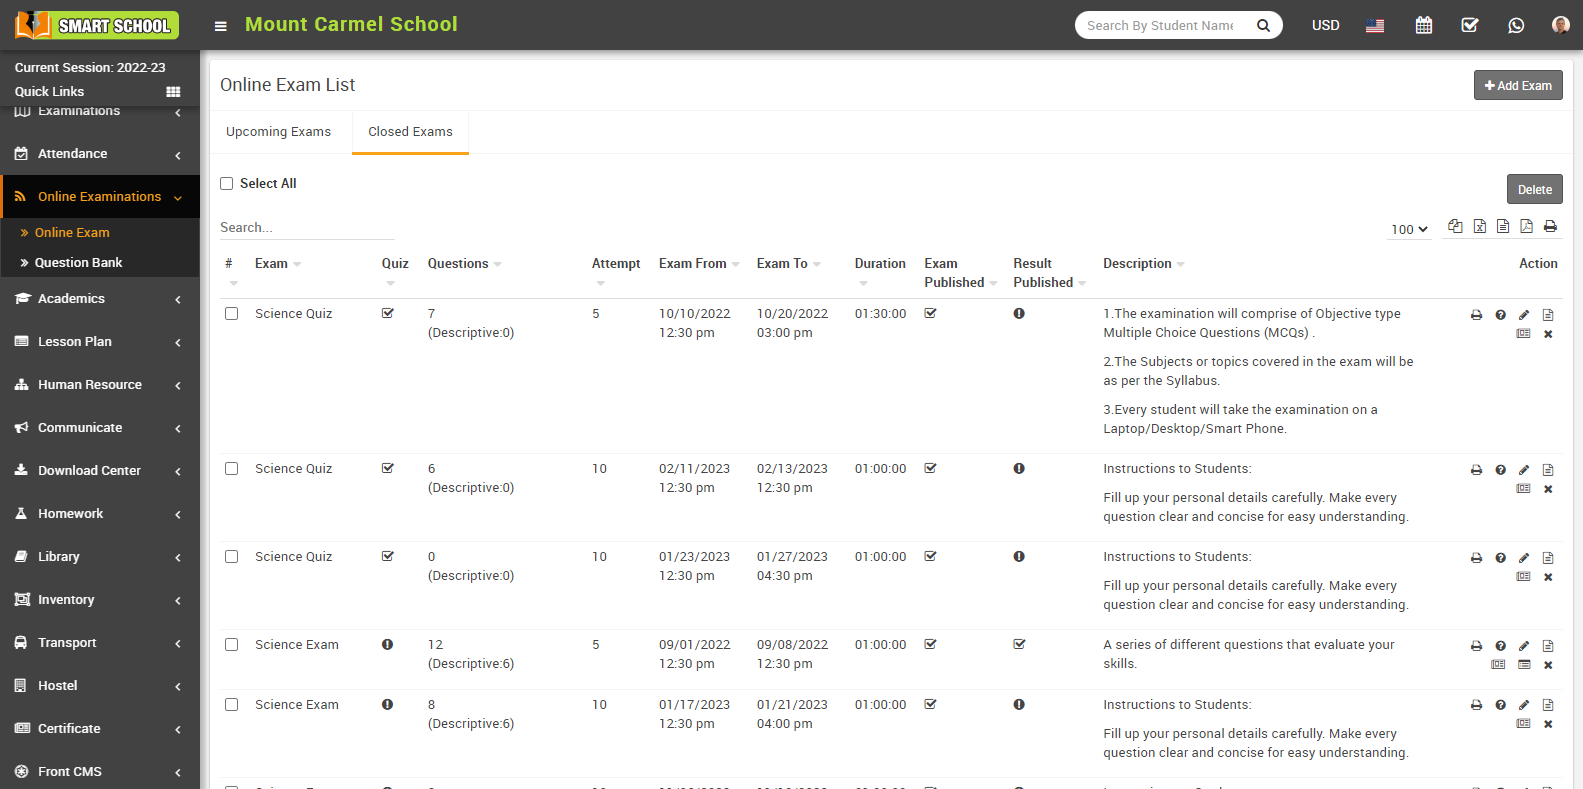
In closed exam if you want to delete the exam from the exam list in bulk, just you need to check the checkbox of “select all” and click on Delete button which is showing in right middle than exam in bulk will be delete successfully.
How to add question on particular exam?
Now select Subject, Class, Section and then click on Search button. After searching, all the questions related to that subject will be visible to you, then select the question you want to add in exam.

To view question list of perticular exam, click on the File-Text icon, this will show you all the question list related to the exam.

Note - If Show me only my question option is Enabled and Teacher Restricted Mode is Disabled then teacher can view only those questions list which is added by him/her and if Teacher Restricted Mode is Enabled and Show me only my question option is Enabled/Disabled then teacher can only add/see questions list of that class in which he/she is a class teacher or subject teacher.
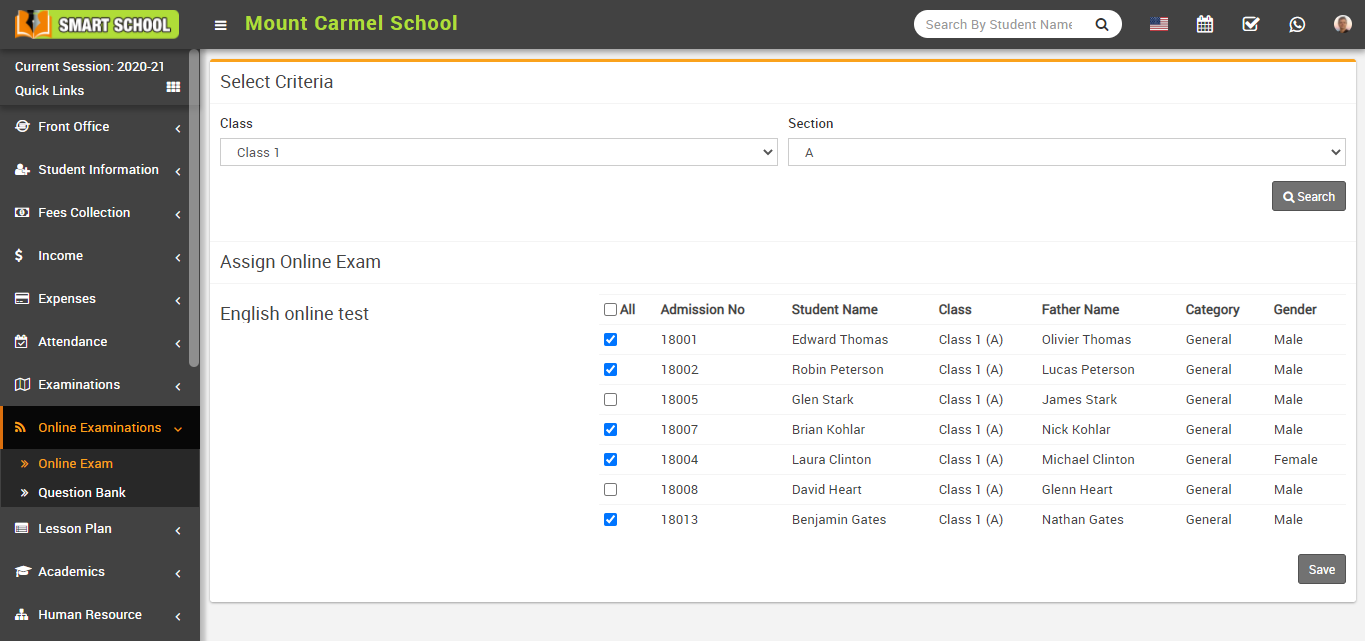
How to assign/view student for Online Exam?
Here select Class and Section and then click on Search button. The list of assign online exam will be shown in this below of the page.
Now select student whom you want to Assign/Unassign the exam and then click on the Save button.
How to Evaluate Descriptive type Question?
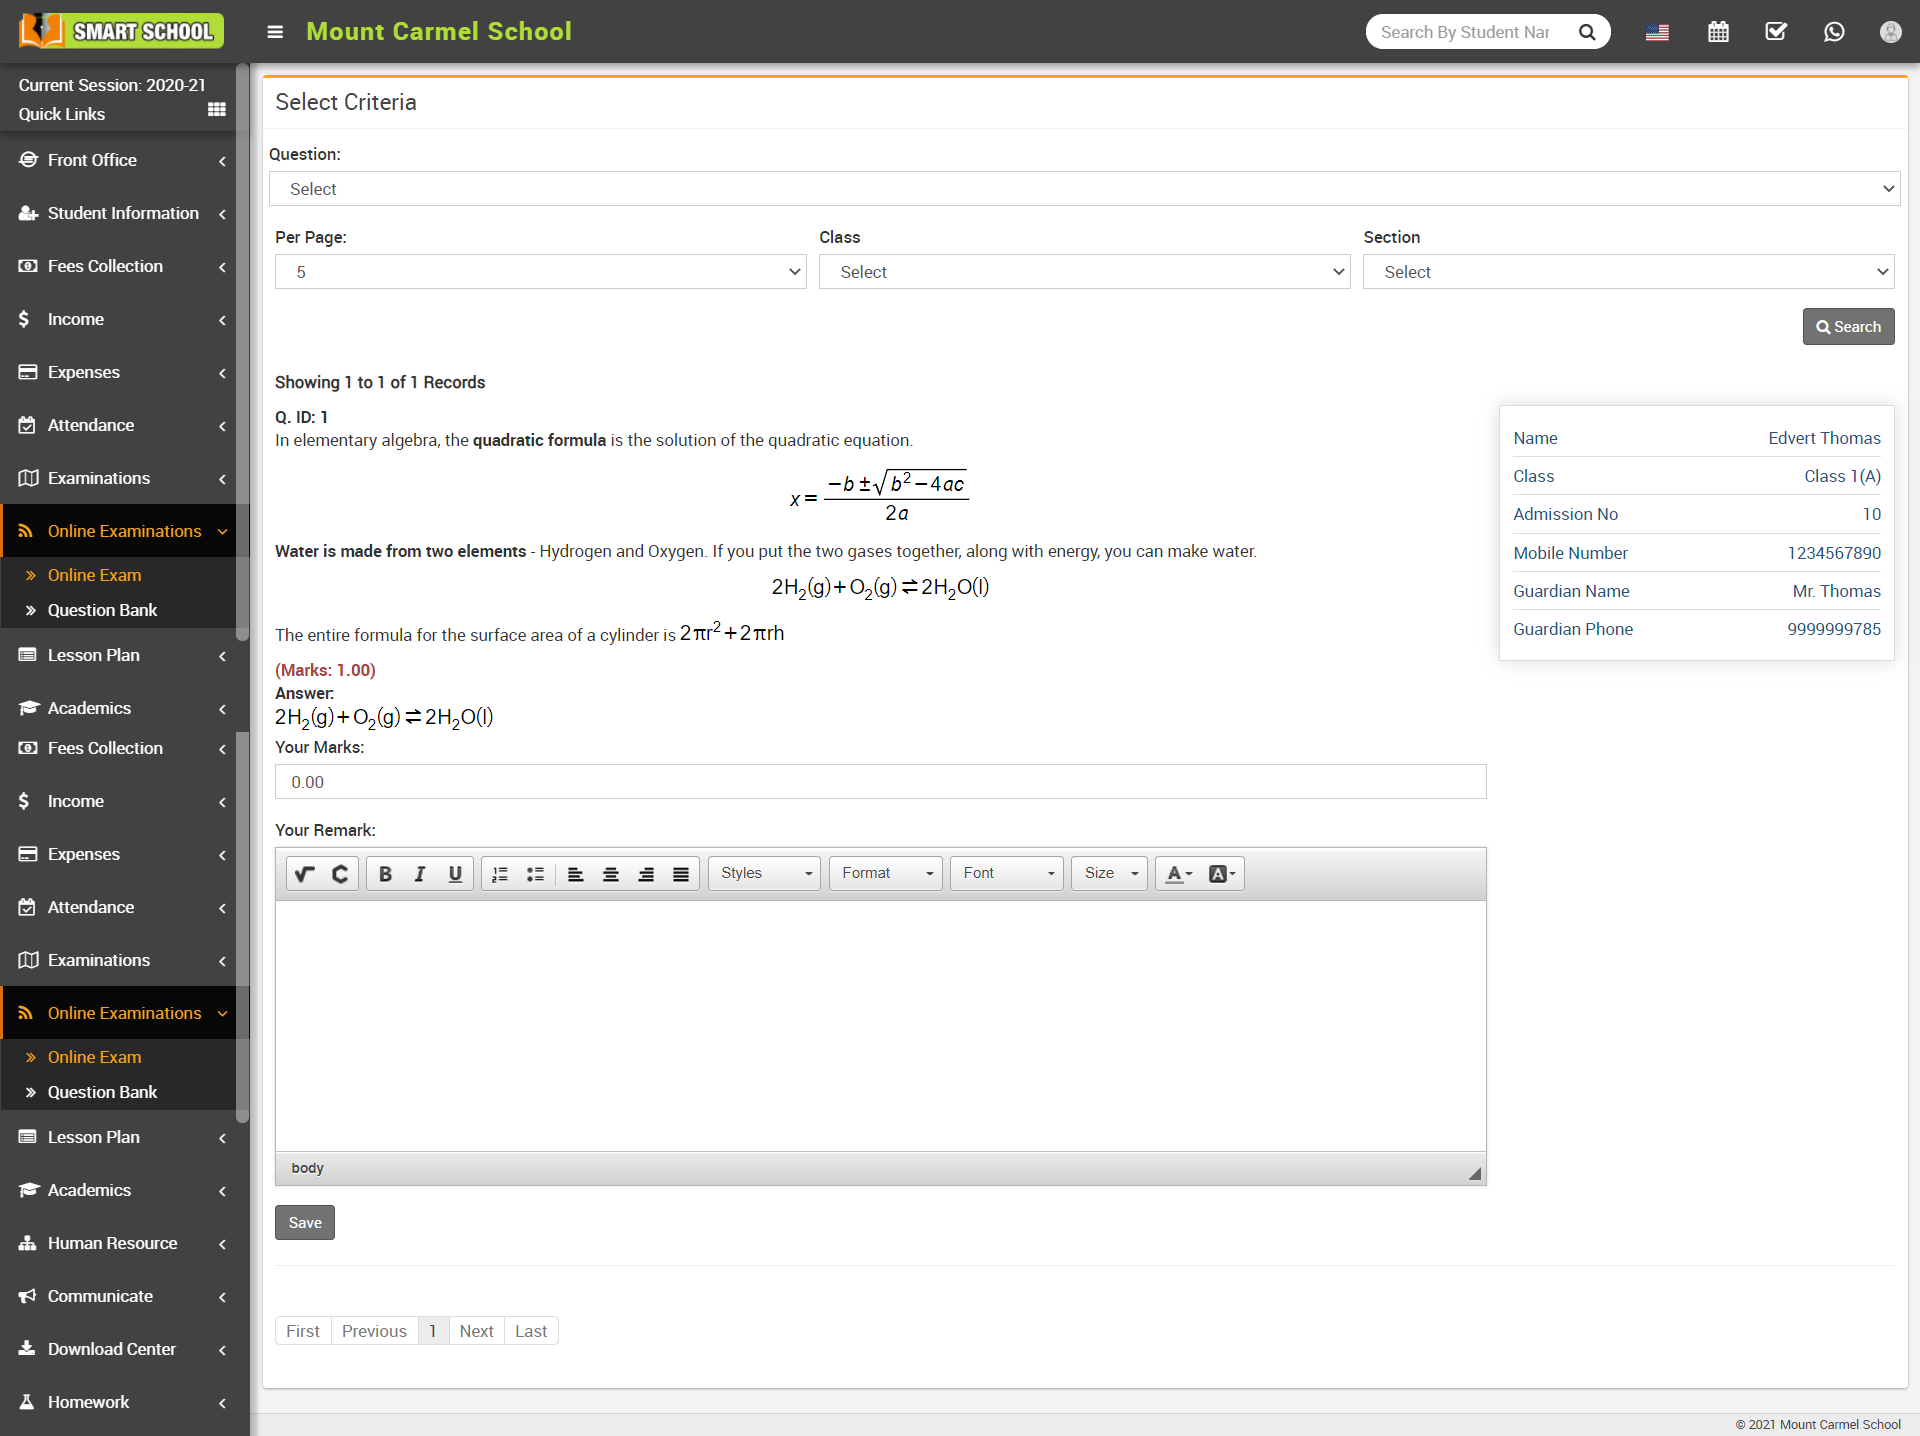
Note - Evaluate Exam icon will show only in Descrptive type questions.
How to generate student's exam rank?
Once you click on the Generate Rank button, rank will be generated for all the student.
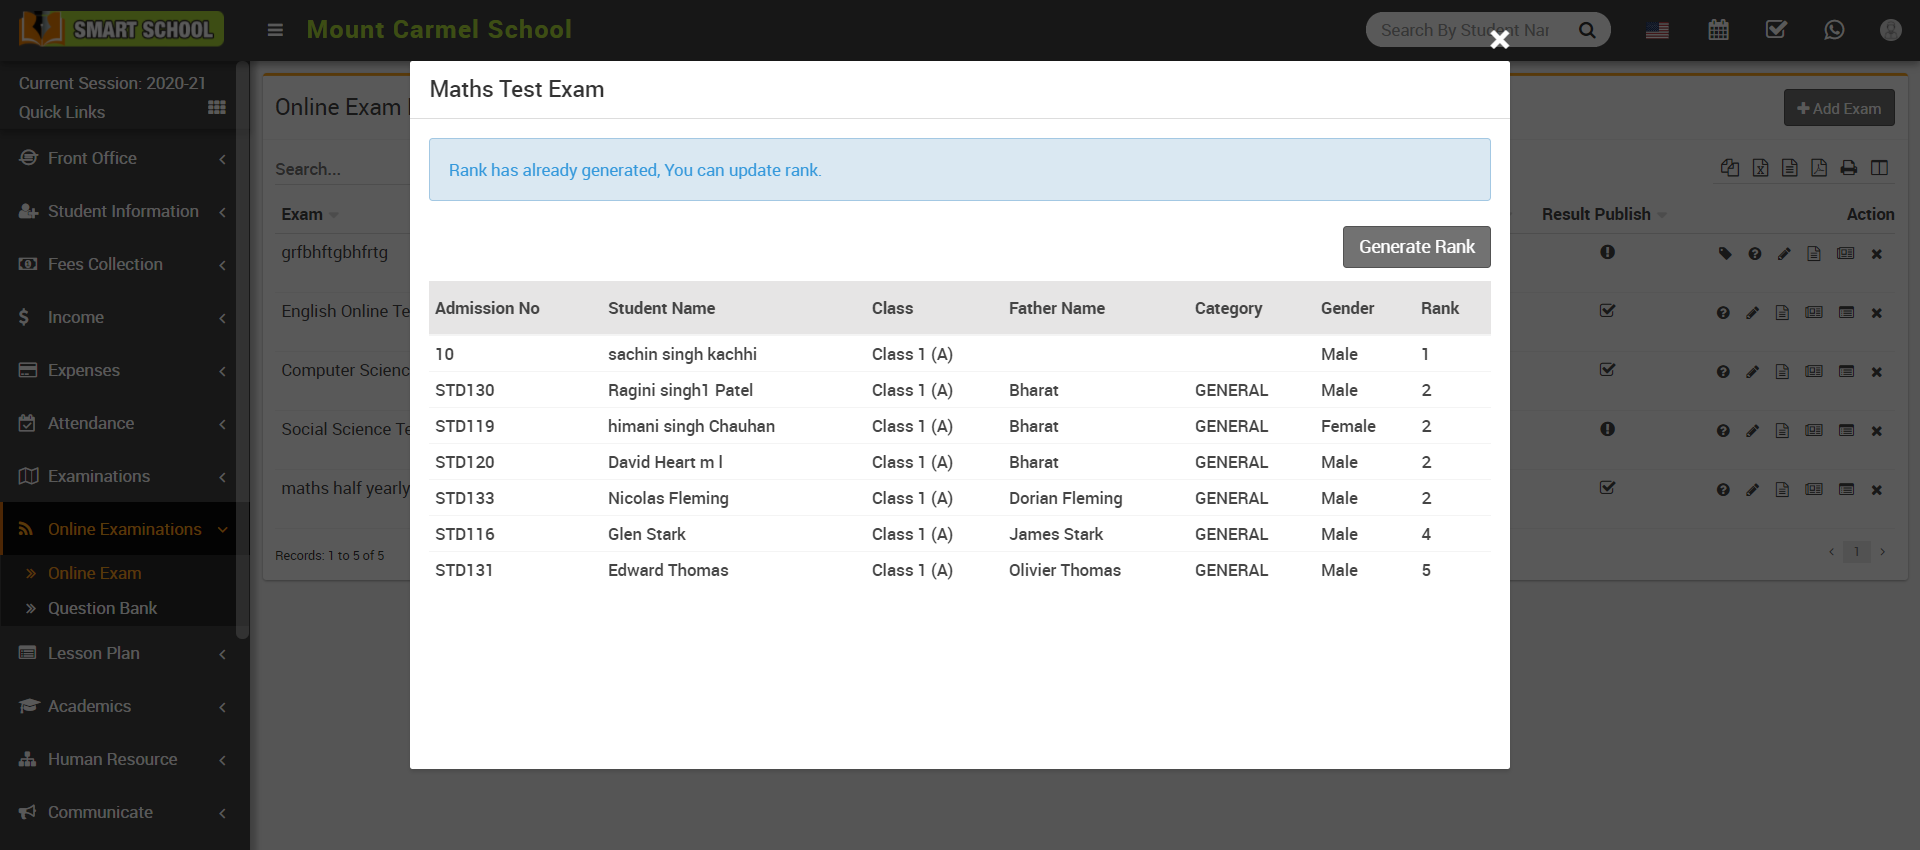
Note - If two or more students have same number then their rank will also be same.
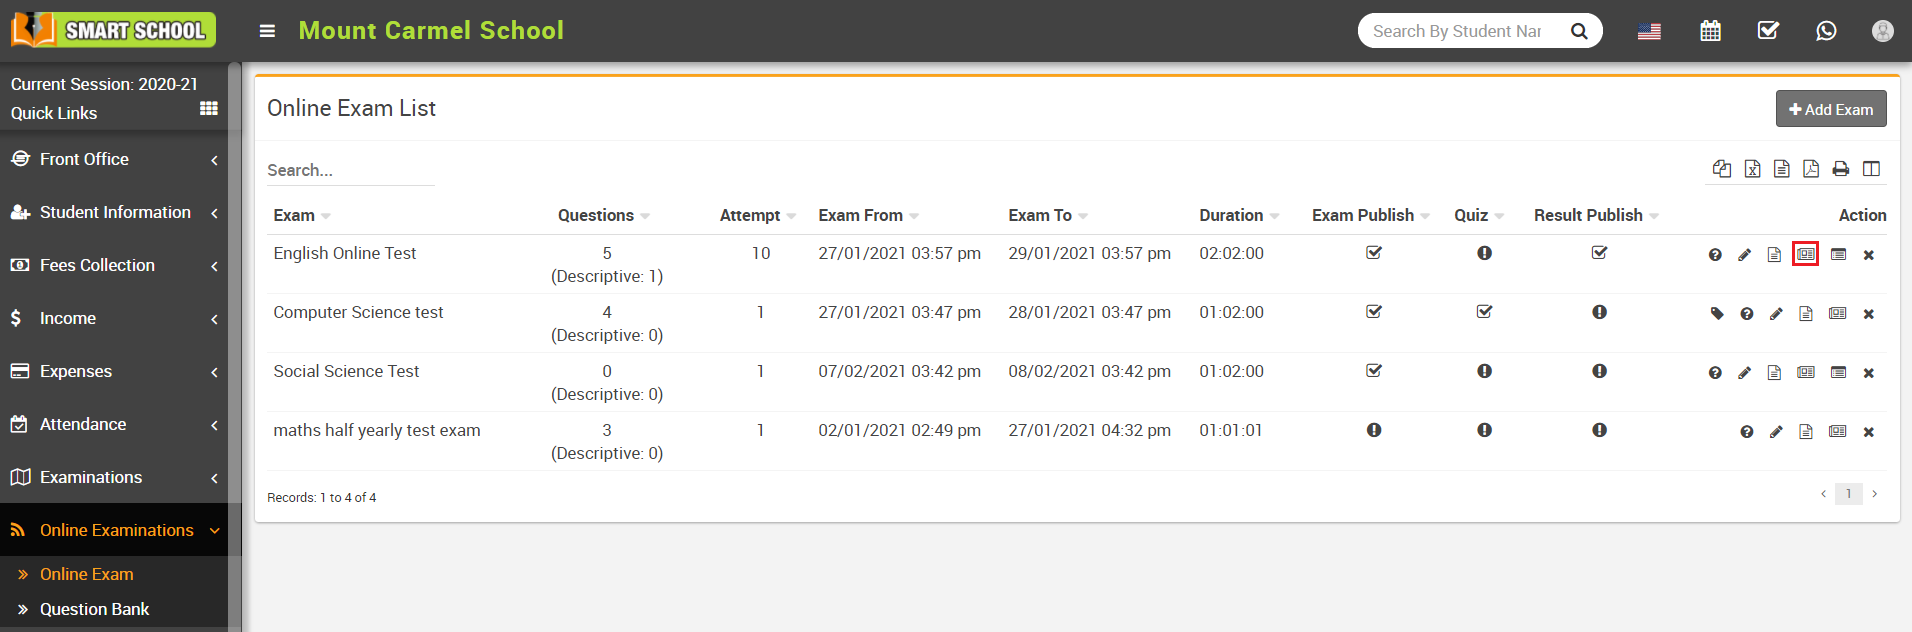
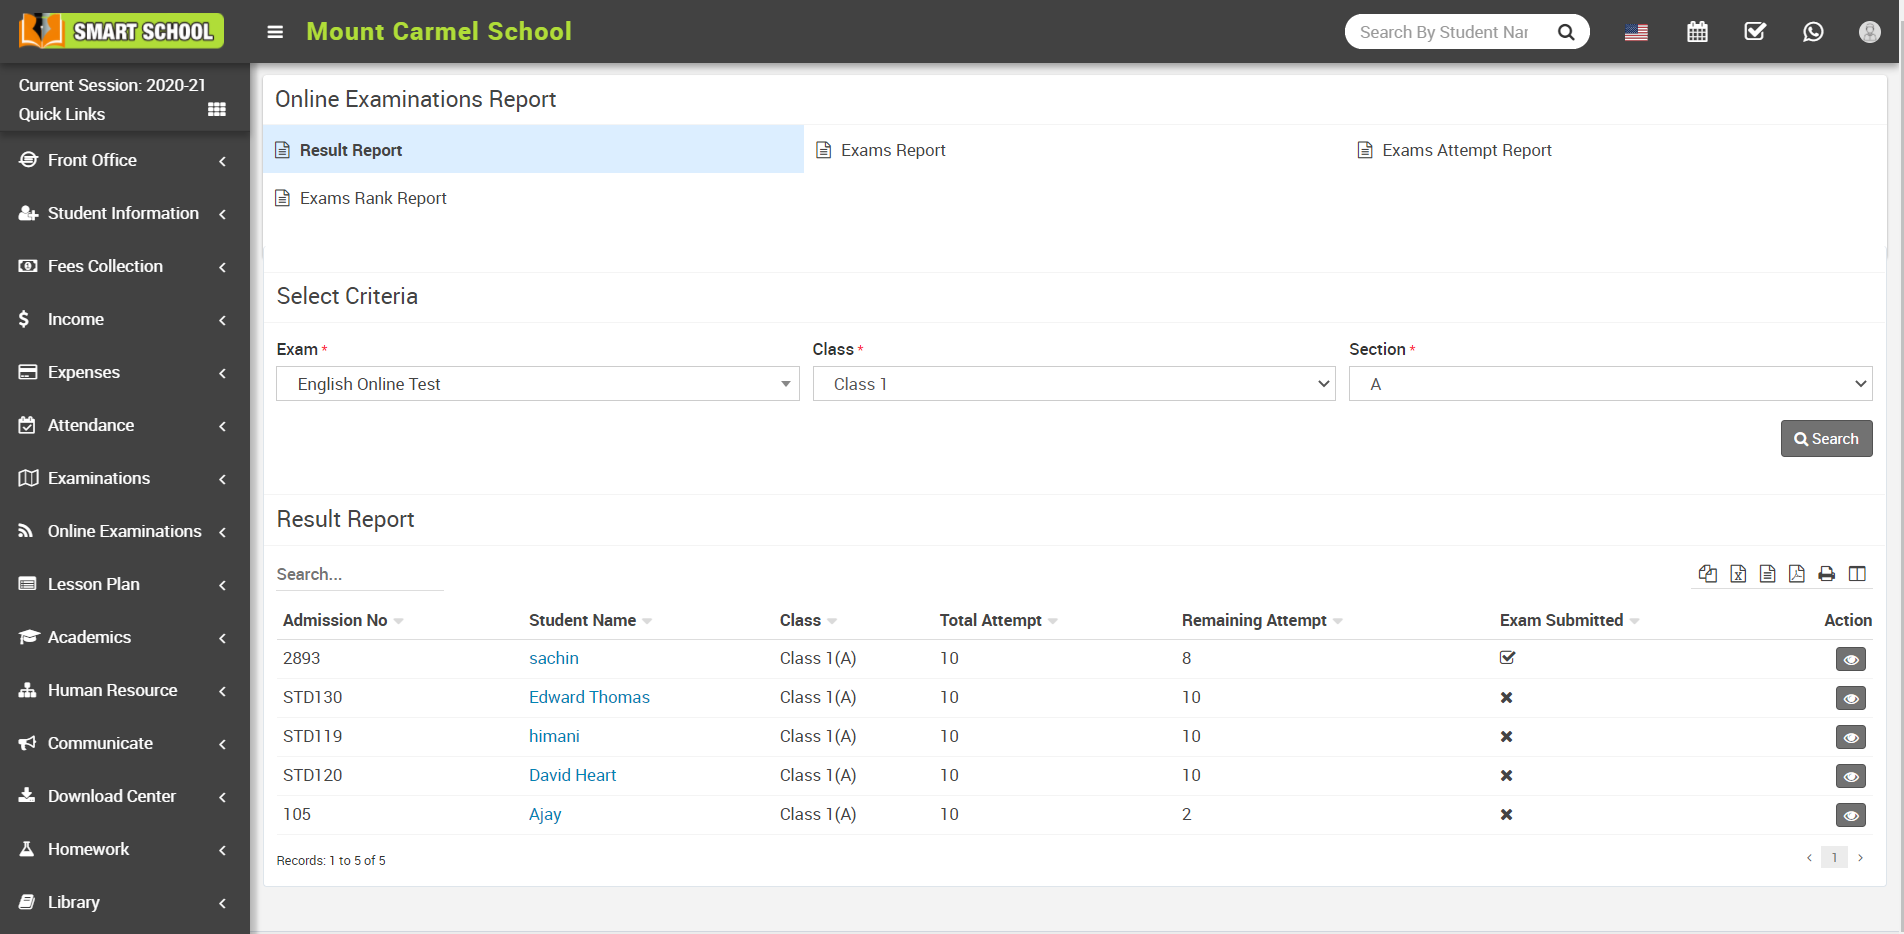
How to check Online Exam Result Report?
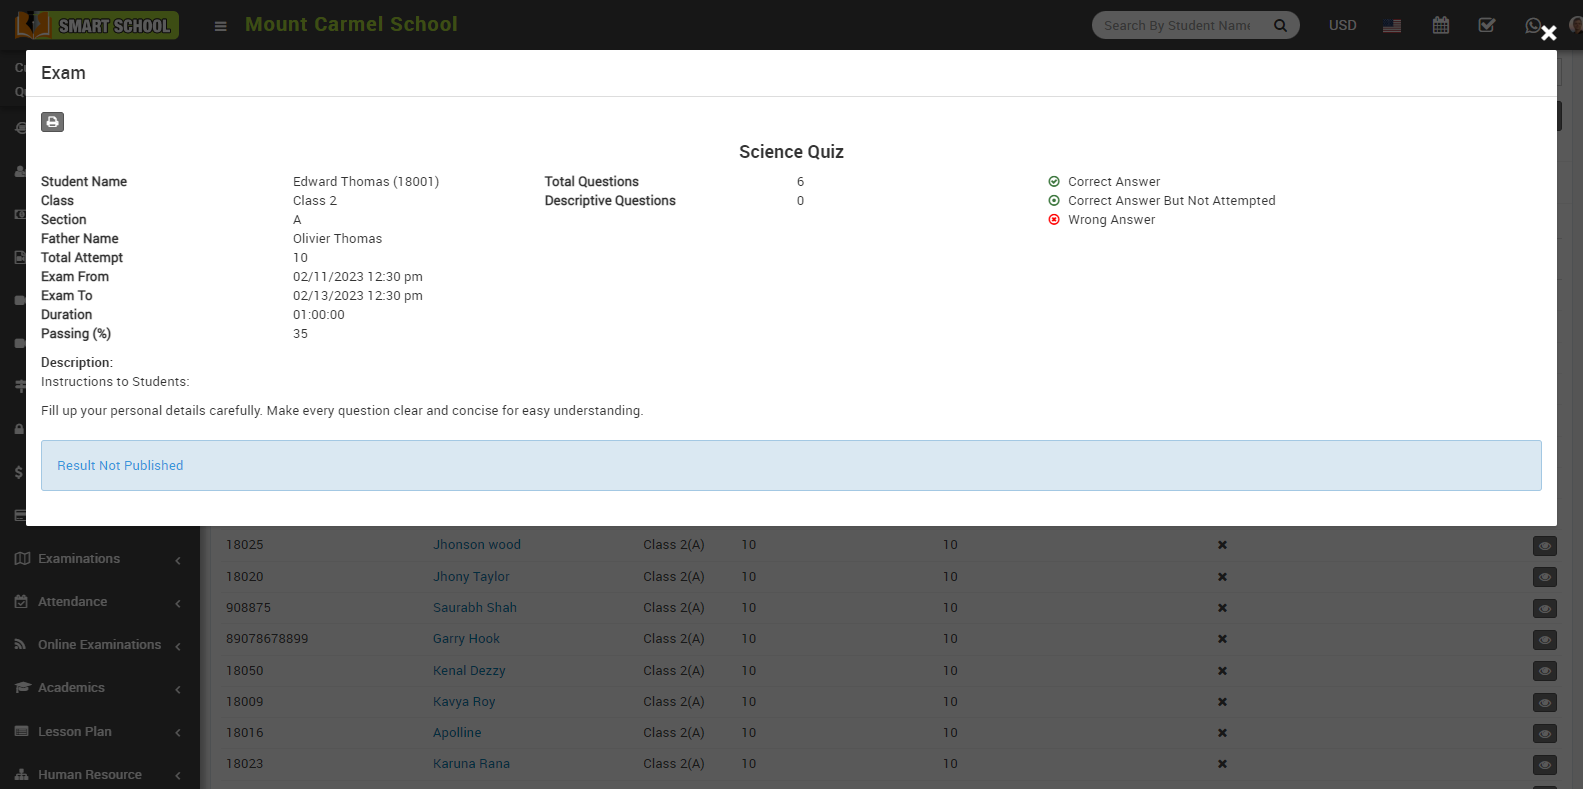
To view exam click on View icon present at Action column in the online exam report, at click of this icon Exam modal will be open.
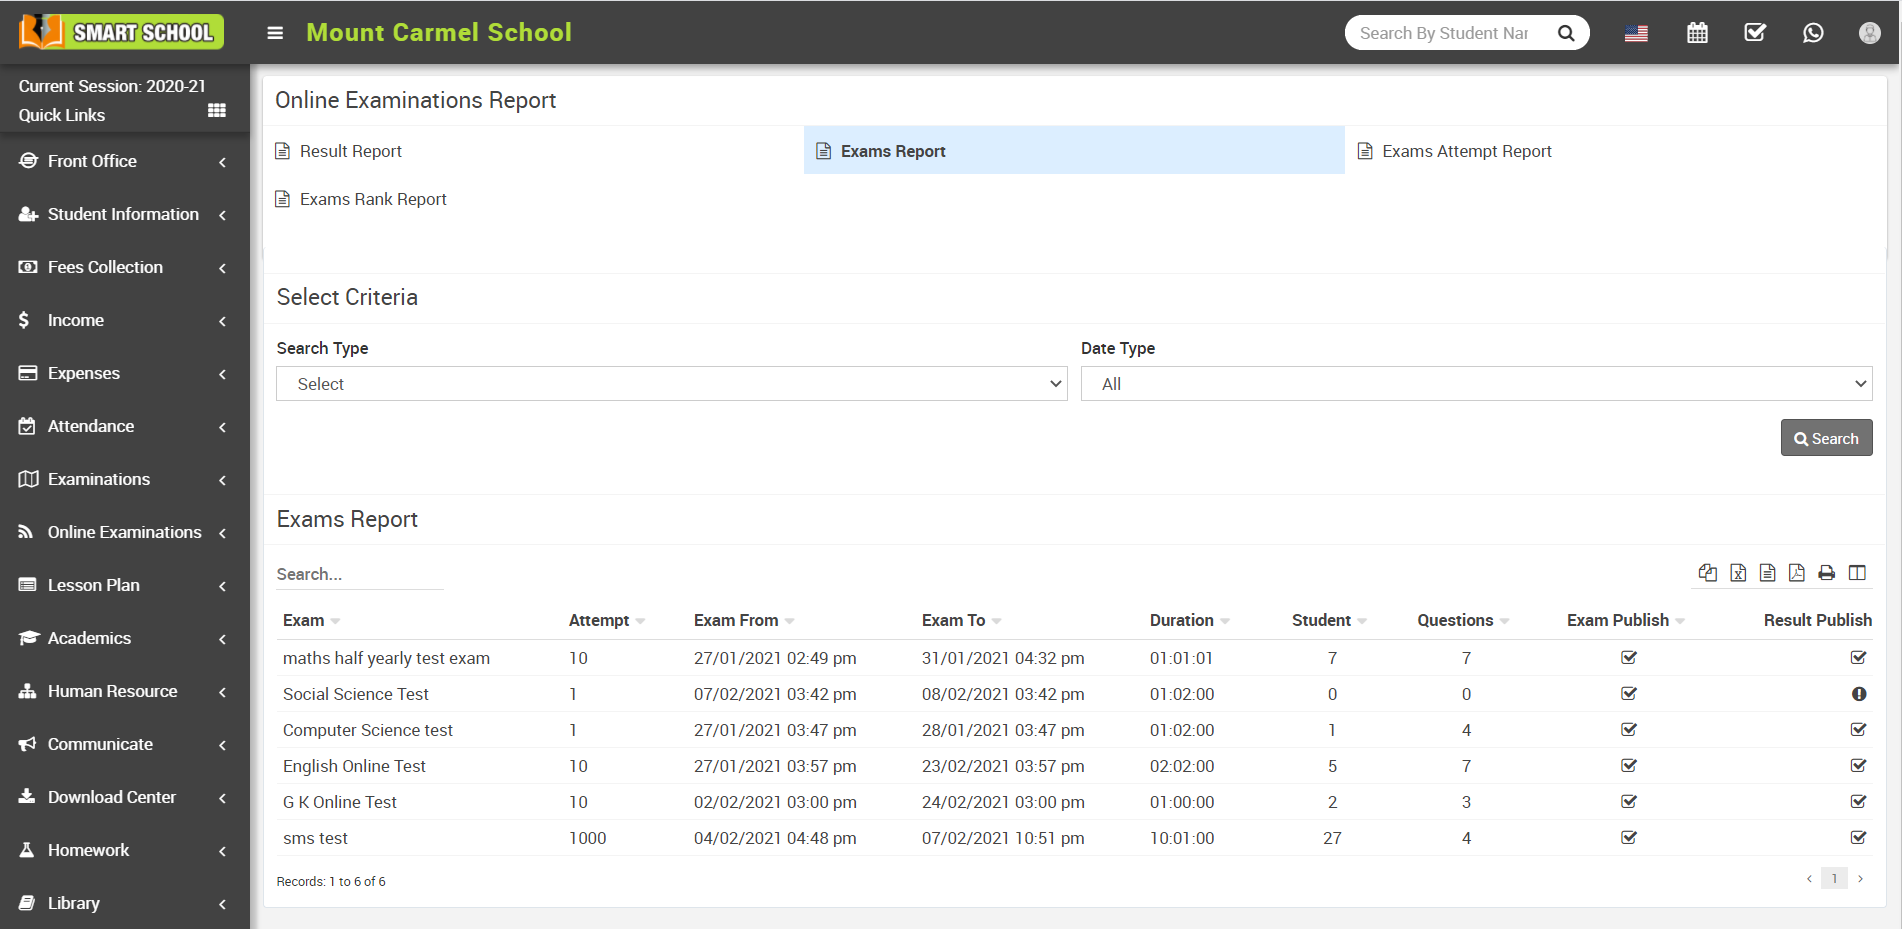
Exam information such as Exam Name, Student Name, Class, Section, Father Name, Total Attempt And Exam From, Exam To, Duration, Passing Percentage, Total Question, Correct Answer, Wrong Answer, Not Attempted, Score Percentage, Question and Answer, and so on are available here. You can also print all the details by clicking on the print icon button shown at the top of the modal.
How to check Online Exams Report?
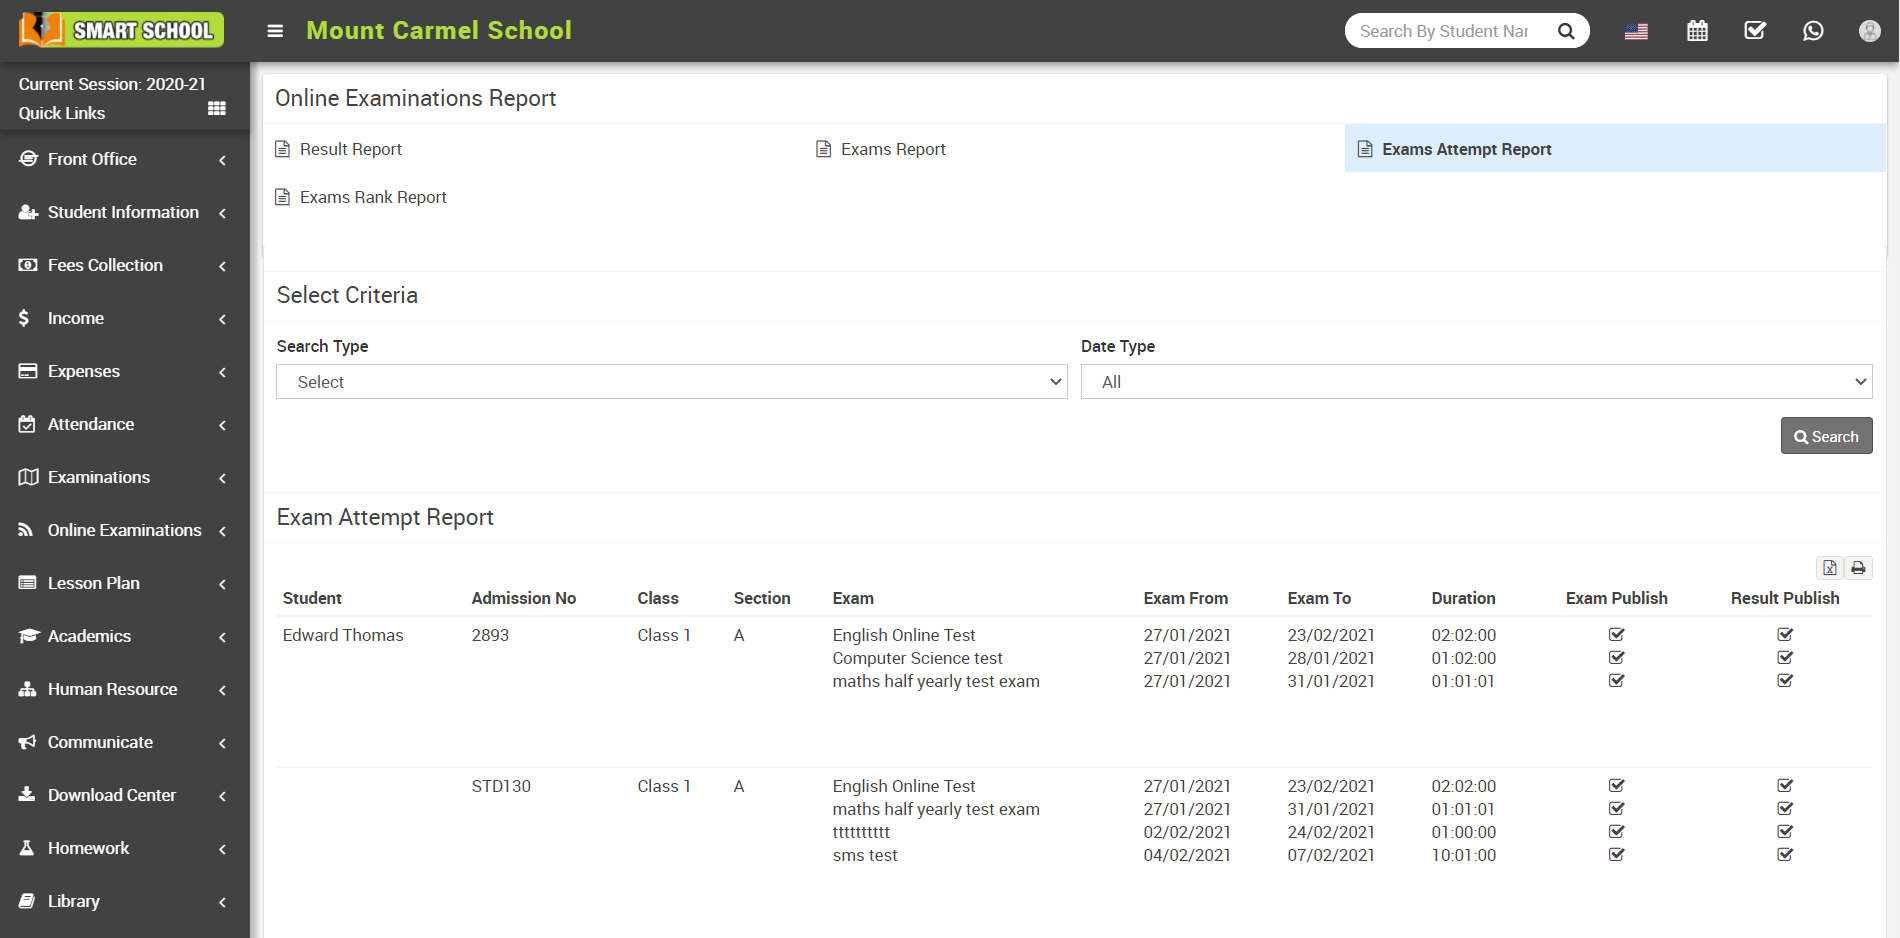
How to check Online Exams Attempt Report?
How to check Online Exam Rank Report?
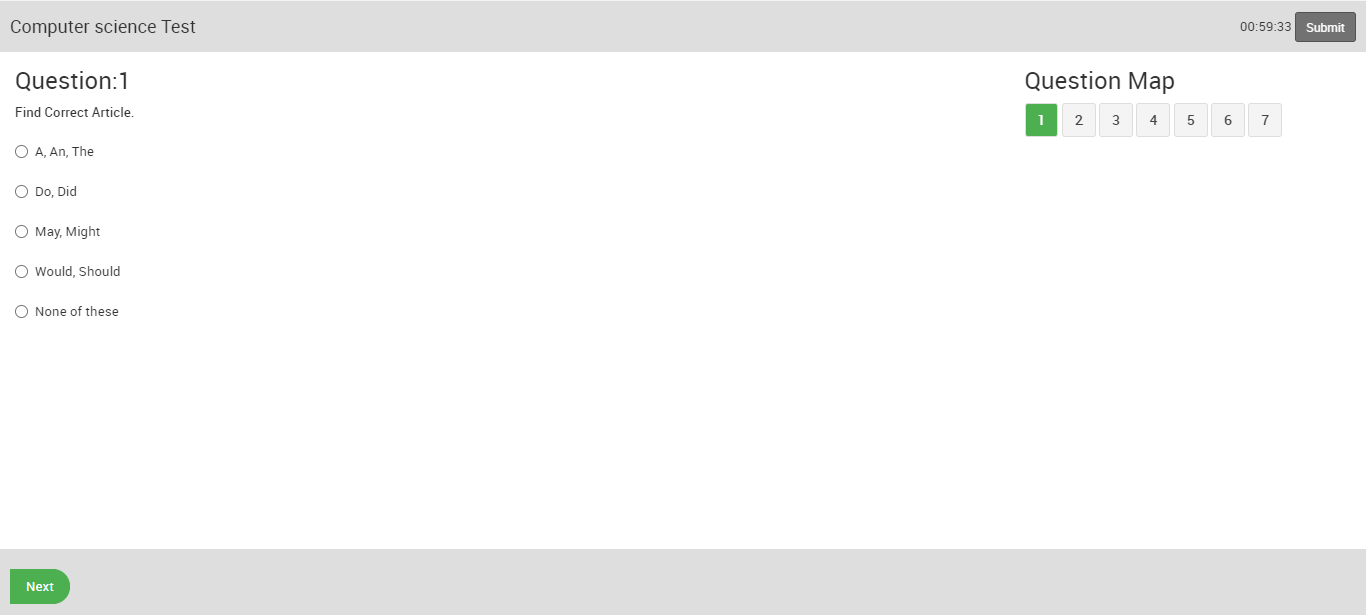
How can student attempt online exam?
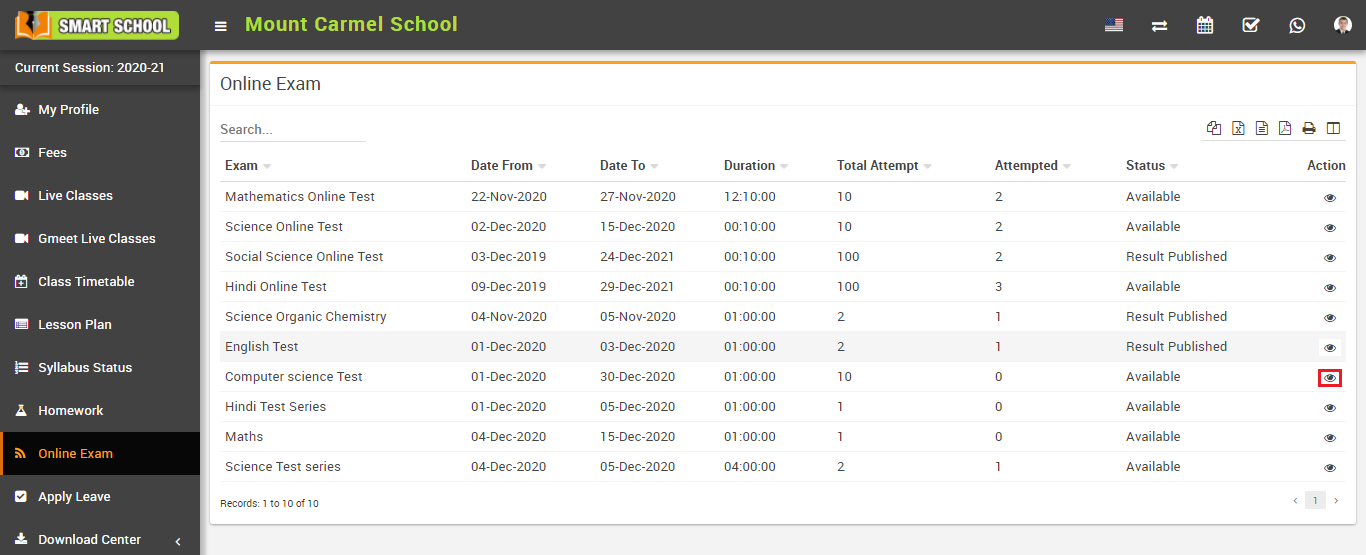
To view exam click on View icon present at Action column in the online exam page, at click of this icon online exam page will be open. Here you can see exam details like Exam Name, Total Attempt, and Exam From, Exam To, Duration, Passing and Total Questions.
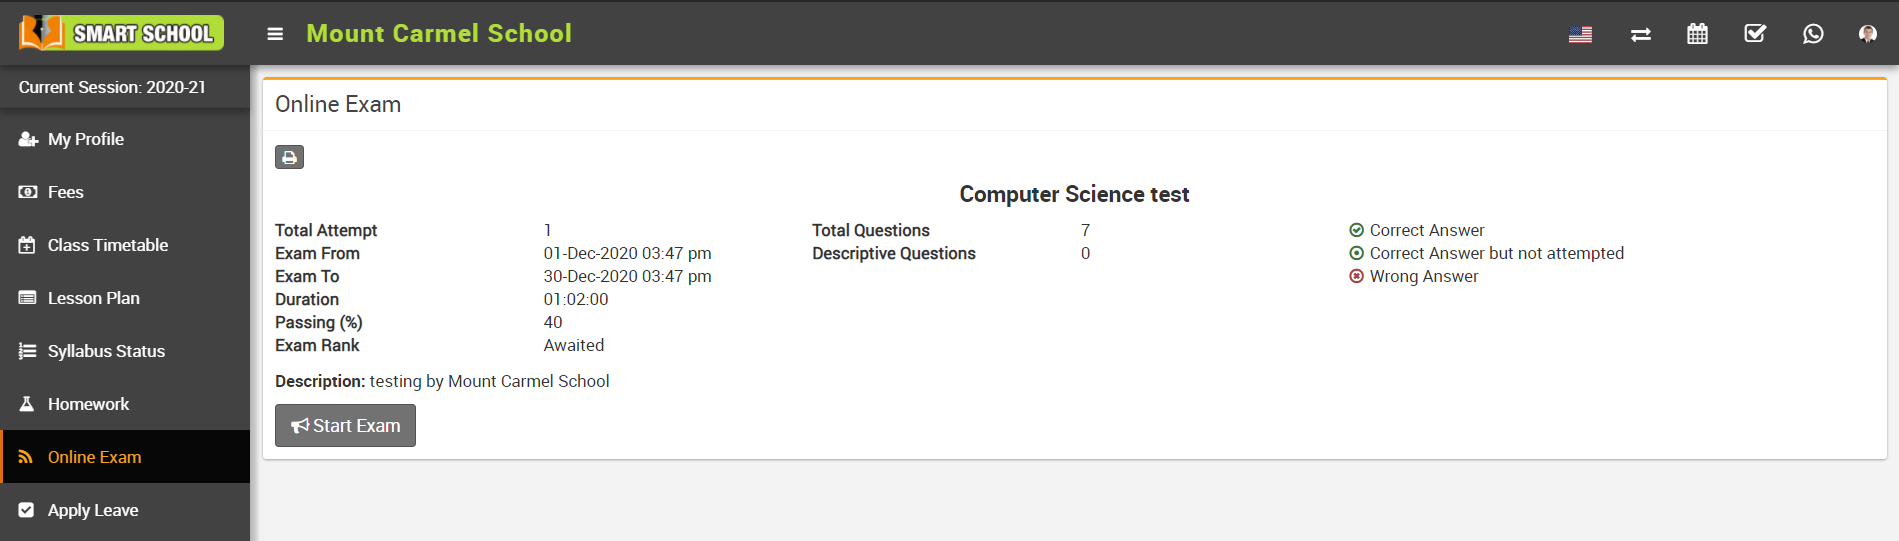
To start exam click on Start Exam button present at online exam page, at click of this button Exam page will be open. After solving all the questions, student can submit exam by clicking on Submit button.