About Fees Collection
Fees collection module workflow:- First we will configure the Fees Type, Fees Group, Fees Master and Fees Reminder and prepare our fees structure for the current session and then we will collect fees of the students then we will search fees payment and search due fees and check all reports and Students can also look for details of fees and can pay fees.
We will create fees structure in smart school by using, Fees Type (under fees type we collect different types of fees by the school like Admission Fees, Months wise Fees, Uniform Fees, Exam fees, Library Fees, Sports Fees, Transport Fees etc.). Fees Group (we use fee groups to create different types of groups.) You can then allocate / allocate this fee group to the entire class-section or a particular student. You can create a fee group as an instalment.

How to add Fees Type?
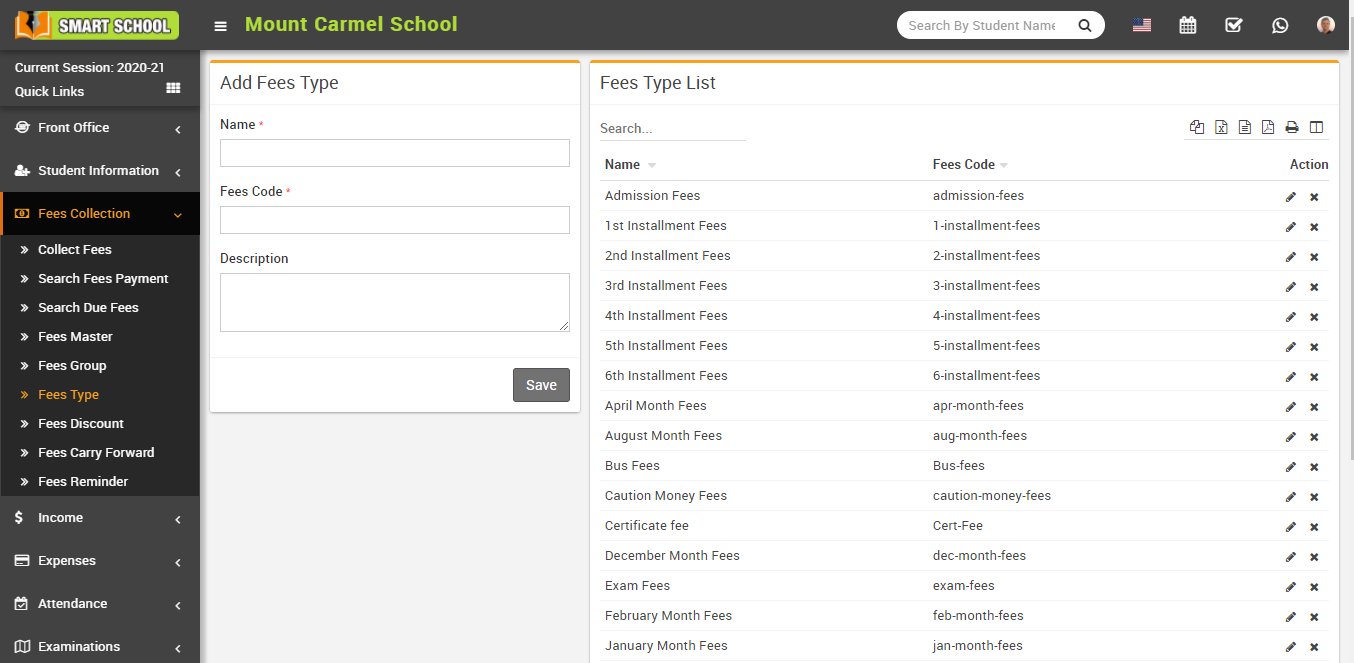
To edit fees type click on Edit icon and to delete fees type click on Delete icon present in the fees type list.
How to add Fees Group?
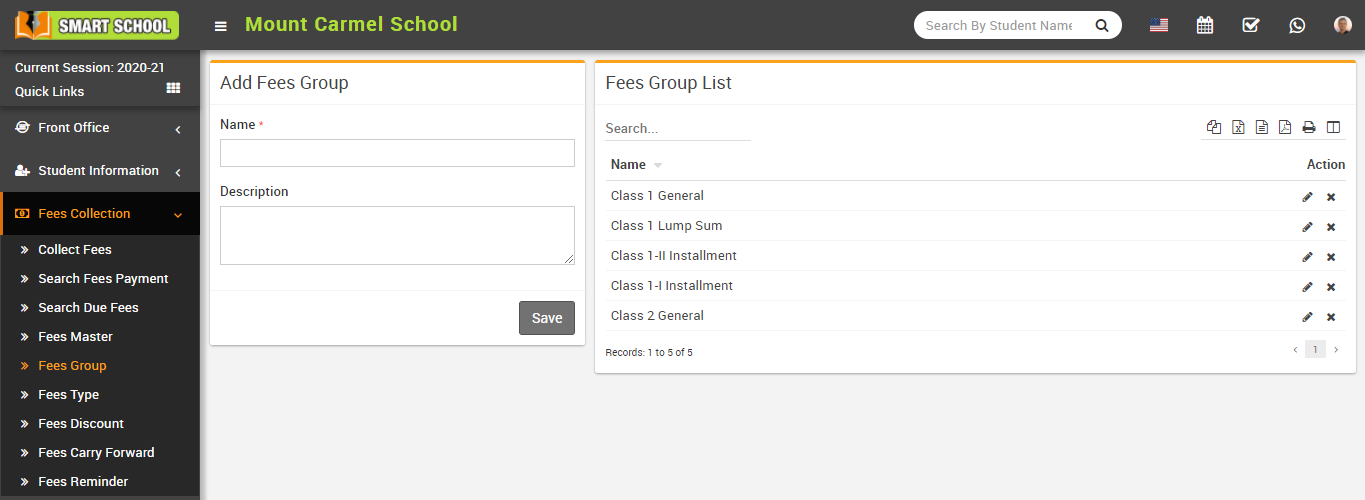
To edit fees group click on Edit icon and to delete fees group click on Delete icon present in the fees group list.
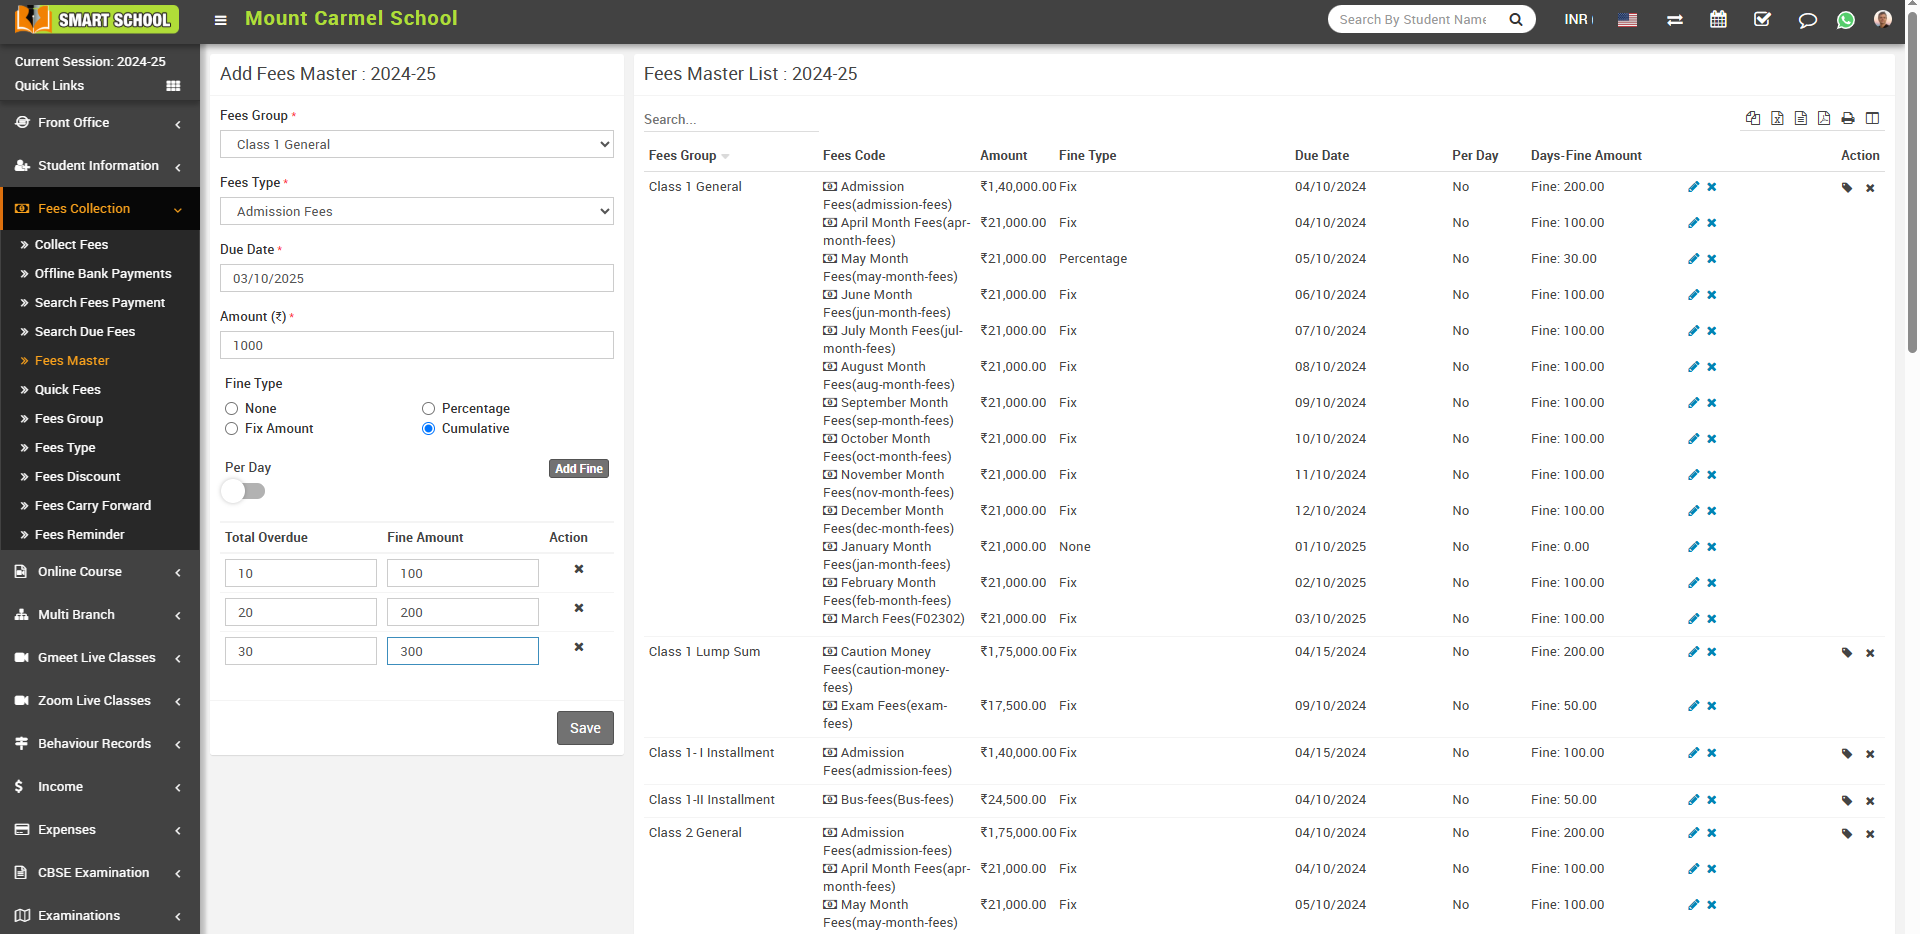
How to add Fees Master?
To add fees master, go to Fees Collection > Fees Master (In fees master, we select fees type and fees group and after that we assign students for fees group.) then select Fees Group, Fees Type and Due Date then enter Amount (fees amount for selected session), Fine Type (None, Percentage, Fixed Amount, or Cumulative). Finally, click the Save button. You can view the added record in the Fees Master list on the right side of the page
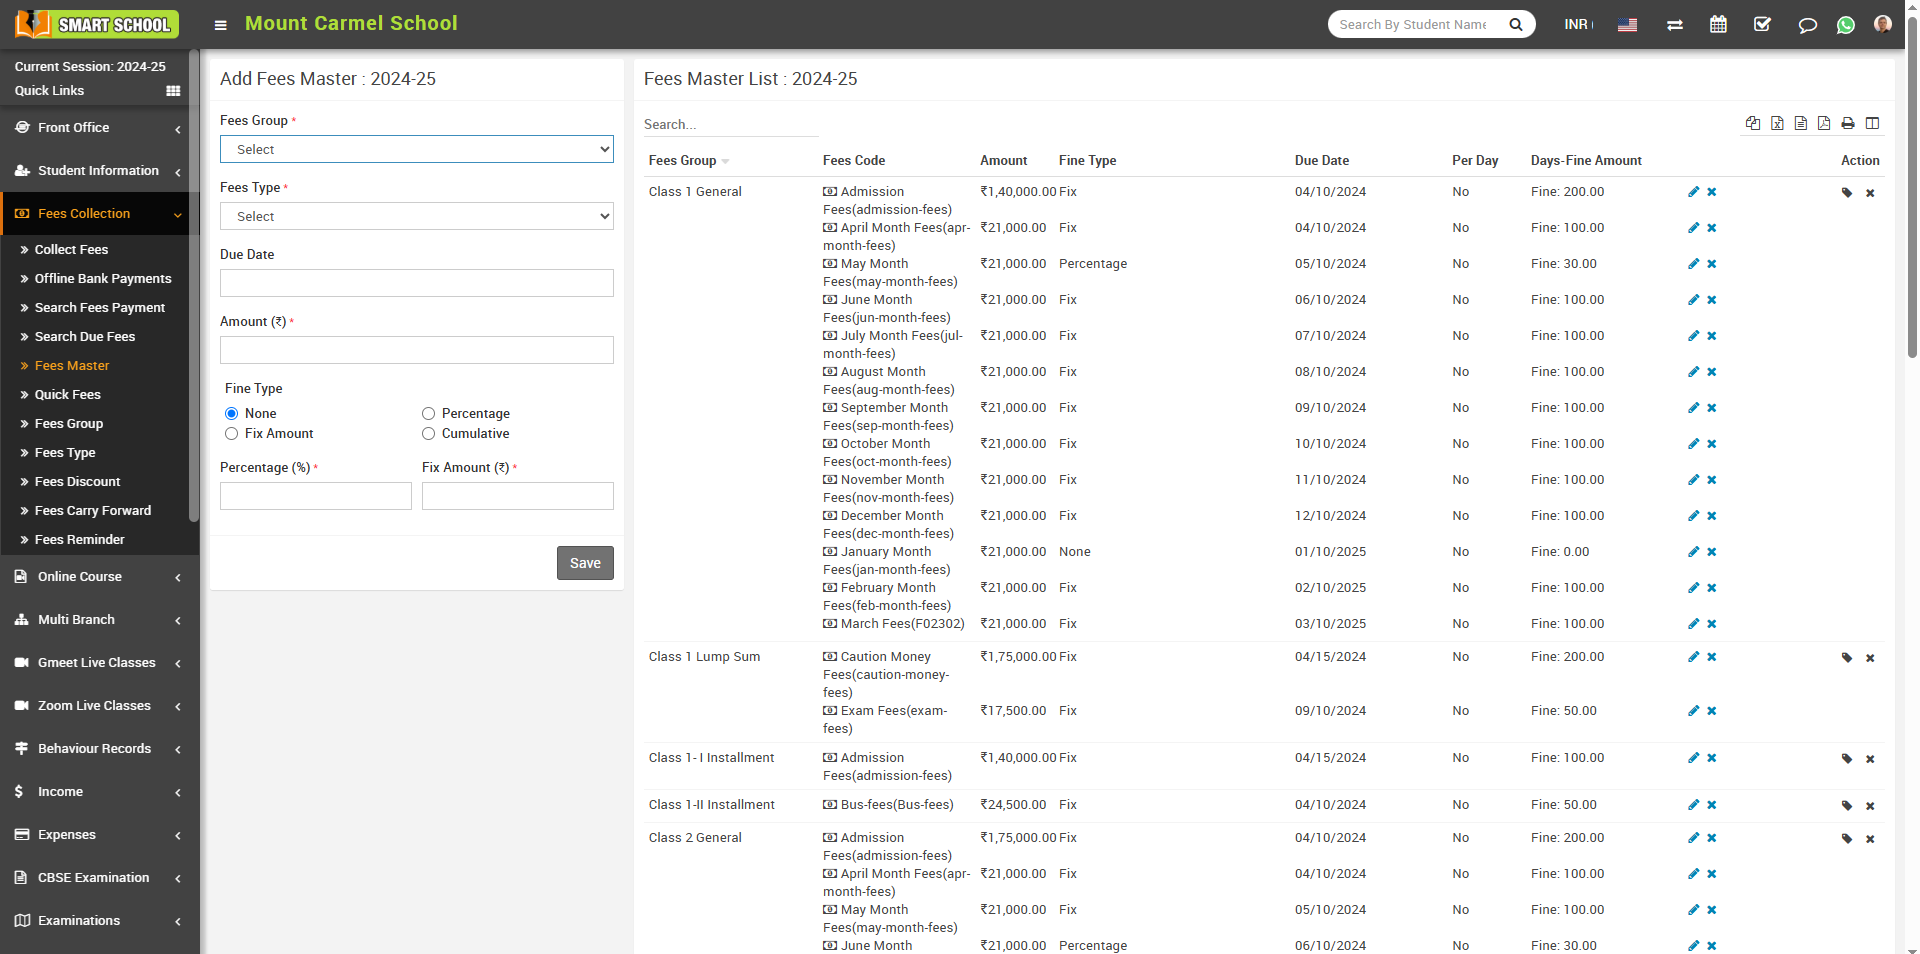
If the Cumulative option is selected, you can see the addition fields such us per day, add fine, Total Over Due, Total Amount will be option in below.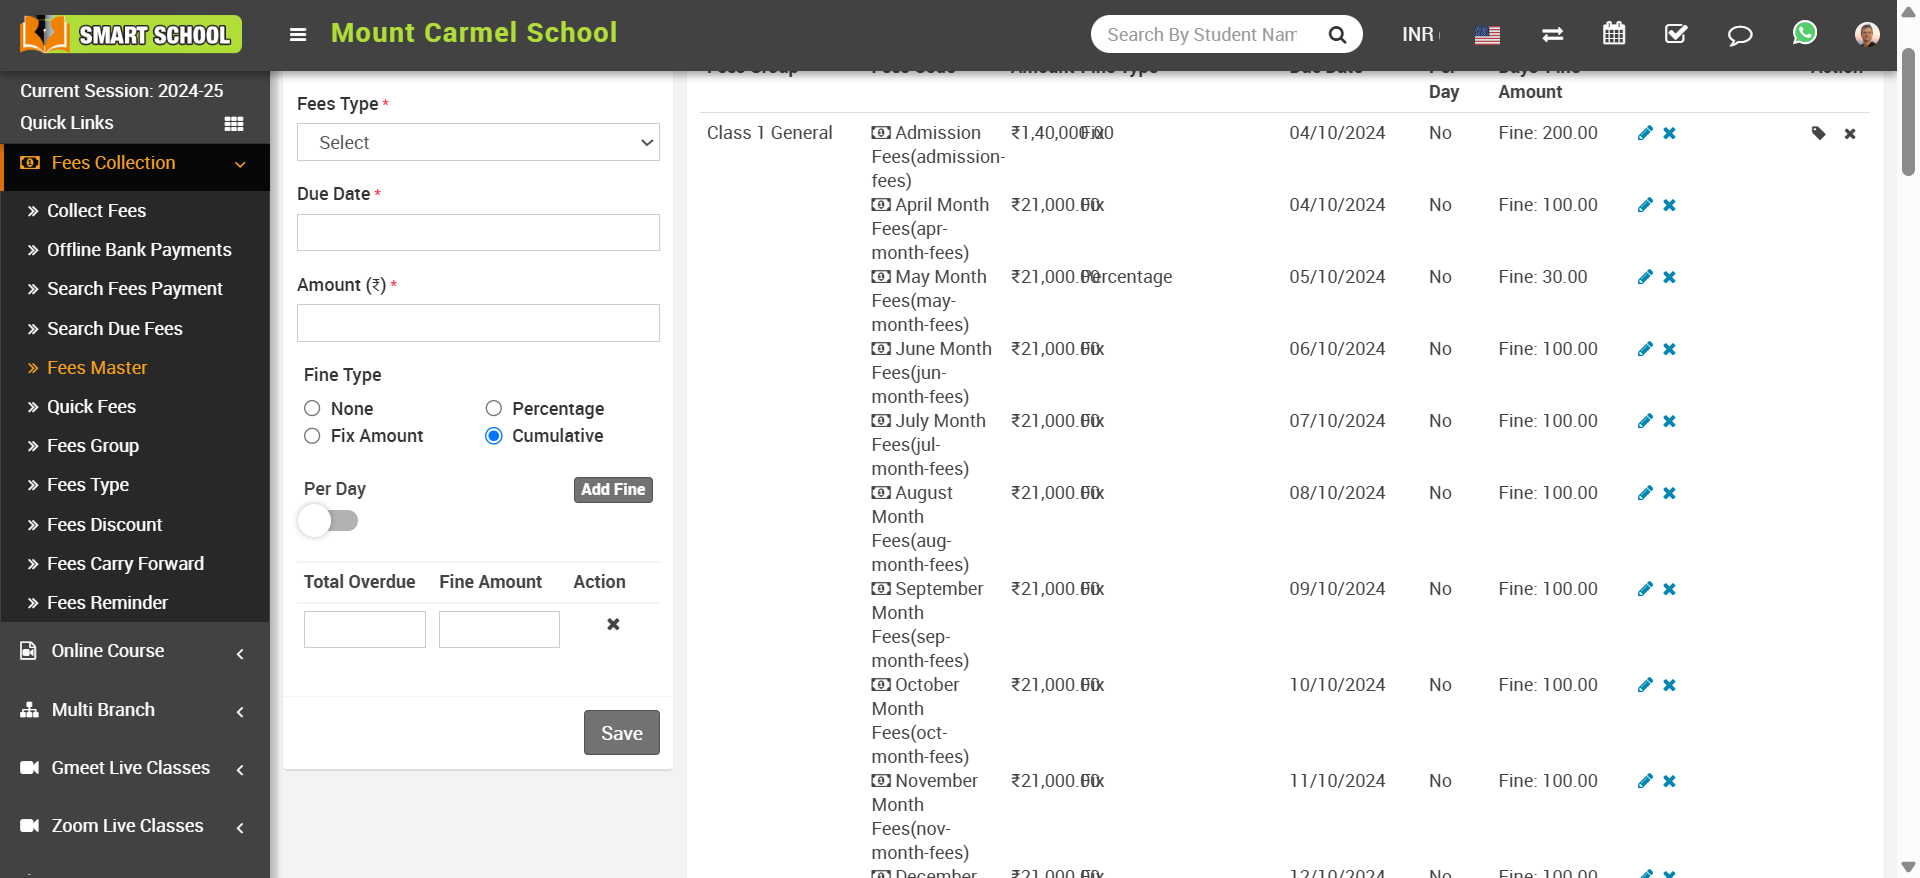
Here's a more detailed example to illustrate how fines work in both Per Day Enabled and Per Day Disabled modes.
Scenario: A charges fines for overdue fees based on the number of days a fees is late. The system allows two configurations:
- Per Day Disabled – Fine is charged in slabs, but not per day.
- Per Day Enabled – Fine is charged daily.
Case 1: Fine Calculation (Per Day Disabled)
When the per-day fine is disabled, enter 10 in the 'Total Overdue' input field and 100 in the 'Fine Amount' input field. As shown in the screenshot below, if the due date (03/10/2025) has passed, a charge of 100 will be applied 10 days after the due date.
If you add the next slab, enter 20 in the 'Total Overdue' input field and 200 in the 'Fine Amount' input field. A charge of 200 will be applied 20 days after the due date.
Similarly, if you add another slab and enter 30 in the 'Total Overdue' input field and 300 in the 'Fine Amount' input field, a charge of 300 will be applied 30 days after the due date. If no further fine slabs are added, the fine will remain 300 onwards.
Case 2: Fine Calculation (Per Day Enabled)
When the per-day fine is enabled, enter 10 in the 'Total Overdue' input field and 100 in the 'Fine Amount' input field. As shown in the screenshot below, if the due date (03/10/2025) has passed, a daily fine of 100 will be charged from the 21st day onwards.
If you add the next fine slab by entering 20 in the 'Total Overdue' input field and 200 in the 'Fine Amount' input field, a daily fine of 200 will be charged from the 21st day onwards.
Similarly, if you add another fine slab by entering 30 in the 'Total Overdue' input field and 300 in the 'Fine Amount' input field, a daily fine of 300 will be charged from the 31st day onwards.
If no further fine slabs are added, the fine of 300 per day will continue from the 31st day.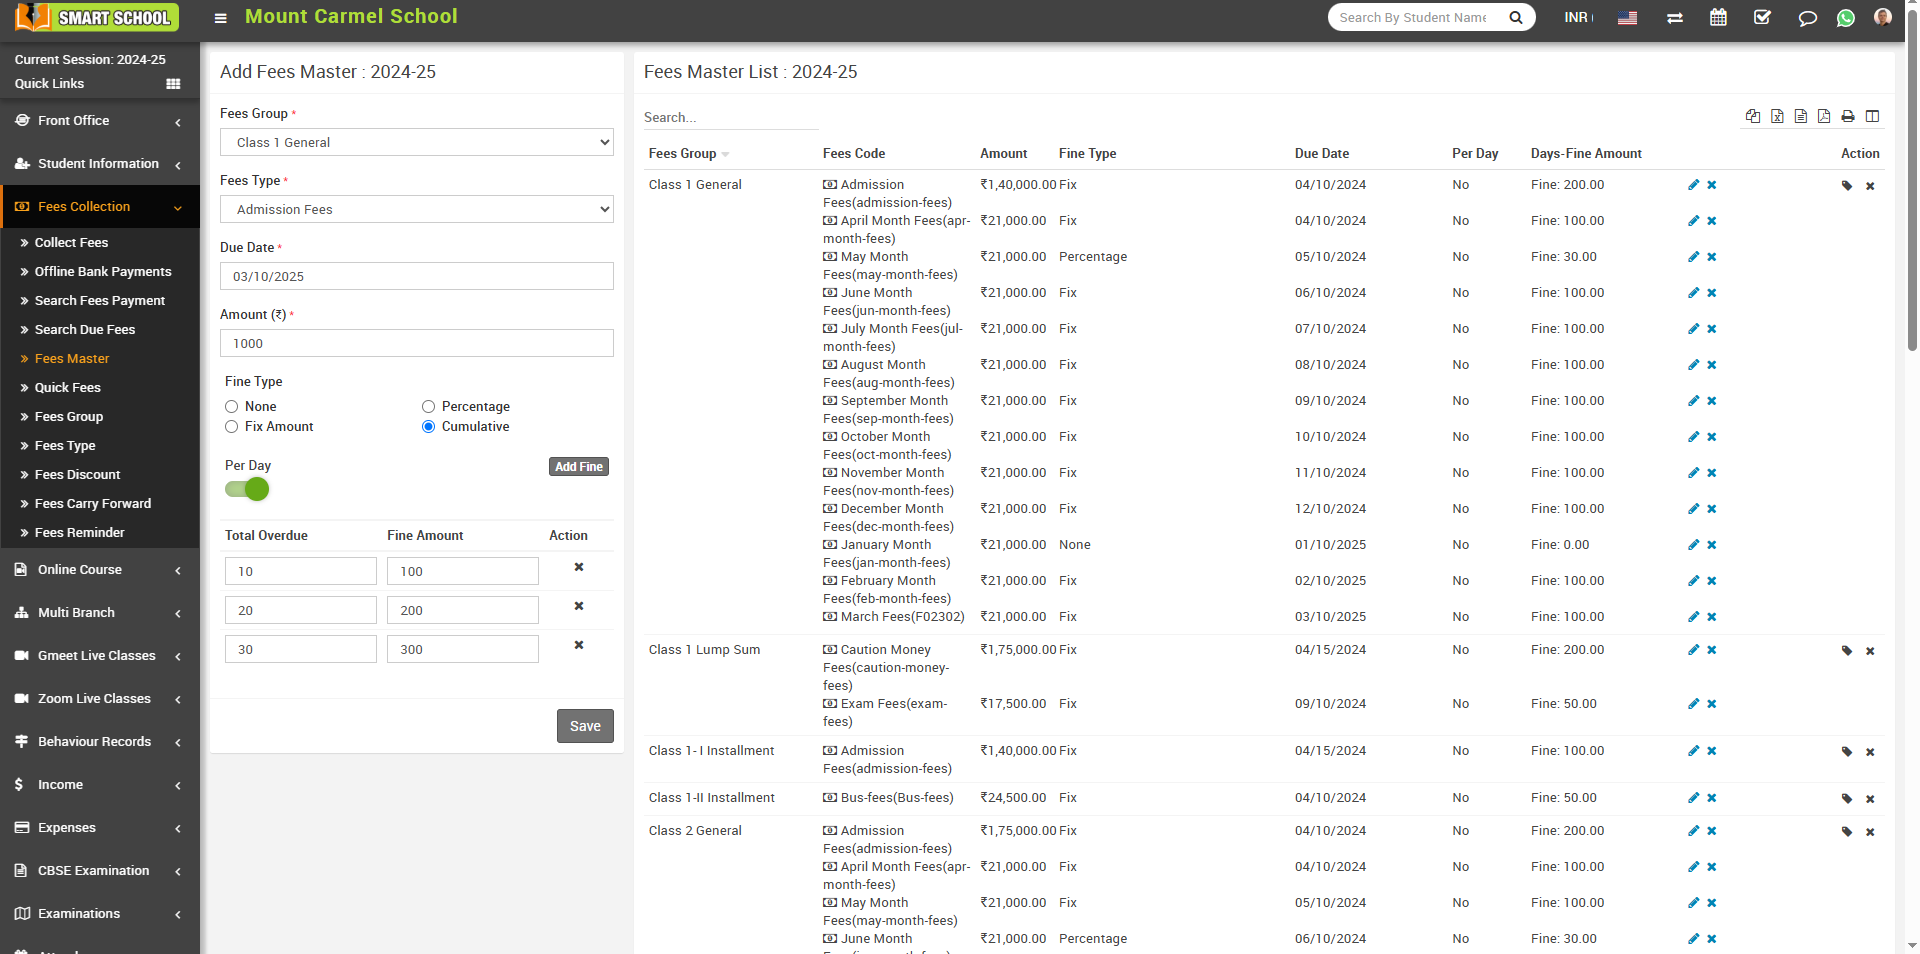
To edit fees code click on Edit icon and to delete fees code click on Delete icon present at Fees Code column in fees master list.
To assign/view student click on Assign/View student icon present at Action column in the fees master list, it will redirect you in the Assigned Fees Group page, here select Class, Section and Category, Gender and RTE and then click on Search button. The list of assign fees group will be shown in the below of the page.
Now select student to whom you want to assign fees group and then click on Save button.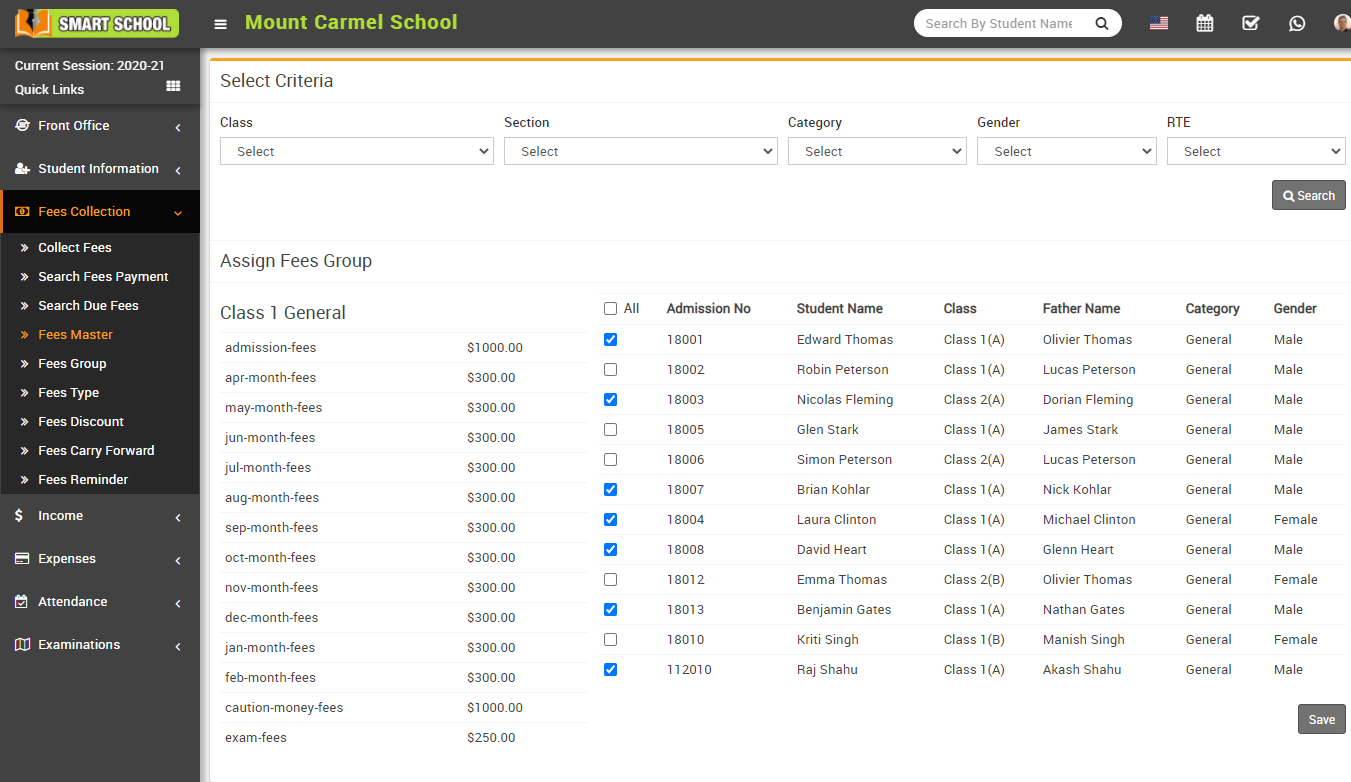
To delete fees master click on Delete icon present at Action column in the fees master list.
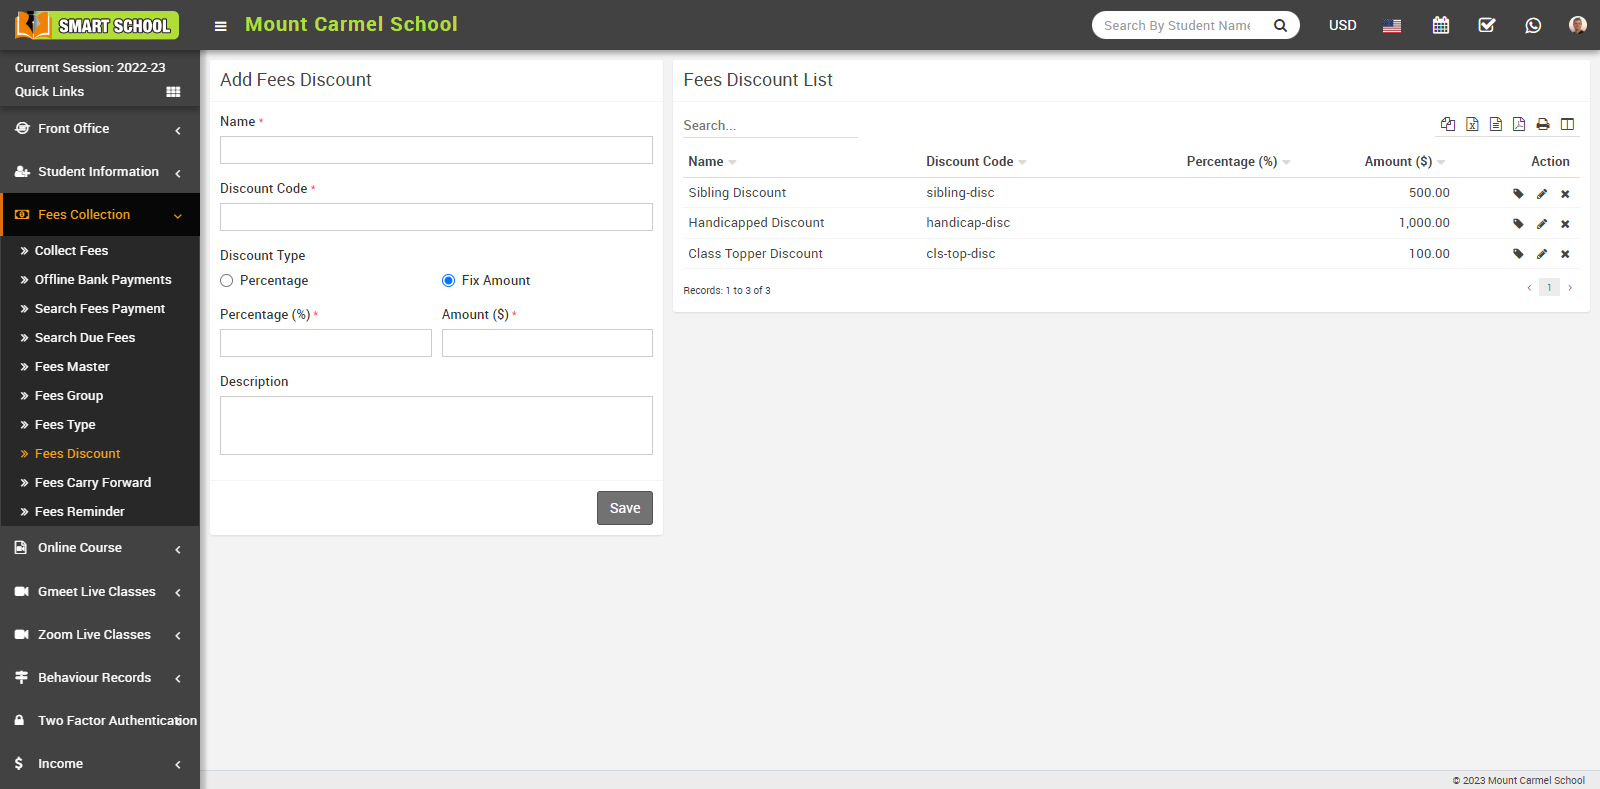
How to add Fees Discount?
To add a fee discount, go to Fees Collection > Fees Discount. Now fill in the discount name, discount code, discount type (percentage or fixed amount), and description, and click on the Save button. You can view this added record in the Fees Discount List. If the Discount type is a percentage, you can offer discounts of 10% or 20% etc. If the Discount type is "Fix Amount," we can apply a discount in fix amount.
To assign / view students, click on the Assign / View Student icon, which is shown in the Action column in the fees discount list. By clicking on this icon, it will redirect you to the Assign Fees Discount page. Now select Class, Section, Category, Gender, and RTE, and then click on the search button. The student list will be displayed, and you can select the student to whom you want to assign the fee discount by checking the box, then click the Save button to assign the discount to the students.
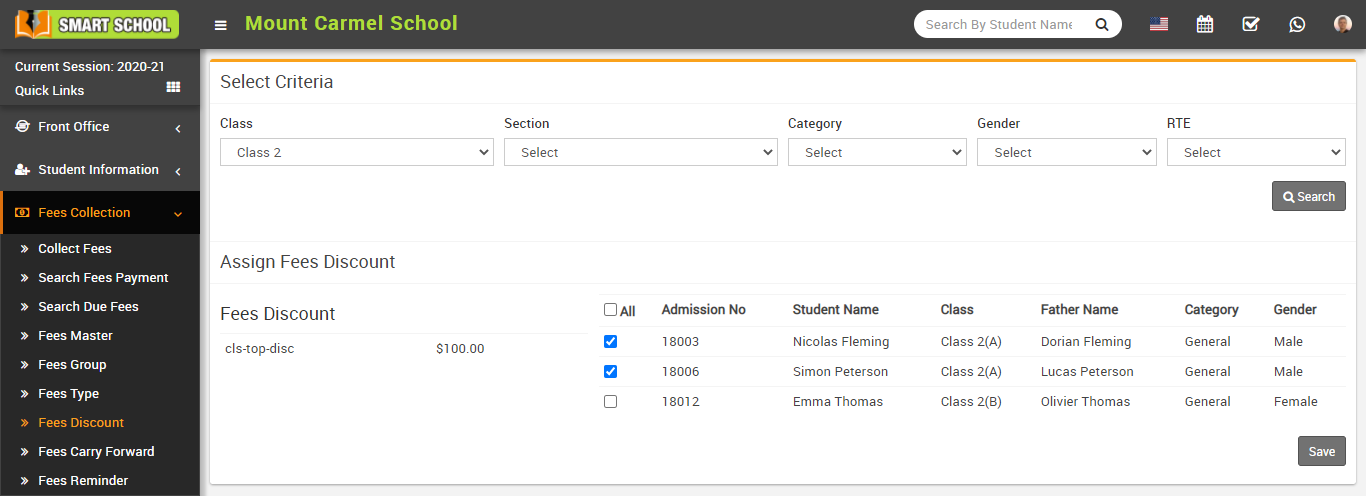
To edit fees discount click on Edit icon and to delete fees discount click on Delete icon present in the fees discount list.
How to add Collect Fees?
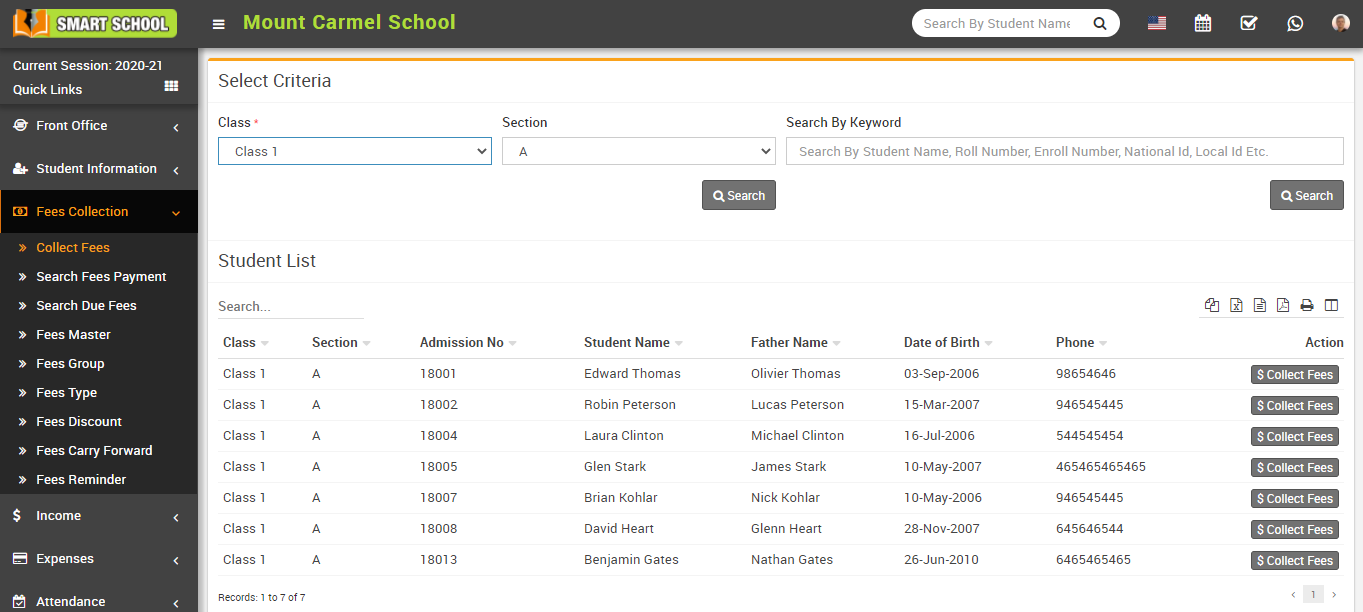
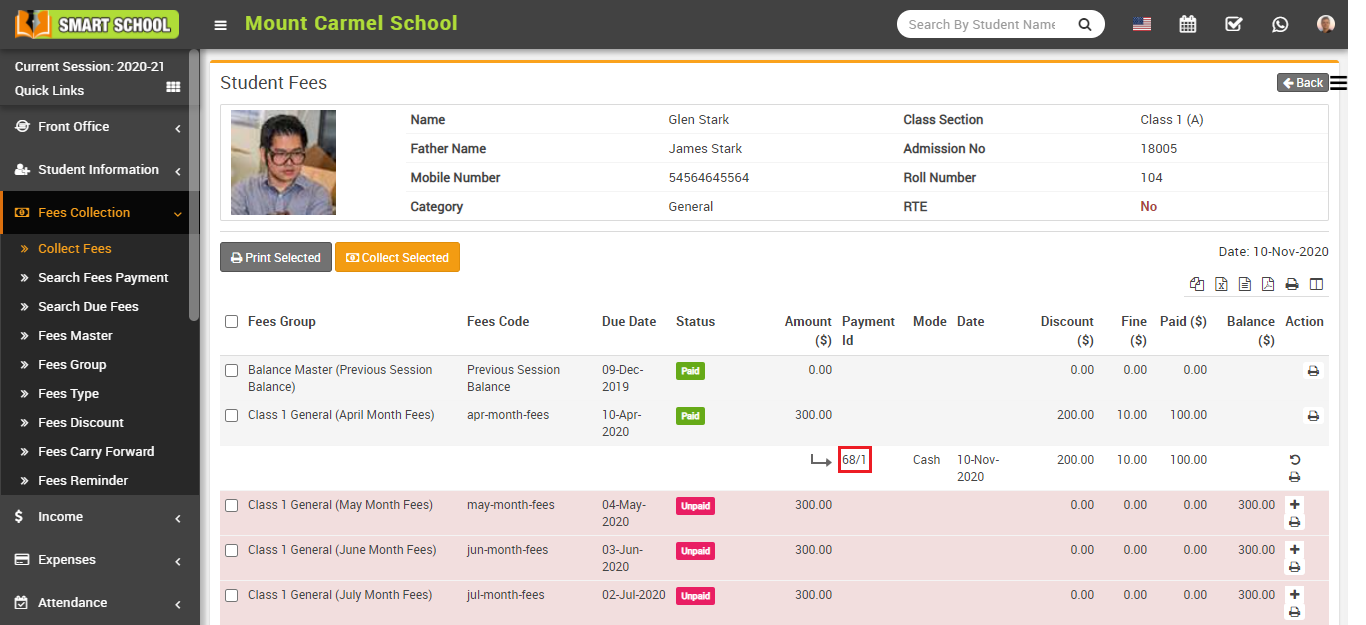
To view fees detail click on Collect Fees button present at Action column in the student list, at click of this button Student Fees page will be open. Here you can see all assigned student fees details. To collect fees click on Add (+) icon present in action column, at click of this icon modal will be open. Fill all the details entries Date, Amount, Discount Group, Discount, Fine, Payment Mode (Cash, Cheque, DD, Bank Transfer, UPI, and Card) and Note (if you have any note) and then click on Collect Fees button.
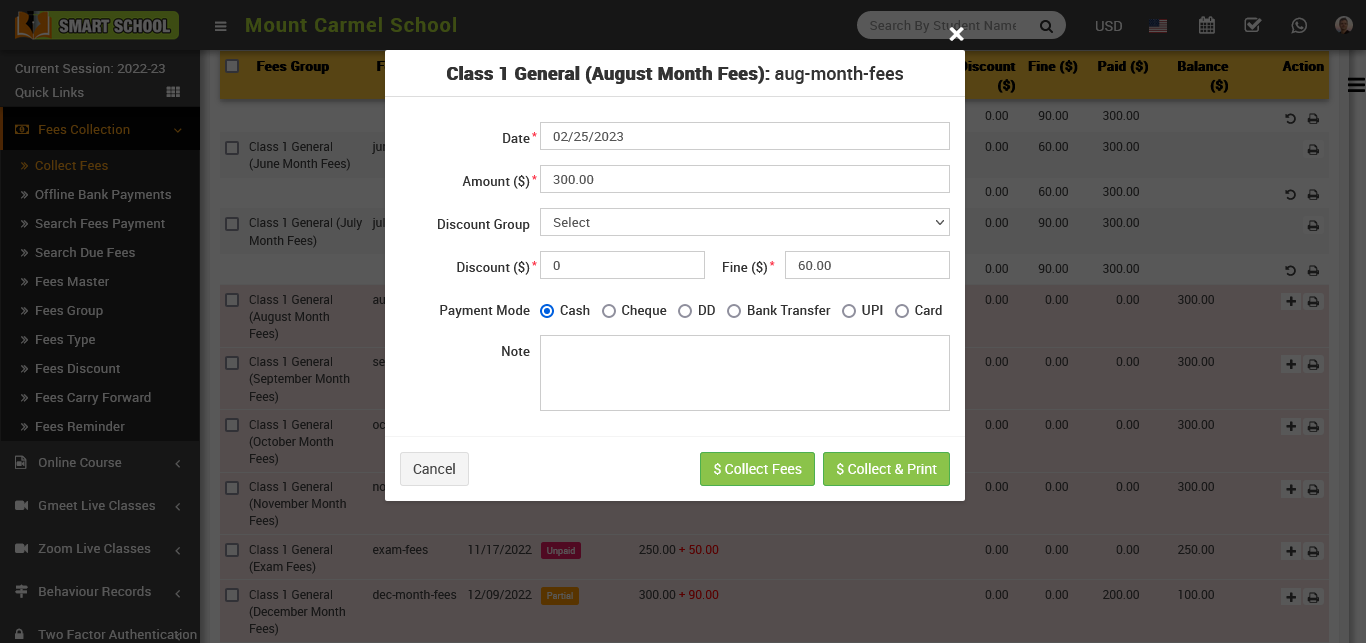
after click on collect fees, so that fees has been collected and you can see fees status as paid in status column.
Now to print fees receipt to click on Print button which is showing in Action column

clicking on it will open a fee receipt.
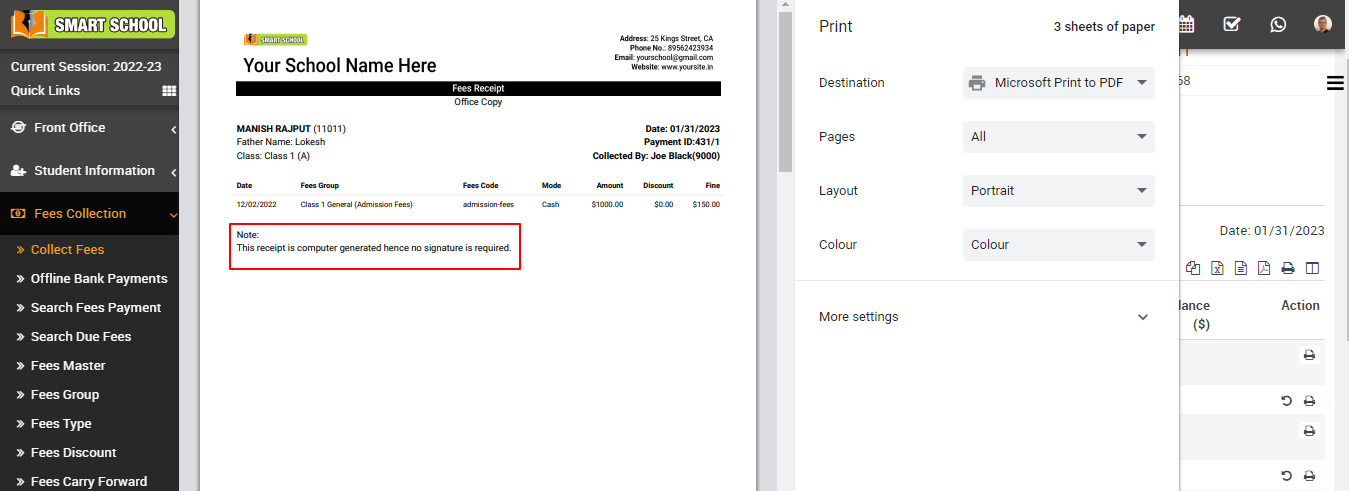
In the receipt, you can see the all details related to fees as well as you can also see the one note that says, "This receipt is computer generated, hence no signature is required
Now in Revert button visible for reverting this fees which is also showing in Action column.
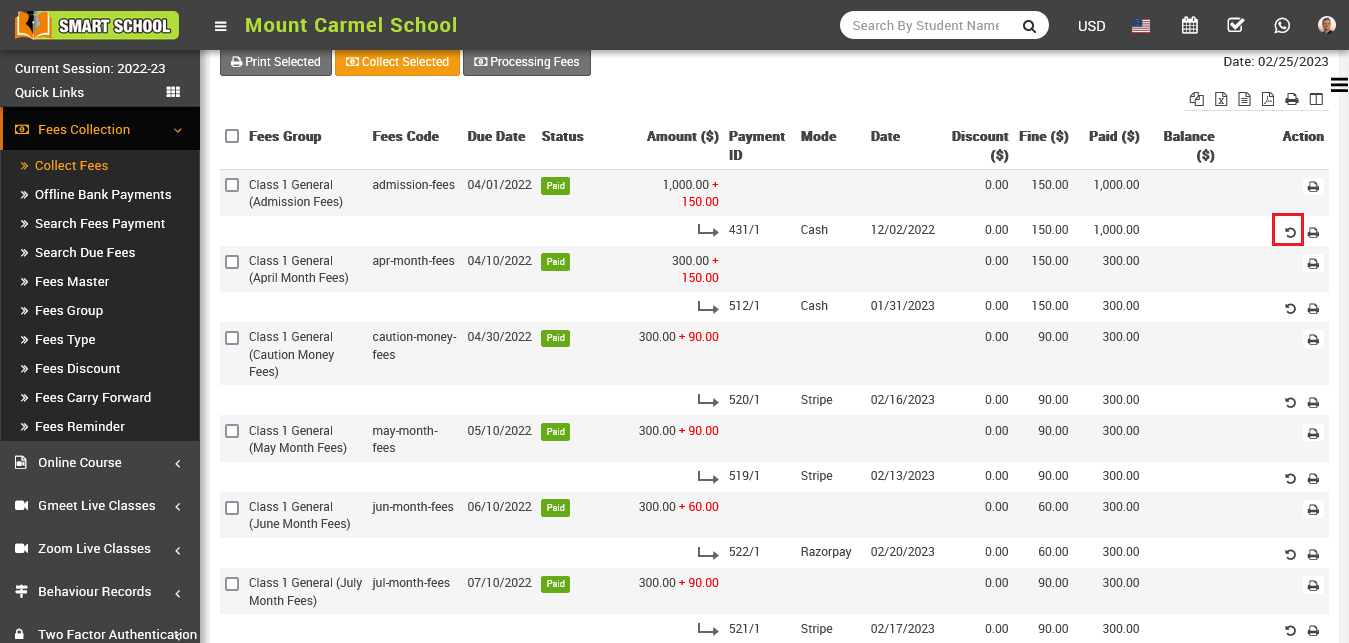
when you click on revert icon, revert confirmation model will be open.
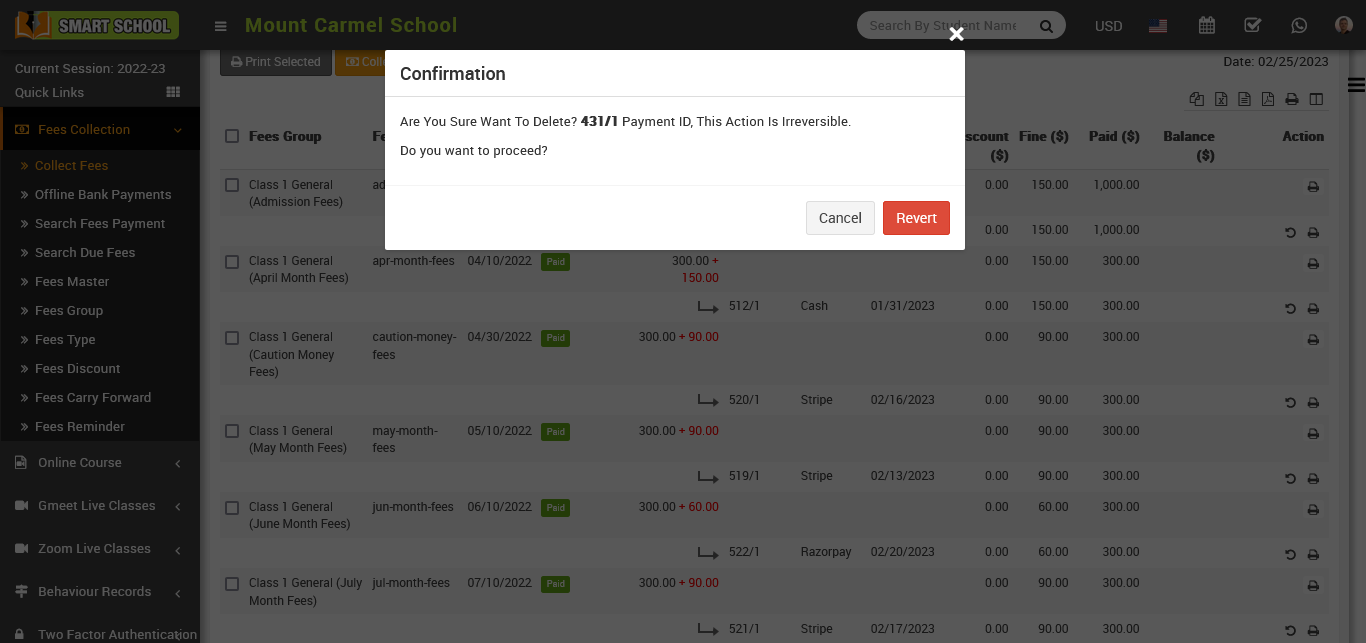
now click on Revert button, so that student fees will be reverted.
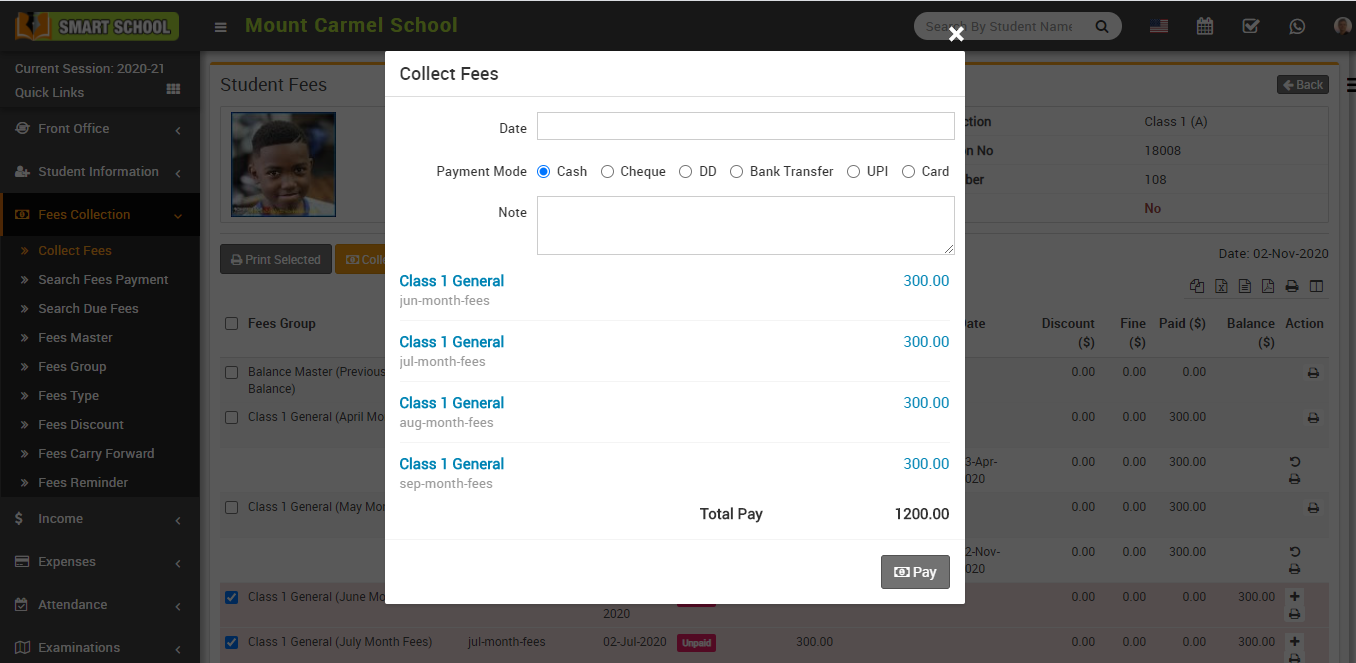
To collect multiple fees, at the same time select multiple fees from left check boxes then click on Collect Selected button, so that collect selected model will be open, in this model you can see the multiple fees and below pay button available, simply click on pay button, multiple fees will be collected.
To fees discount adjustment, click on Apply Discount button from Action column, at click of this button Discount modal will be open. Here enter Payment Id on which you want to apply discount and enter Description and then click on Apply Discount button.
How to search Fees Payment?
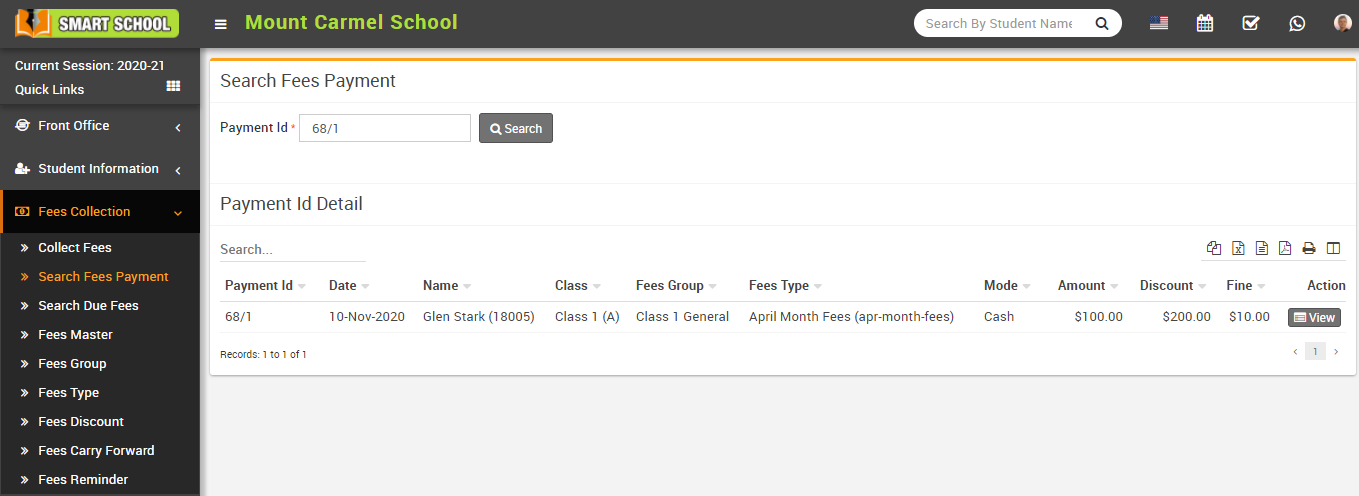
To view payment id click on View icon present at Action column in the payment id detail list.
How to search Due Fees?
Go to Fees collection > Search Due Fees to look for overdue fees. You can select a single, multiple, or all fees group in Fees Group by checking the checkboxes next to the Balance Master, Admission Fees, Class Fees, Tuition Fees, and so on as available in your fees group, and then selecting the class, section, and clicking on the "Search" button.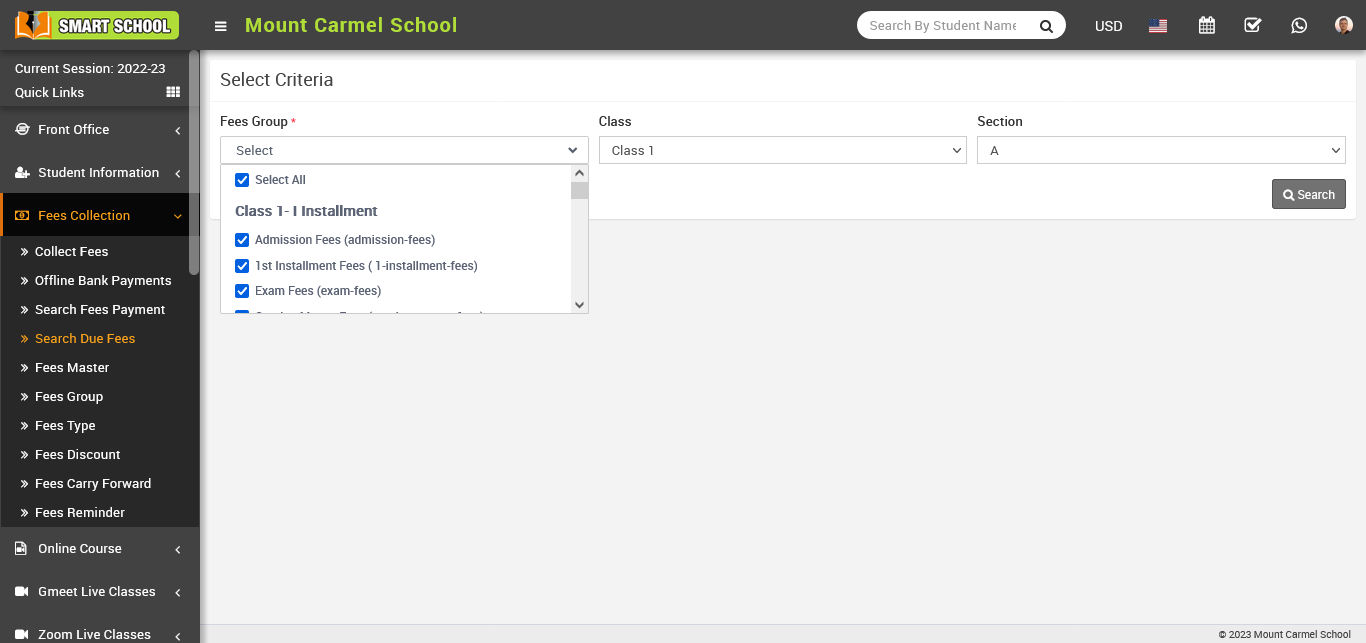
Here, you can see the list of students whose fees are due.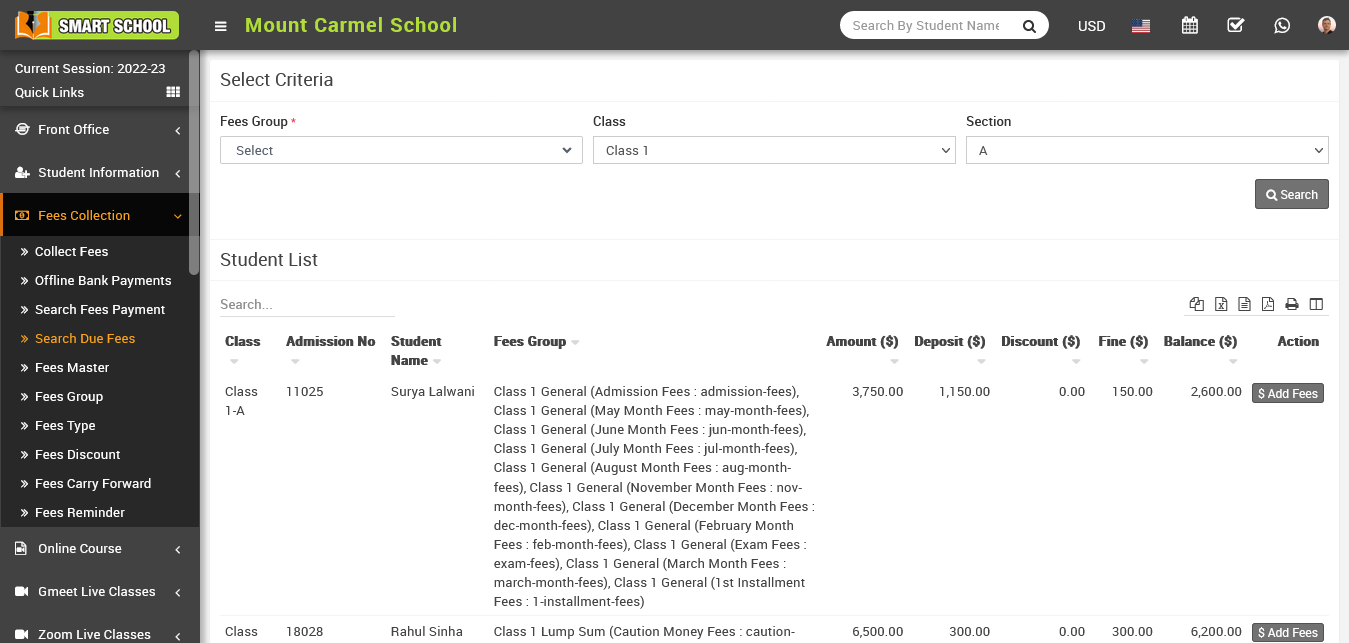
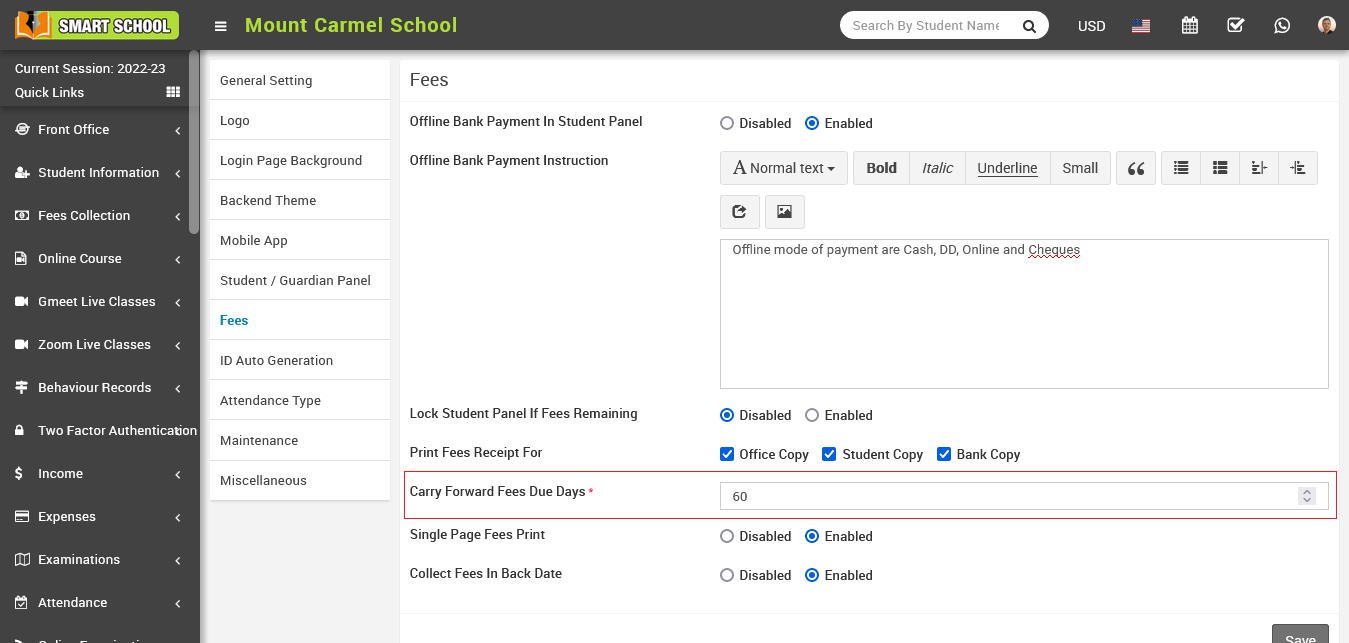
How to Carry Forward Fees ?
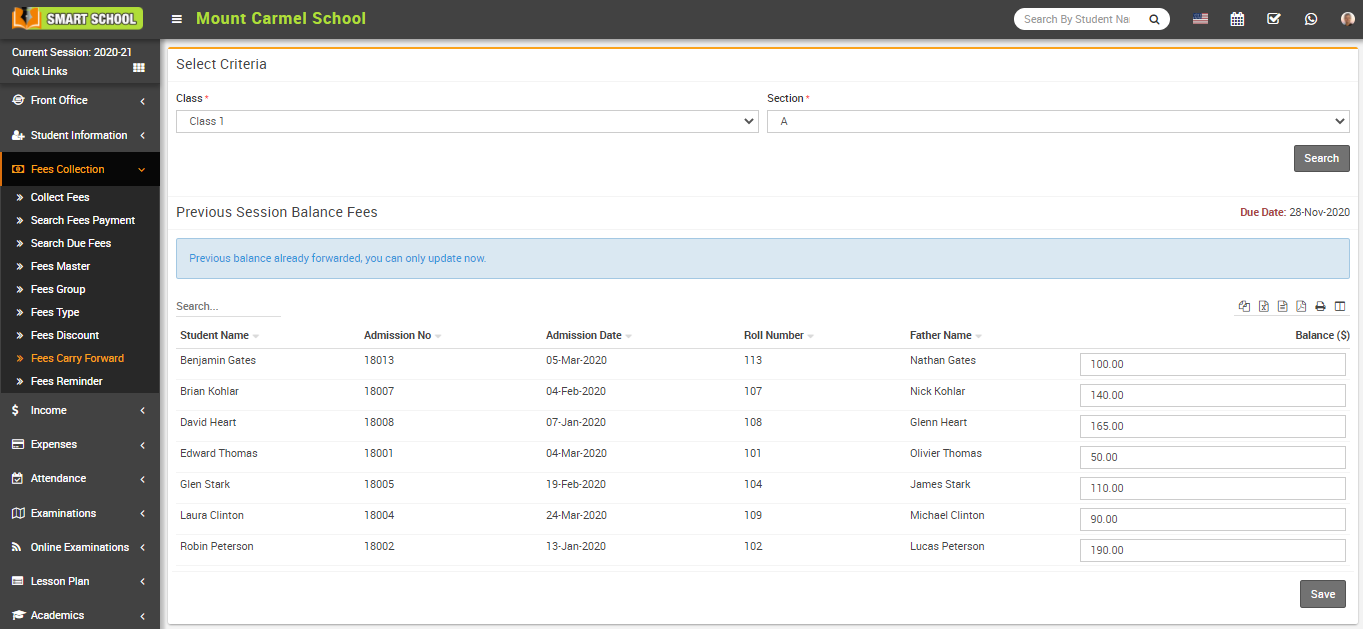
To set carry forward due date, go to System Settings > General Setting then go to Fees section and then enter Carry Forward Fees Due Days and then click on the Save button. the number of days which you enter here due date will be exceed from current date.
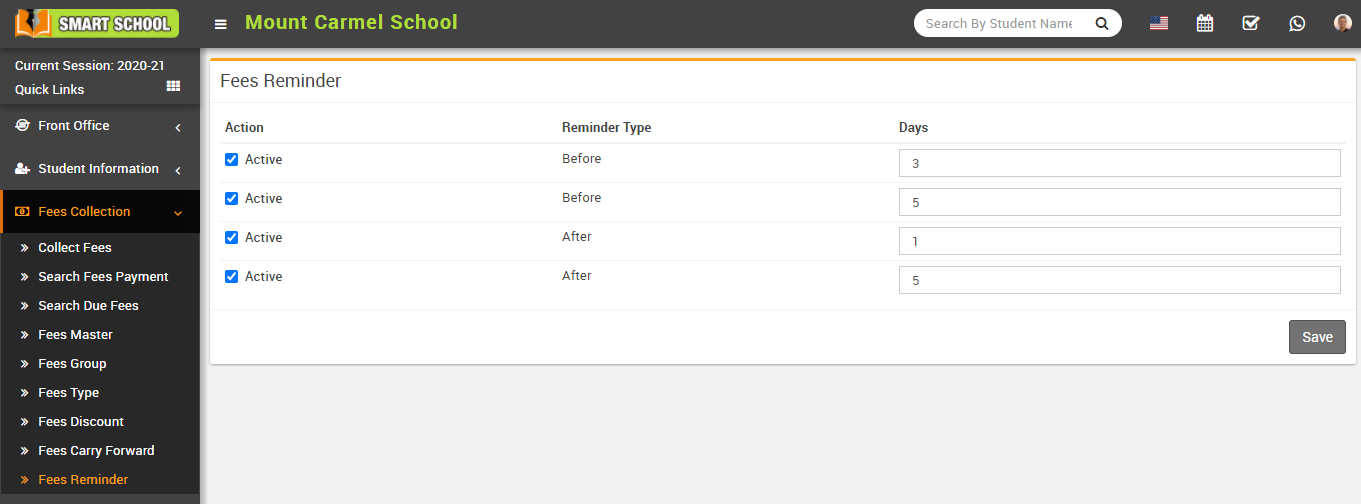
How to use Fees Reminder?
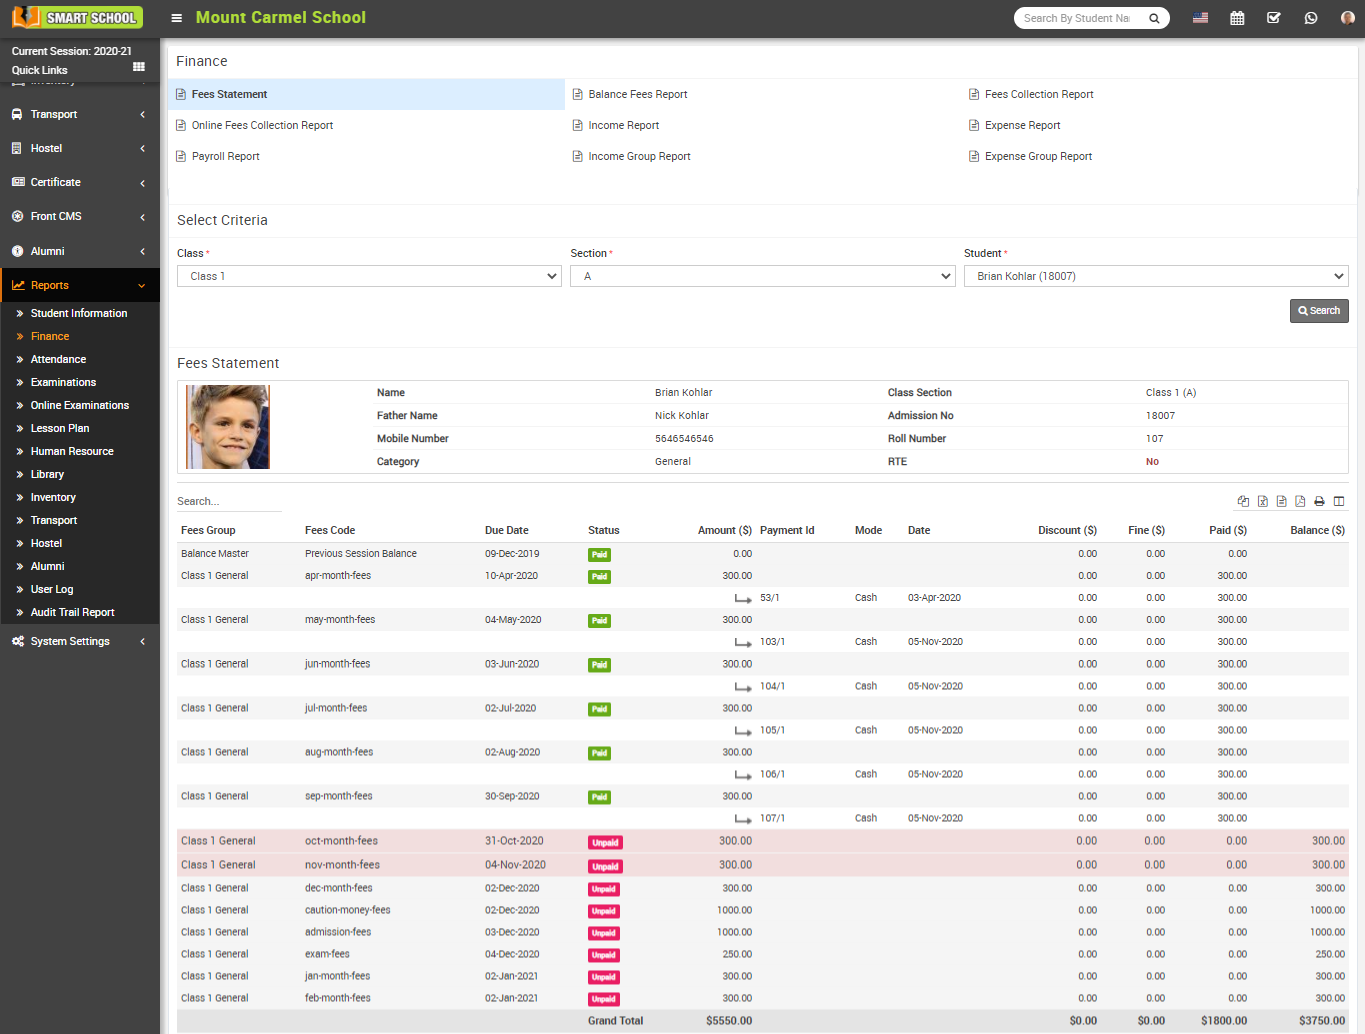
How to check Fees Statement report?
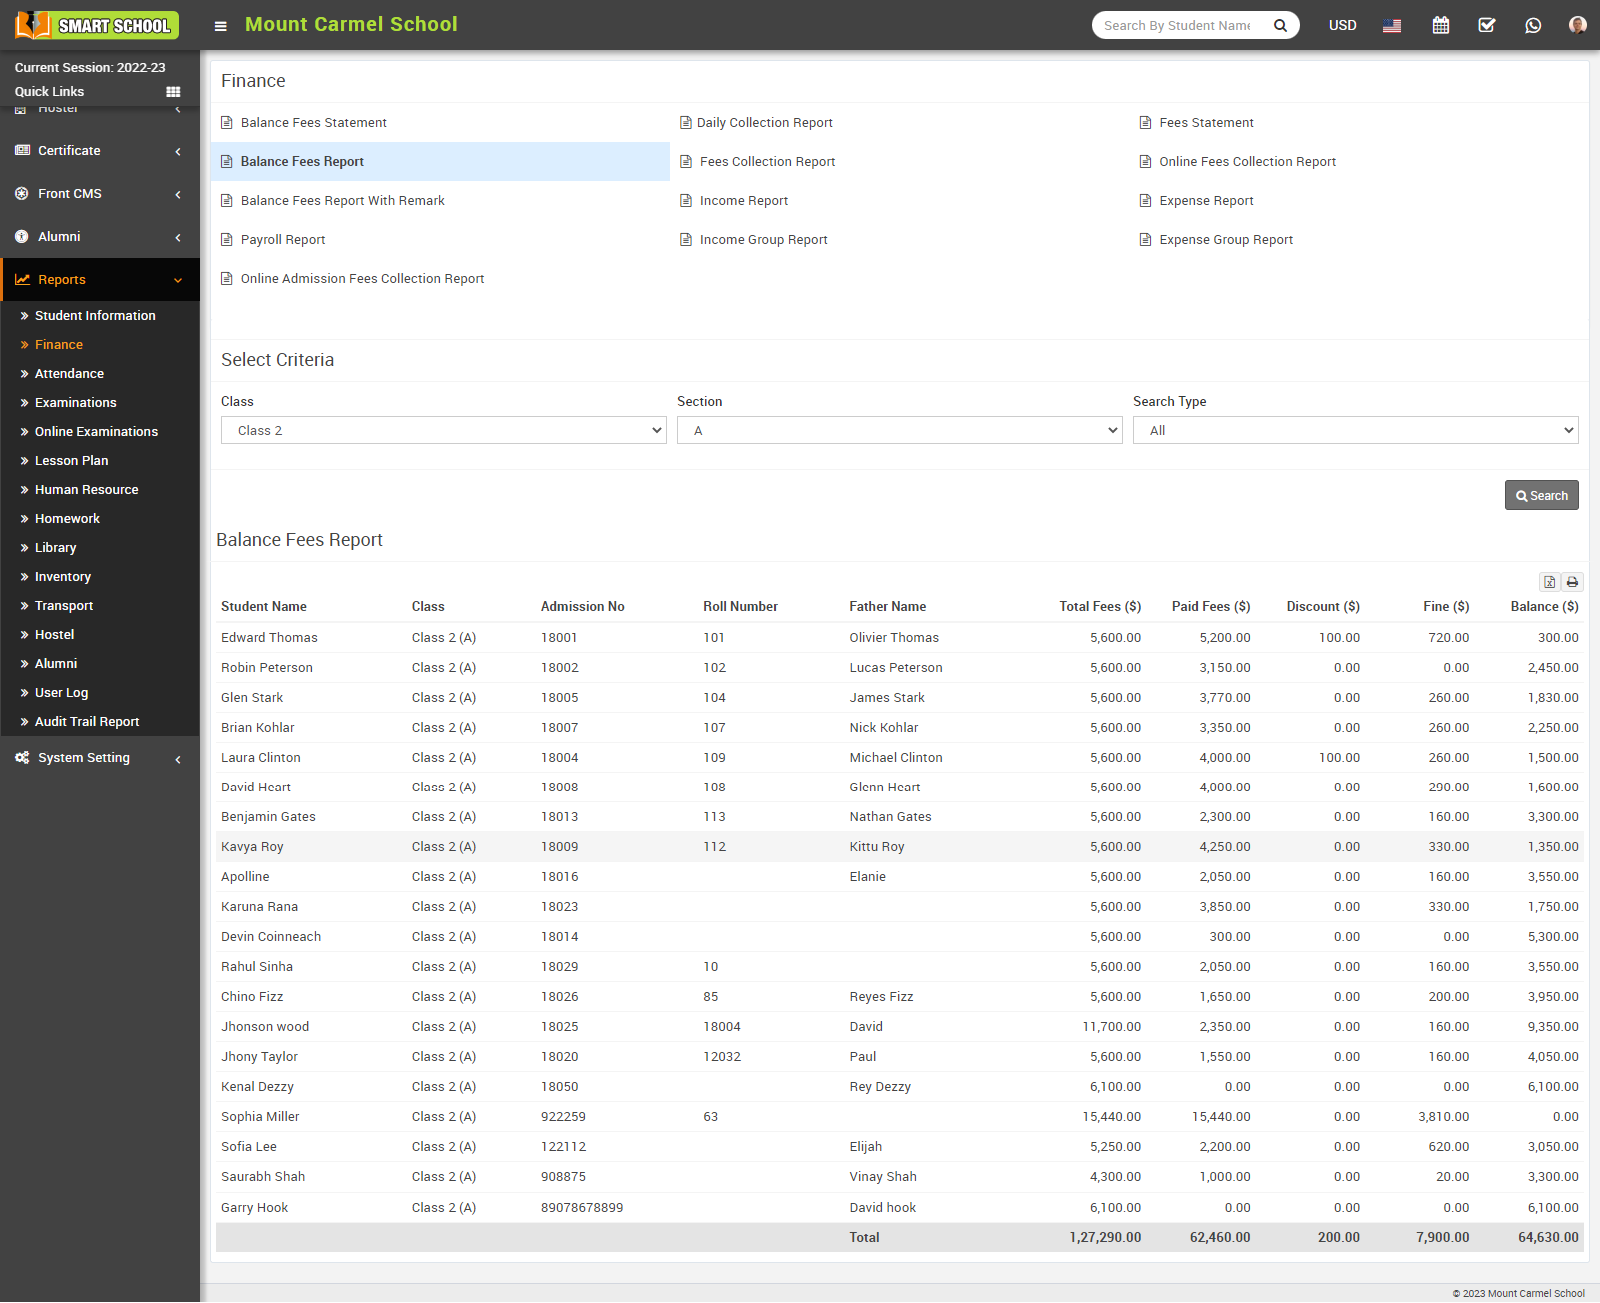
How to check Balance Fees report?
To check the balance fees report, go to Report > Finance and click on Balance Fees Report. Here select Class, Section and Search Type in search type you can see all, balance, paid and select the one of them and then click on the Search button. The list of searched record will be shown in the below of the page.
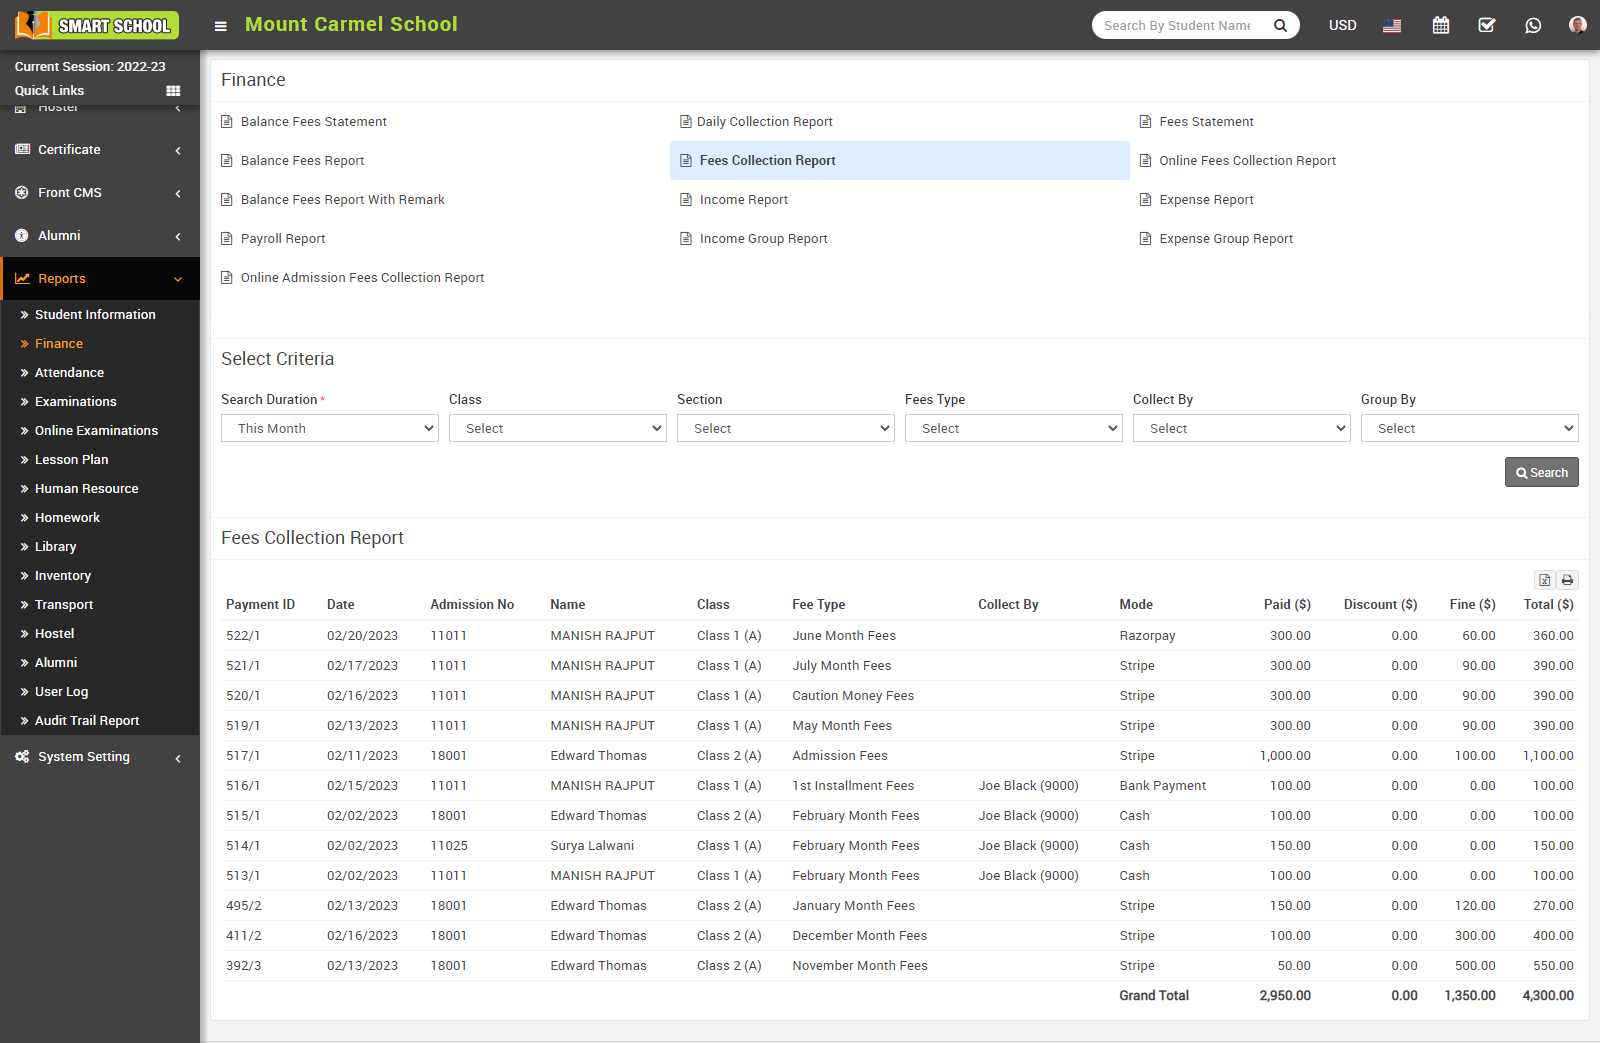
How to check Fees Collection Report?
To check fees collection report, go to Report > Finance click on Fees Collection Report. Here please select the Search Duration, Class, Section, Fees Type, Collect By and Group By and then click on Search button. The list of searched record will be shown in the below of the page.
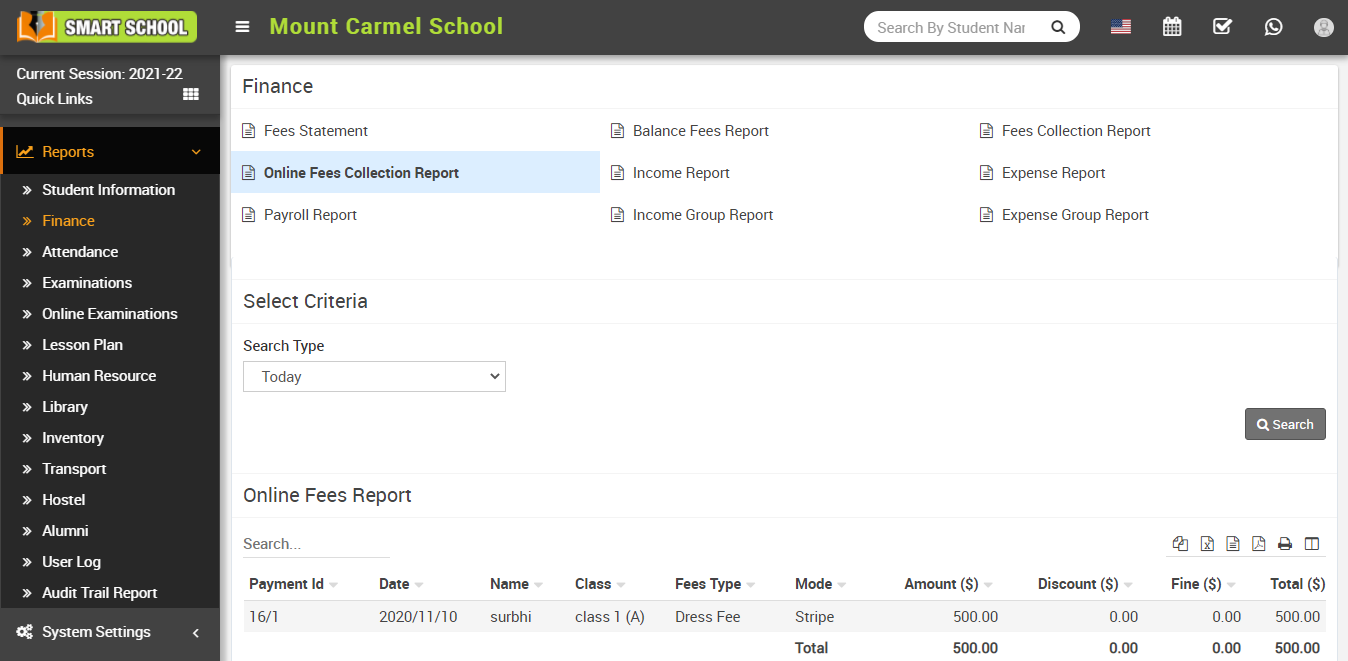
How to check Online Fees Collection Report?
How to check Payroll Report?

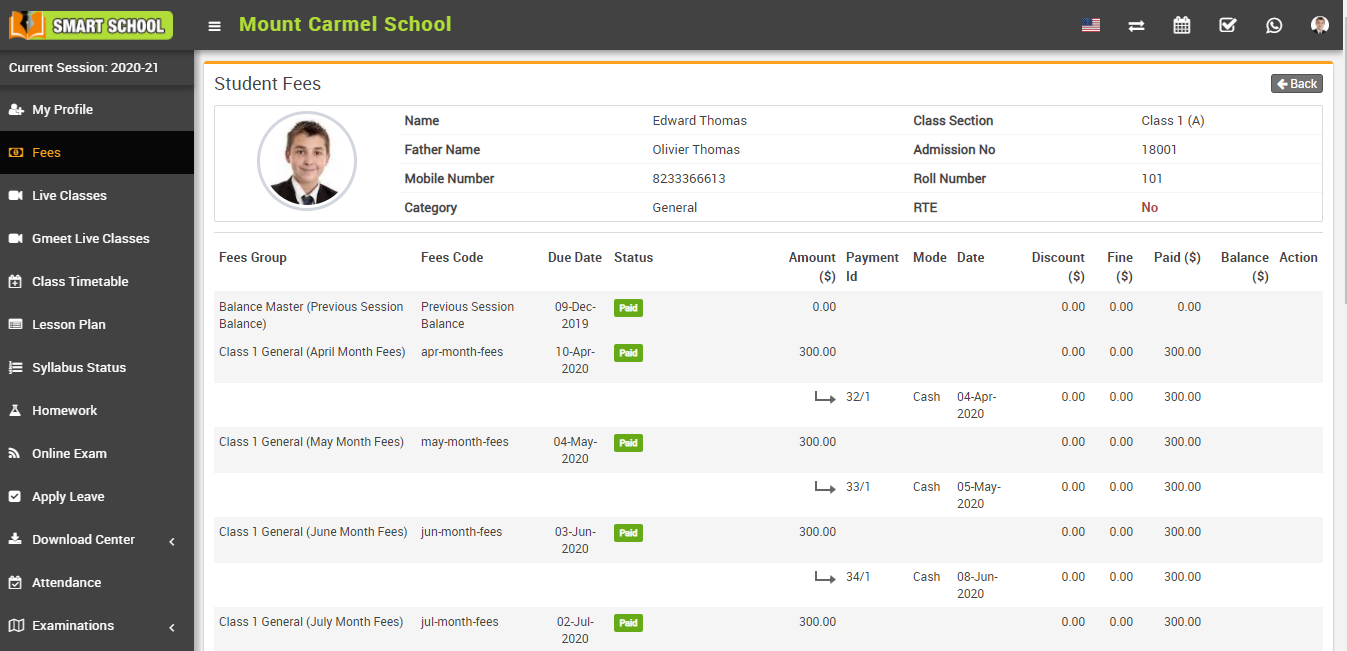
How student can view fees Details?
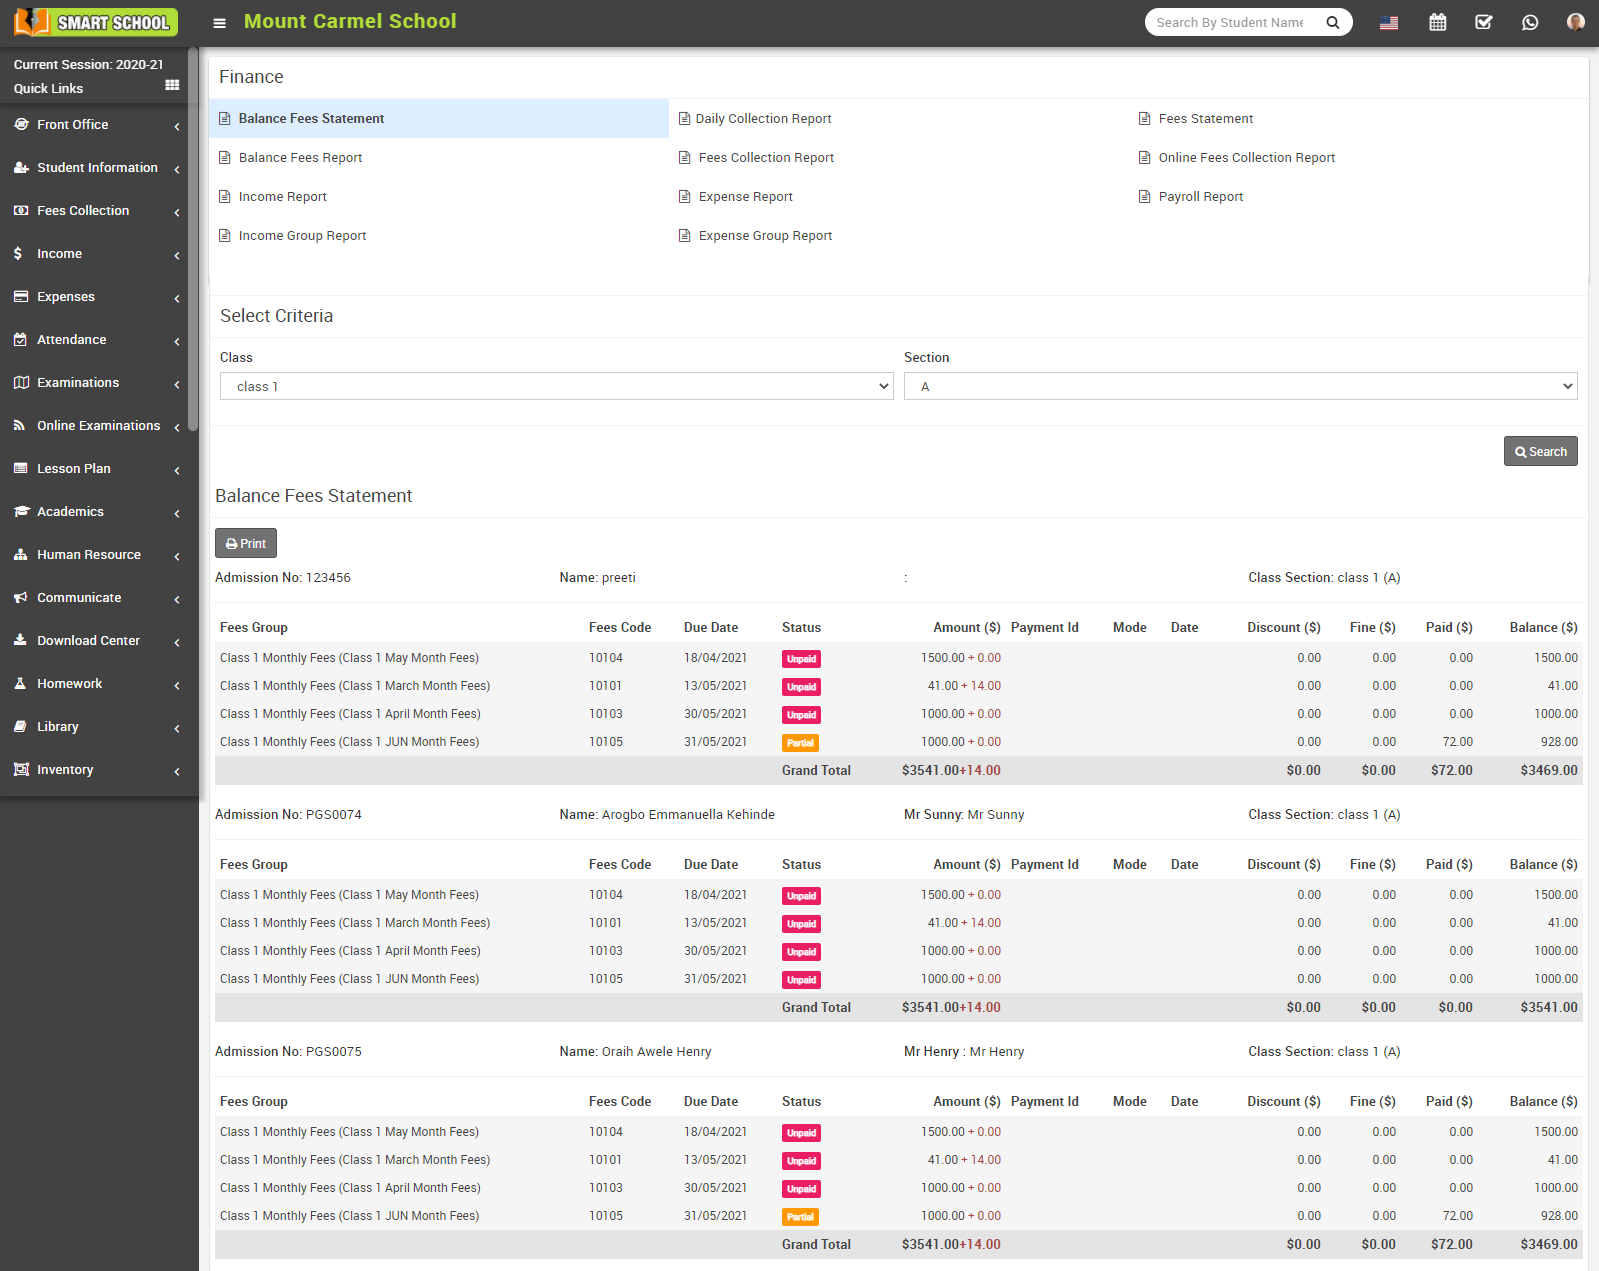
How to check balance fees statement?
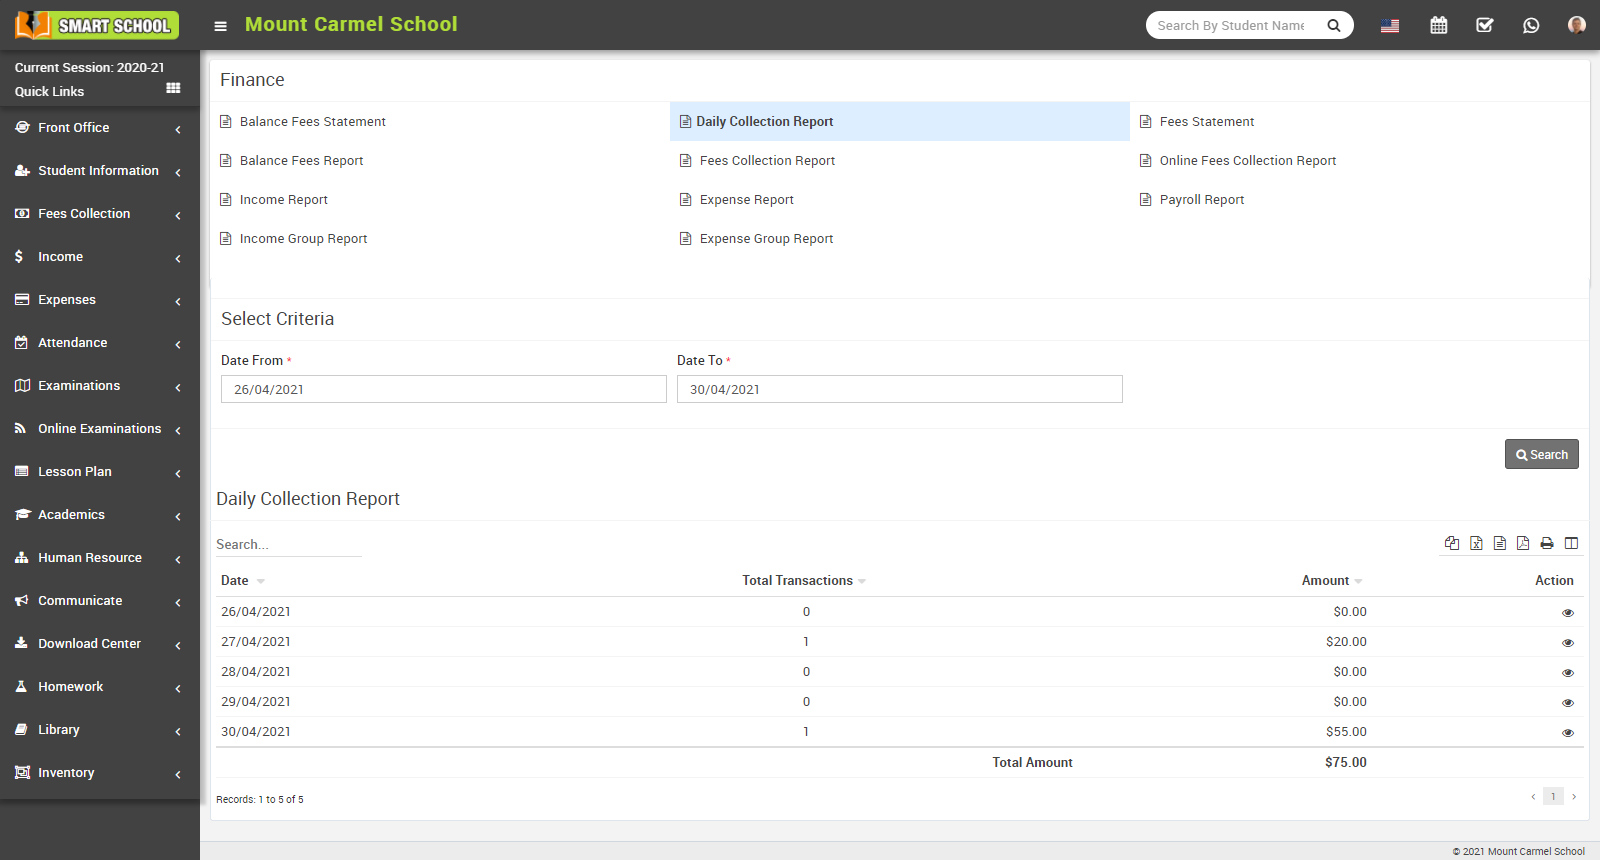
How to check daily collection report?
How to check Balance Fees Report with Remark report?
To check Balance Fees Report with Remark report, go to Report> Finance Click on Balance Fees Report with Remark report. Here select Class and Section then click on Search button. The list of balance fees report with remark will be show in the below.
In this report, you can see Student Name and his Admission No, Class and section, in Fees with its details and in Amount you can see the total fees amount of that student, in Deposit you can see how much student paid his fees, in Balance, you can see how much fees remaining of that student, Guardian Phone, in Remark, when you take the print of balance fees report, you can mention the remark on that print, manually.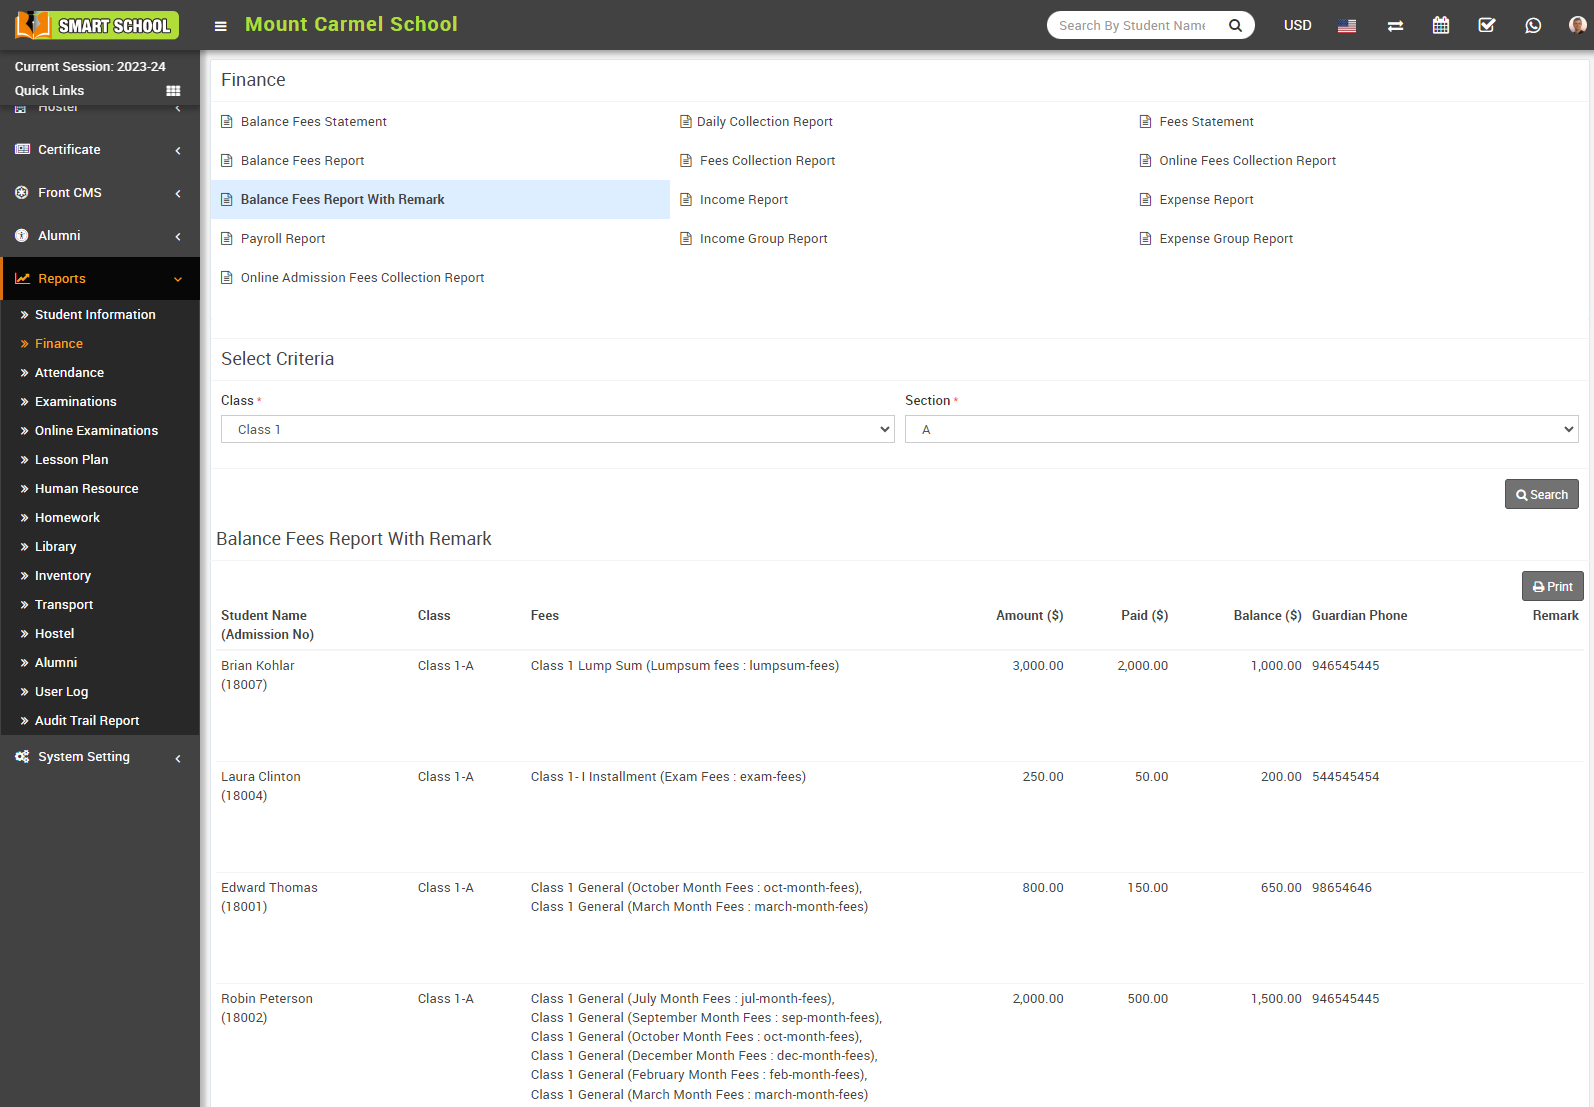
To print the balance fees report with a remark, click on the printer icon on the right side, the print module will open, and you can draw the print.
How to check income expense balance report?
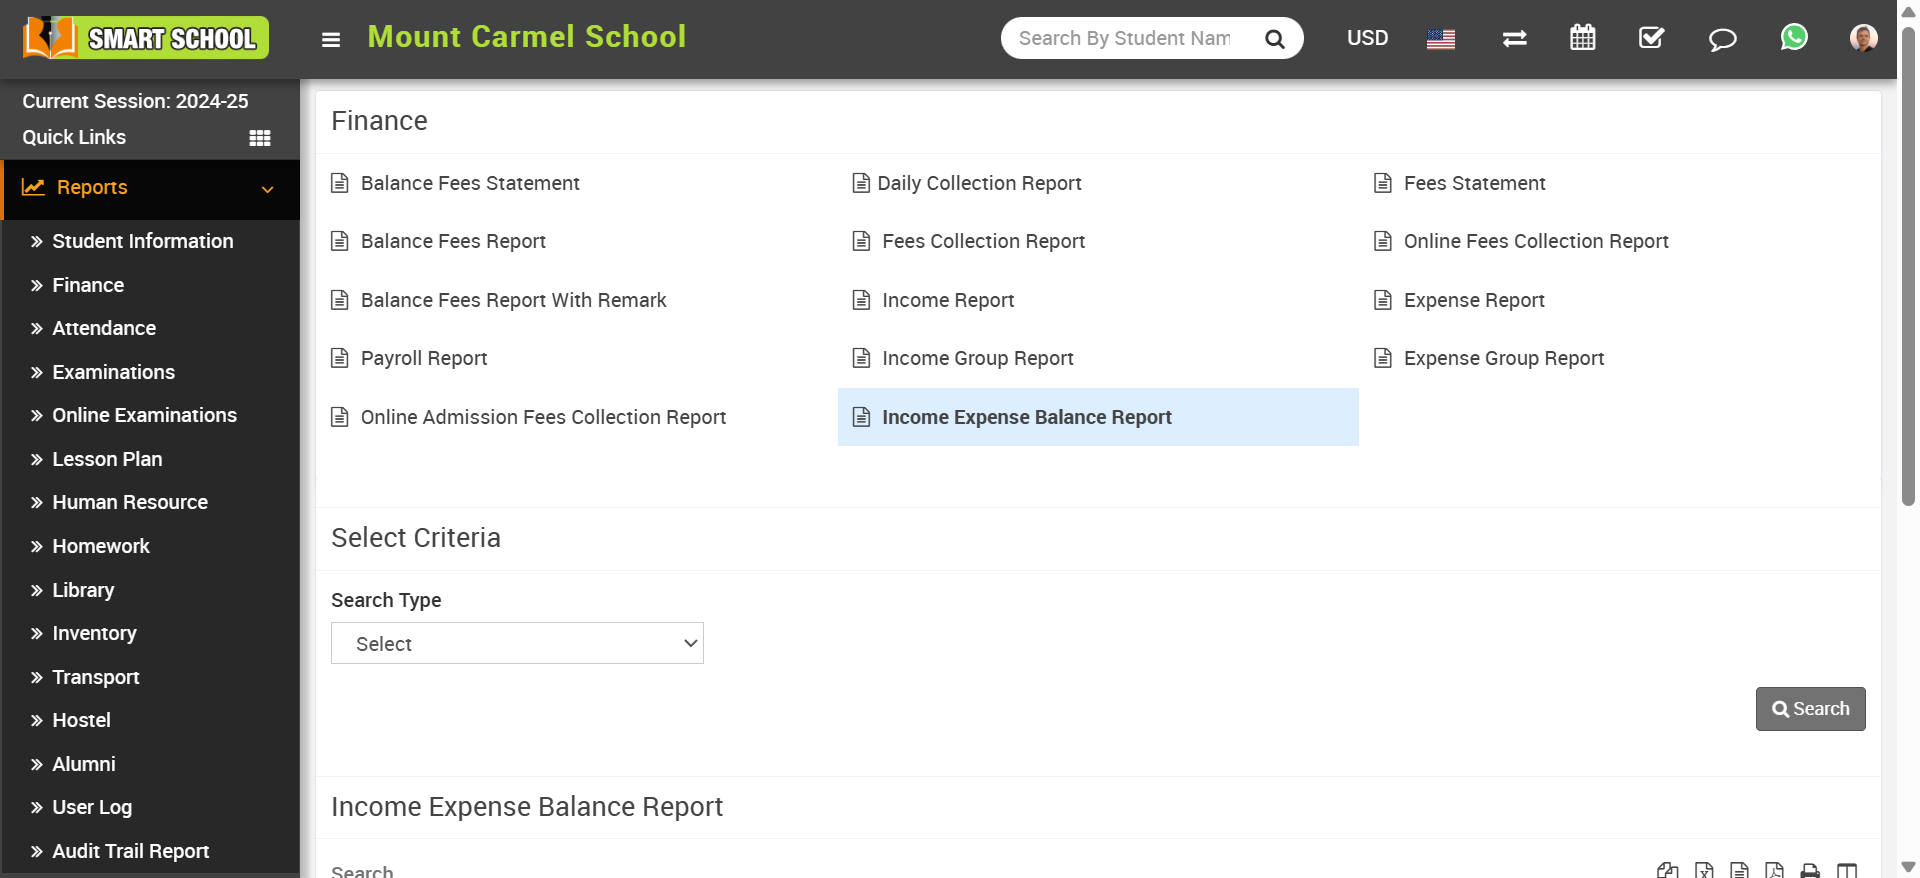
Here select Search Type in search type you can see previous months or year report and then click on the Search button. The list of searched record will be shown in the below of the page.
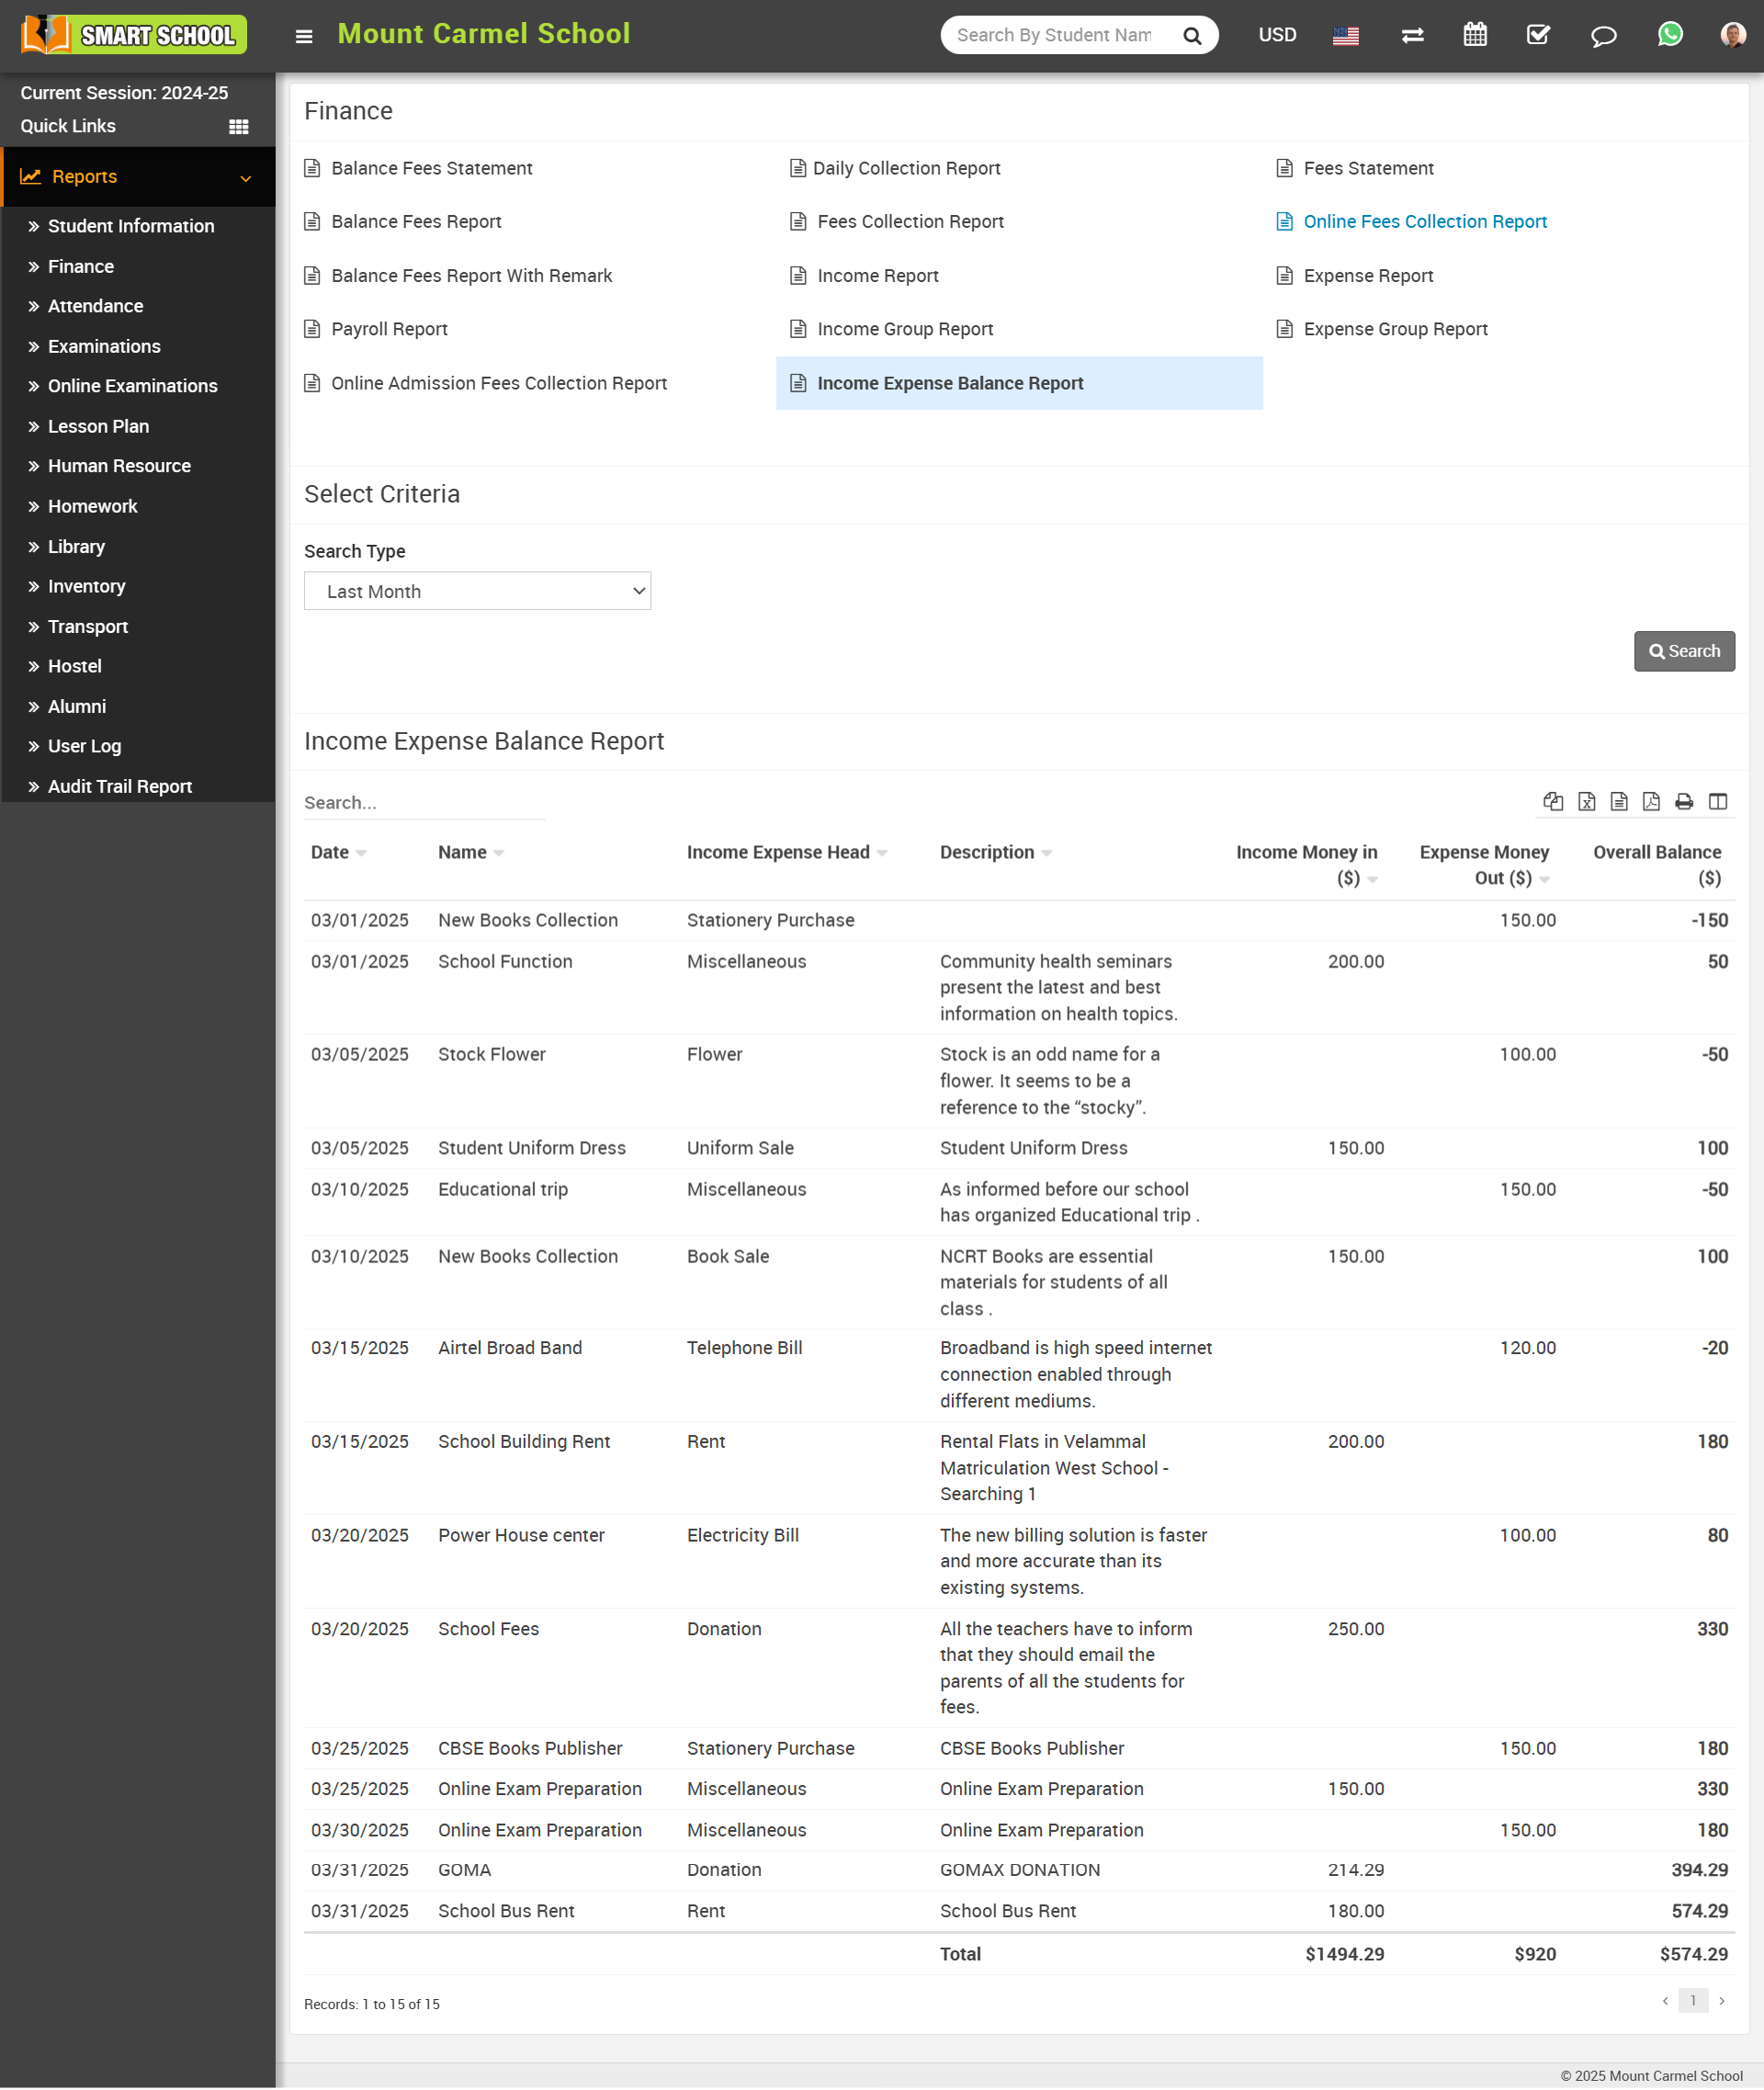
In this report, you can analyze the school's income and expenses, including money received (income), money spent (expenses), and the overall balance.