About Examination
Examination Module Workflow: In smart school, we use four types of exam types General Purpose (Pass/Fail), School Based Grading System, College Based Grading System and GPA Grading System.
General purpose (pass/Fail) - This is non-grading exam type used in majority of schools/institutions.
School Based Grading System - Is grading exam type, in this you can merge two or more exams of same session to get consolidated result with final exam. For merging exams subjects should be same for all exams.
College Based Grading System - Is grading exam type, in this you can merge two or more exams of different session to get consolidated result with final exam.
GPA Grading System - Is GPA grading exam type based on credit hours and grade points.
First we will add Mark grade and then create Exam group and then check Exam schedule and check the examination rank report and student can also check the exam schedule and exam result.
How to add Marks Grade?
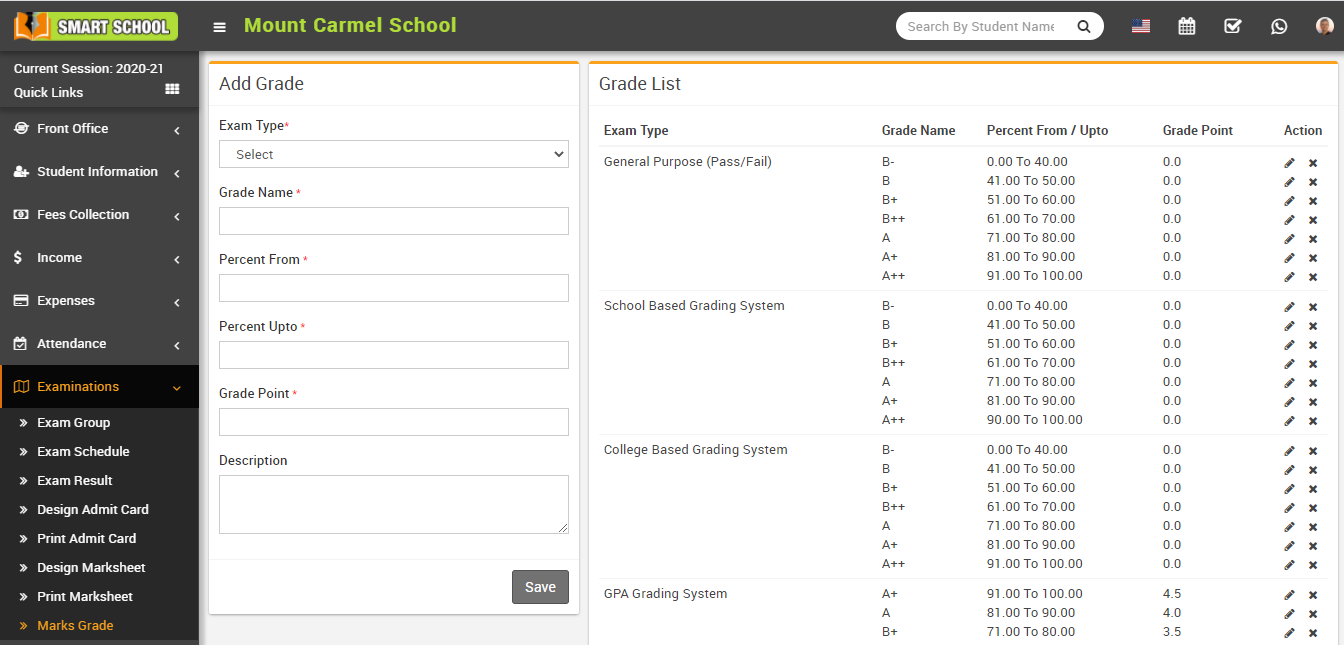
To edit grade click on Edit icon and to delete grade click on Delete icon Present in the grade list.
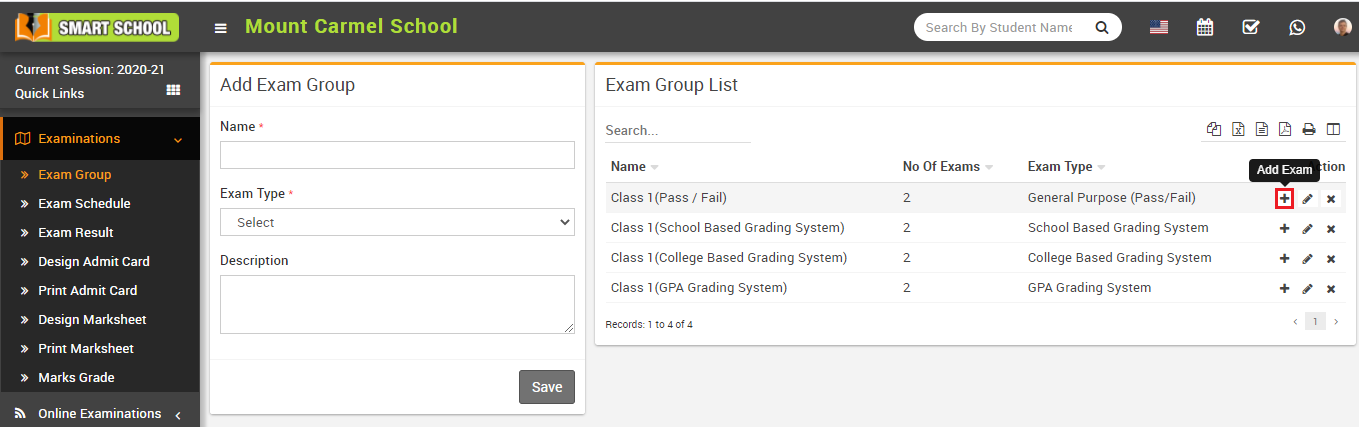
How to add Exam Group?
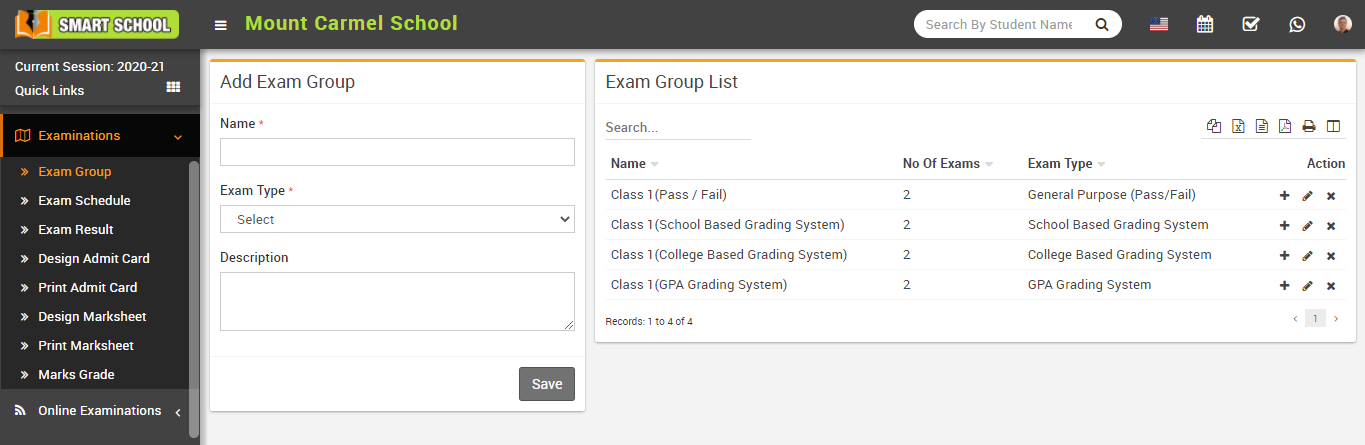
To add exam click on Add (+) icon present at Action column in the exam group list, at click of this icon Exam list page will be open.
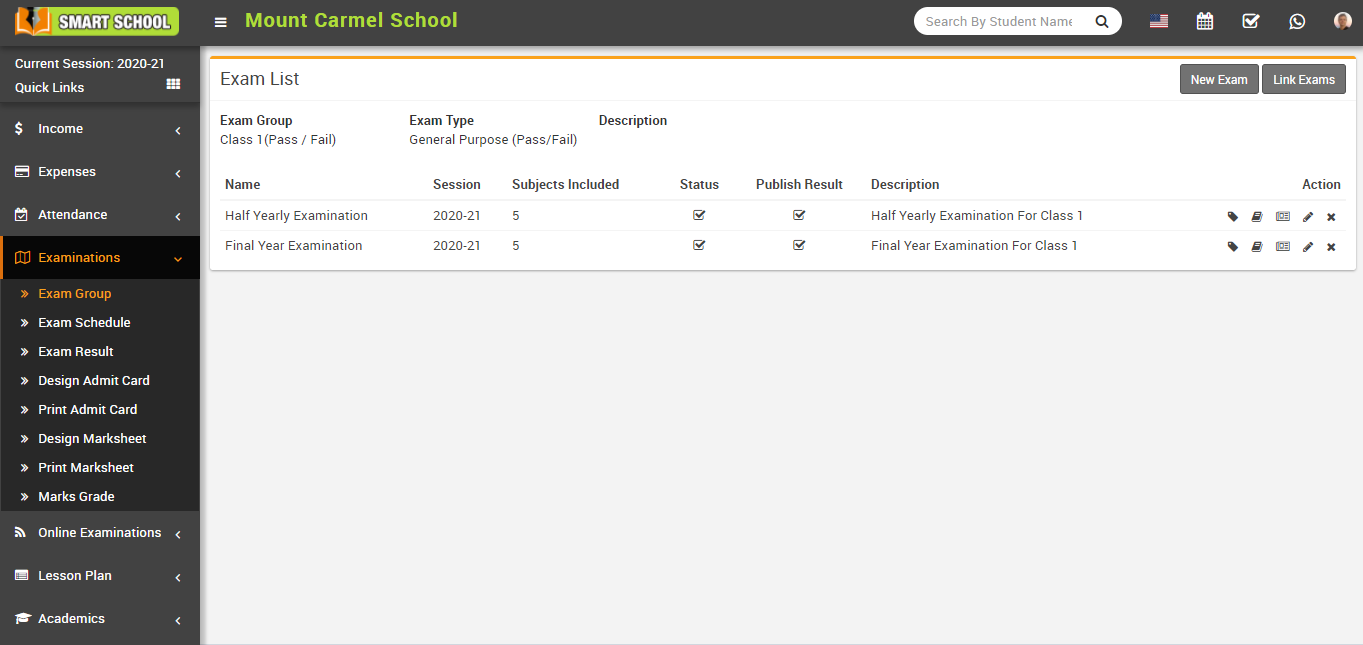
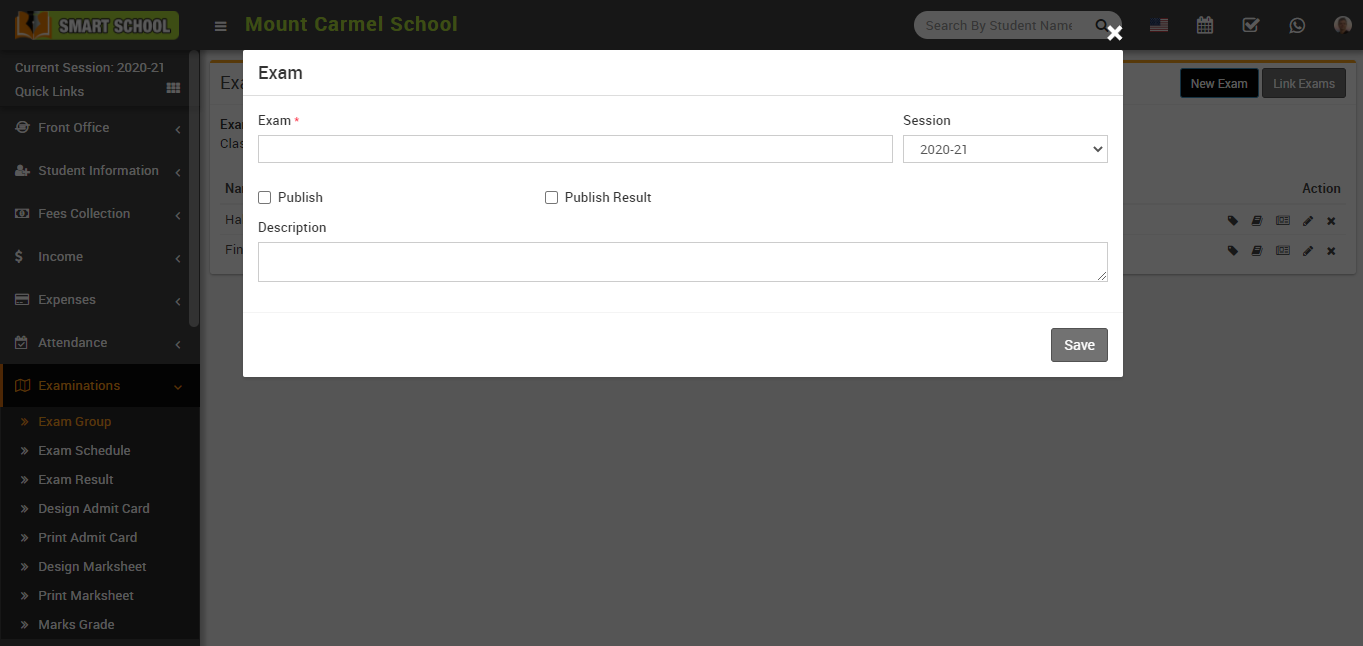
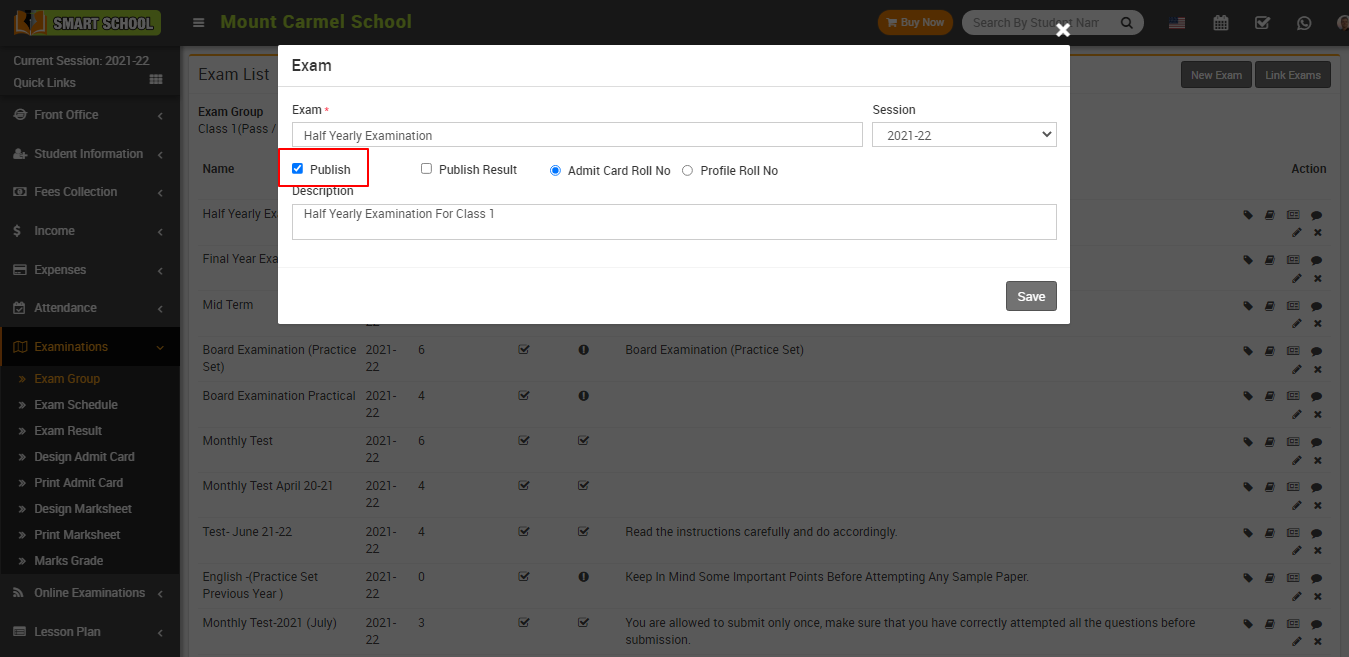
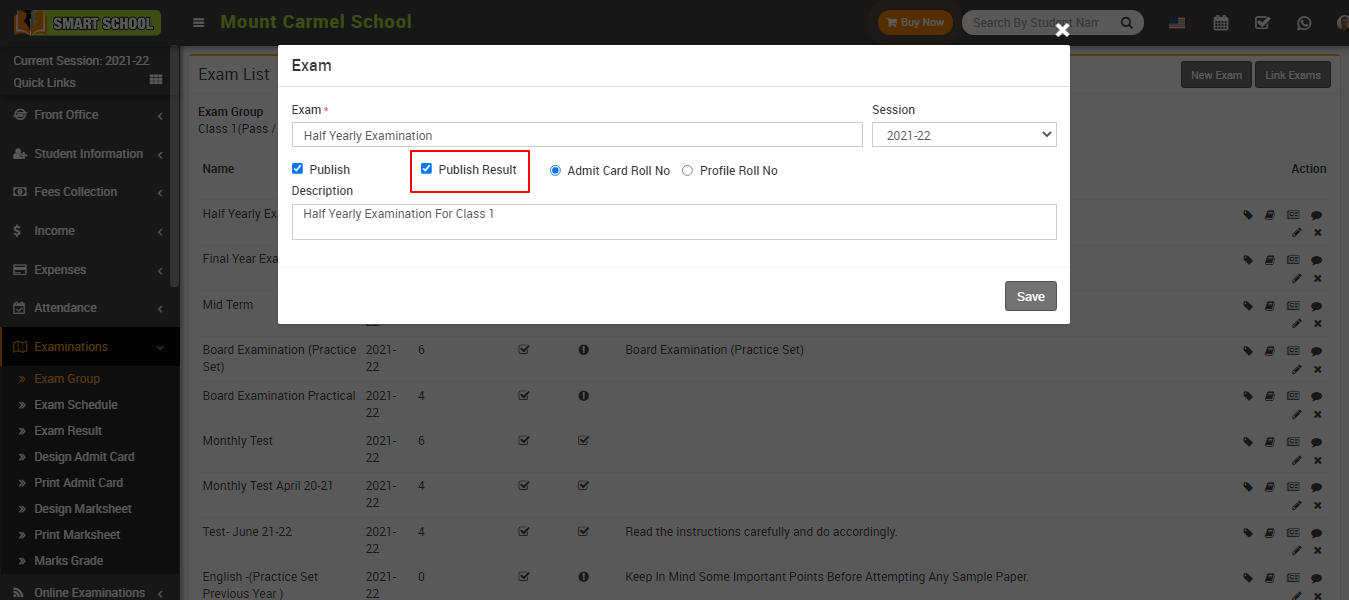
To add new exam click on New Exam button present at top right corner of the exam list page, at click of this button Exam modal will be open.
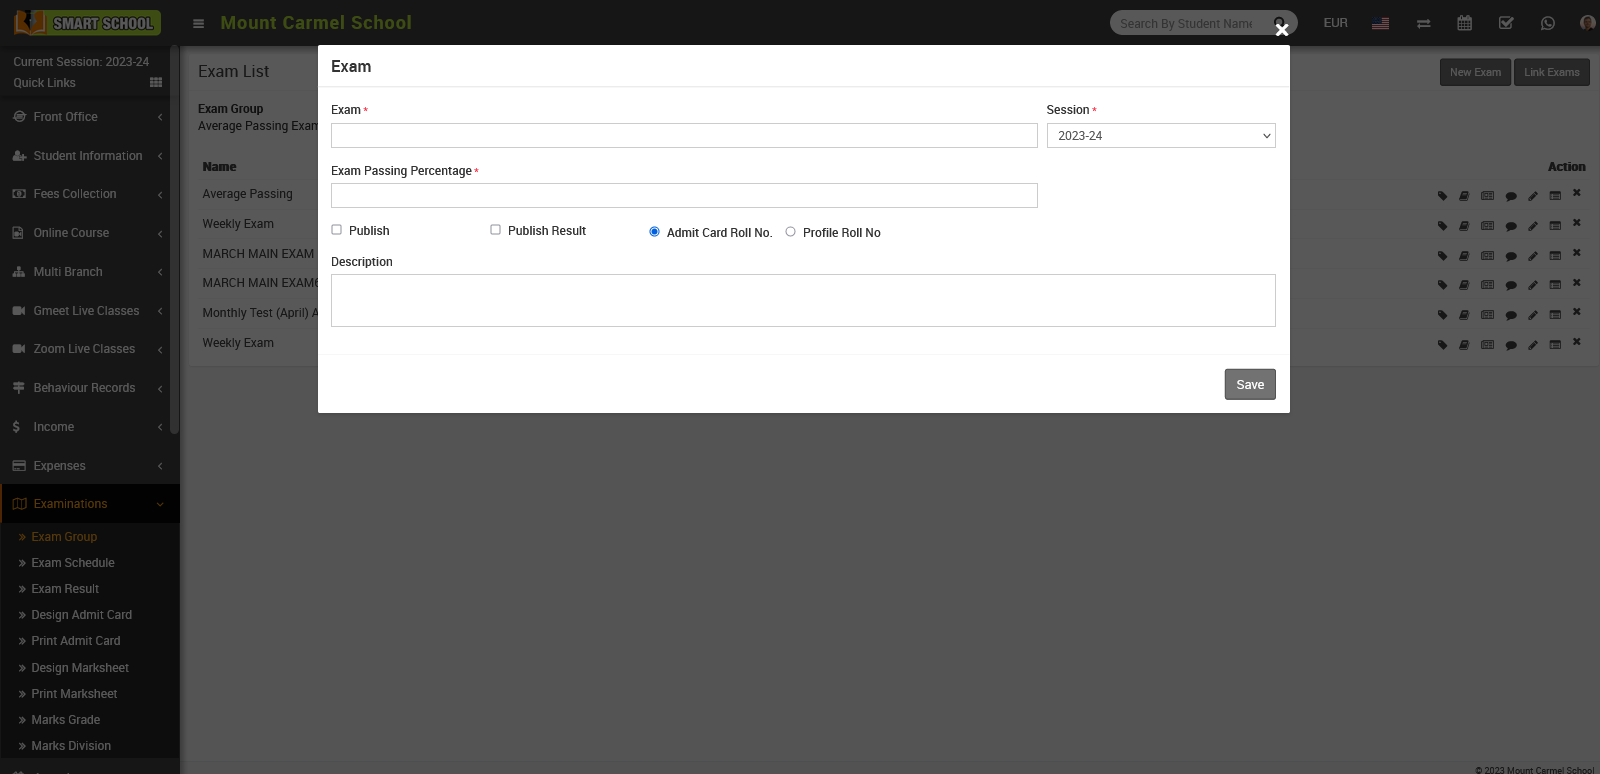
Here fill the detail such as Exam Name, Session, Publish, Publish Result, and if you want to show admit card roll no. on the marksheet you need to select the admit card roll number or if you want to show profile roll no. on the mark sheet, simply select the profile roll no. and enter the Exam Passing percentage and finlly fill the Description about the exam and then click on the Save button. You can view this added record on the exam list page.
To edit exam click on Edit icon and to delete exam click on Delete icon present in the exam list page.
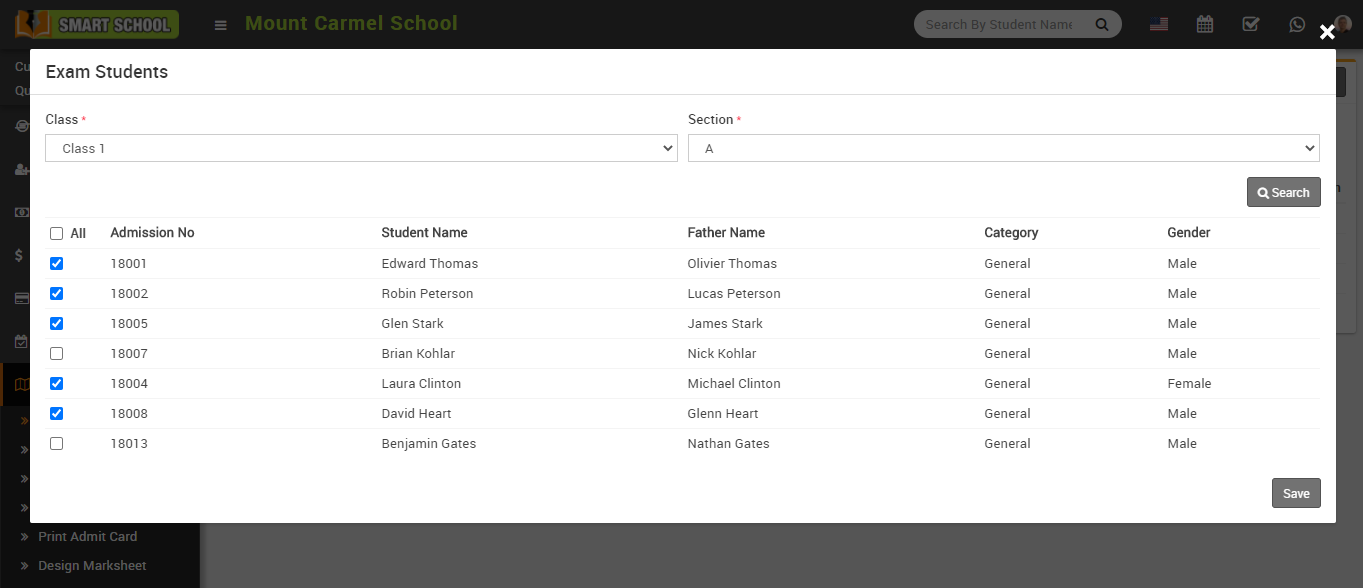
How to assign/view student for exam?
Now click on Assign/View student icon present at Action column in the exam list page, at click of this icon Exam Student modal will be open.
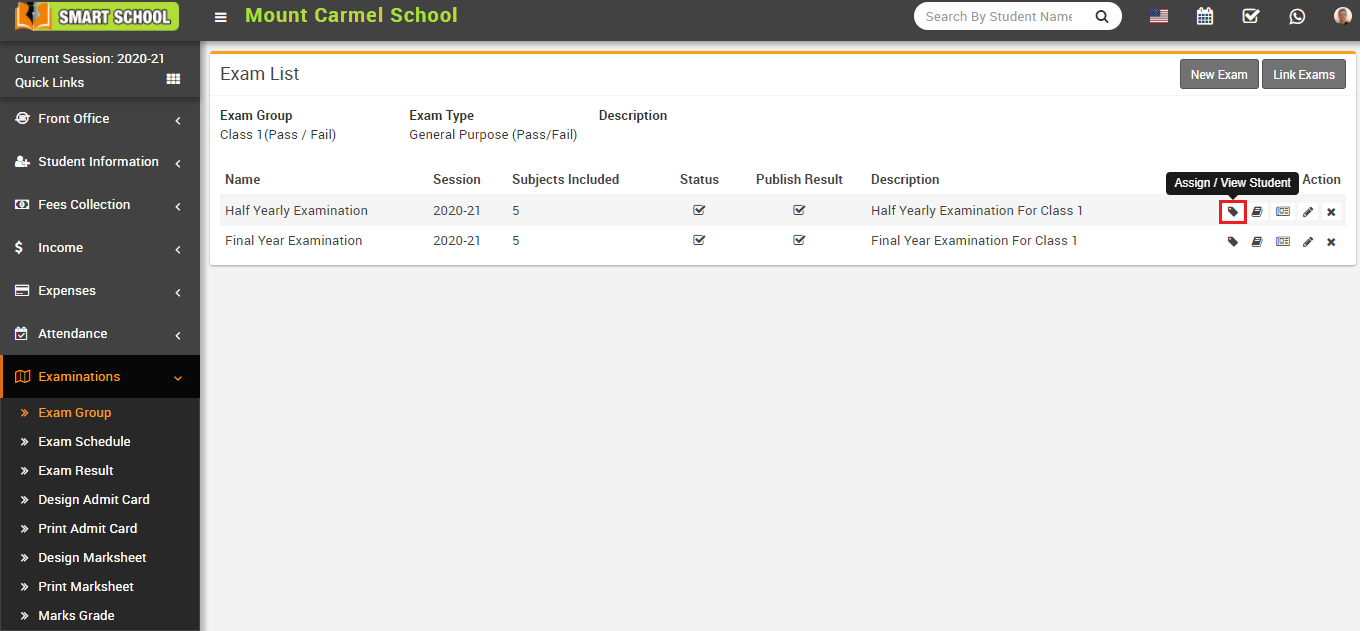
Here select the Class and Section and then click on the Search button. Here you can see all assigned or unassigned student for the exam. Now select student you want to Assign and Unassign for exam and then click on the Save button.
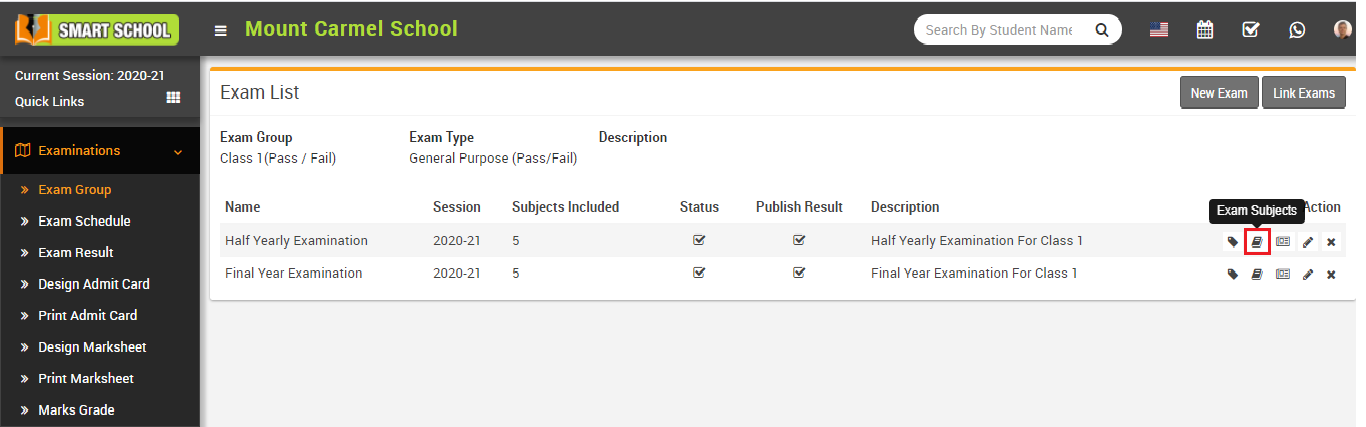
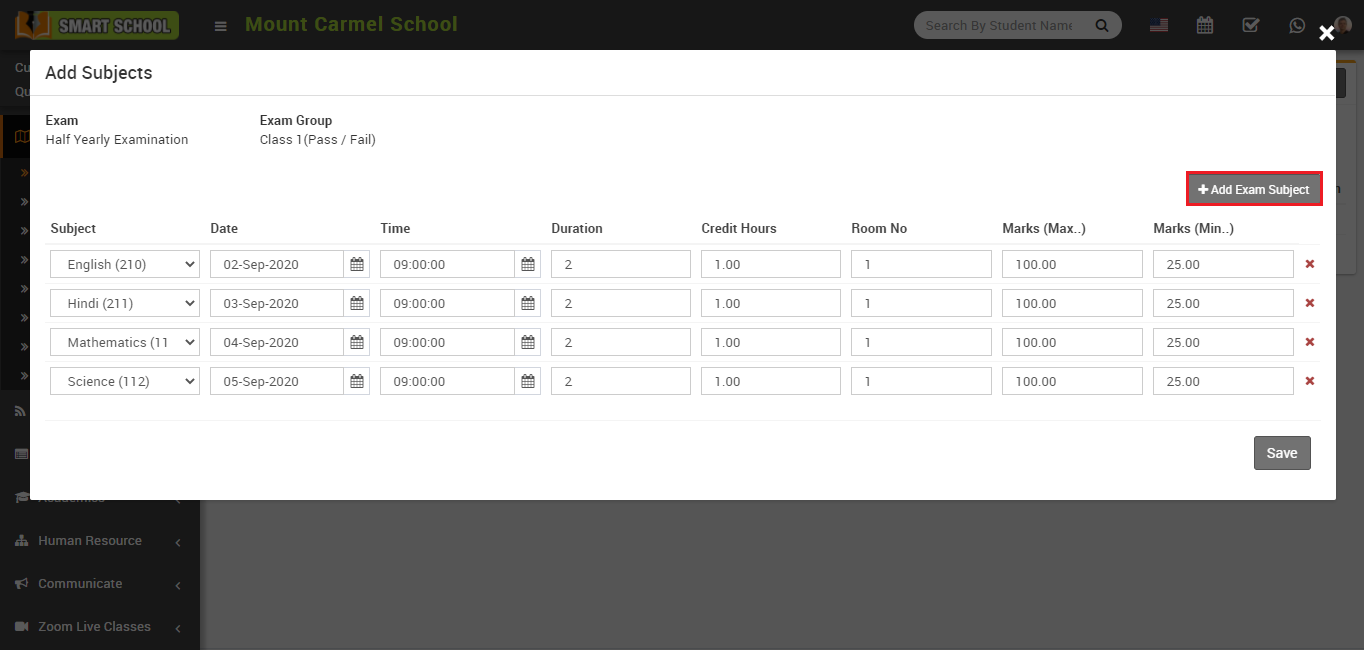
How to add subject in Exam?
Now click on the Exam Subject icon present at Action column in the exam list page, at click of this icon Add Subjects modal will be open.
Here click on the Add Exam Subject button present in the right side of the add subject page, at click of this button new column box will be added then fill the details Subject, Date, Time, Duration, Credit Hours (If you are using GPA grading system exam type, then enter the credit hour otherwise ignore it.), Room No., Marks (Max) and marks (Min.) and then click on Save button. If you want delete any subject then click on Remove icon.
How to publish exam and exam result in Smart School?
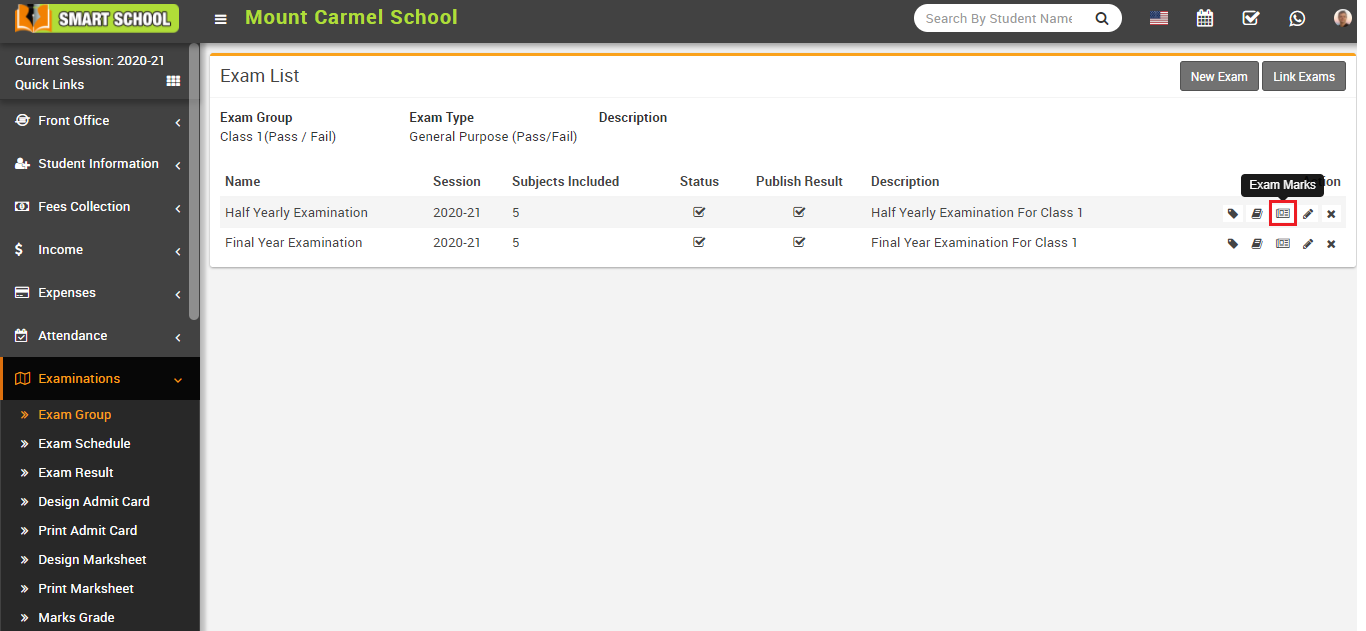
How to add marks in exam?

Here click on Exam Marks icon present at Action column in the exam list page, at click of this Exam Subject modal will be open.
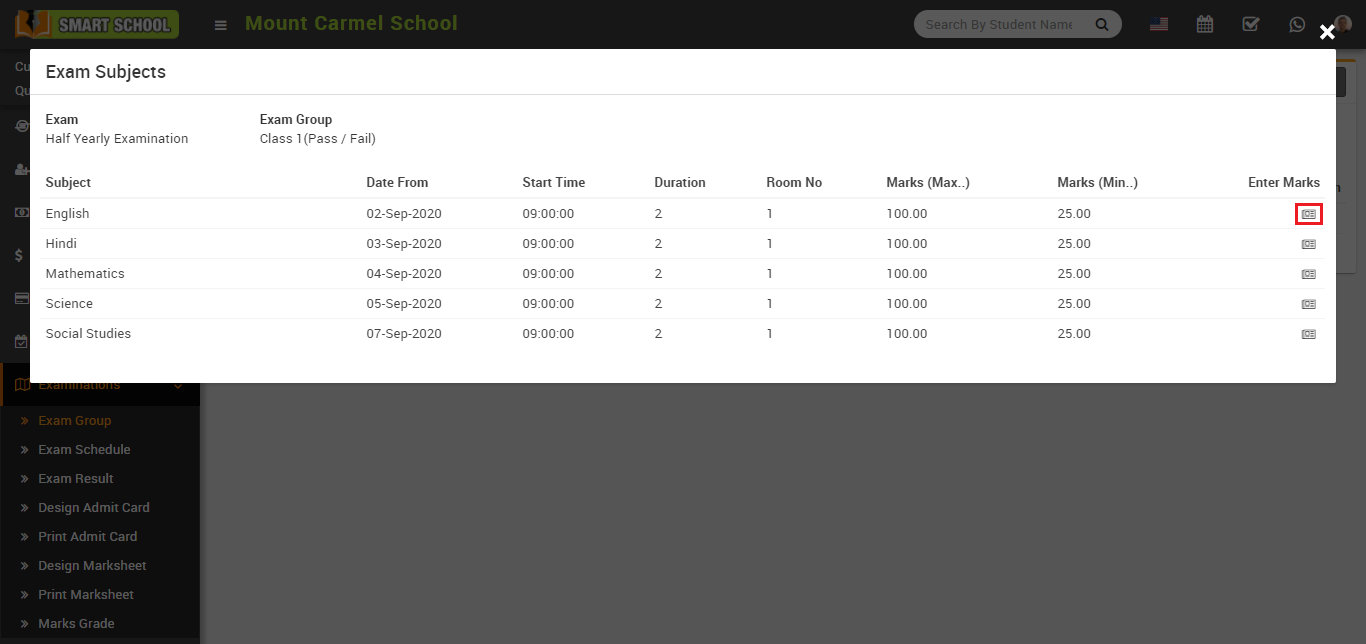
Here click on the Exam Marks icon present at Enter Marks column in the exam subjects, at click of this icon subject modal will be open.
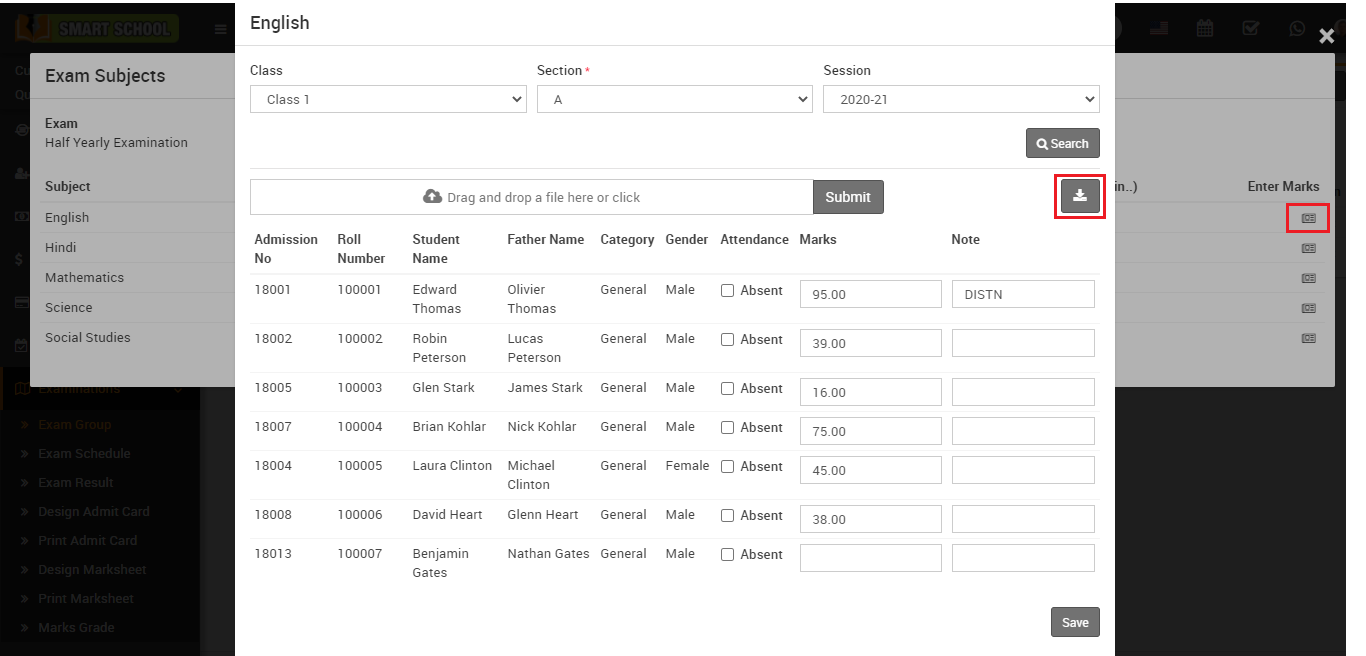
Here select the Class, Section and Session and then click on Search button. You can also download the import file from right side clicking on Download Import File button. After importing csv file marks will be fill in marks input box, if you want you edit and check marks and then upload the file and then click on Submit button.
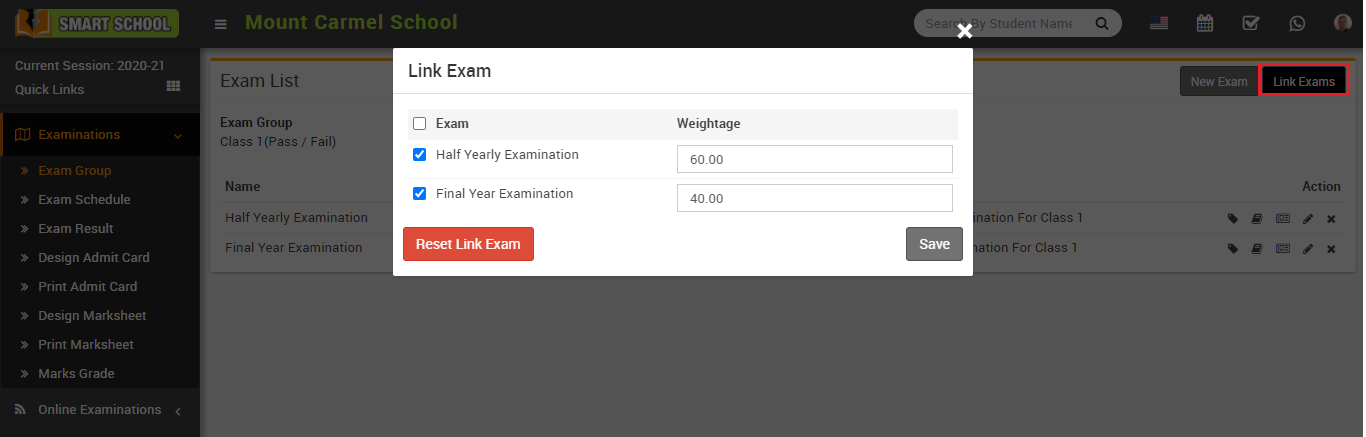
How to link two exams?
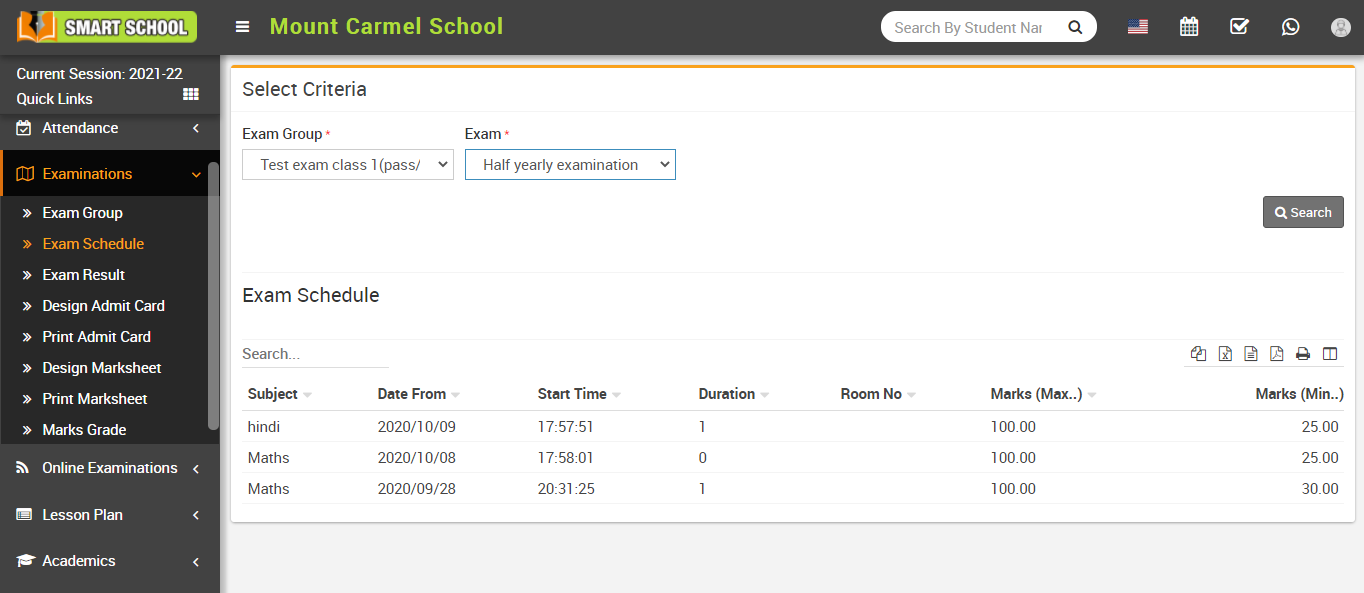
How to check Exam Schedule?
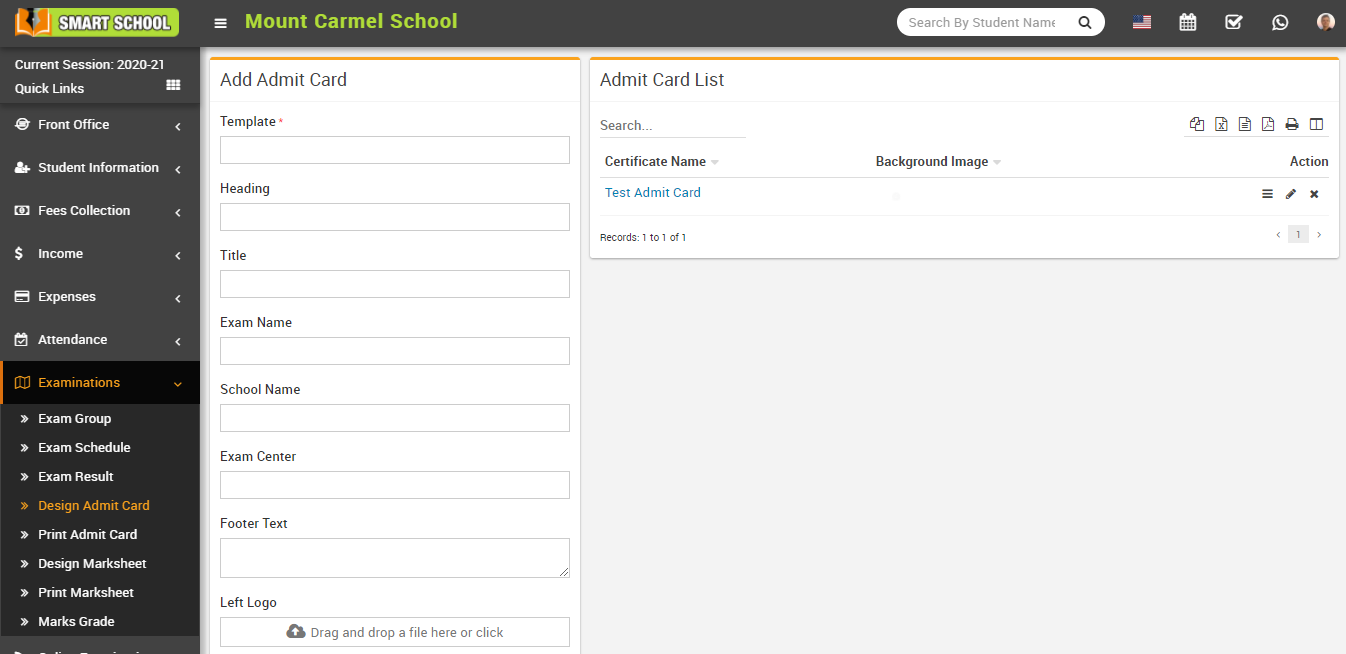
How to add Design Admit Card?
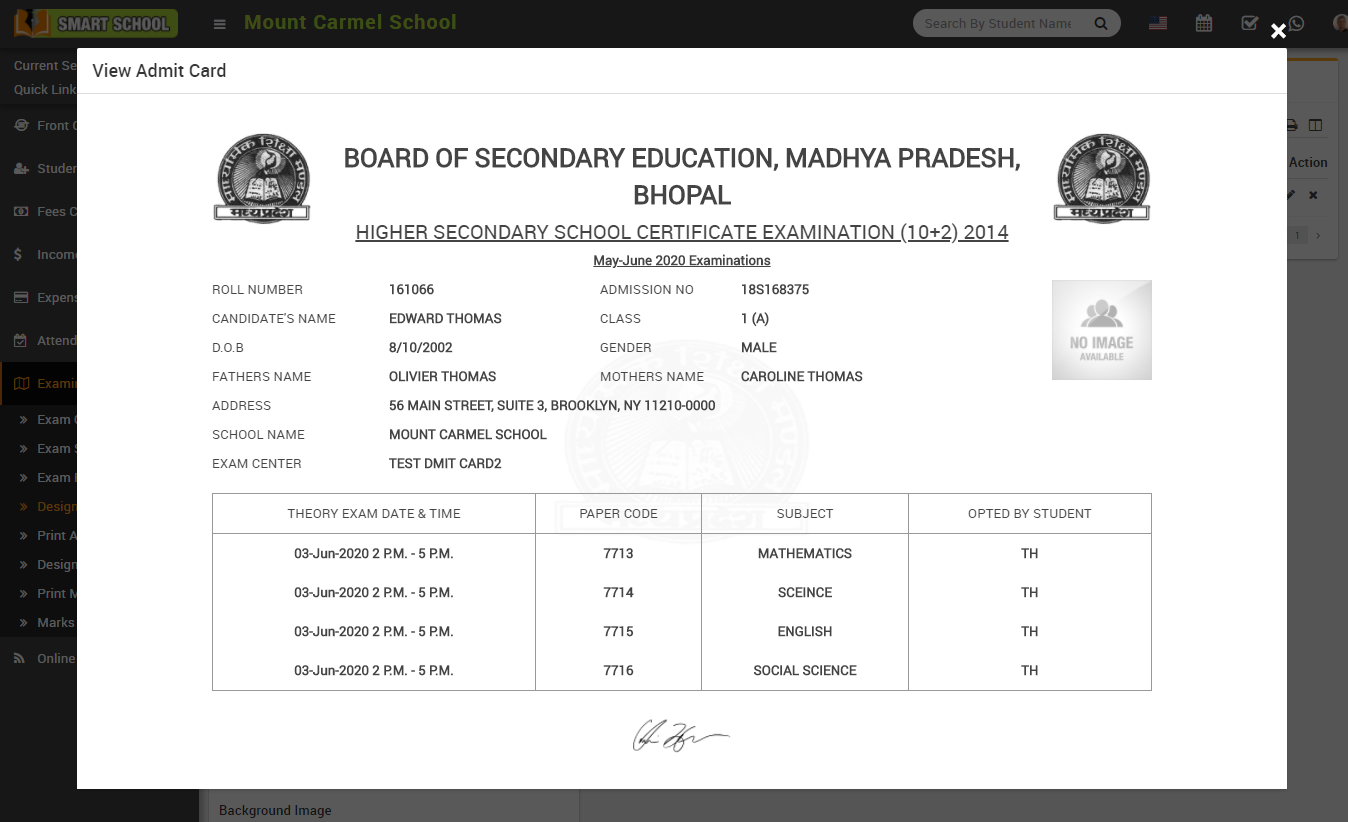
To view admit card click on the View icon present at Action column in the admit card list, at click of this icon Admit Card modal will be open.
To edit admit card click on Edit icon and to delete admit card click on Delete icon present in admit card list.
How to Print Admit Card?
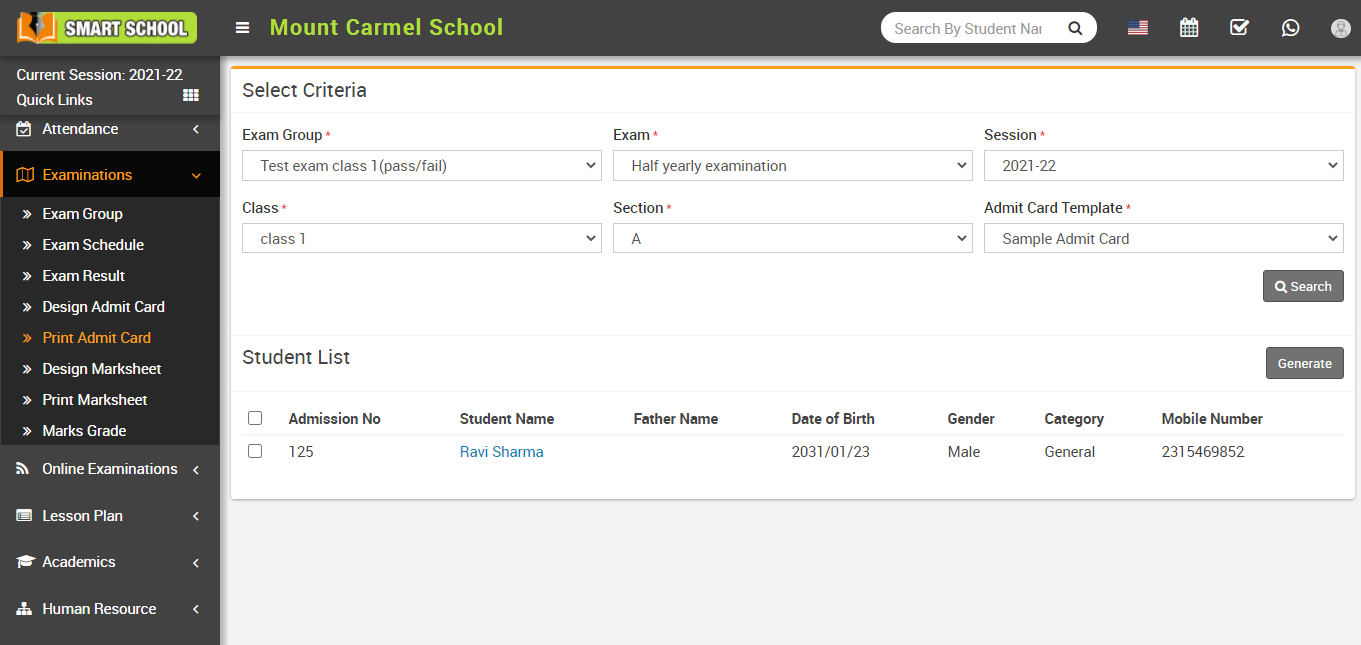
Now select student for generate admit card and click on the Generate button present at right side in the student list, at click of this button admit card will be open.
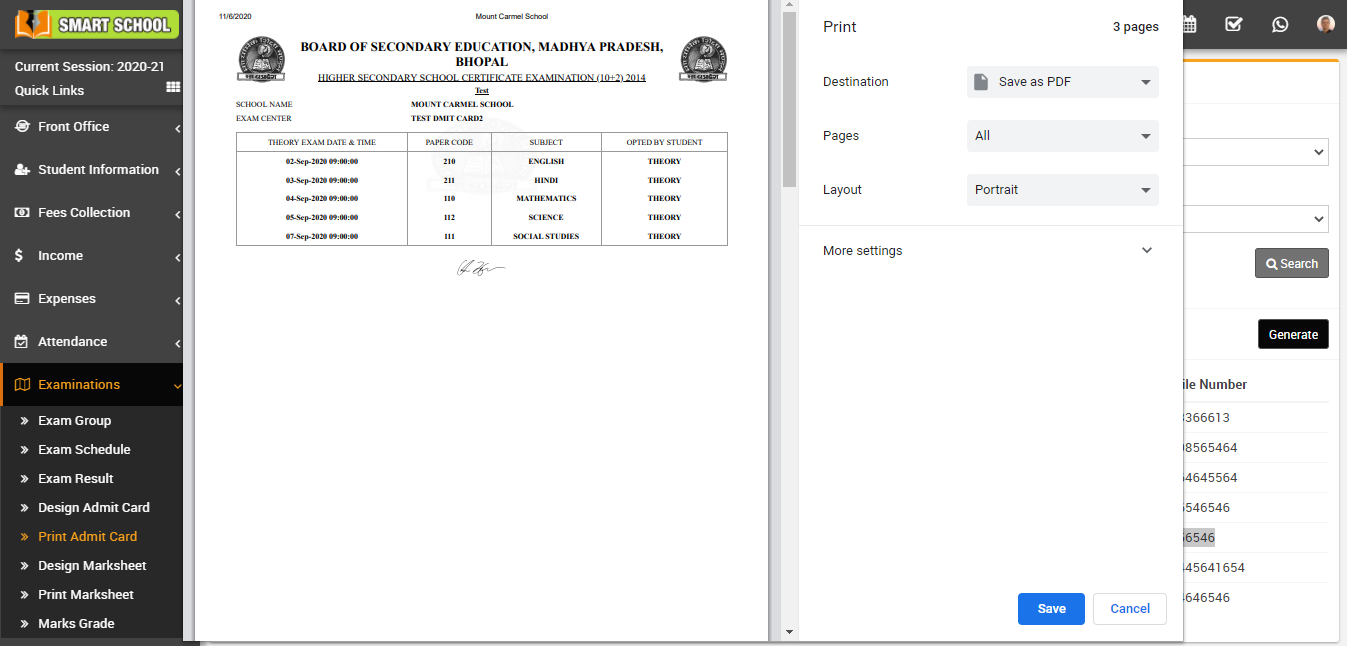
Note: Do not print the admit card directly, here select the Destination (save as pdf) and save pdf file and then print admit card using this pdf file.
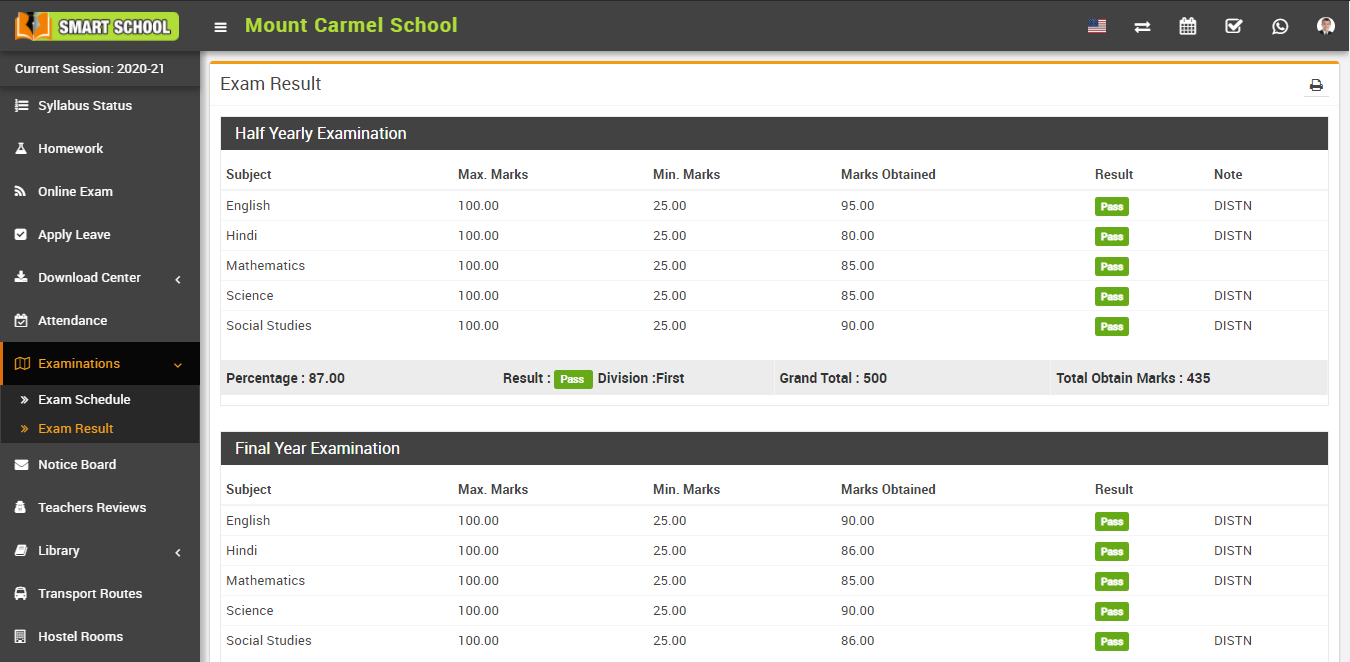
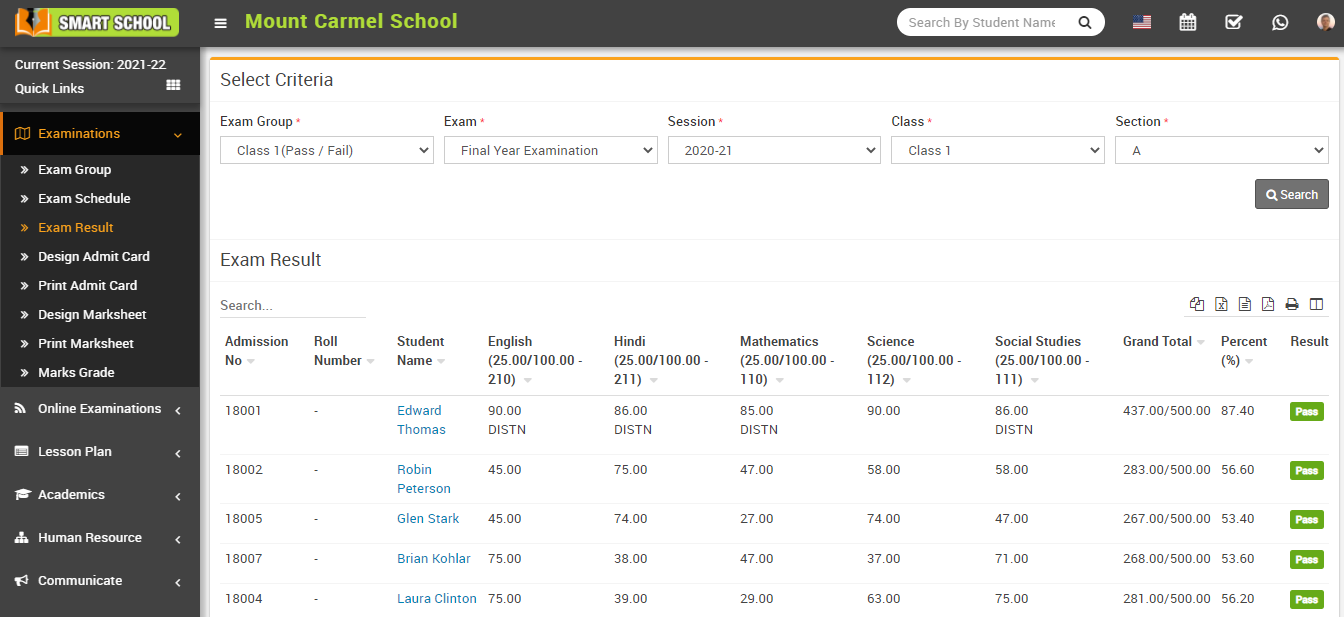
How to check Exam Result?
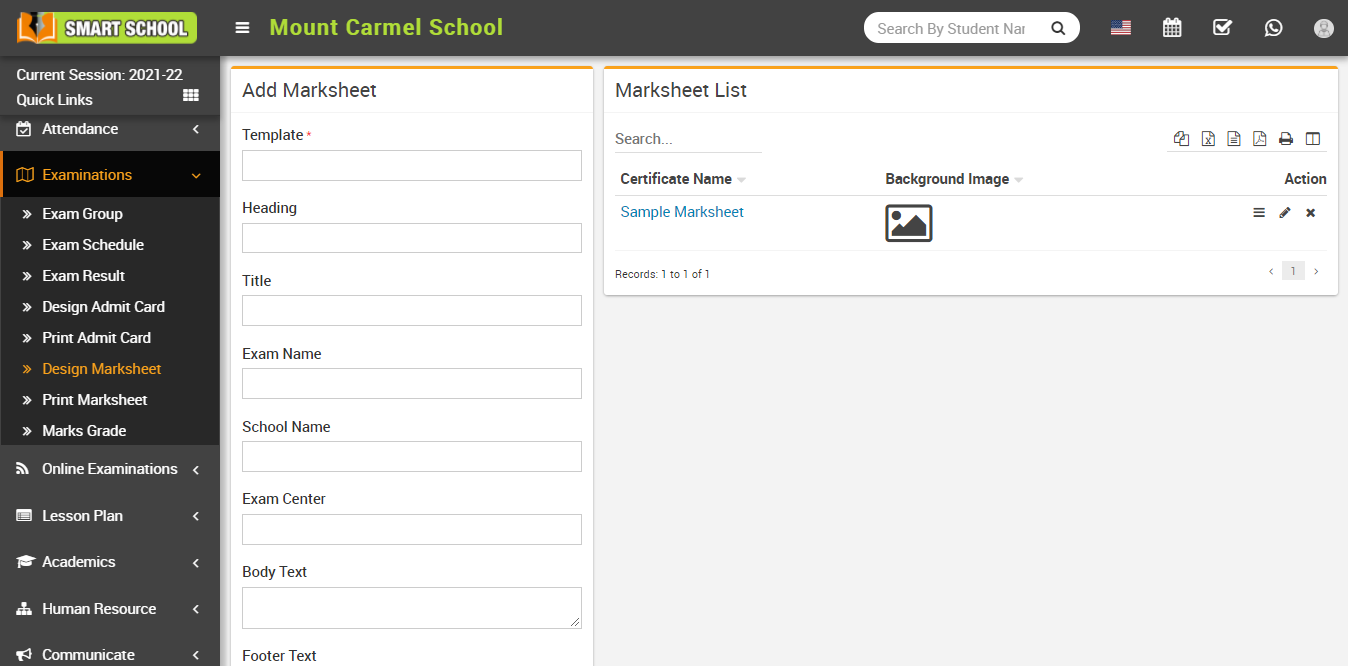
How to add Design Marksheet?
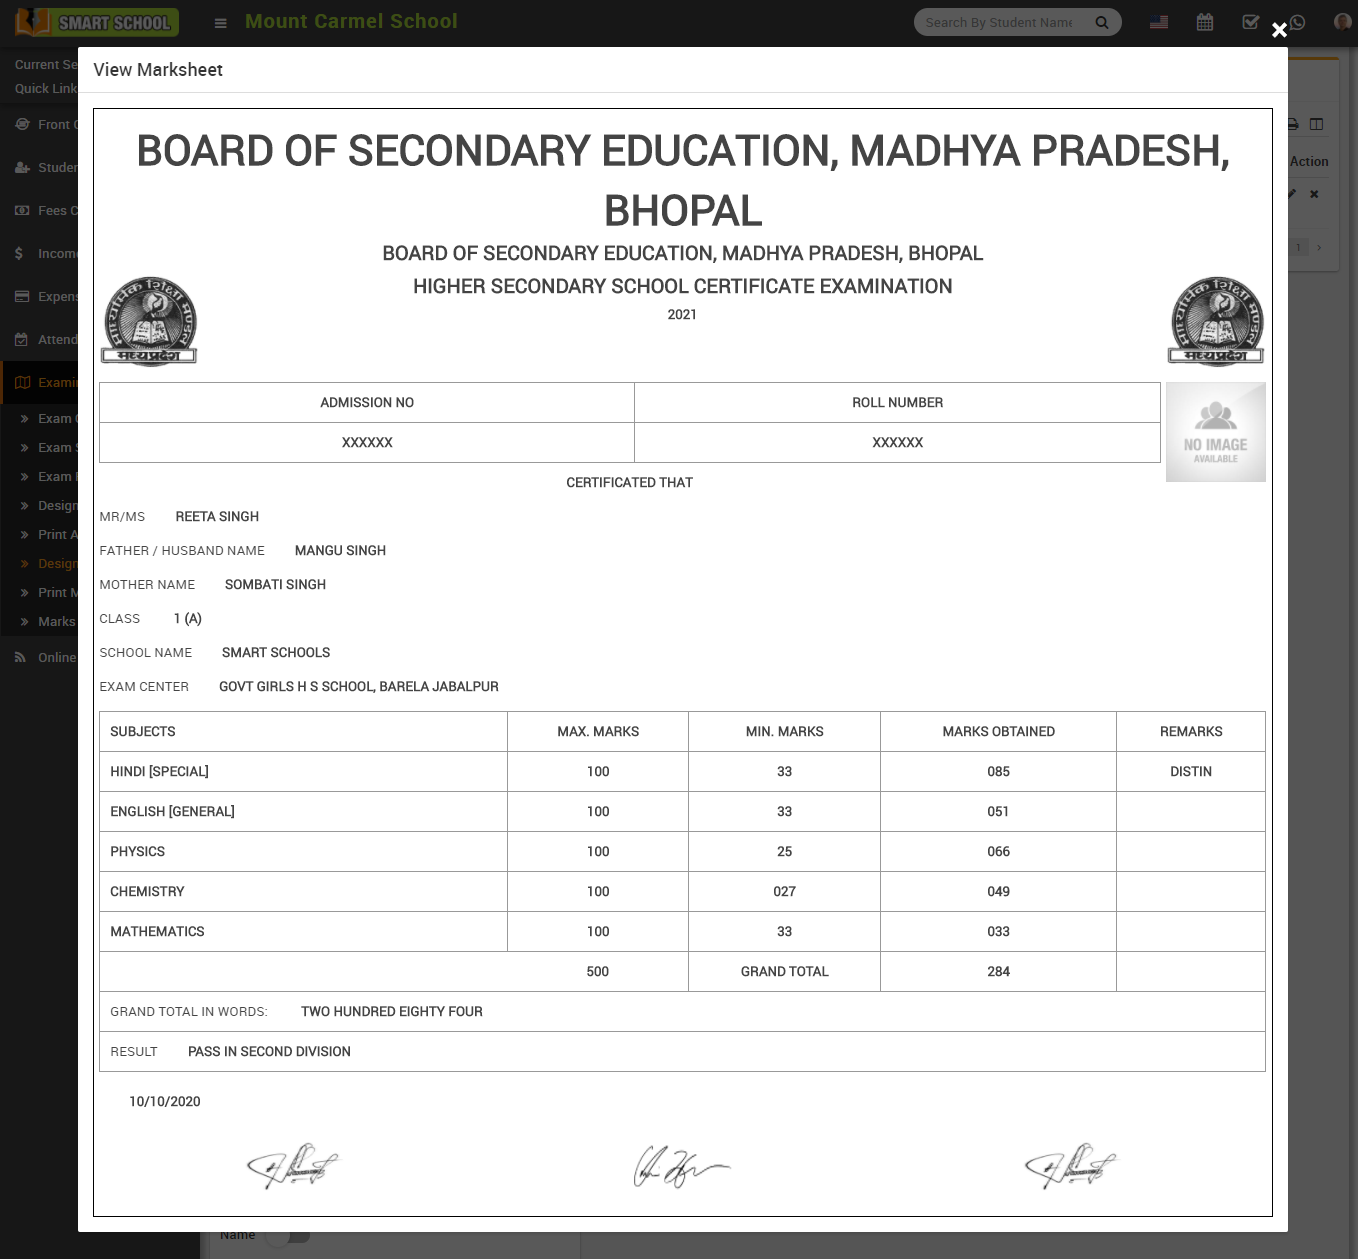
To view marksheet click on the View icon present at Action column in the marksheet list, at click of this icon View Marksheet model will be open.
To edit marksheet click on Edit icon and to delete marksheet click on the Delete icon present in the marksheet list.
How to Print Marksheet?
To print the marksheet, go to Examinations > Print Mark sheet.
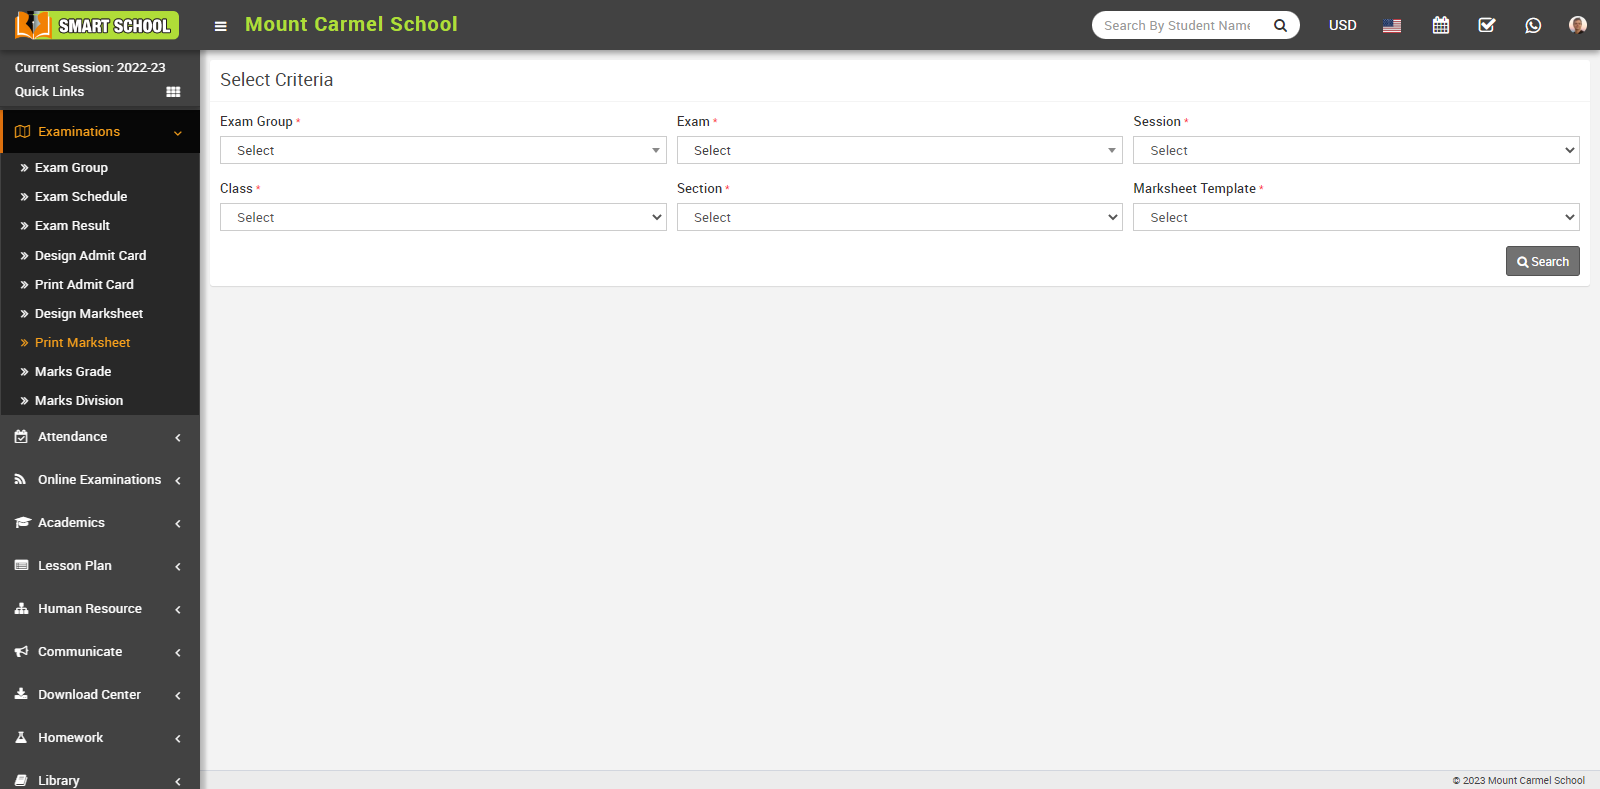
Now select the Exam Group, Exam, Session and Class, Section and Marksheet Template and click on the Search button. The Student List will be displayed below.
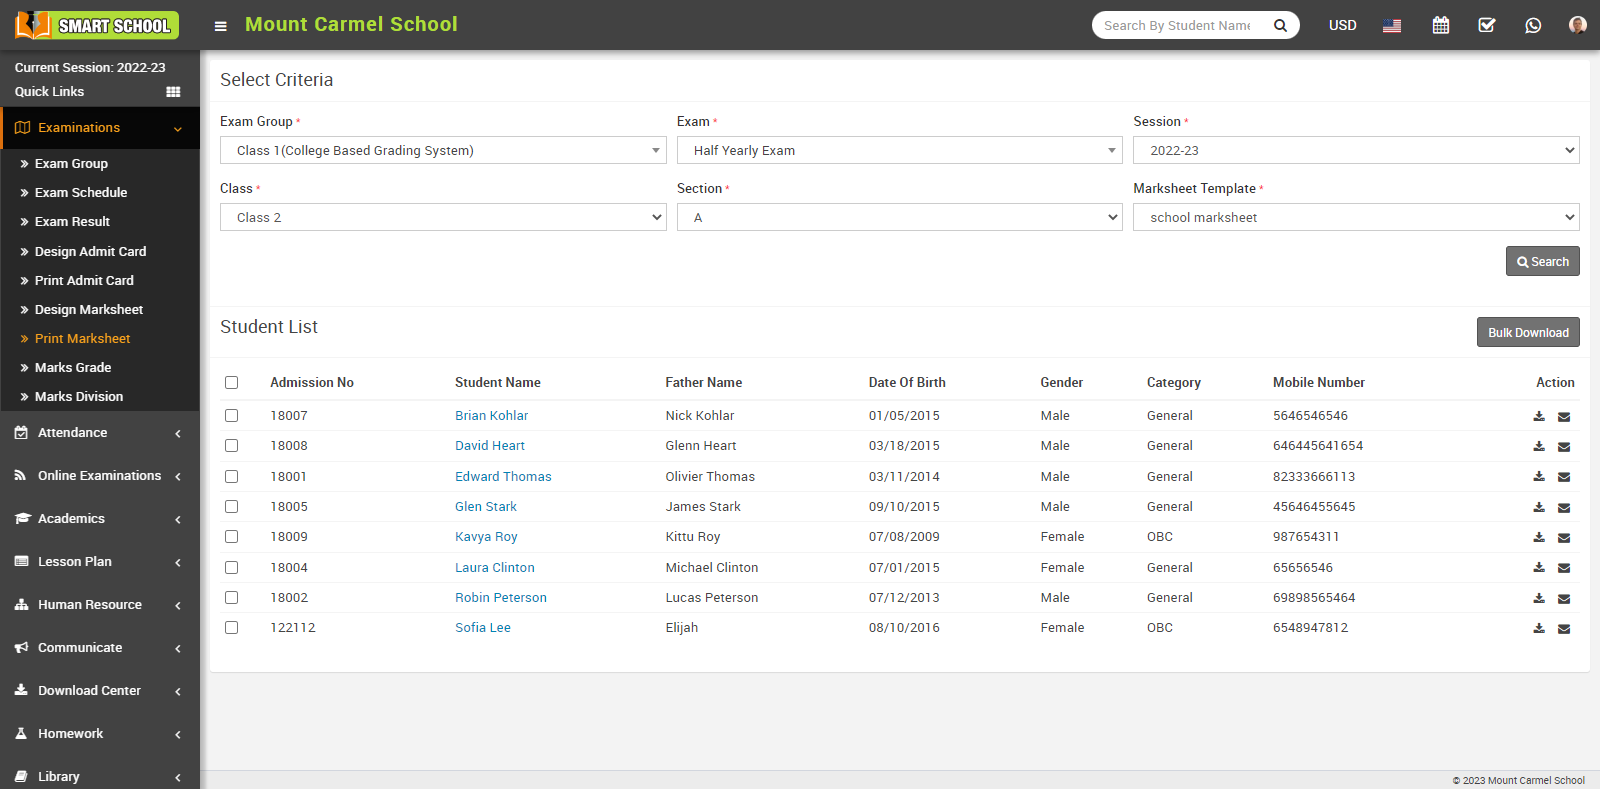
Here you can download the marksheet for an individual student or in bulk. To download the marksheet for a specific student, go to the Action column and click on the Download icon. The marksheet for that student will be downloaded to your system.
To download multiple marksheets, check the multiple or all checkboxes and click on the Bulk Download button, which is located right above the student list. This will download a bulk marksheet into your system.
To receive your marksheet by email, simply click on the Email icon showing in the Action column.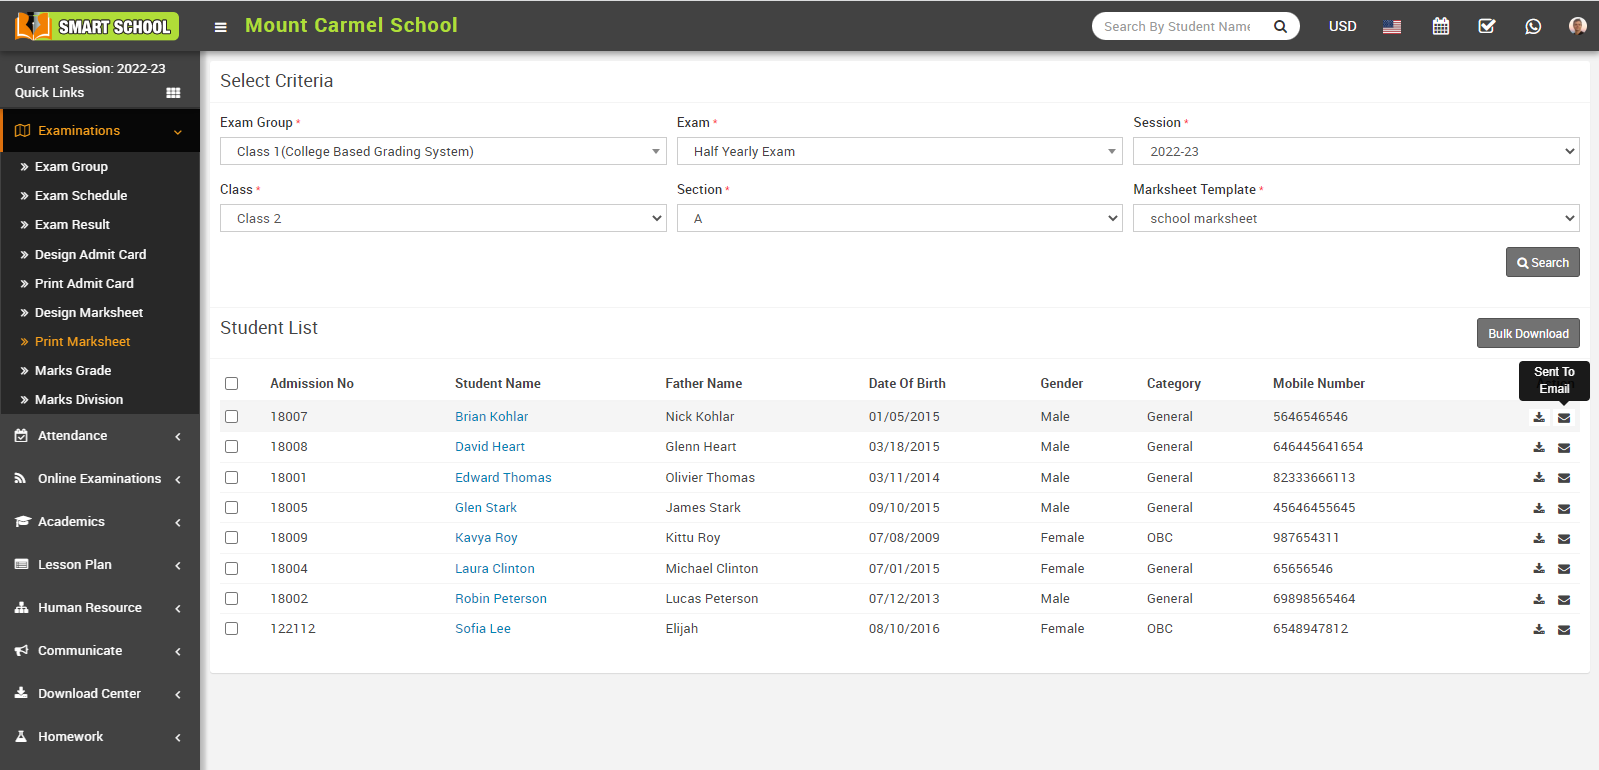
An email will be successfully sent to your registered email address, which you submitted at the time of admission.
How to check Rank report?
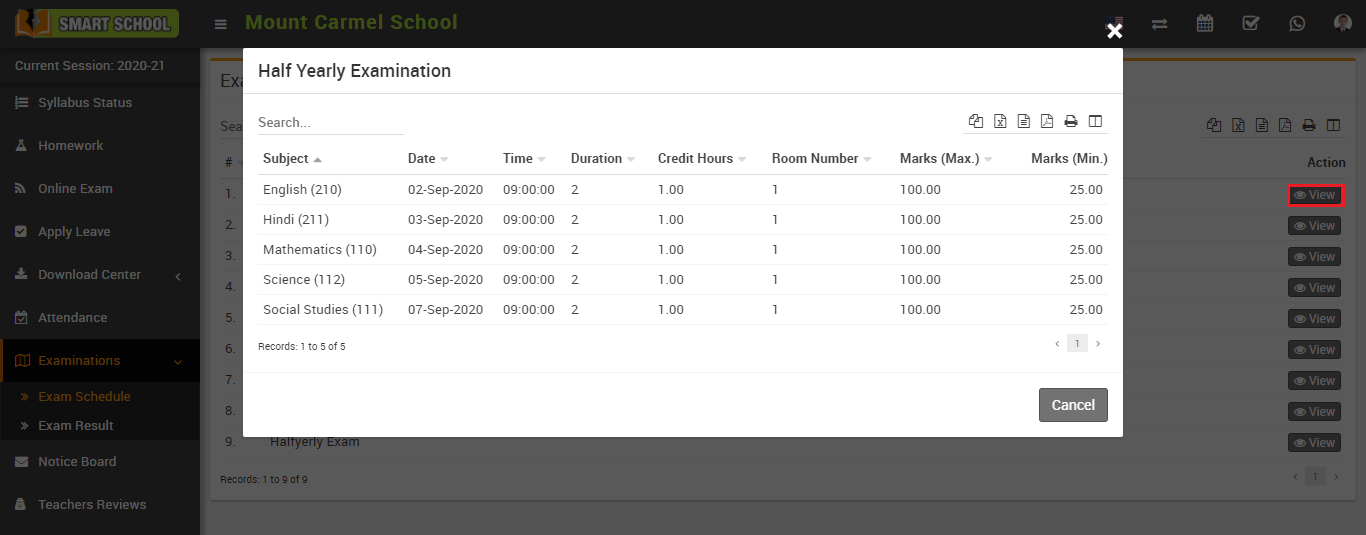
How student can check Exam Schedule?
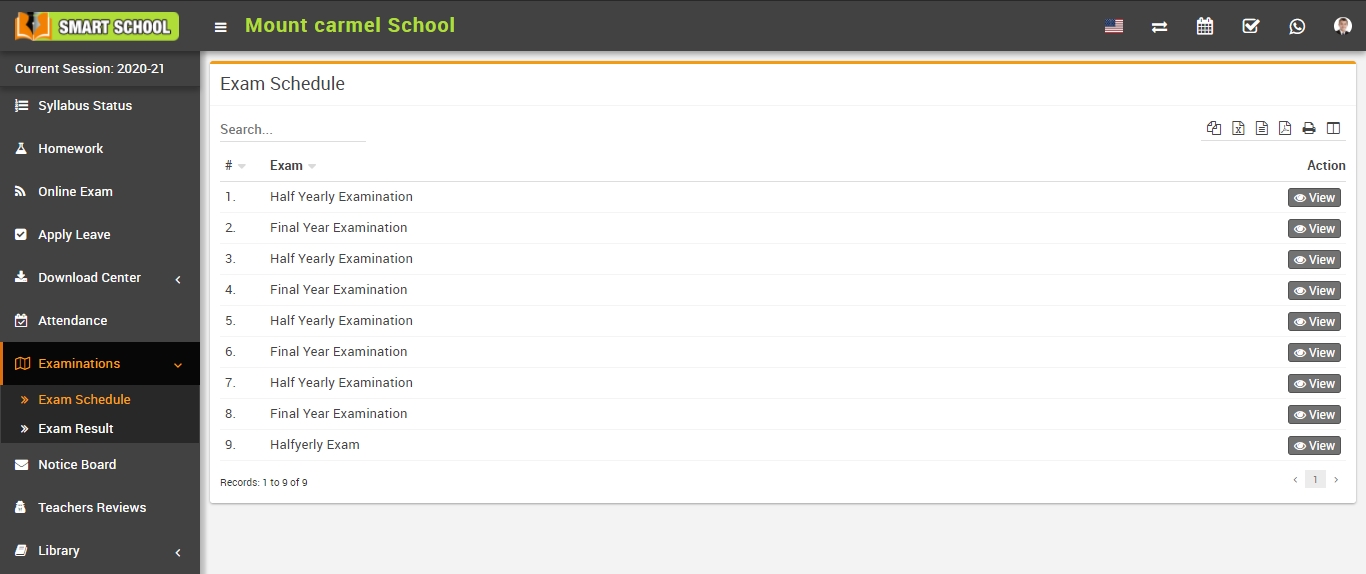
To view exam schedule click on View icon present at Action column in exam schedule page, at click of this icon Examination modal will be open. Here you can see exam schedule details.
How student check Exam Result?