About Behaviour Records
Behaviour is the way in which one acts or presents themselves. It consists of a person’s unique mannerisms, ways of speech, habits and more. The way in which one behaves can tell you a lot about the kind of person they are, and help us understand their character better. Good behaviour always attracts others and makes one seem approachable and nice. It is an expression of good character and morals.
Similarly, bad behaviour is repulsive to people and has no positive consequences. However, outward behaviour can also be deceptive, and we must never judge a book solely by its cover. Still, behaviour is an important factor that establishes one’s position in society.
Incident :- An incident is an event that has unintentionally happened, but this may not result in damage, harm, or injury.
How to check the list of incidents?
To check the incidents list, go to Behaviour Records > Incidents. After clicking on incidents, the incident list page will open, and here you can view the incidents list.
Now, in the incidents list table, you can see the columns of title, point, and description. The incident name appears in the Title column, and the incident point appears in the Point column, depending on whether the incident was positive or negative. If incidents are positive, students will get the positive point, and if incidents are negative, students will get the negative points. In the third column of the description, you can see the description of the incident.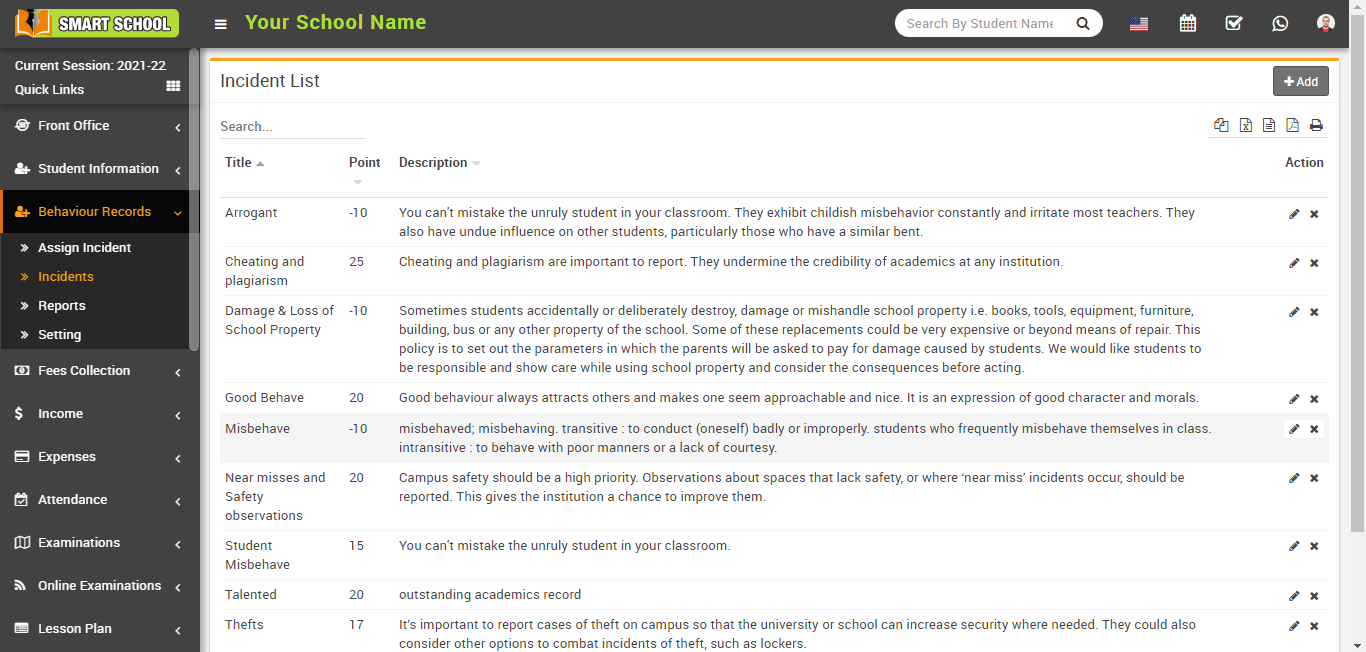
How to edit the incidents in the incident list?
To edit the incident, go to the Behaviour Records > Incidents page. The incident list will be open, there is an action column, in this column, you can see pencil or edit icon, with the help of this pencil or edit icon, you can edit the specific incident.
Now click on the pencil or edit icon next to the specific incident you want to edit. 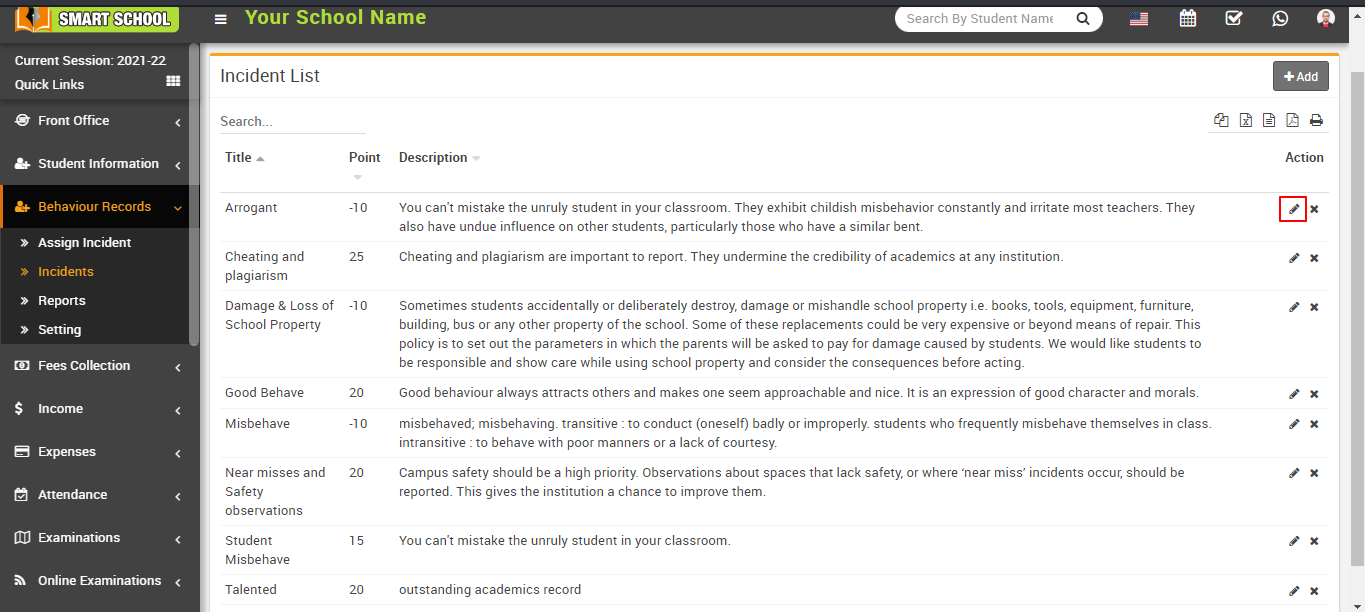
The Edit Incident modal will appear after clicking the Edit icon. 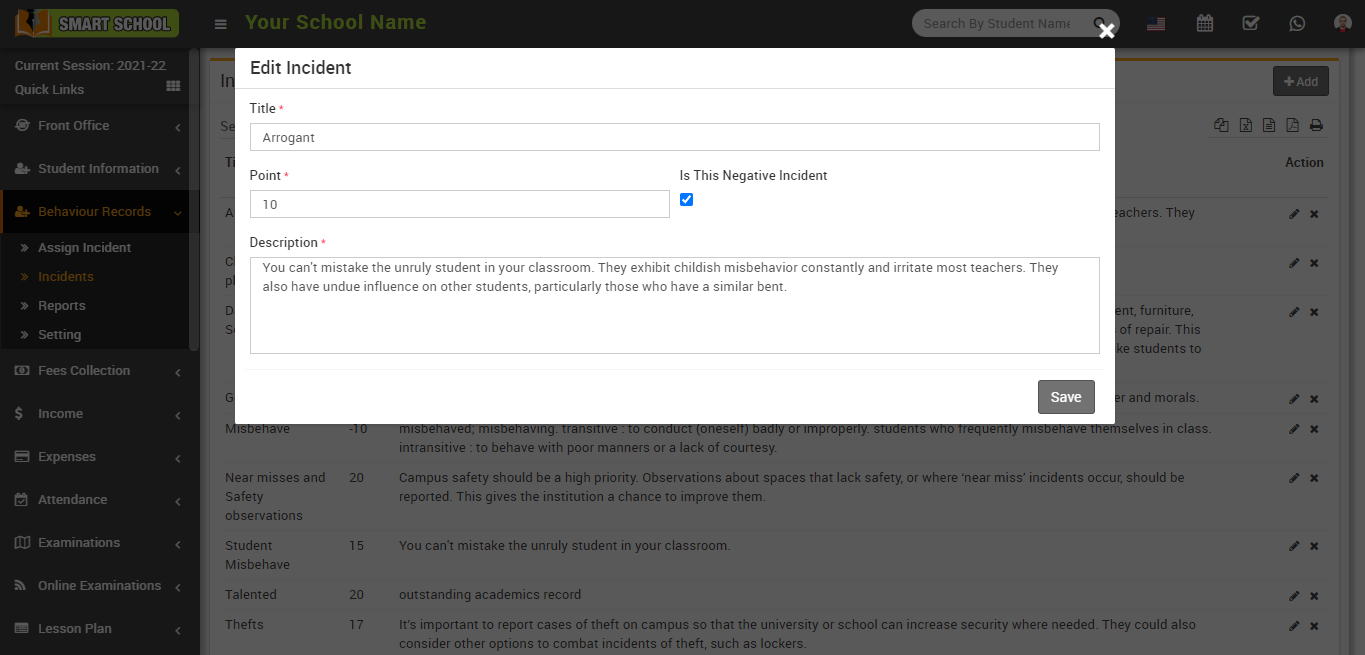
You can see previous details mentioned, such as the incident title, point, Is This a Negative Incident and description in the edit incident modal. Now you can edit the data that has already been mentioned in the incident and save it by clicking the save button in the bottom left corner. The incident will be successfully edited.
How to delete an incident from the incident list?
To delete the incident from the incident list, go to Behaviour Records > Incidents. When you click Incidents the incident list page will open. 
The Action column can be found in the right-hand corner of the incident list page. In the Action column, you can see the cross icon is available. You can delete any incident you want by clicking on this cross icon.
Now, click the cross icon. 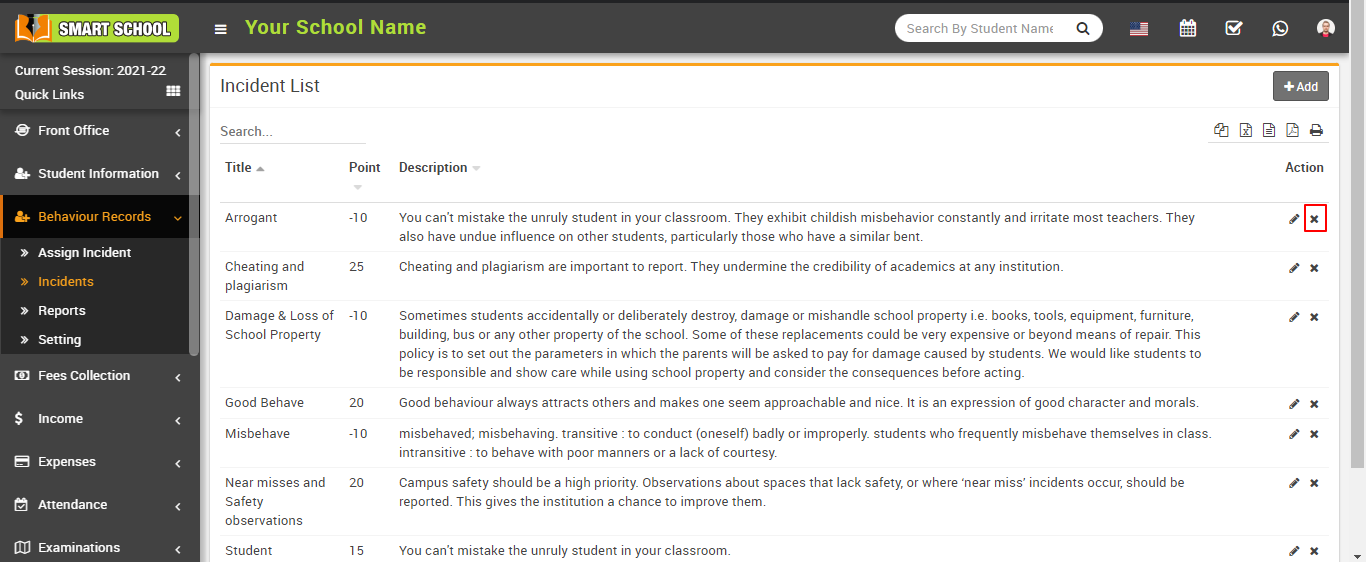
A delete confirmation message will appear.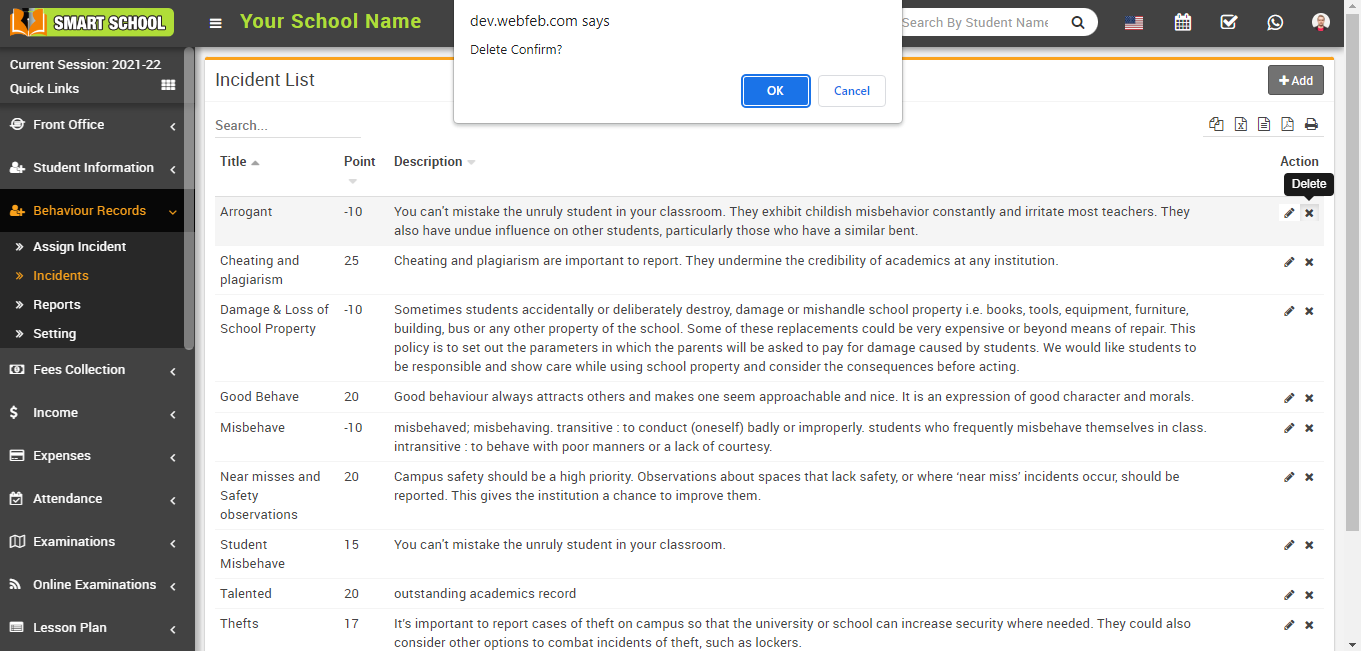
Now click on OK, which is showing in the bottom right, and the incident will be deleted.
How to add the incidents?
To add the incidents, go to the Behaviour Records > Incidents. The incident list page will be open, and now in the top right corner you can see the +Add button showing. With the help of this button, you can add the incidents.
Now, click the +Add button to open the Add Incident modal. 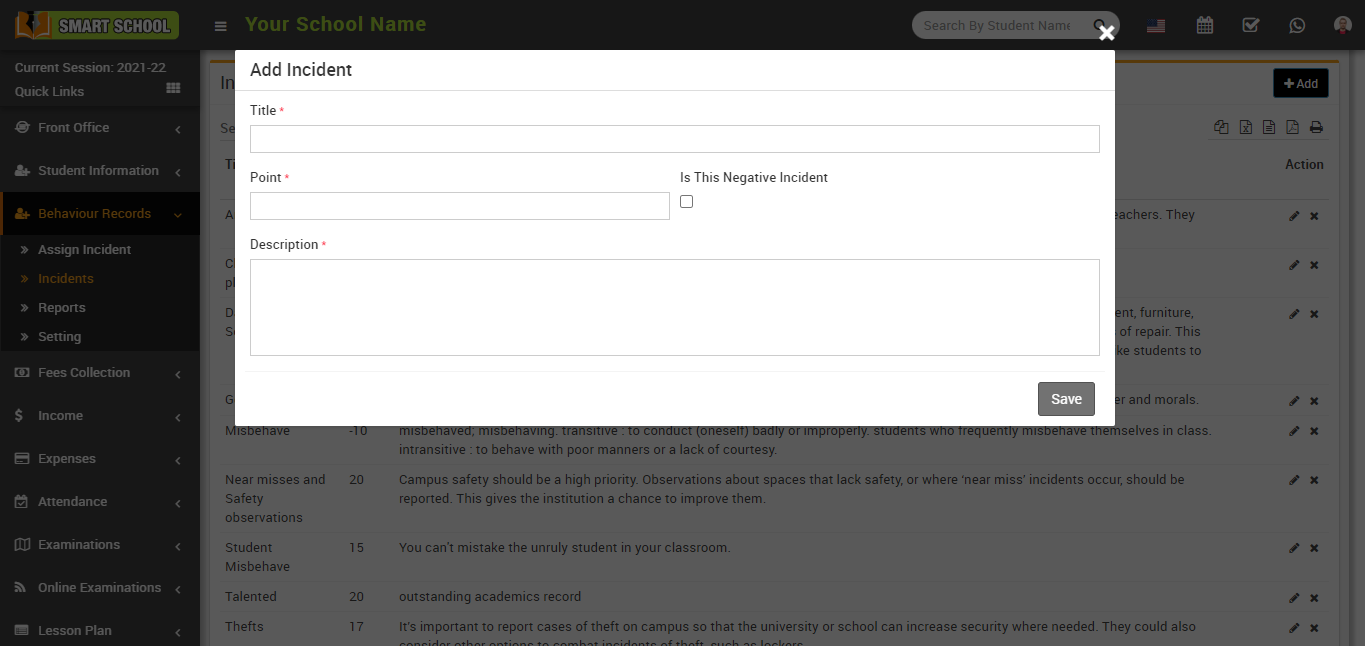
Now you can see mandatory options to fill out (Title, Point, and Description).
Title: Fill in the name of the incident in the title field.
Point: In points, you can fill in the points according to the incidents, whether they are positive or negative. If the incident was positive, you could award positive points of 10, 15, 20, and so on.
Is This Negative Incident: If the incident is negative, check the box to give it negative points Example: -10, -15, and -20, etc.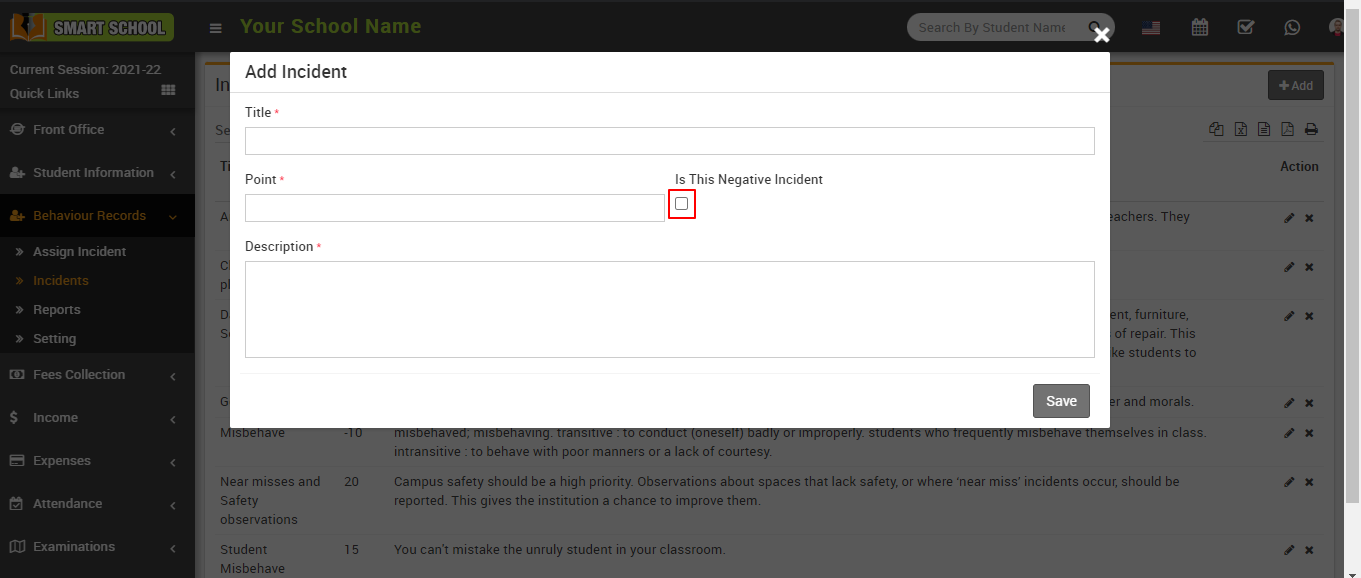
And in the incident list, you can see the negative incidents.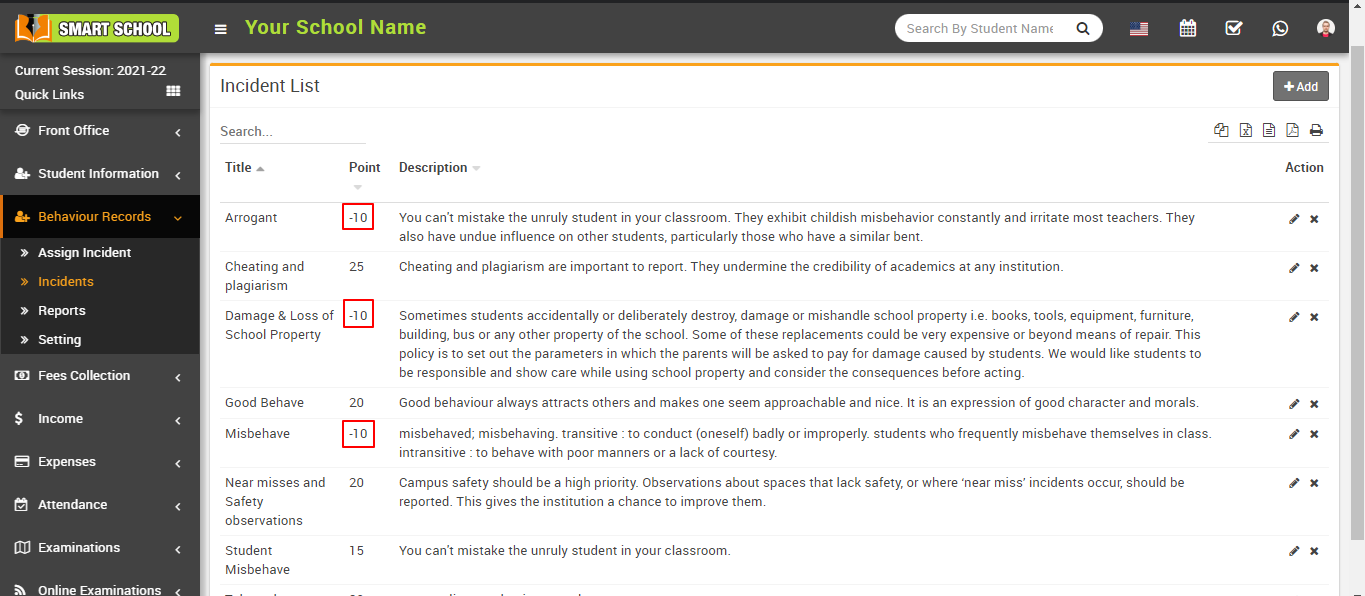
Description: Here, you can write a detailed overview of that incident.
After filling out all of the incident details, click the save button in the bottom left corner. 
By clicking on the save button, your details will be saved, and you can see saved details in the incident list.
How to assign incidents to the students?
To assign an incident to a specific student, go to the select criteria at the top of the page, then select the class and section, and then click on the search button in the top right corner. Students are displayed in the assign incidents list of related classes and sections after clicking on search.
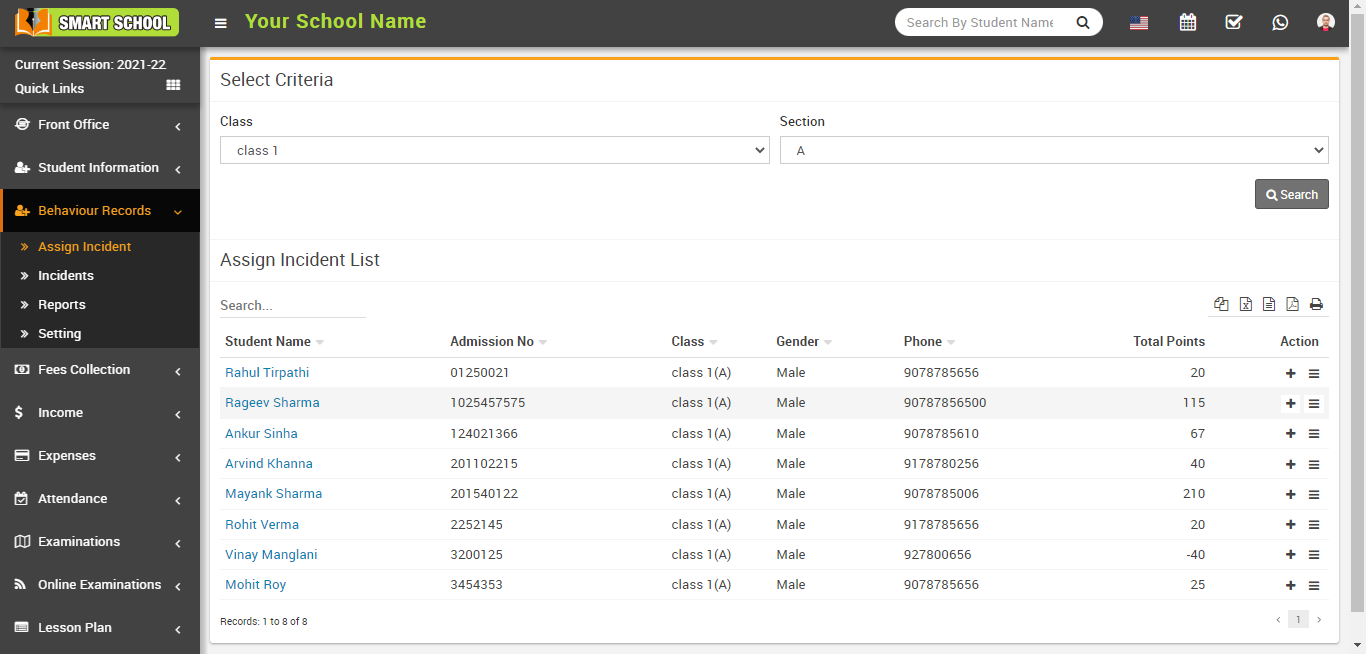
Click the search button to open the previous assign incident list, a list will appear below. 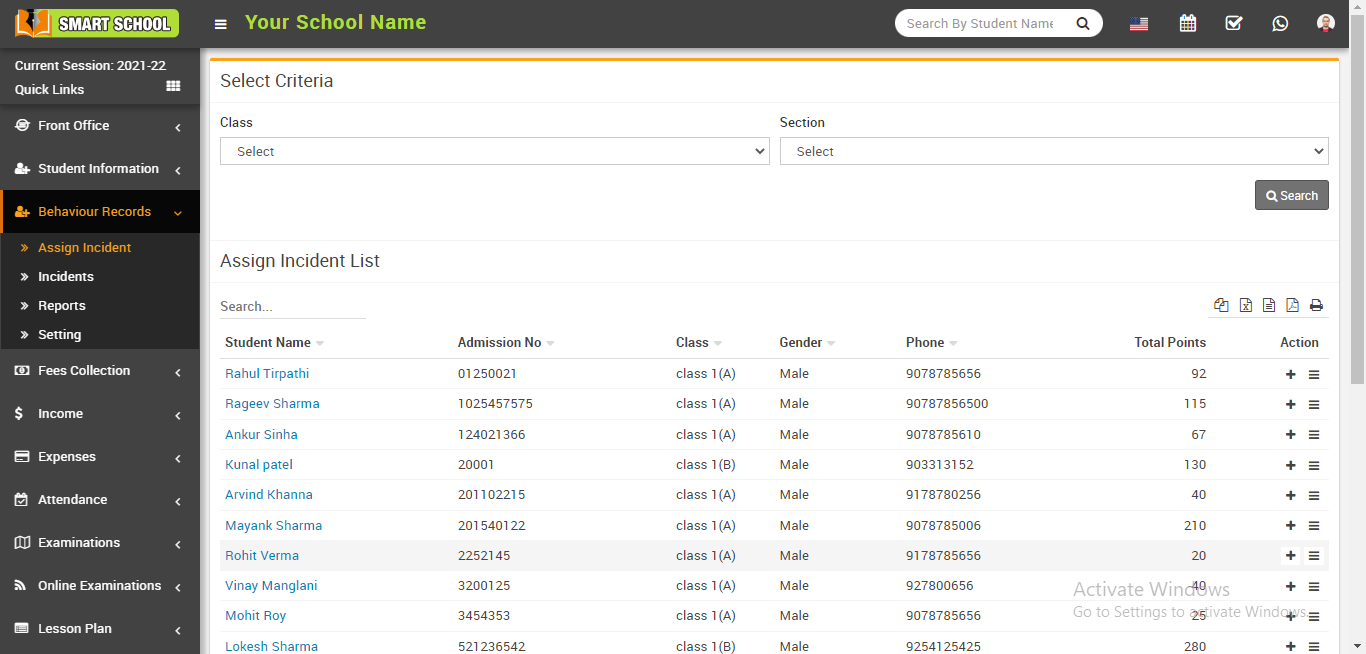
The assign incident list has seven columns: the first column contains the student name list that you searched using the above criteria; the second column contains the student admission number; the third column contains the student's class and section; the fourth and fifth columns contain the student's gender and phone number; and the sixth column contains the student's positive and negative total points.
Now, in the last column, there is an action column with two icons: the plus icon and the view icon. 
With the help of the plus icon or add icon, we can assign the incident to the student.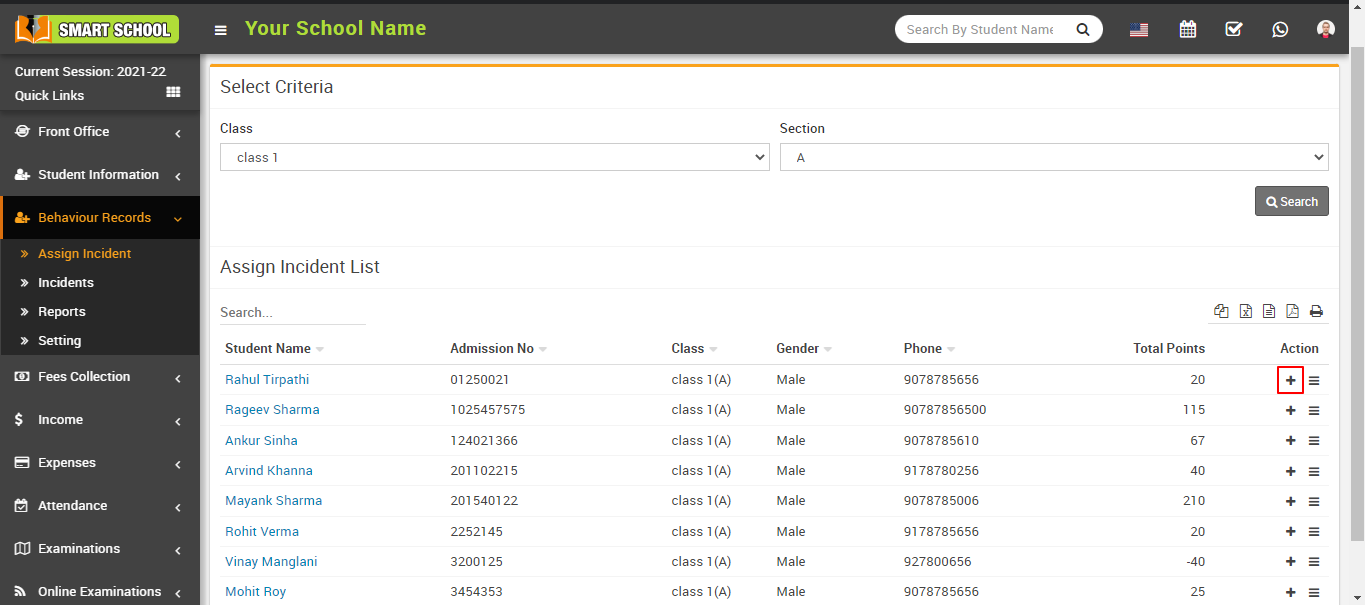
Now click on the plus icon (assign incident), which is shown right below in the action column. The Assign Incident window will be opened after clicking the plus icon. 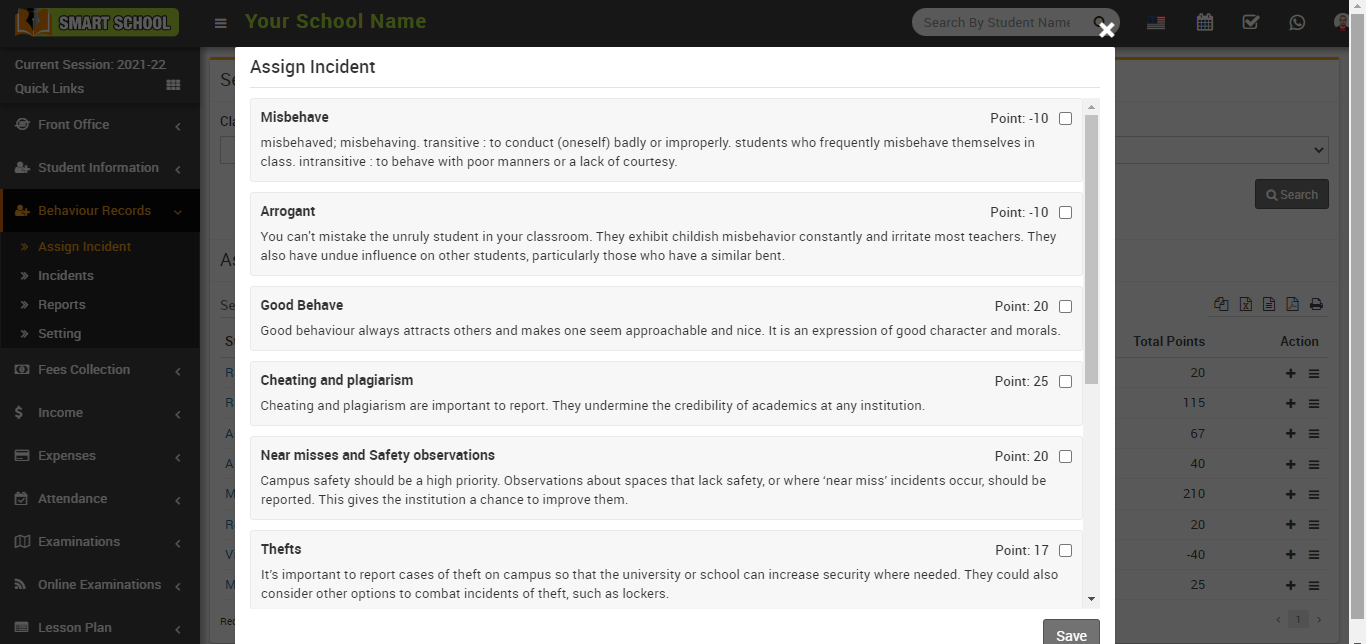
On the assign incident page, you can see the various types of incidents that are displayed, whether positive or negative. Now on this page, you can also see incident points and a checkbox on the right side of the page. Now, when assigning the incident to the student, please check the check box. You can also check the multiple checkbox of assign incidents to the student.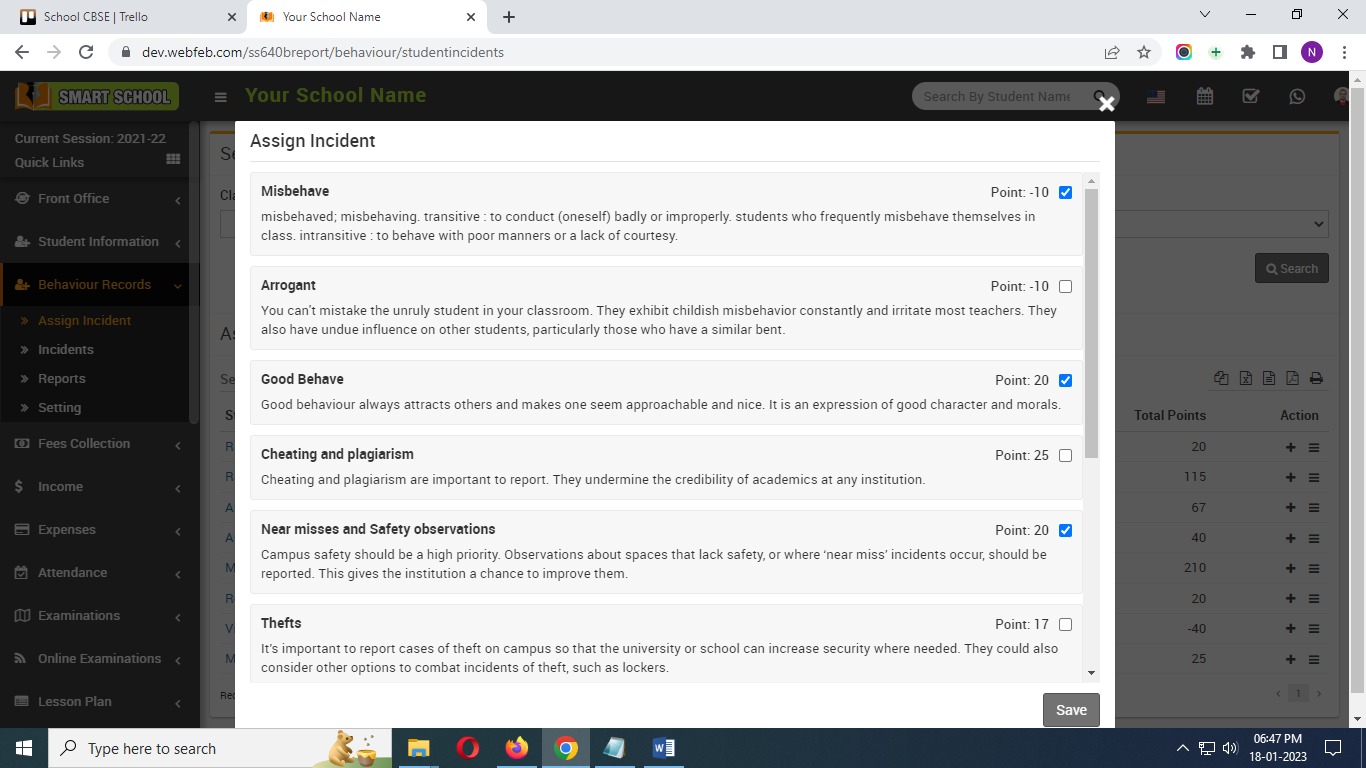
Now click on save button which showing in left bottom corner. By click on save button, incident and points are assign to the student.
How to view the assigned incident?
To view the assigned incident, navigate to behaviour records > assign incident. The assigned incident list will open, now, in the action column, click on the list icon next to the plus icon. 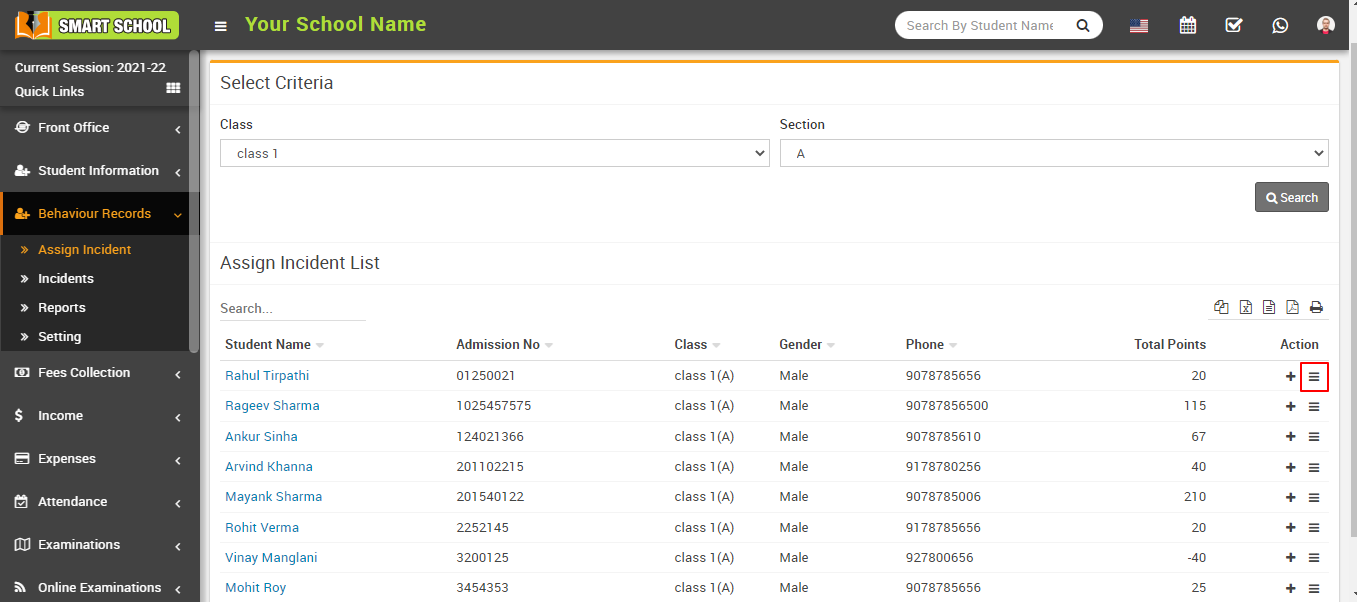
The View Assigned Incident page will open after you click the View List icon. 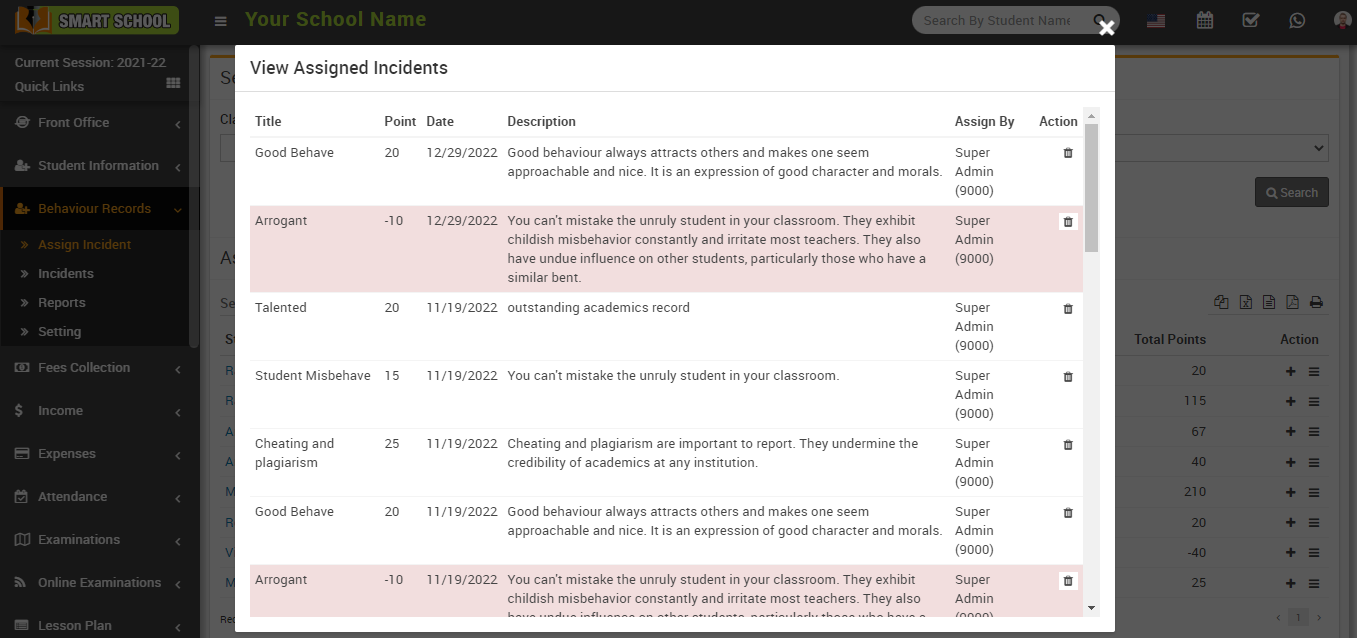
Now on the assigned page, you can see the title name of the incident in the first column, the point (positive or negative) in the second column, the date in the third column, and the incident description in the fourth column. You can also see who assigned the incident in the Assign by column and in the Last Action column, from here, you can delete the assigned incident by clicking on the delete icon.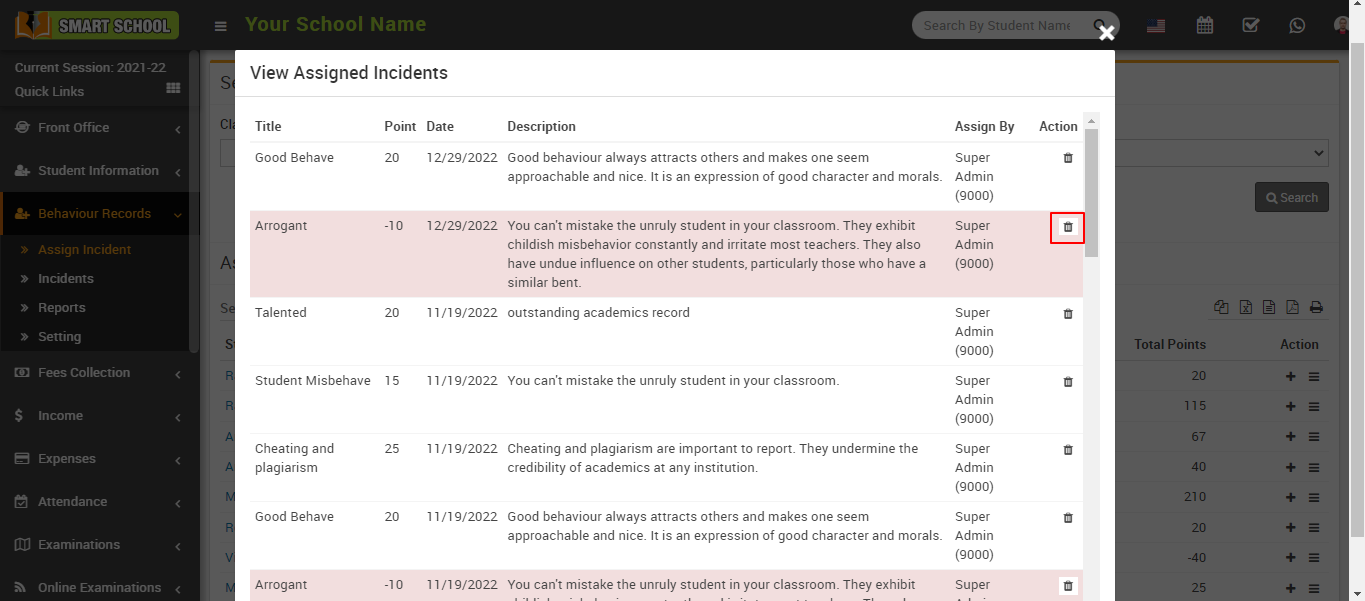
A confirmation window will appear after you click the delete button. 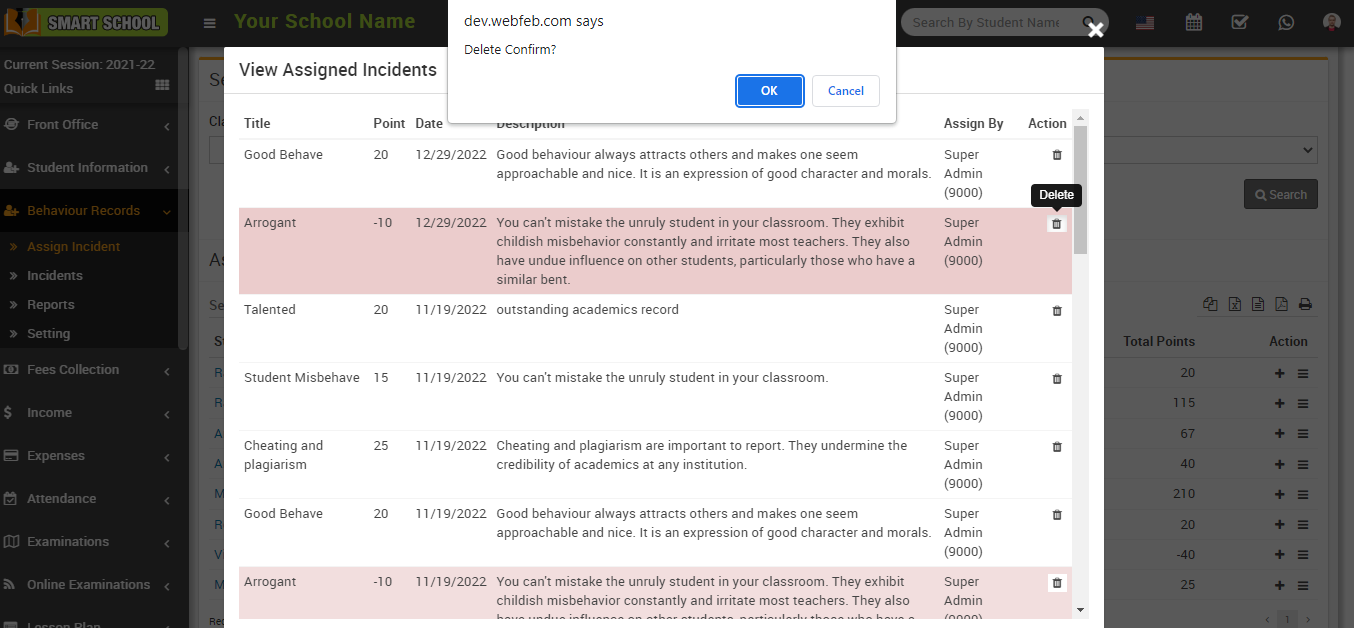
Now, at the bottom right, click the OK button, and the incident will be deleted.
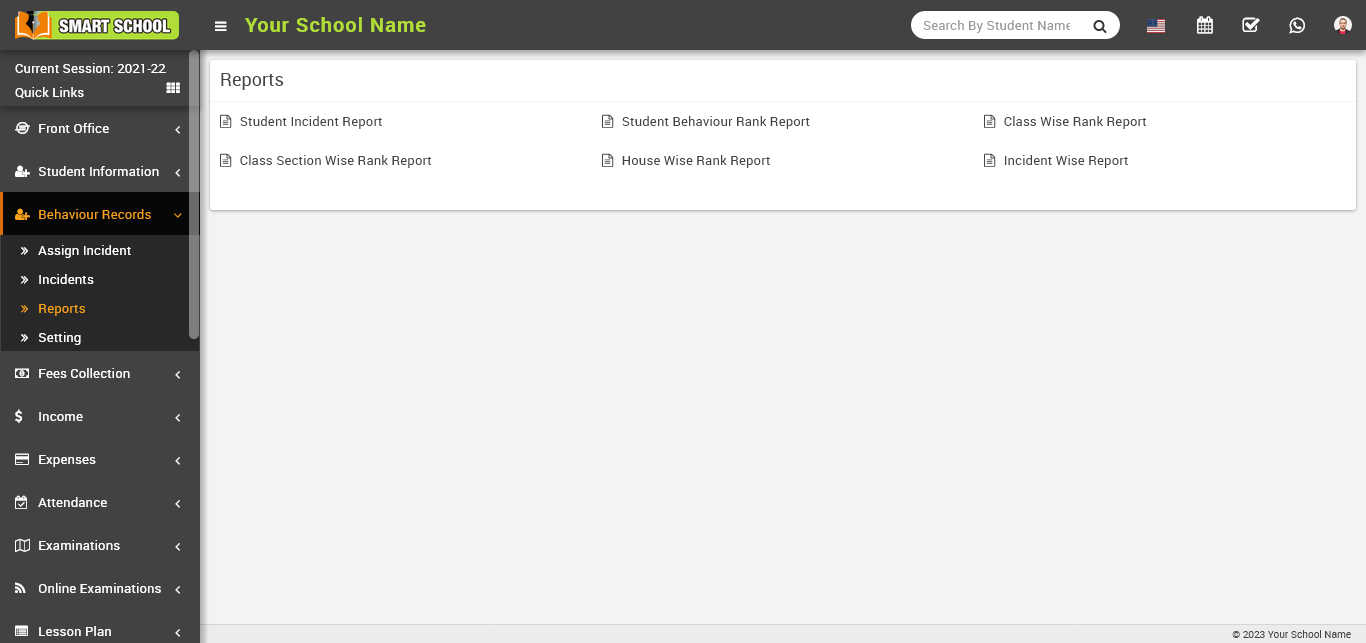
How to check behaviour records in reports?
To check the behaviour record reports, go to the behaviour record > Reports, after clicking on reports, all incident reports will open.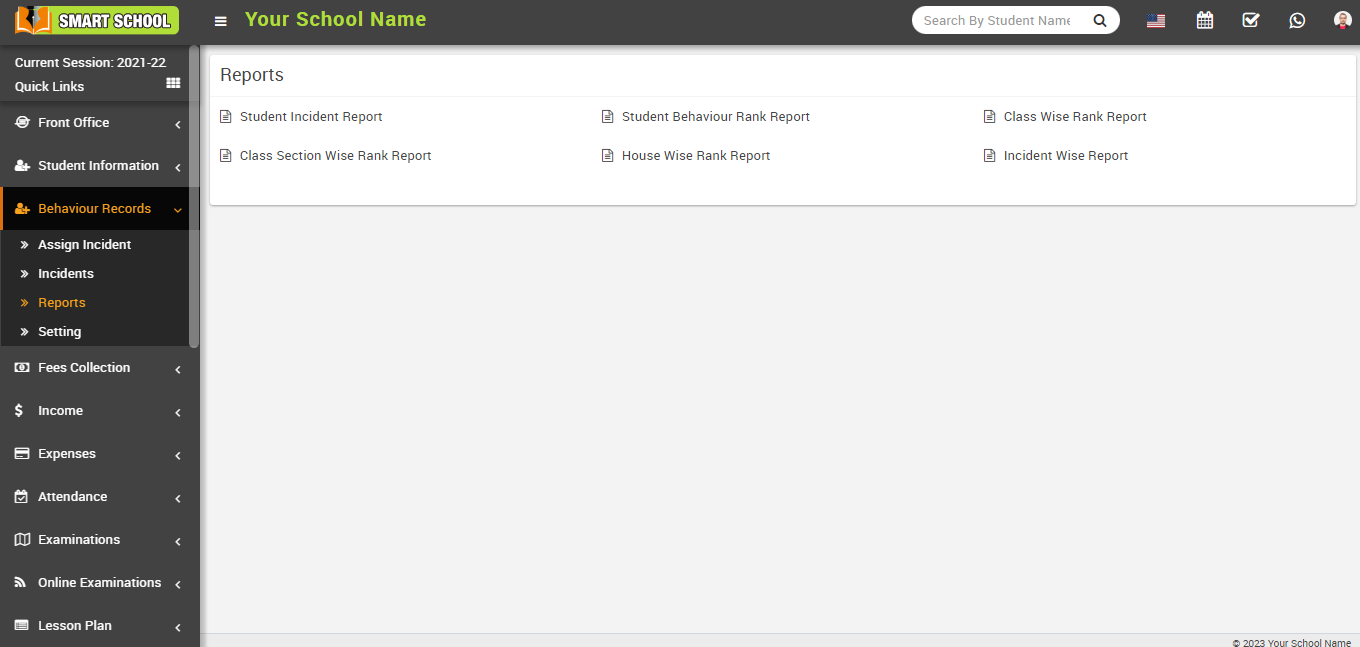
There are various incident reports available here, such as student incident report, student behaviour rank report, class wise rank report, class section wise rank report, house wise rank report, and incident wise report.
Now, click on student incident report, and at the bottom, select criteria will appear. 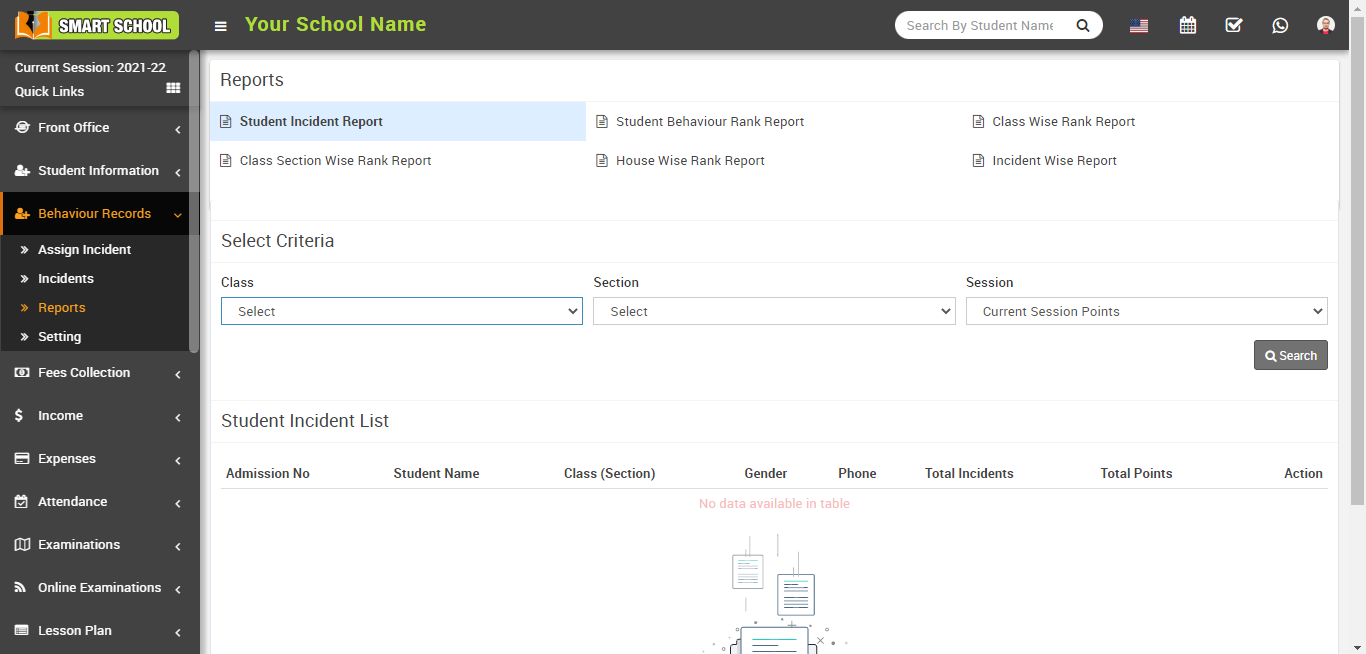
Please select the class, section, and session, and then click on the search button in the right middle corner by doing so, the student incident list will appear at the bottom.
Note: In session, you can select the current session points as well as all session points.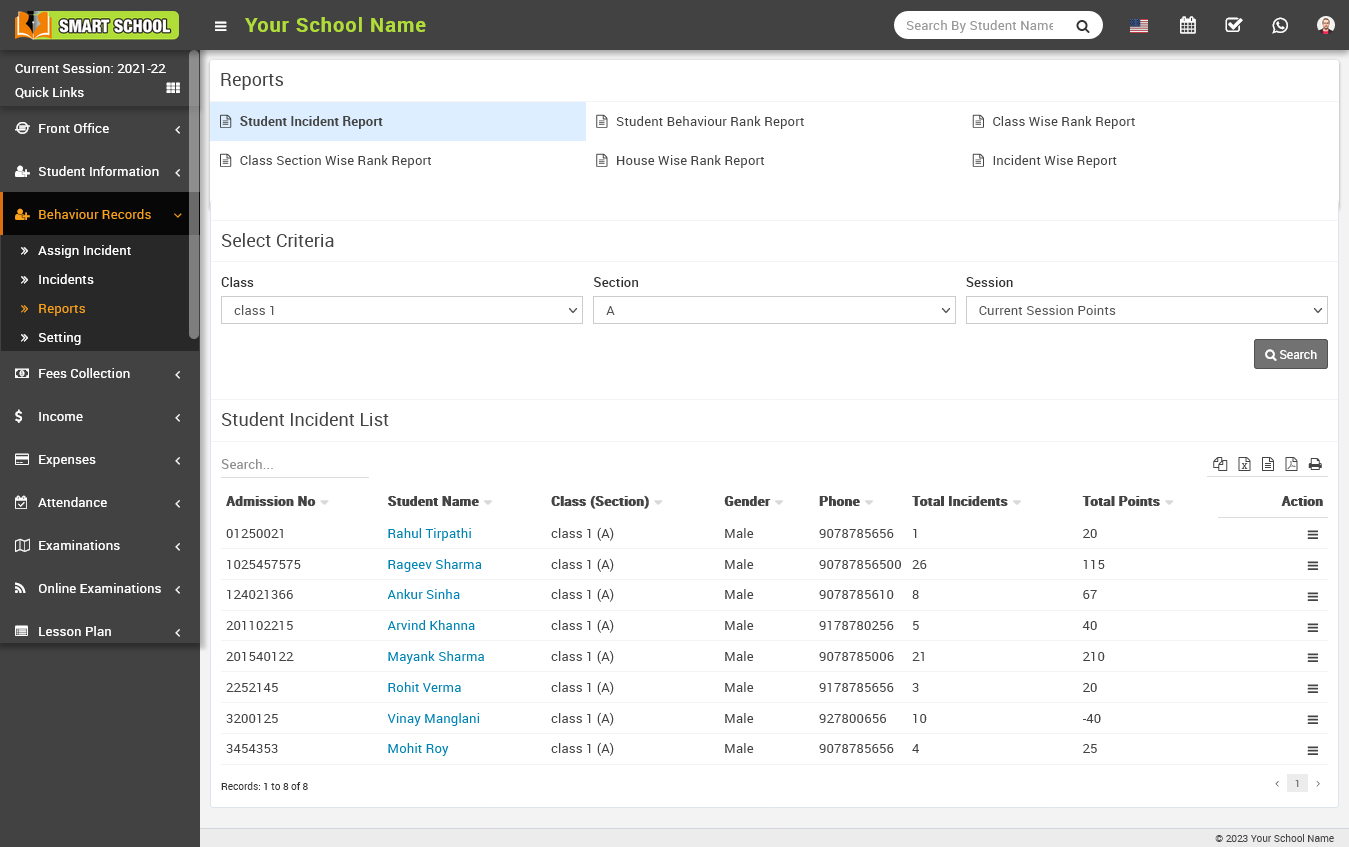
Here you can see the student incident list. In this table, you can see the student's admission number, name, class and section, gender, phone number, and the total number of incidents and points the student has earned.
To see the indivisible incident report, go to the action column, which is showing at the bottom right, and click on show.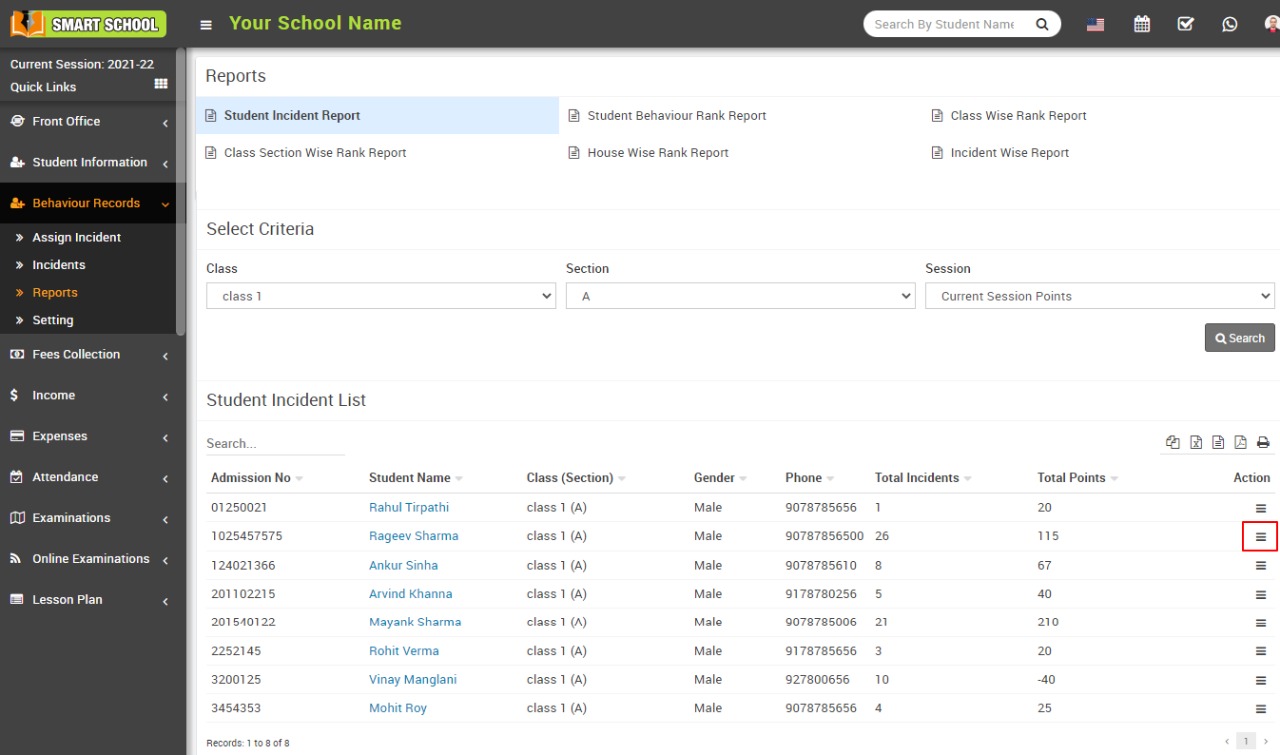
The assign student incident model will be opened by clicking on the show button. 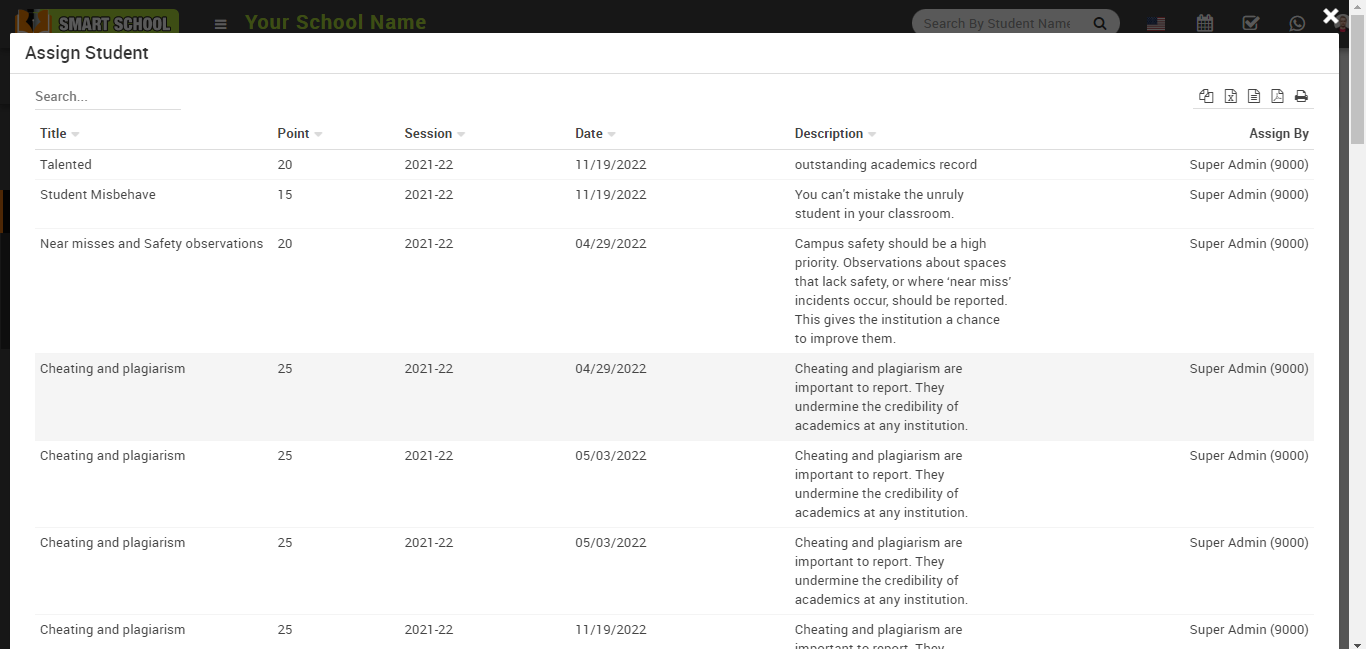
On this model, you can see all the details of the incident assigned to the student.
Student Behaviour Rank Report
To check the student behaviour rank report, go to Behaviour Records > Reports. After clicking on Reports, all reports will open. 
Now click on student behaviour rank report.

Select the criteria as class, section and session in which you want to see the report, the session drop-down menu has two options: current session points and all session points. 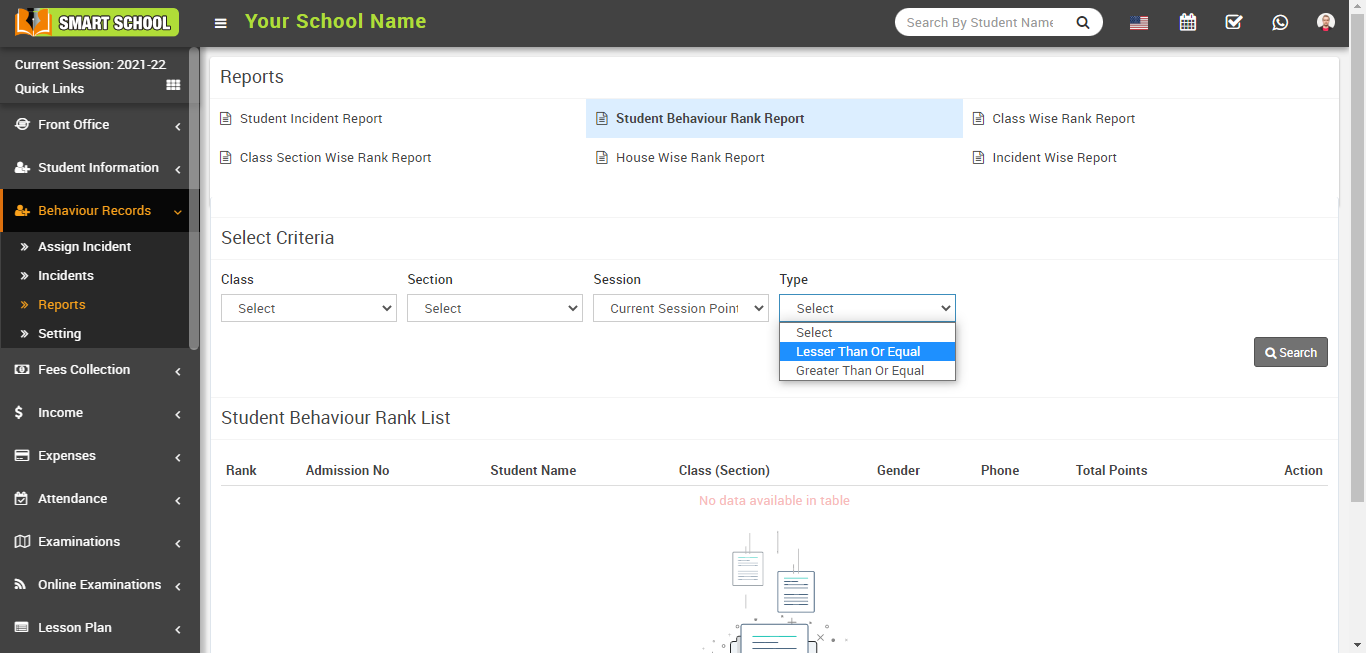
You can now select the range of points as lesser than or equal to and greater than or equal to from the type drop-down menu. 
Fill in the range of points that you want to see in a report between the ranges in the points tab and click the search button on the right side. 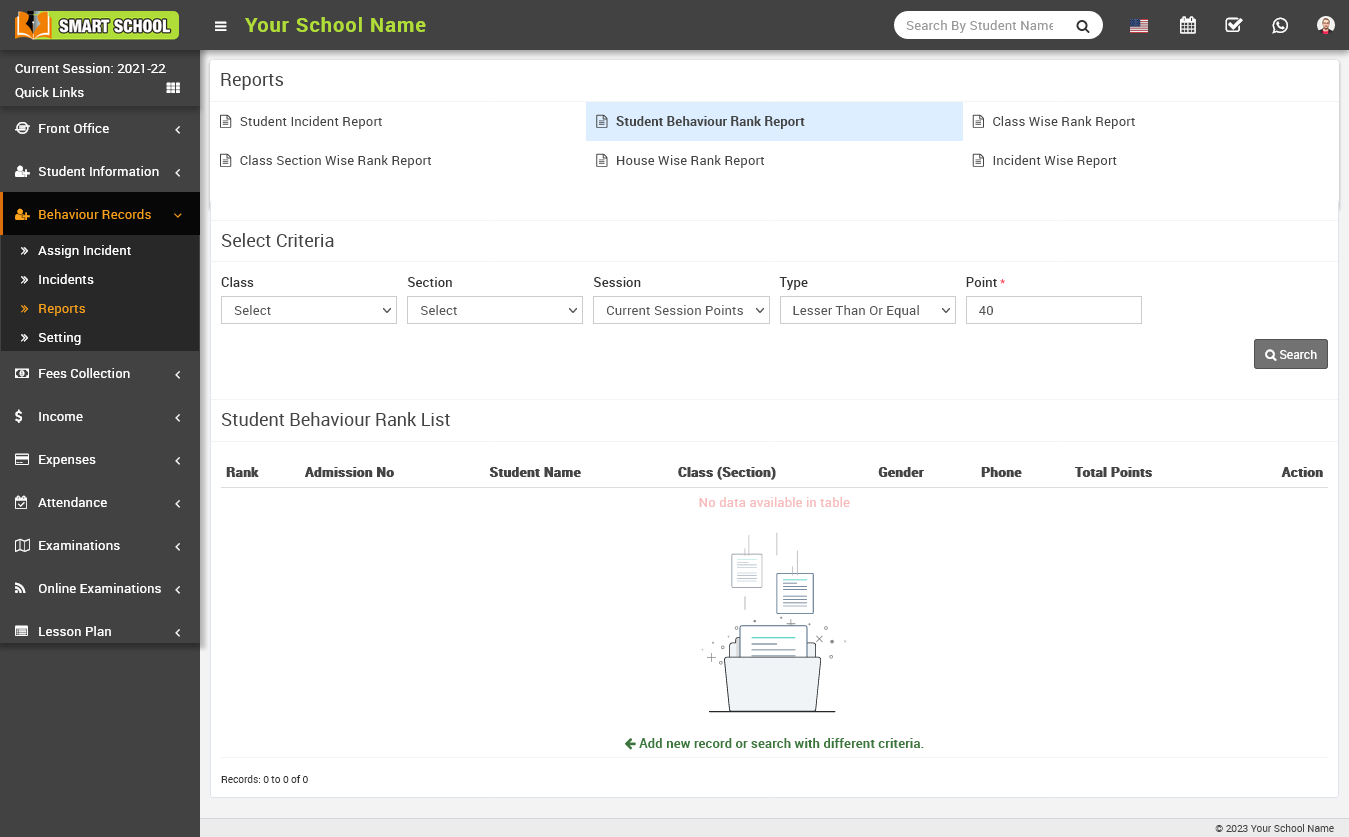
As you select the above criteria after clicking the search button, the student behaviour rank list will appear at the bottom. 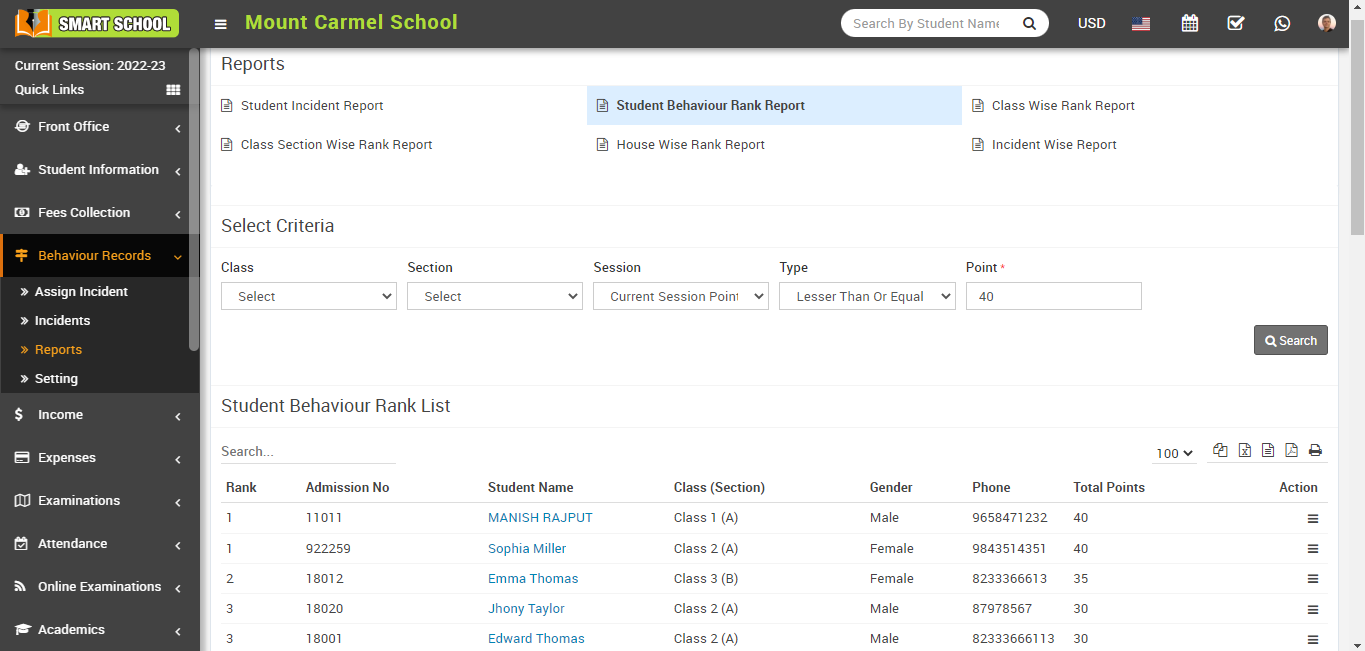
In this list, you can see student behaviour rank wise, which is shown in the first column, and other information about the student, such as his admission number, student name, class and section, gender, phone, and total points, which is shown in the action column. With the help of the Show button, you can see the assigned incident for that particular student. Now, click the show button. 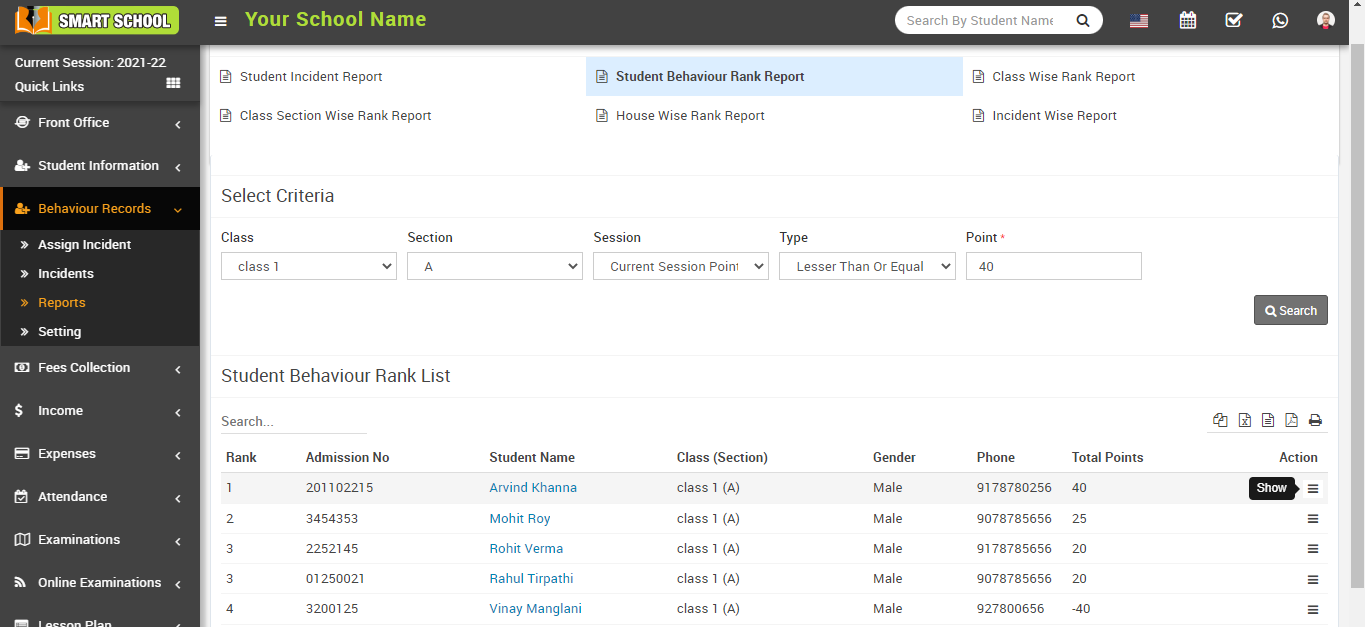
The assigned incident page will be open, and here you can see all the details of the incident.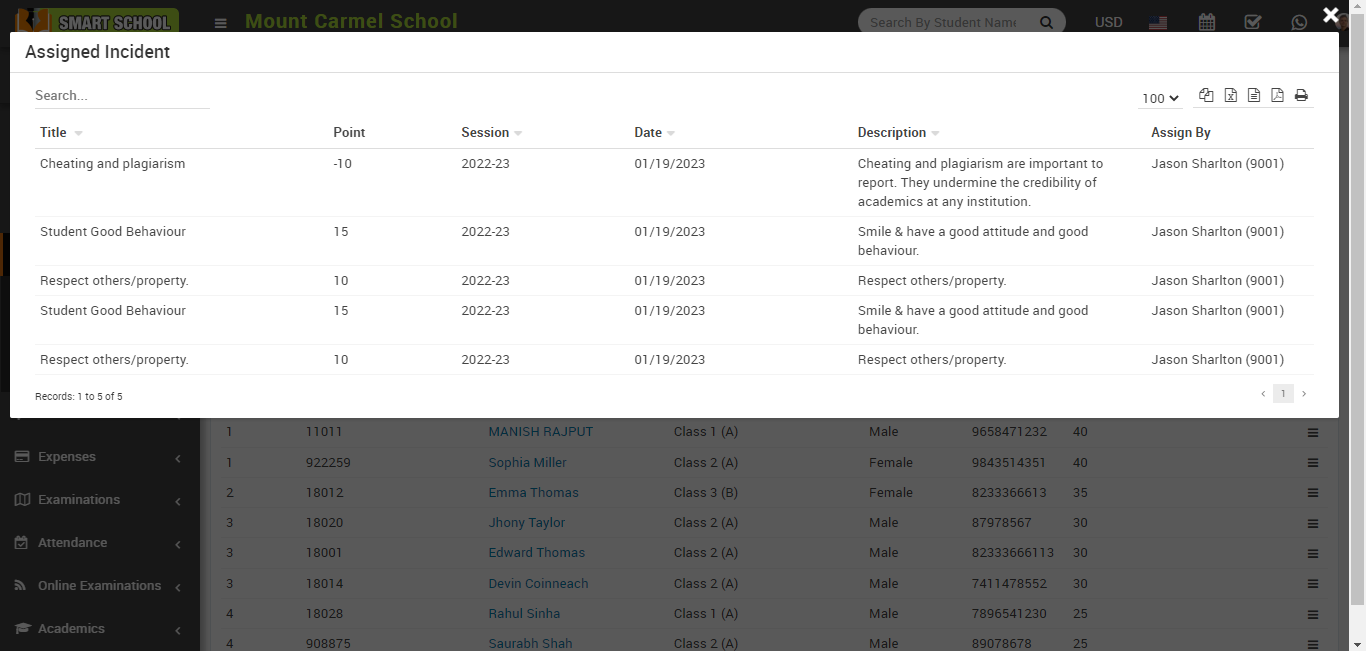
Class wise rank report
To check the class-wise rank report, go to the Behaviour Records > Reports model, after clicking on Reports all reports will open.
Now click on the class-wise rank report, the list will be open at the bottom.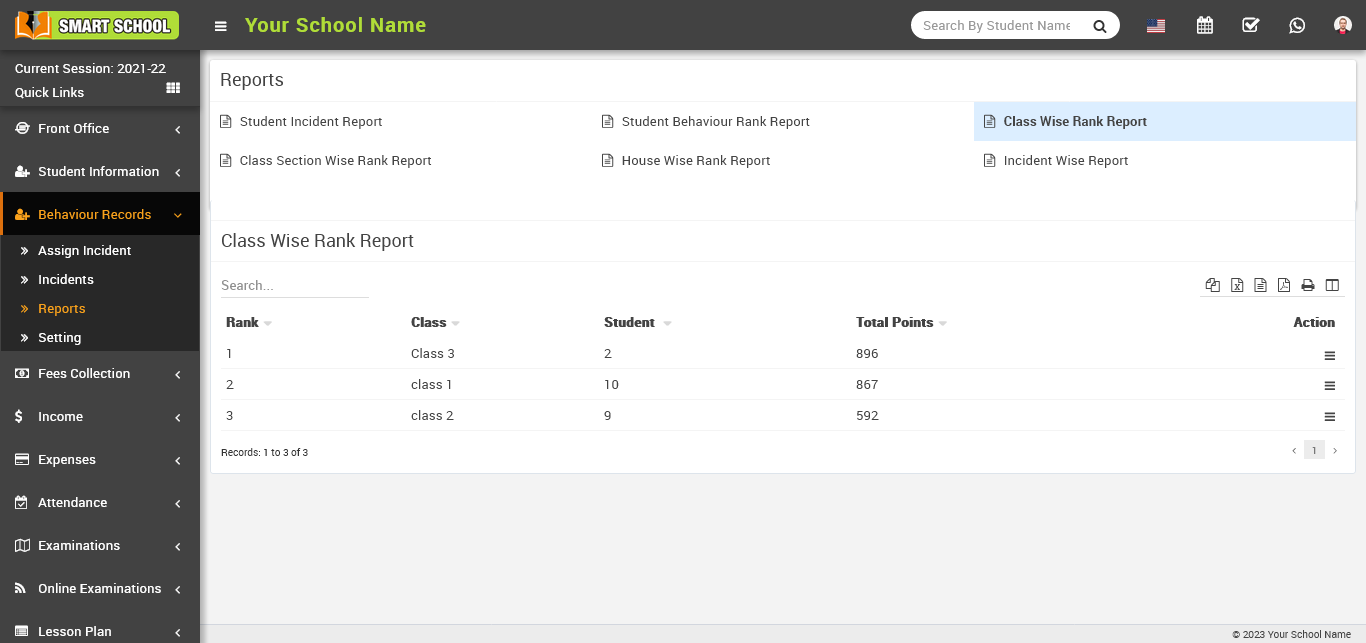
Here, in the first and second columns, you can see the incident report class rank wise, and in the third column, the count of the total students in that class, and in the fourth column, the total points in that class, and action is the last column in this table, where you can see the show button while hovering the mouse over the three lines icon, and by clicking on the show button, you can see the assigned incident rank report class wise.
Now, click the Show button, and the student's assigned incident report will be displayed in class-rank order. All of the incident's details are available here. 
Class Section wise Rank Report
To check the class section wise rank report, go to the Behaviour Records > Reports model. After clicking on Reports, all incident reports will open.
When you click on the class-section-wise rank report, the list will appear at the bottom. 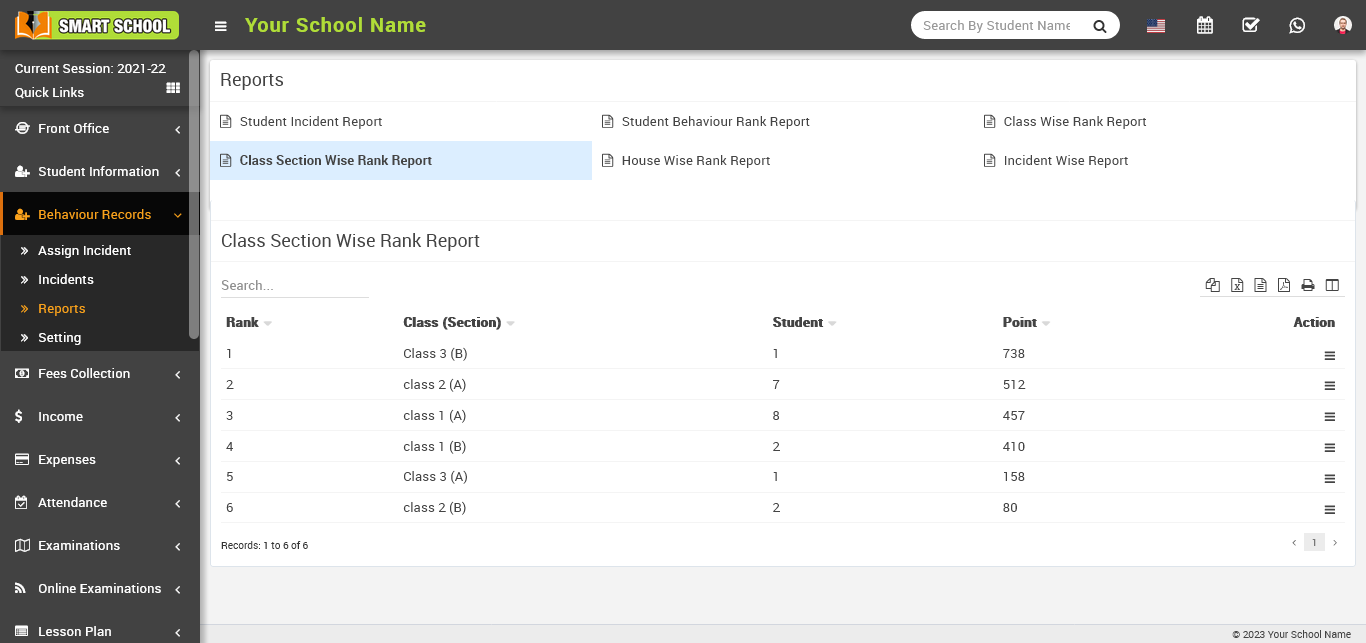
In this table, you can see the incident report class and section rank wise in the first and second columns, and the count of the total students in that class and section in the third column, and the total points in that class and section in the fourth column. Action is the last column in this table, where you can see the show button while hovering the mouse over the three-line icon, and by clicking on the show button, you can see the assigned incident rank report class and section wise. 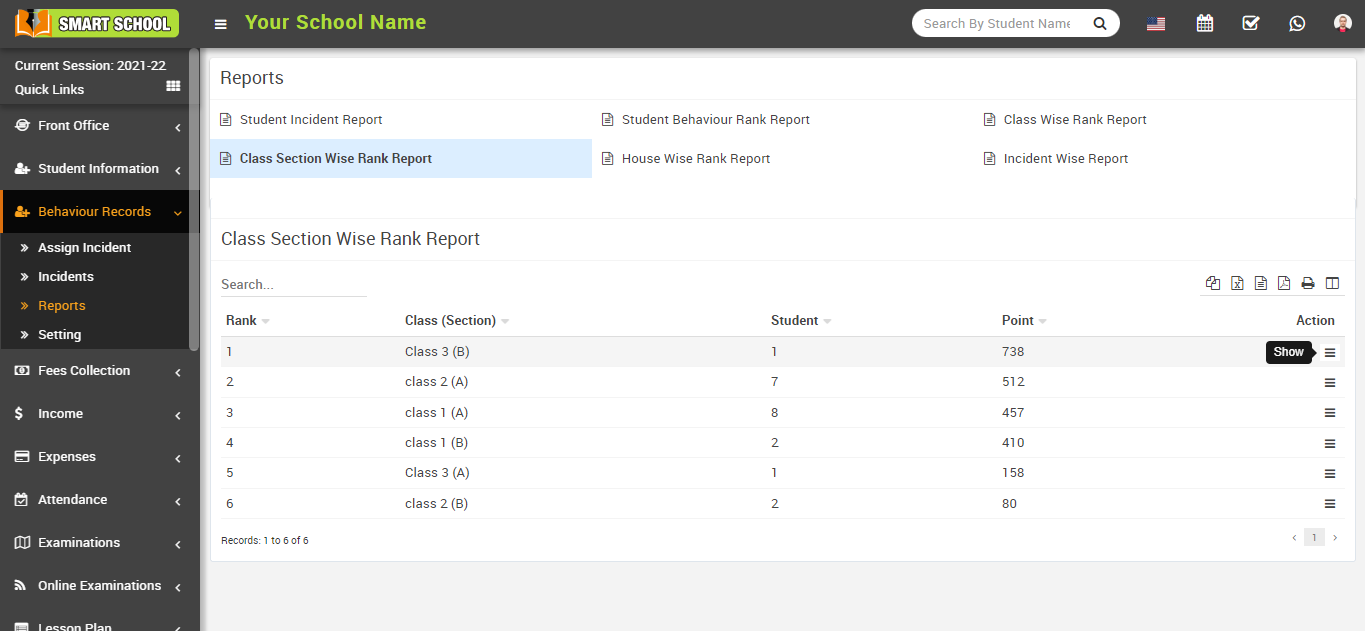
Now, click the Show button, and the student's assigned incident report will be displayed by class and section rank. All of the incident's details are available here.
House Wise Rank Report
To check the house-wise rank report, go to Behaviour Records > Reports after clicking on Reports, all incident reports will open.

Now click on the house-wise rank report, and the list will be open at the bottom.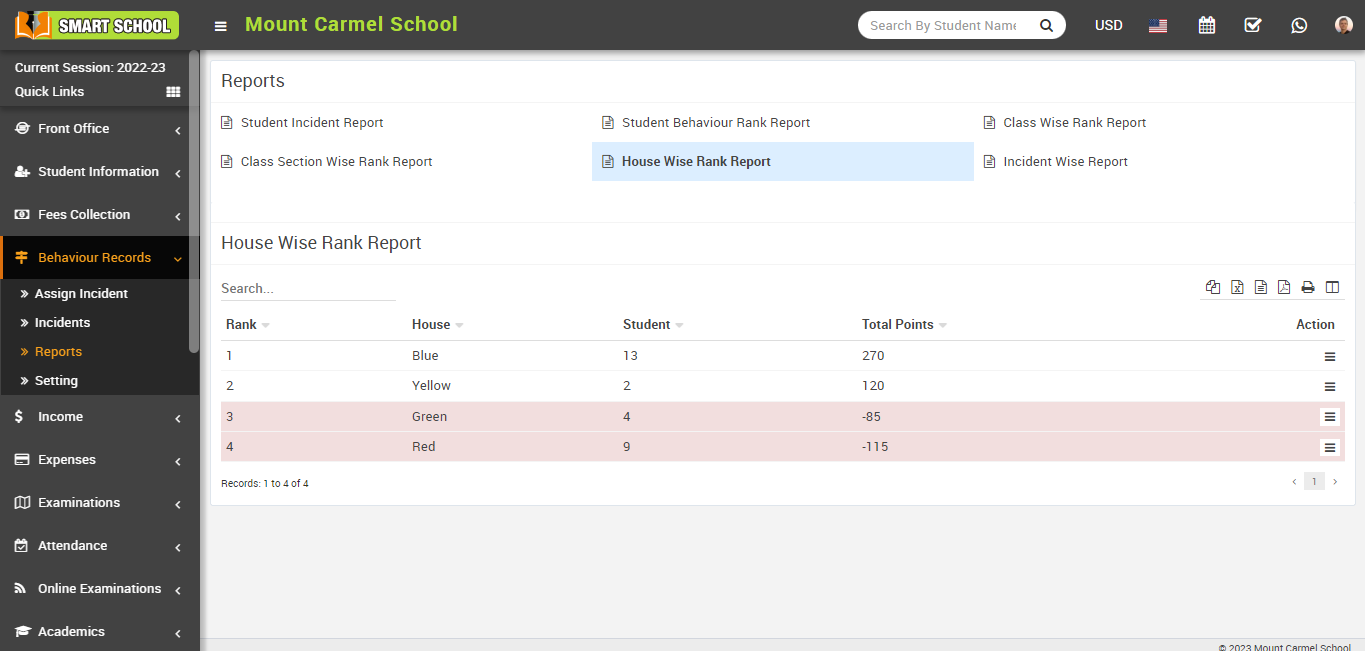
Here, in the first and second columns, you can see the incident report by house rank, with the third column showing the count of the total students in that house and the fourth column showing the total points of the students related to that house.
The last column in this table is Action, and by hovering the mouse over the three lines icon and clicking on the show button, you can see the assigned incident rank report house wise. 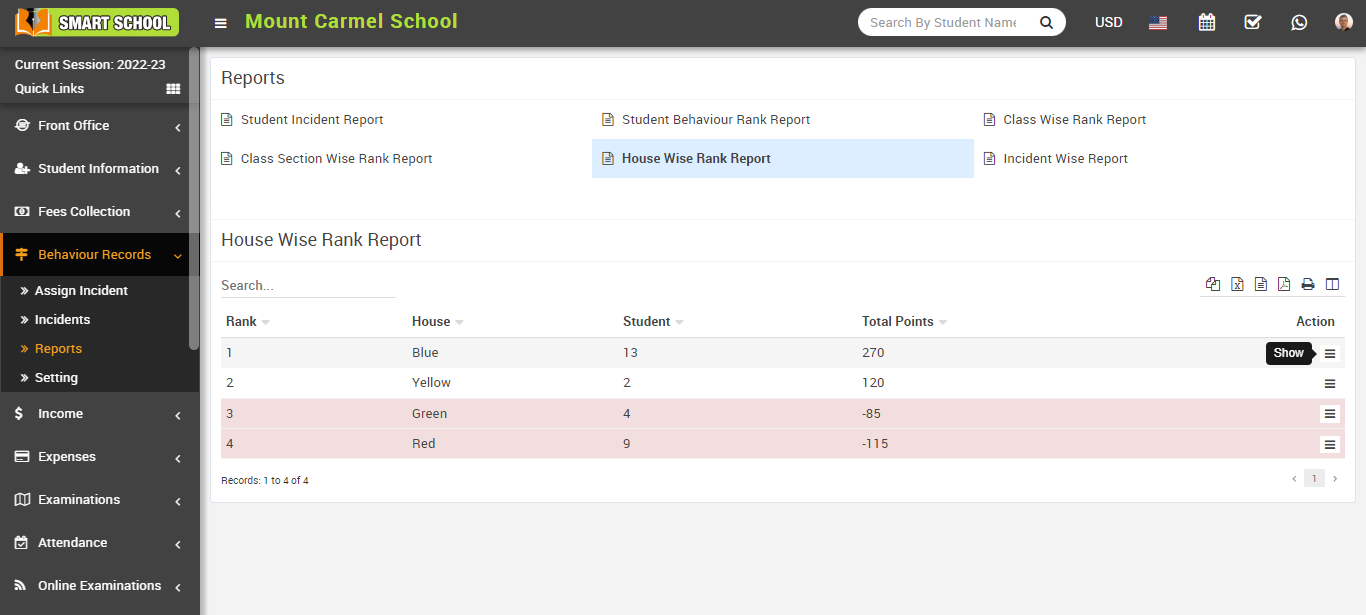
Now, click the Show button, and the assigned incident report for each student, house rank wise, will be displayed. All of the incident's details are available here. 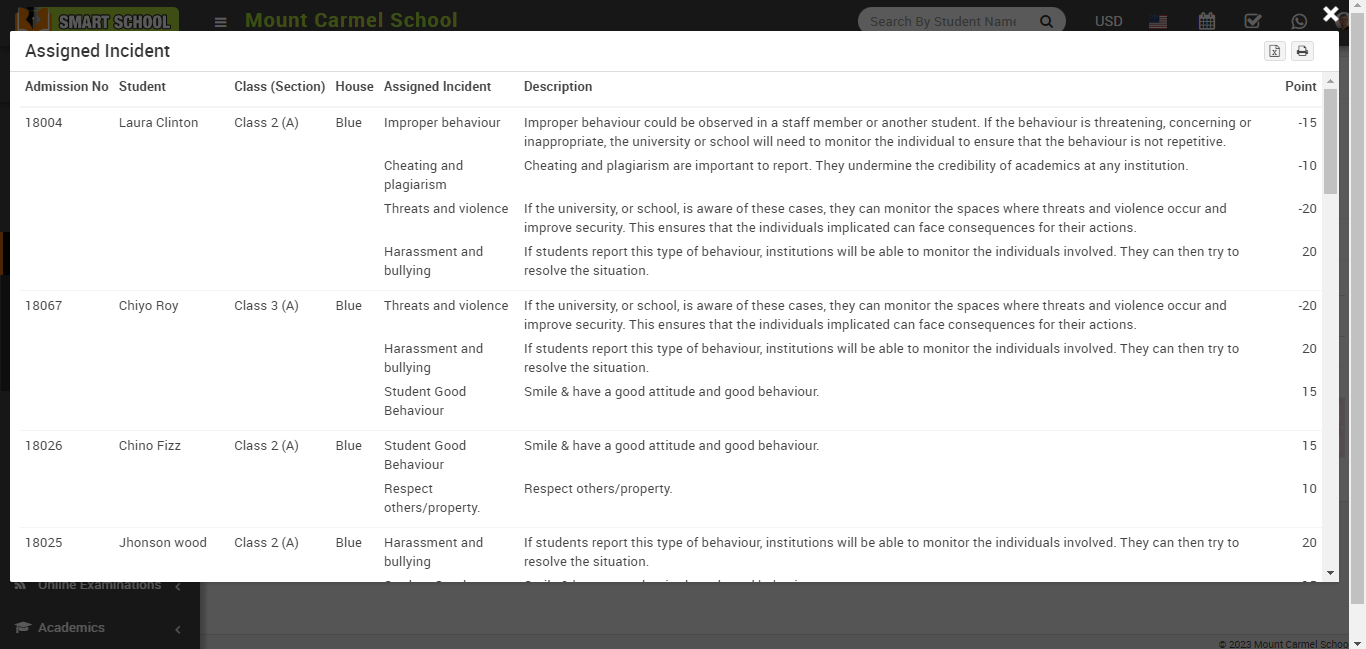
Incident Wise Report
To check the incident-wise report, go to Behaviour Records > Reports after clicking on Reports, all incident reports will open.
Now click on incident-wise report, and a list will open at the bottom.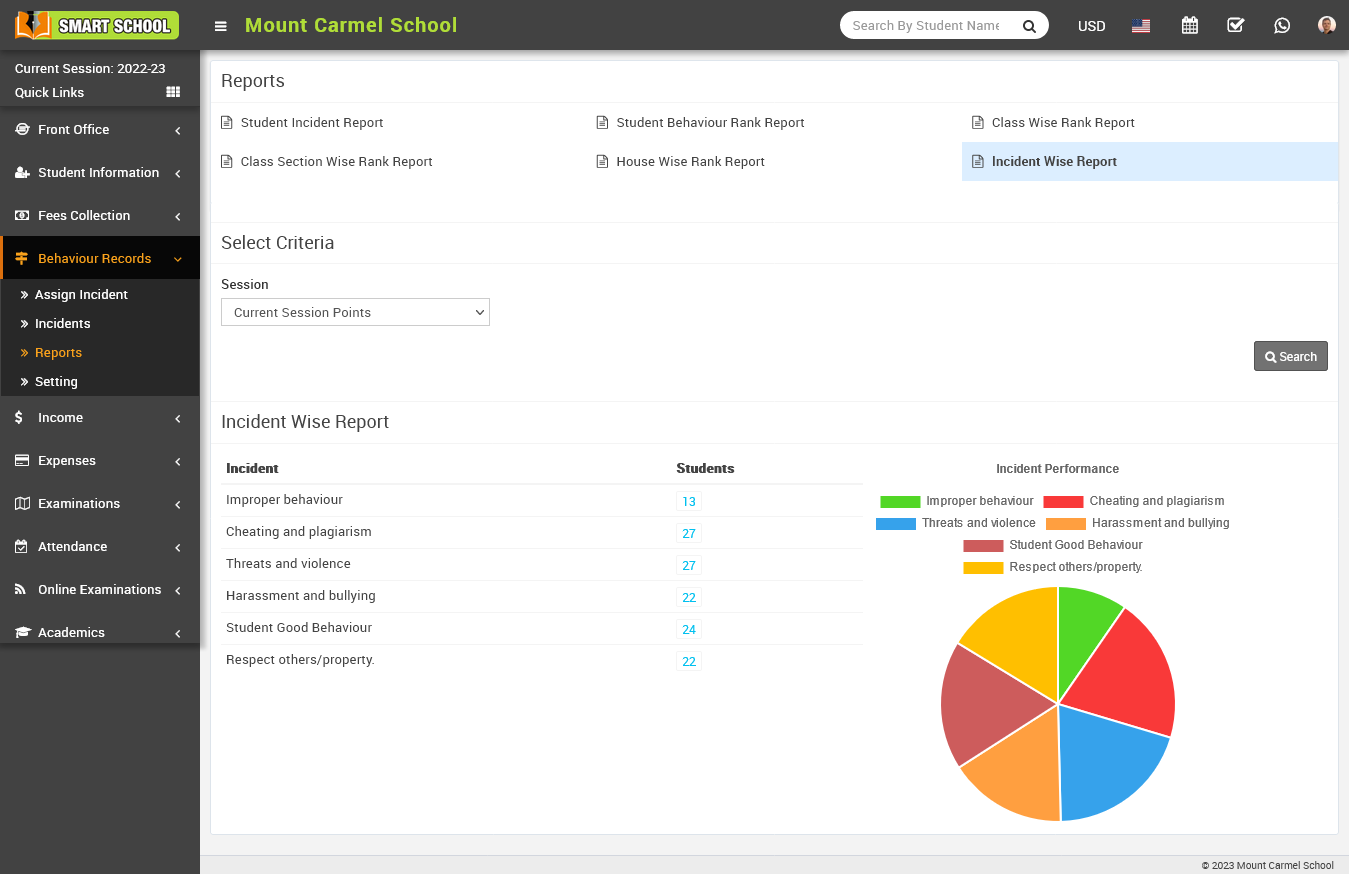
You can select the criteria from the session-wise point’s drop-down menu available, and it will show you points according to the current session-wise points and all session-wise points.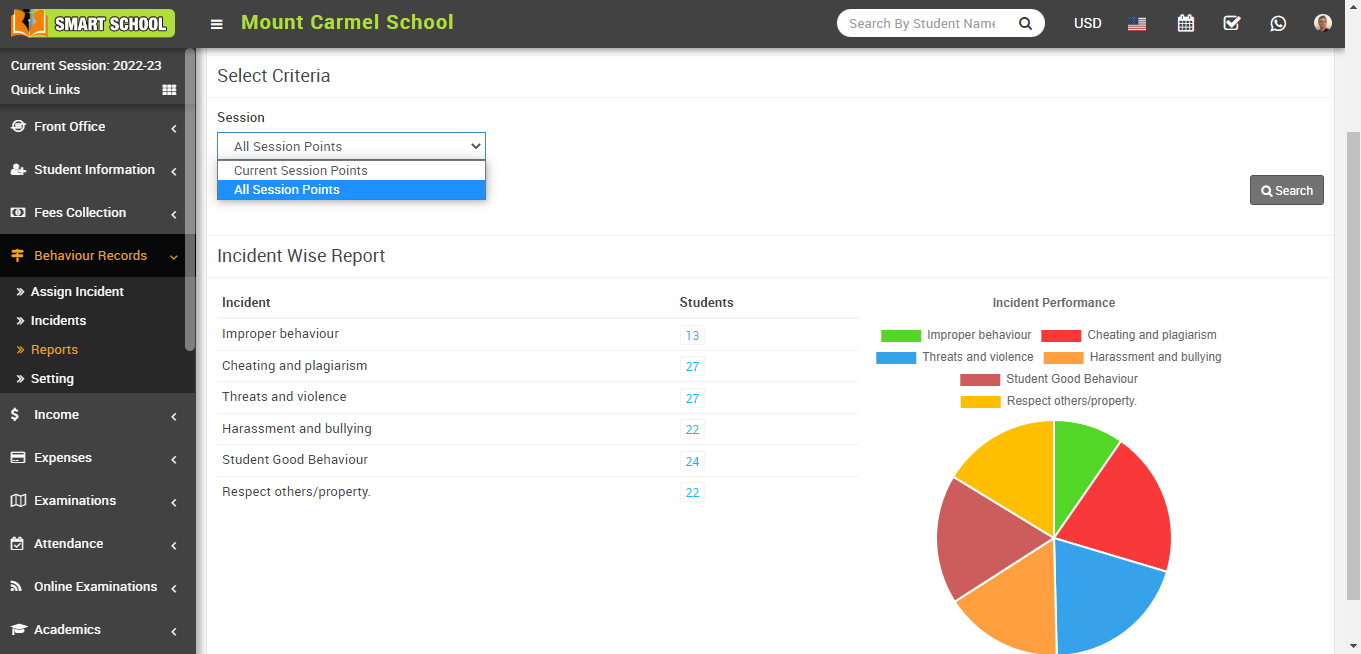
Now select the session and click on the search button that is showing in the left corner, so that an incident-wise report will be shown below as well as the report shown in the pie chart.
After clicking on search, an incident-by-incident report list will appear in the box below. The first column displays the name of the incident; in this column, you can see the multiple incident names, and the second column displays the total number of incidents assigned to the student.
While hovering the mouse over the numbers in the student column view option.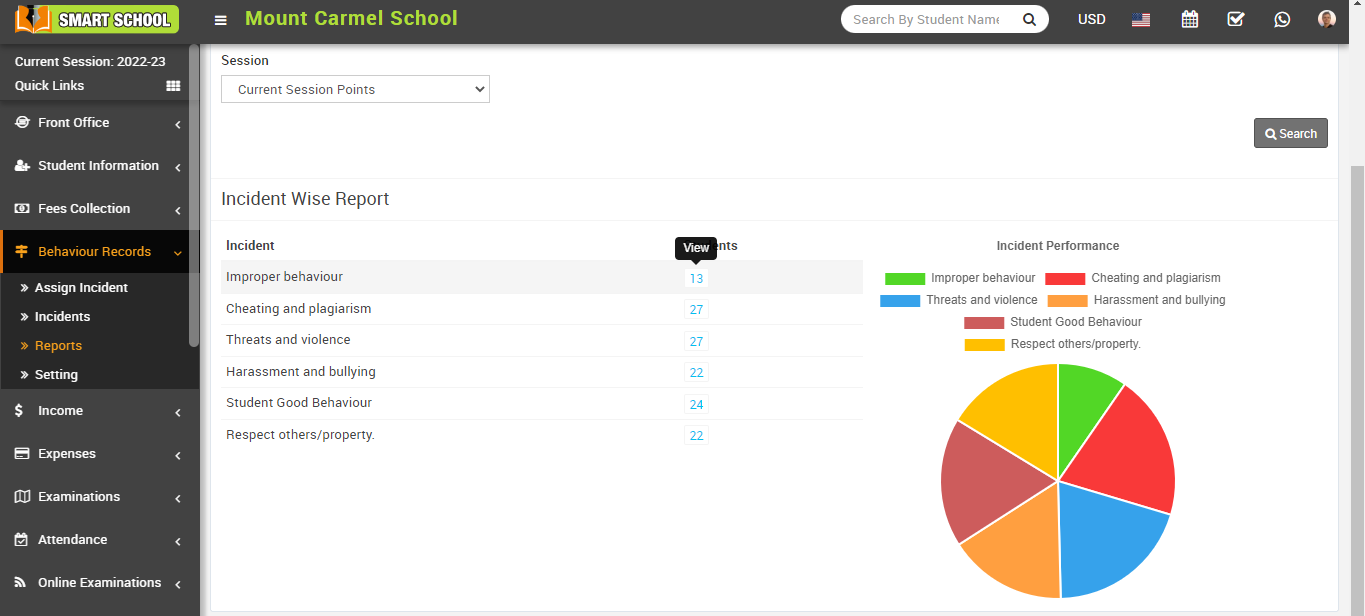
Now click on that number, and it will show the list of all the total assigned students that are related to that particular incident.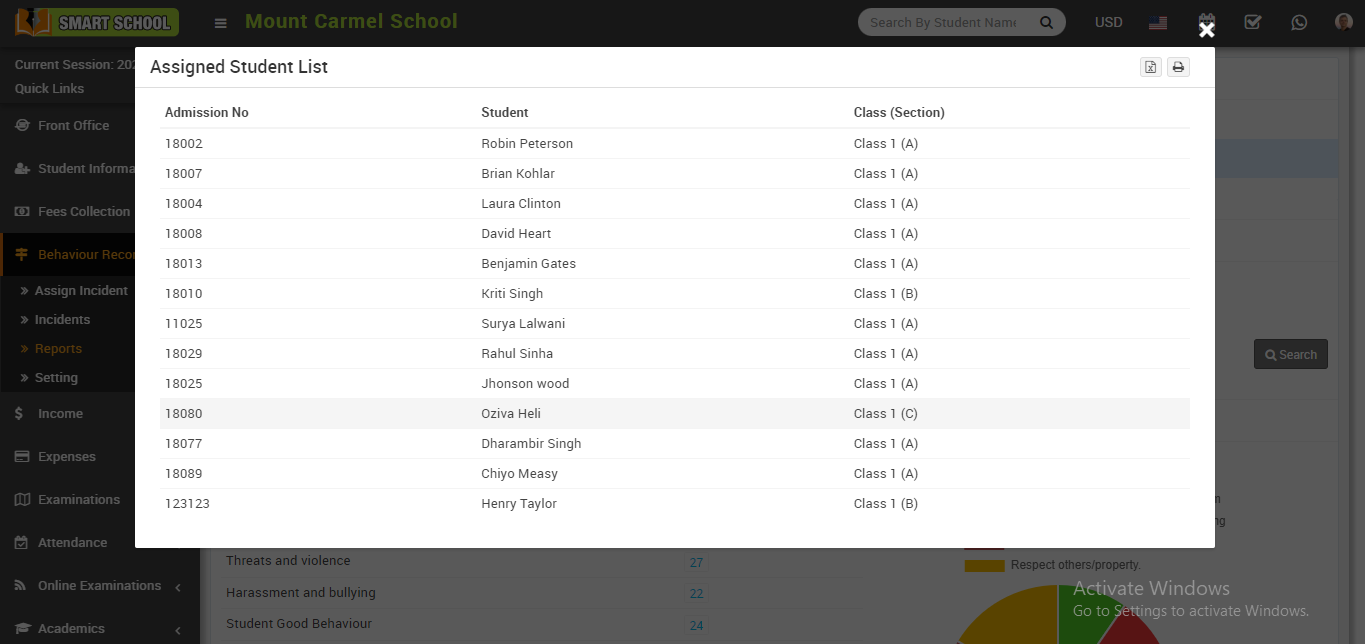
You can also see the incident performance through the pie chart, which is shown in the left-hand bottom corner.
In the pie chart, incidents are shown in a circle with different indivisible colours, and these colour codes show the incident performance. You can also differentiate these colour codes by their name, which is mentioned above in the pie chart.
How can we check the student's behaviour report in his profile?
To check the student behaviour report in his profile, go to Student Information > Student Details.
On the right side, the select criteria page will appear now, select the class and section of the student for whom you want to see a behaviour report, and click the search button. 
Now, click on the name of the student whose profile you want to view. 
Now click on student behaviour tab which is shown right above.
After clicking on student behaviour, you can see the behaviour report details for that particular student.
How to comment on an incident?
To comment on an incident, first you need to check whether the settings for comments for the students as well as the parents are enabled or disabled. Go to the behaviour records > setting.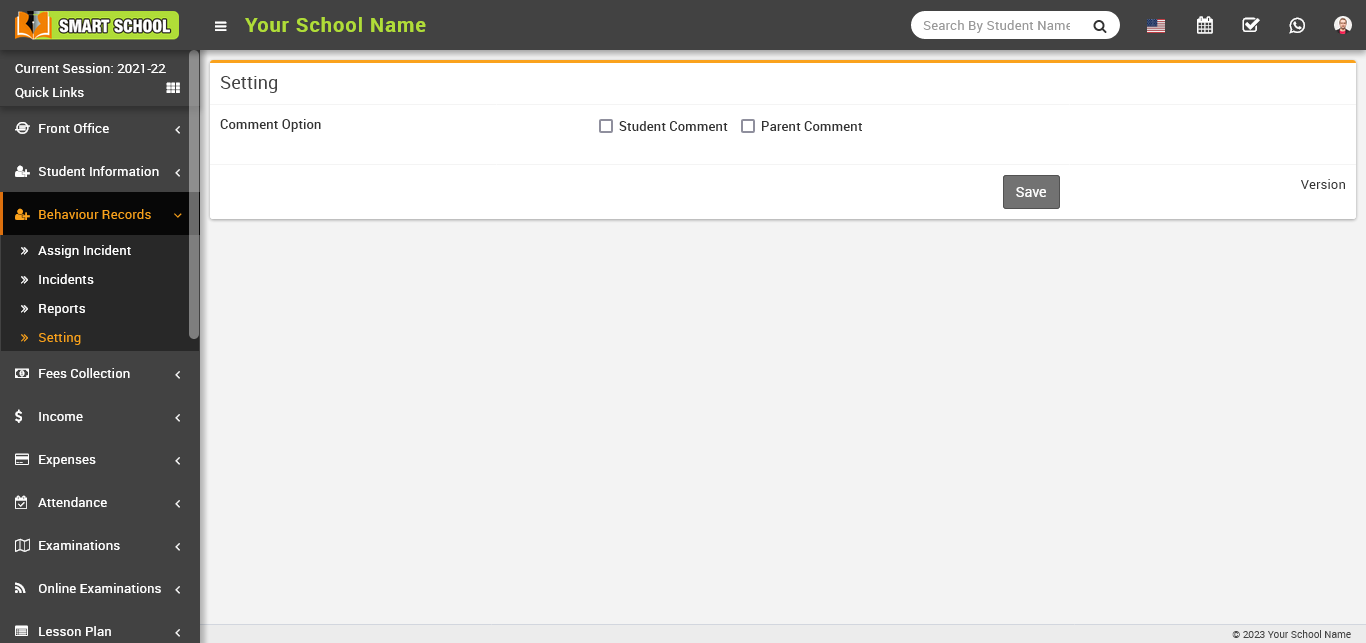
Here you can see the comment option showing for the student as well as the parent, now check the checkbox where you want to comment. If you check both checkbox, so that student and his parent will be able to comment on related incident. Then click the save button to save setting. 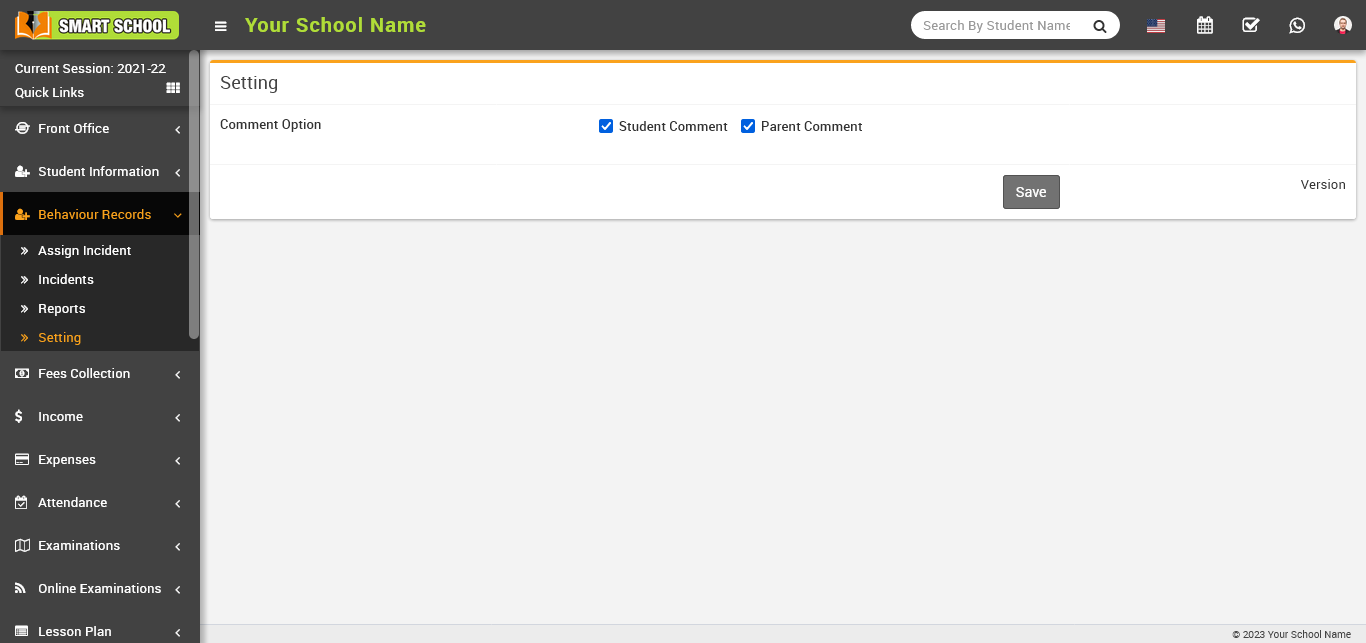
To comment on the student's incident, go to the student information page and click on student details.
On the right side, the select criteria page will appear now, select the class and section of the student for whom you want to leave a comment about his incident and click the search button. 
Now, click on the name of the student whose profile you want to view. 
Now click on student behaviour tab which is shown right above.
In the incident of student behaviour list showing in the student profile, you can see all the details showing in this table, and now in the action column, you can see the comment option available.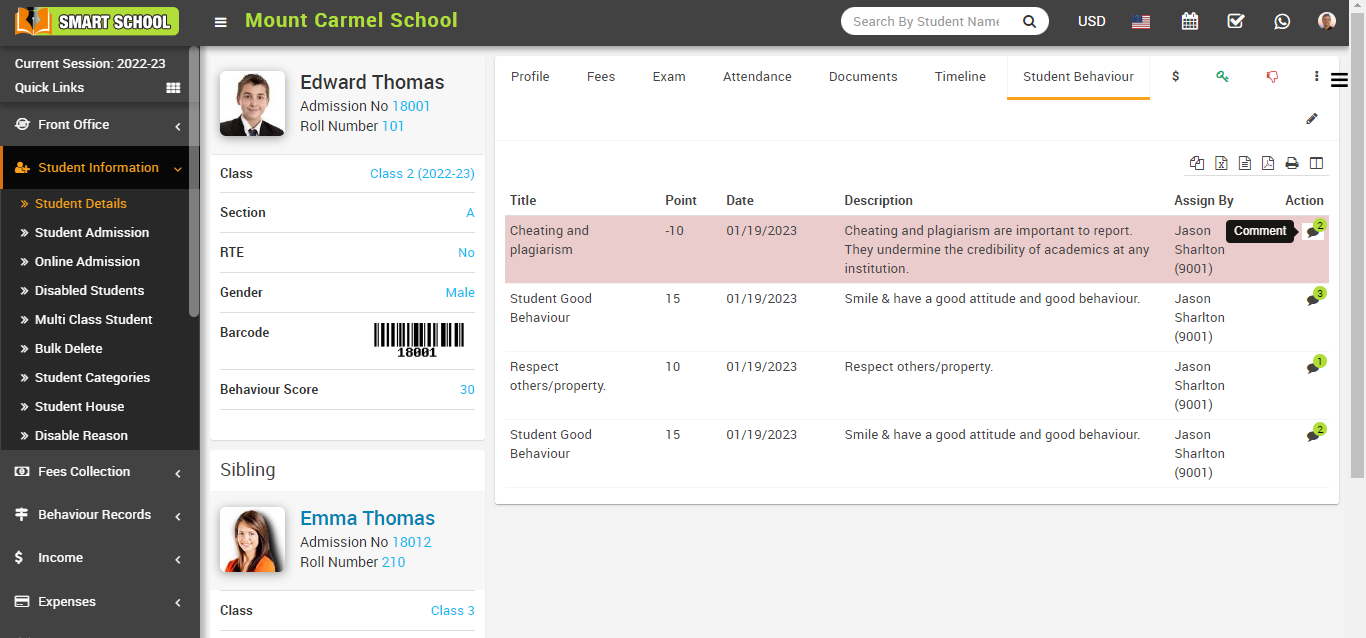
When you click on the comment icon, a comments modal will appear. 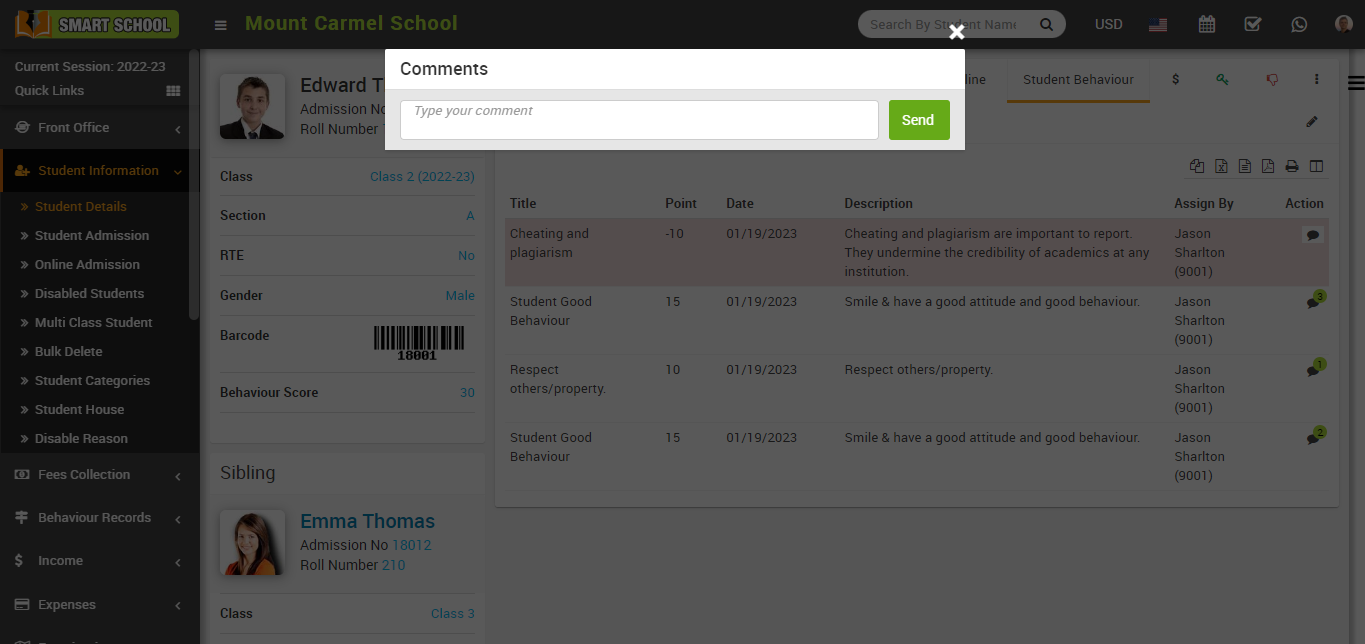
Now, write the comment related to the incident and click on the send button, which is showing on the right side, and the comment will be sent to the student / parent and comment will show on comment box.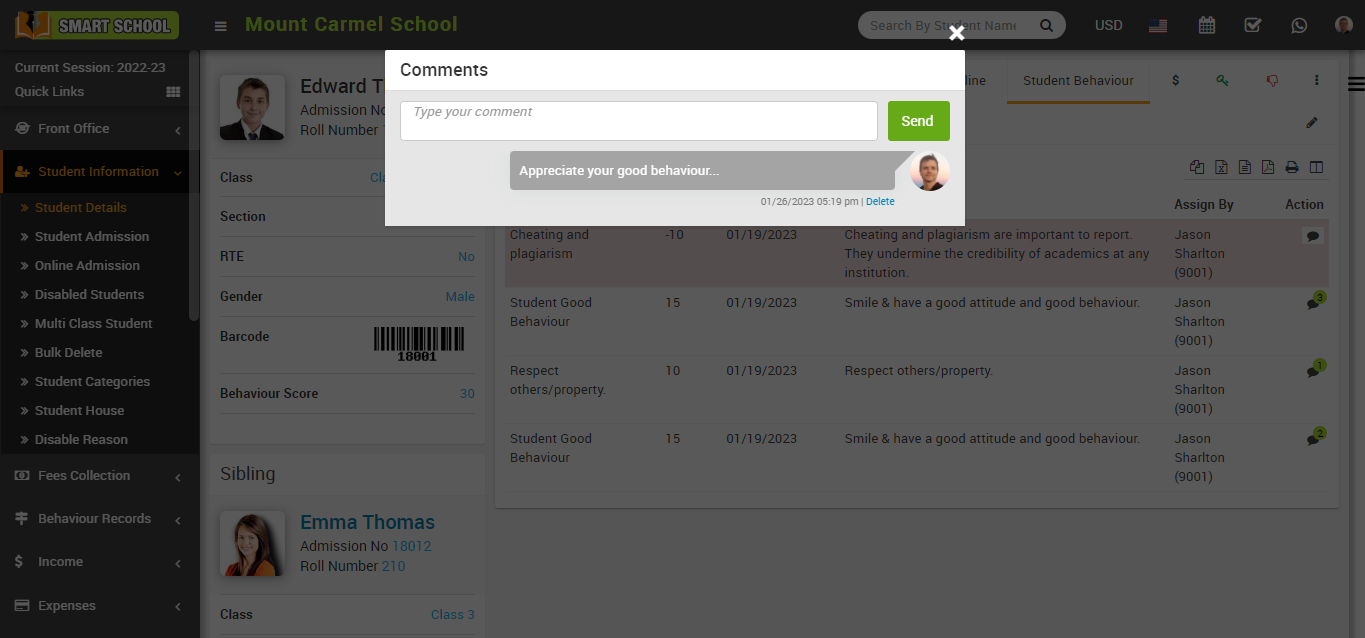
If you want to check the comment that you sent, you have to go to the student login in your smart school.
Now, fill the credential of the student and click on the sign in button, student profile will be open.
On the right side of the page, you can see the student behaviour option available, please click on student behaviour tab.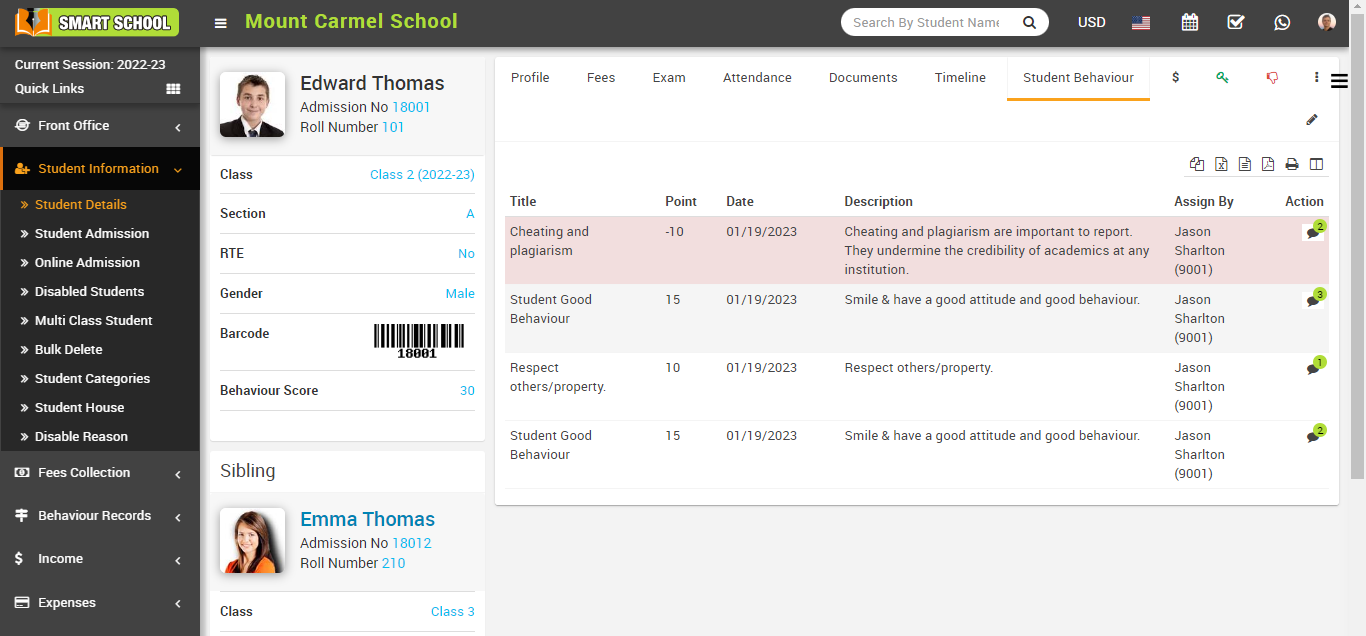
In the student behaviour tab, you can see all the details related to the incident now, in this table, you can see the action column in this action column, you can see the comment option available, and here, students can see the comment on the incident that was left by the superadmin or staff.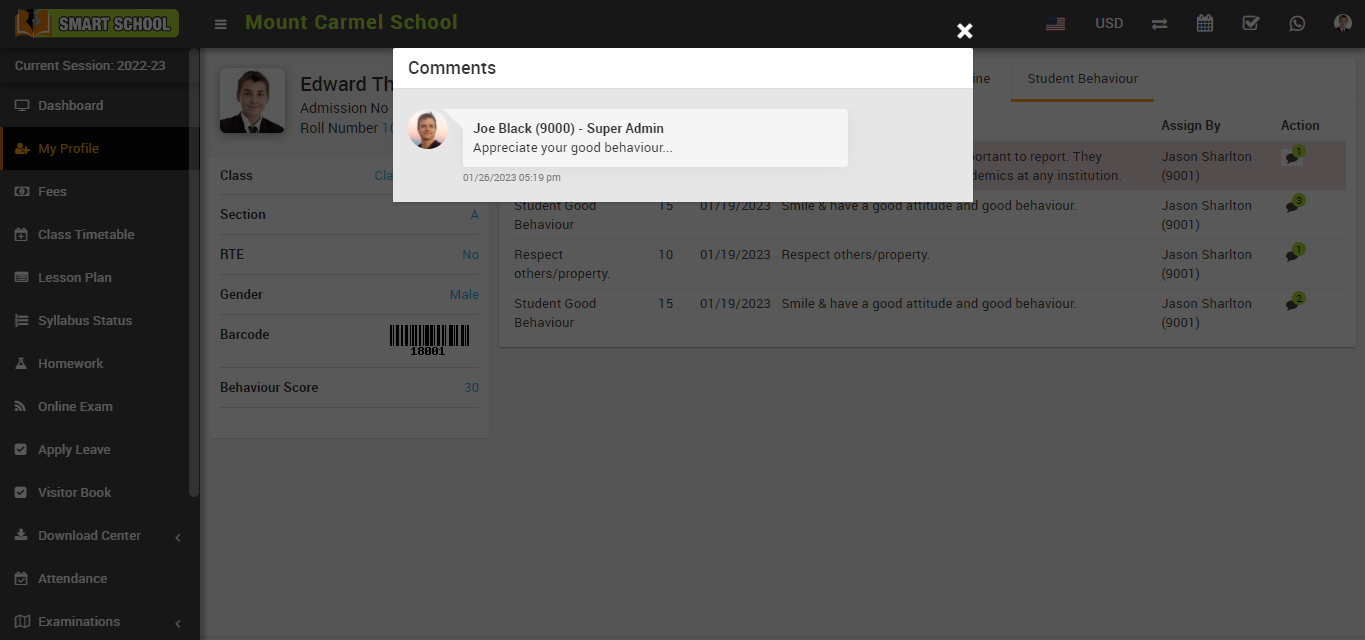
Students can now leave a comments on an incident, simply type the comment in the comment box and click the send button on the right side, the student's comment will be successfully sent and comment will show on comment box. 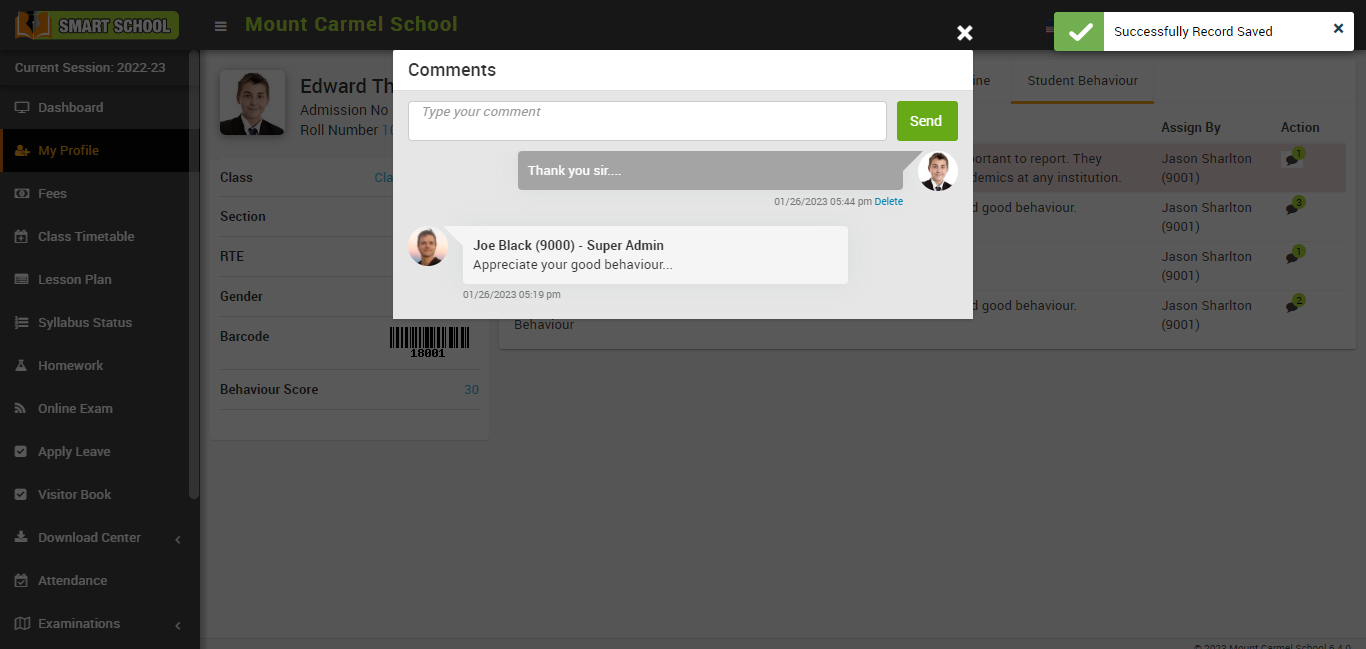
Note: The same procedure can be followed for parents as described above for students.